Haberdashery Fun

  • Home
  • About
    • Look Book
  • Contact
    • Collaborate?
  • Tutorials
  • Shop
    • Email
    • Facebook
    • Instagram
    • Pinterest

Keep up to date with the latest posts!

DIY.. Thank-You Wine Tote

in Applique, DIY Projects on 29/07/13

Do you ever have a party to attend and think.. Ugh. What should I bring? I do all the time. On the way to the event my husband and I just grab a quick bottle off wine. We hand it over to the hostess with a .. “Here – thanks for having us” gesture. No card.  Lame.

We were recently visiting friends in Toronto. While relaxing in their backyard I was brainstorming about unique thank you gifts.  I had a big glass of white wine in my hand and had just given Trish, the hostess, a journal cover I made for her..  She loved the quirky saying that I appliqued on the front. Agh- Ha!!

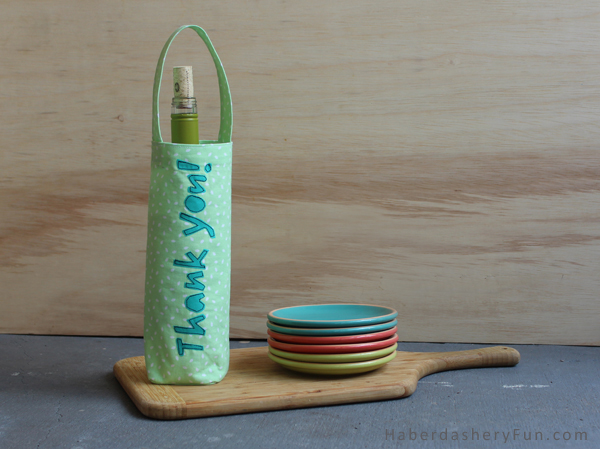
So, why not sew thank you gifts with fun sentiments on them? I love the idea of this wine tote. Add an amusing personal message to give it that extra ooomph. I think it’s a great gesture of appreciation.  It’s a gift that will keep on giving.  Plus, it shows how awesome and crafty you are!

Before we get started, here are a few things:

You will need to make the pattern. The pattern pieces all have straight sides, so you can use your rotary cutter and be finished cutting in a flash. Mark on the fabric and then cut.. It’s that easy.

  1. Main pattern piece – Draw a rectangle 11″W x  11 3/4″H. Add 3/8″ SA
  2. Bottom – Draw a square 2 3/4″ x 2 3/4″. Add 3/8″SA
  3. Straps – Cut a rectangle 3″W x 14″L.  No SA

Materials Needed:

  1. Fabric – A superb fat quarter project
  2. Interfacing
  3. Pellon EZ Steam
  4. Thread, scissors,  pins, sewing machine
  5. Disappearing ink pen, chaco lining pen,  chalk – Use your favorite instrument
  6. Pens, paper, printed saying
  7. Iron and ironing board

I chose to applique the words onto the fabric and used a contrasting thread color. If you don’t know how to applique or don’t really like to applique, you could also use freezer paper to screen print. I love to use freezer paper and have many tutorials here on my blog. My recent Summer Totebag project has been very popular, check it out here.

Another option is a Silhouette machine. I seriously WANT one of these! Not just for paper crafters, these machine can cut almost anything – fabric included. I keep hoping my husband will surprise me with one.

Alright.. let’s sew!

  1. Cut your fabric. 3 pieces needed. If the fabric is really lightweight, you can use interfacing and fuse the fabric to give it a little stability.
  2. Trace your words on the EZ Steam paper. Make sure to trace the mirror image. You can use your windows as a light box
  3. Iron down onto your fabric
  4. Cut out the words
  5. Pin your pattern pieces together so you can eyeball where you want to words. You want to get the word placement just right. Too high or too low and all that work down the drain.. While you are at it, also mark your strap placement
  6. Peel the backing off and gently iron in place. After you have ironed the letters down, turn down the top edge 1/4″ and iron. Turn down another 1/2″ and press again.  Place into your sewing machine and edgestitch along the top
  7. Sew your straps. I have an awesome strap making tutorial here.  After you have pressed the straps, place into your sewing machine and edgestitch both sides. Your finished strap will be 1 1/2″ x 14″.  Pin and sew into the tote.  If you feel like it, stitch the bottom edge of the facing down as well
  8. Finish the bag – place right sides and pin togther. Sew the side seam. Now pin the bottom square into place and sew.

That’s it. Happy sewing. I hope you have a great week.

Related Posts Plugin for WordPress, Blogger...

4 Comments

« Fat Quarter Love
Giveaway!! Baby and Toddler Hooded Towel »

Comments

  1. SallyT says

    July 30, 2013 at 5:12 pm

    This is great. love the idea. What font did you use and also what size?

    Reply
    • Haberdashery Fun says

      August 5, 2013 at 11:19 am

      Hi, I used Word -the font is called “Forte” and the size 120. I changed the font a little and took off the top of the Y and K. This made it much easier to applique. Have fun!

      Reply
  2. Hampton says

    August 1, 2013 at 8:48 am

    This is a neat idea. I have given a bag with a bottle of wine, but I like the idea of adding the personal message

    Reply
  3. Nicole says

    April 24, 2015 at 9:21 am

    This is so cute and a great tutorial. I found you on the Sew Many Ways linky party and definitely going to pin this one. Thanks for sharing!

    Reply

Leave a Reply Cancel reply

Your email address will not be published. Required fields are marked *

This site uses Akismet to reduce spam. Learn how your comment data is processed.

About me


Hi there - I'm Marni Weaver. A sewer, a sometimes quilter and a lover of fabric design. I started this blog to share my ideas. Come Join the Fun
shop now

Popular Categories

project for baby fabric projects seasonal projects fat quarter projects sewing tips and tricks inspiration

Categories

  • Applique
  • Baby
  • Bags and Pouches
  • Color
  • DIY Projects
  • Fabric
  • Fabric Design
  • Fat Quarter Projects
  • Home Decor
  • Inspiration
  • Just for Fun
  • Kids
  • No Sew
  • Patterns
  • Print On Fabric
  • Quilting
  • Scrap Fabric Projects
  • Seasonal
  • Sewing Tips & Tricks

Lovely sponsors

Recent Comments

  • Make Nine in 2021 – Sew, Bake, Snap on DIY.. Reversible Fabric Storage Bin
  • 26 Diy placemats ideas - Perfect Table Setting on DIY.. Heart Shaped Placemats Tutorial For Sew Mama Sew
  • More Free Tote Patterns | on Reversible 1 Hour Tote Pattern
  • Collapsible Kraft-Tex Bowl on DIY.. Collapsible Fabric Bowls
  • Haberdashery Fun on DIY.. Reversible Fabric Storage Bin

Projects Elsewhere

find me on Pellon Projects sew mama sew contributor

momtastic contributor

Pinterest

Visit Marni@Haberdashery Fun's profile on Pinterest.
Follow on Bloglovin

I'm Reading

  • Cluck Cluck Sew
  • Cooking Dangerously
  • In Color Order
  • Jen Hewitt
  • Jolly Jabber
  • Karly Spalding Photography
  • Leigh Laurel Studios
  • Lindsay Sews
  • Lotta Jansdotter
  • Love Patchwork and Quilting Magazine
  • Made
  • Making It Lovely
  • Noodle-Head
  • Polka Dot Chair
  • Sharon Holland Designs
  • Silhouette America Blog
  • Silhouette Design Store
  • The Purl Bee
  • The Purple Fig

Press:

Stitch Winter 2014

haberdashery_fun

I made the most glorious little Kraft-tex journal I made the most glorious little Kraft-tex journal cover over the holidays.  Not only do I love the color of the month for December (blue turquoise), but the texture of my journal is like aged leather and looks durable and rugged. Did you know Kraft-tex is actually paper??? My cover was simple to make and is just one rectangular piece of Kraft-tex, folded over at the ends and topstitched. Thats it.❤️

You can check @ctpublishing for other projects and more info.
.
.
.
#haberdasheryfun #haberdasheryfunpatterns #krafttex #krafttexuniversity #krafttexstyle #ctpublishing #isew #isewlation
Highlights from 2020. Glad it’s complete. Upward Highlights from 2020. Glad it’s complete. Upward and onward. What are you creating for the year ahead? Here’s to making 2021 a creative, fun, adventurous and graceful year.
What a fun class! Thank you to the participants in What a fun class! Thank you to the participants in my first zoom block printing class. It was an amazing group of people coming together with a common goal - sharing their love of print and pattern design.

My hubby snapped a few pictures during the workshop. I’m normally a “hider outer”, but thought this was a perfect opportunity to say Hi.  Even if it is looking down and away from the camera. 🤪

I will be hosting another block printing zoom workshop mid January. Come one come all. DM or email me for details.
.
.
.
#coffeewithhaberdasheryfun #blockprintingworkshop #zoomclass #pdfpattern #haberdasheryfun #haberdashery 
#blockprint #blockprinting #isew #fabricdesign #surfacepatterndesign #zoomsewingclass #zoomdesignclass
You’ve printed some fabric.. now what?? Build or You’ve printed some fabric.. now what?? Build or buy a frame and make yourself some easy wall art = ✔️

Want to learn how to block print? Grab a cup of coffee, a few supplies and join me for a free zoom class this Sunday, Dec 13th at 11am ( Eastern Time Zone ).

Check my recent blog post for the supply list. If you want to come and just hang out and watch, that’s ok too. DM or email me for details.
.
.
#haberdashery #blockprint #coffeewithhaberdasheryfun #PDF 
#isew #haberdasheryfun #curvyzipperpouch #fabricdesign 
#surfacedesign #haberdasheryfunpatterns #creativehappylife
Want to learn how to block print? I’m hosting a Want to learn how to block print? I’m hosting a free zoom class and the supply list is now up on my blog. You can DM me or send an email to marni@haberdasheryfun.com to join this free class. Click on the link in my bio to go to my blog.

Sunday, December 13 at 11am Est time zone.

.
#haberdashery #haberdasheryfun #blockprinting #pdfpattern #haberdasheryfunpatterns #coffeewithhaberdasheryfun #fabricdesign #blockprint
Follow on Instagram

Copyright © 2021 · Klar theme by Crimson Pear :: web & surface design