Haberdashery Fun

  • Home
  • About
    • Look Book
  • Contact
    • Collaborate?
  • Tutorials
  • Shop
    • Email
    • Facebook
    • Instagram
    • Pinterest

Keep up to date with the latest posts!

DIY.. Make A Mini Holiday Card Organizer

in DIY Projects, Fat Quarter Projects on 09/12/13

I am happy to be sharing my mini holiday card organizer today.  I love the ENTIRE month of December.  To me it means receiving Christmas cards from loved ones near and far. Every year the cards pile up on our kitchen counter, so this year I thought I would make a hanging card holder.

Good news, make this organizer in a neutral color and you can use it all year around.. It is perfect to hang near your desk or in the kitchen to gather all that stuff. This is a GREAT fat quarter project, so it won’t cost too much to create.
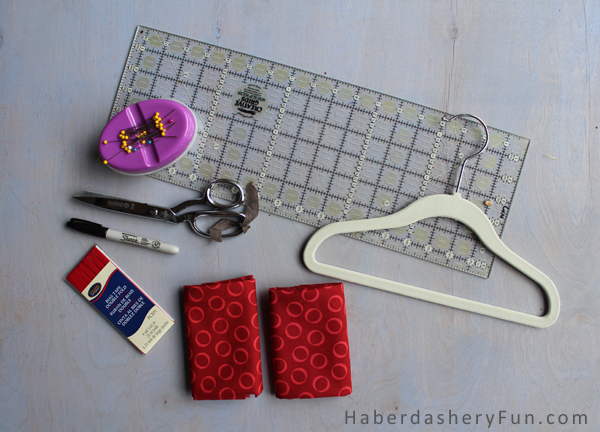
Materials Needed:

  1. 2 Fat quarters
  2. Clear vinyl
  3. Double fold bias tape- store bought or homemade
  4. Sewing machine and sewing supplies
  5. Rotary cutter and cutting mat
  6. Iron and ironing board
  7. Paper and pens
  8. Child size clothing hanger

Alright, let’s get sewing:

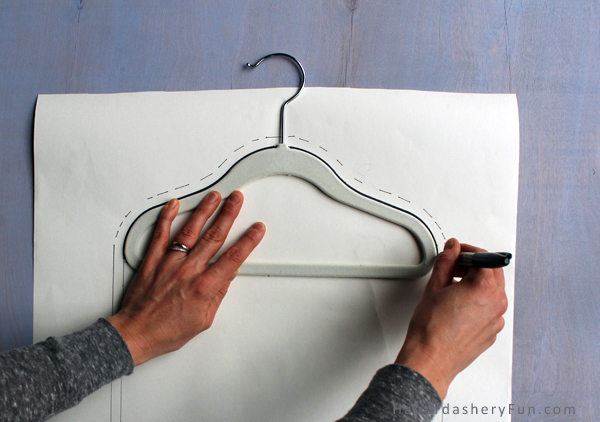
Lay the child size hanger on the paper and trace around the edge. Lengthen the bottom edge approximately 16″.  Draw parallel lines from the sides of the hanger. Add 3/8″ seam allowances around all edges, excluding the bottom edge.

Pin the pattern to each fat quarter and cut out. Cut 2 of the same pieces.

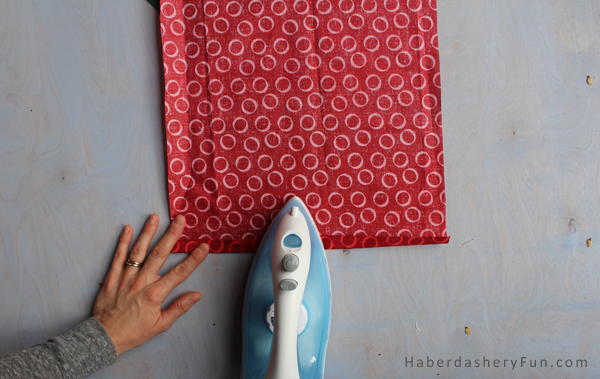
Double check the organizer length is even on both fabric pieces. If needed trim the bottom edge with a rotary cutter so they match completely. Turn under the bottom edge 1/2″ and press with an iron. Place into a sewing machine and topstitch. Repeat on the other fabric piece.

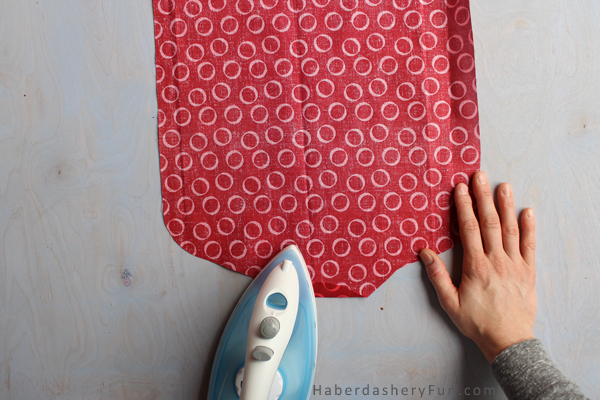
On one side only – turn under the top curved edge 1/2″ and press with an iron. Place into a sewing machine and topstitch. This becomes the FRONT of the organizer.

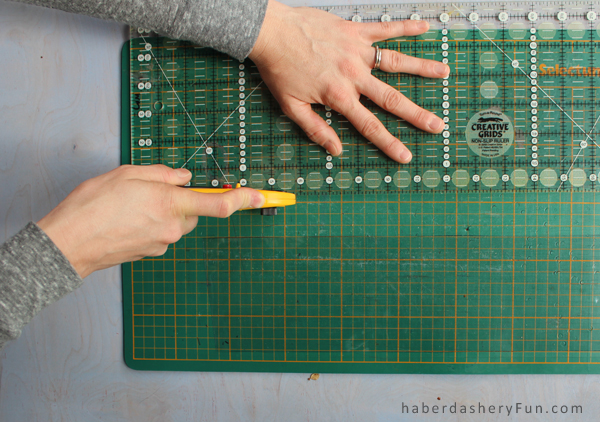
Lay vinyl onto cutting mat. Cut 3 strips measuring 12-3/4″ x 4″. These become the pockets.

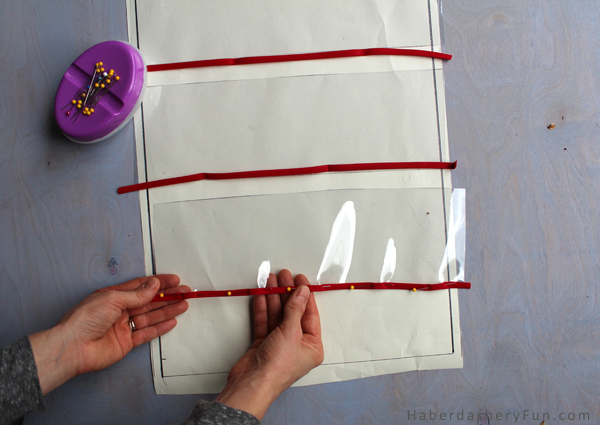
Cut 3 pieces of bias tape, each measuring 13″ in length. Pin bias tape to one edge of the vinyl strip. Place into sewing machine and edgestitch down. Repeat for the other 2 strips of vinyl. Trim ends if needed.

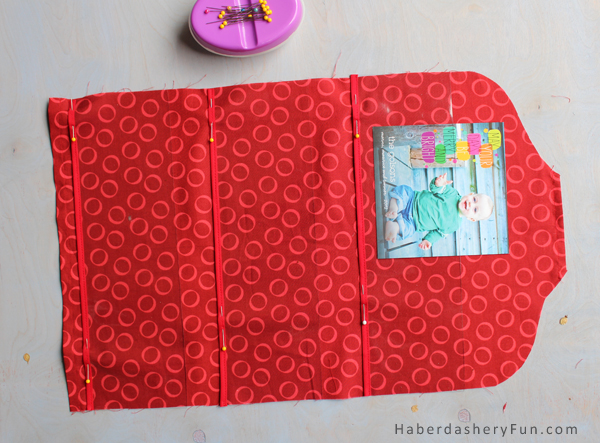
Lay front piece of organizer right side up. Place the 3 strips of vinyl on top. Adjust strips evenly, make sure to start first vinyl strip approximately 5″ down from top edge. This is so that the cards do not hang over the top. Place into sewing machine and edge stitch down. Optional – stitch down the center of each vinyl piece.

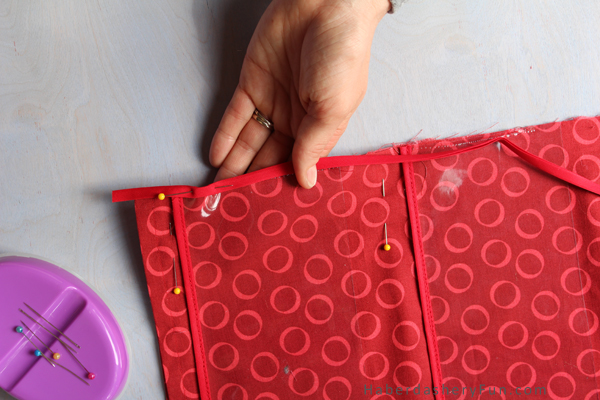
Cut another piece of bias tape measuring 52″. Pin to one end of the organizer. Make sure to leave a tail at least 1″ long. Place into sewing machine and edge stitch down. Turn tails under and stitch.

That’s it! Easy right? Now place your hanger inside the organizer and you are good to go!

Have you heard about the blog Craft Snob? Sara hosted a Bite Sized Sewing Series and invited me to share this tutorial the other week.. I LOVE her blog. It was such a pleasure to have been able to take part in her series. Thanks again!

Happy Sewing.

Related Posts Plugin for WordPress, Blogger...

10 Comments

« Stumbled Across.. A New Patchwork & Quilting Magazine!
DIY.. Mini Alphabet Pillows »

Comments

  1. Sara says

    December 9, 2013 at 10:06 am

    Thanks for sharing, Marni!

    Reply
  2. Ann says

    December 9, 2013 at 6:15 pm

    Smart! We love displaying the kid pictures we get year round, and this is way tidier than a fridge full of them

    Reply
    • Haberdashery Fun says

      December 15, 2013 at 8:06 pm

      Thanks Ann. I should have made this in a more neutral color. Now I have to make another one for my office and pictures. 🙂

      Reply
  3. Kte says

    December 14, 2013 at 7:38 am

    This is such a great idea – thanks so much for sharing!

    Reply
  4. Alana says

    December 17, 2013 at 9:53 am

    What a great idea!

    Reply
    • Haberdashery Fun says

      December 17, 2013 at 11:06 am

      Hi – Thank you so much!! It is VERY useful and we have it hanging in the middle of our kitchen 🙂

      Reply
  5. Danielle says

    December 20, 2013 at 7:18 pm

    Fun display. Thanks for sharing at Silver Pennies Sundays. x

    Reply
    • Haberdashery Fun says

      December 20, 2013 at 7:19 pm

      Hi – thanks for stopping by! 🙂

      Reply

Trackbacks

  1. Tutorial: Hanging Christmas card organizer | Sewing | CraftGossip.com says:
    December 15, 2013 at 3:18 pm

    […] Marni from Haberdashery Fun  shows how you can a hanging pocket organizer.  It’s made to slip over a clothes hanger, with pockets .  You can use it at Christmas time to organize cards you receive in the mail.  Or, make it in a non-holiday fabric and use it year round to organize jewelry, office supplies, craft supplies, or more.  This would make a great organizer for your gift wrap supplies! Go to Haberdashery Fun for the tute. […]

    Reply
  2. CraftCrave | Blog | Free Handcraft Items or Tutorials (large): Tuesday, 17 Dec 2013 says:
    December 17, 2013 at 7:19 am

    […] DIY.. Make A Mini Holiday Card Organizer – 1 freebie(s)? […]

    Reply

Leave a Reply to Ann Cancel reply

Your email address will not be published. Required fields are marked *

This site uses Akismet to reduce spam. Learn how your comment data is processed.

About me


Hi there - I'm Marni Weaver. A sewer, a sometimes quilter and a lover of fabric design. I started this blog to share my ideas. Come Join the Fun
shop now

Popular Categories

project for baby fabric projects seasonal projects fat quarter projects sewing tips and tricks inspiration

Categories

  • Applique
  • Baby
  • Bags and Pouches
  • Color
  • DIY Projects
  • Fabric
  • Fabric Design
  • Fat Quarter Projects
  • Home Decor
  • Inspiration
  • Just for Fun
  • Kids
  • No Sew
  • Patterns
  • Print On Fabric
  • Quilting
  • Scrap Fabric Projects
  • Seasonal
  • Sewing Tips & Tricks

Lovely sponsors

Recent Comments

  • Make Nine in 2021 – Sew, Bake, Snap on DIY.. Reversible Fabric Storage Bin
  • 26 Diy placemats ideas - Perfect Table Setting on DIY.. Heart Shaped Placemats Tutorial For Sew Mama Sew
  • More Free Tote Patterns | on Reversible 1 Hour Tote Pattern
  • Collapsible Kraft-Tex Bowl on DIY.. Collapsible Fabric Bowls
  • Haberdashery Fun on DIY.. Reversible Fabric Storage Bin

Projects Elsewhere

find me on Pellon Projects sew mama sew contributor

momtastic contributor

Pinterest

Visit Marni@Haberdashery Fun's profile on Pinterest.
Follow on Bloglovin

I'm Reading

  • Cluck Cluck Sew
  • Cooking Dangerously
  • In Color Order
  • Jen Hewitt
  • Jolly Jabber
  • Karly Spalding Photography
  • Leigh Laurel Studios
  • Lindsay Sews
  • Lotta Jansdotter
  • Love Patchwork and Quilting Magazine
  • Made
  • Making It Lovely
  • Noodle-Head
  • Polka Dot Chair
  • Sharon Holland Designs
  • Silhouette America Blog
  • Silhouette Design Store
  • The Purl Bee
  • The Purple Fig

Press:

Stitch Winter 2014

haberdashery_fun

I made the most glorious little Kraft-tex journal I made the most glorious little Kraft-tex journal cover over the holidays.  Not only do I love the color of the month for December (blue turquoise), but the texture of my journal is like aged leather and looks durable and rugged. Did you know Kraft-tex is actually paper??? My cover was simple to make and is just one rectangular piece of Kraft-tex, folded over at the ends and topstitched. Thats it.❤️

You can check @ctpublishing for other projects and more info.
.
.
.
#haberdasheryfun #haberdasheryfunpatterns #krafttex #krafttexuniversity #krafttexstyle #ctpublishing #isew #isewlation
Highlights from 2020. Glad it’s complete. Upward Highlights from 2020. Glad it’s complete. Upward and onward. What are you creating for the year ahead? Here’s to making 2021 a creative, fun, adventurous and graceful year.
What a fun class! Thank you to the participants in What a fun class! Thank you to the participants in my first zoom block printing class. It was an amazing group of people coming together with a common goal - sharing their love of print and pattern design.

My hubby snapped a few pictures during the workshop. I’m normally a “hider outer”, but thought this was a perfect opportunity to say Hi.  Even if it is looking down and away from the camera. 🤪

I will be hosting another block printing zoom workshop mid January. Come one come all. DM or email me for details.
.
.
.
#coffeewithhaberdasheryfun #blockprintingworkshop #zoomclass #pdfpattern #haberdasheryfun #haberdashery 
#blockprint #blockprinting #isew #fabricdesign #surfacepatterndesign #zoomsewingclass #zoomdesignclass
You’ve printed some fabric.. now what?? Build or You’ve printed some fabric.. now what?? Build or buy a frame and make yourself some easy wall art = ✔️

Want to learn how to block print? Grab a cup of coffee, a few supplies and join me for a free zoom class this Sunday, Dec 13th at 11am ( Eastern Time Zone ).

Check my recent blog post for the supply list. If you want to come and just hang out and watch, that’s ok too. DM or email me for details.
.
.
#haberdashery #blockprint #coffeewithhaberdasheryfun #PDF 
#isew #haberdasheryfun #curvyzipperpouch #fabricdesign 
#surfacedesign #haberdasheryfunpatterns #creativehappylife
Want to learn how to block print? I’m hosting a Want to learn how to block print? I’m hosting a free zoom class and the supply list is now up on my blog. You can DM me or send an email to marni@haberdasheryfun.com to join this free class. Click on the link in my bio to go to my blog.

Sunday, December 13 at 11am Est time zone.

.
#haberdashery #haberdasheryfun #blockprinting #pdfpattern #haberdasheryfunpatterns #coffeewithhaberdasheryfun #fabricdesign #blockprint
Follow on Instagram

Copyright © 2021 · Klar theme by Crimson Pear :: web & surface design