Haberdashery Fun

  • Home
  • About
    • Look Book
  • Contact
    • Collaborate?
  • Tutorials
  • Shop
    • Email
    • Facebook
    • Instagram
    • Pinterest

Keep up to date with the latest posts!

DIY.. Make A Mini Jewelry Roll

in DIY Projects, Fat Quarter Projects on 17/12/13

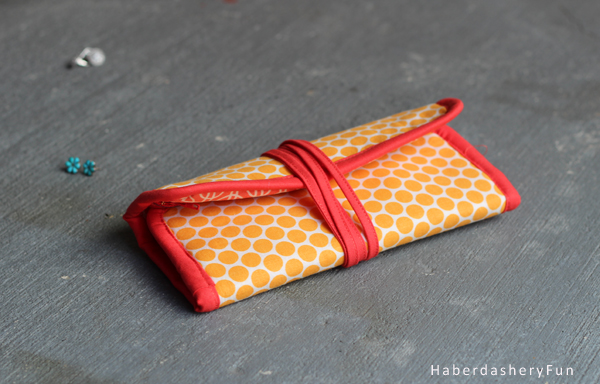
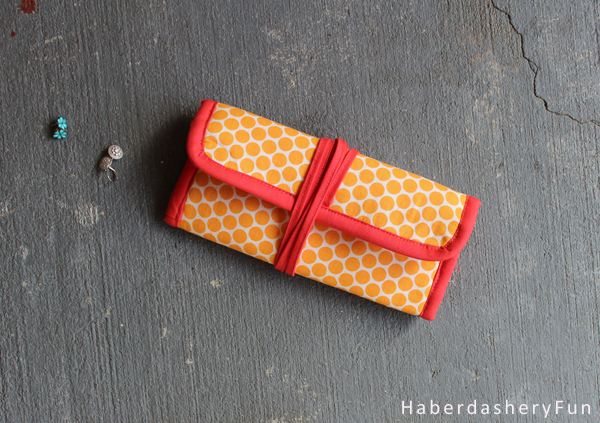
Just in time for the holidays.  Ok, so I”m cutting it pretty close for gift giving.. But I promise you all, this mini jewelry roll is really easy to make. Miniature in size, it is perfect for your handbag or weekend tote.

Put away those ziplock baggies and get sewing!!

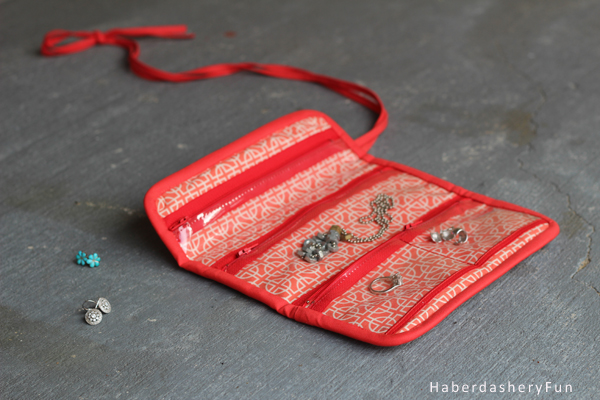
This little jewelry roll was inspired by a DIY post from a few months ago. Last August I made a travel jewelry roll, but didn’t provide the DIY steps. Quite a few people commented and emailed asking for the tutorial.. So here it is!

My favorite part? Head on over to my profile at the Pellon Projects website to download the step by step tutorial. The PDF makes it super easy to sew this project.

Materials needed:

  1. 3-4 Fat quarters
  2. Clear vinyl
  3. Fusible batting – Pellon TP971 works great
  4. Double fold bias tape – home made or store bought
  5. 3 zippers – 7″ wide
  6. Rotary cutter, cutting mat and quilting ruler
  7. Disappearing ink pen
  8. Sewing machine and related supplies
  9. Iron and ironing board
  10. Zipper foot – optional
  11. Cotton balls – optional

A few comments:

  1. Sewing with vinyl isn’t that hard! No seriously, it isn’t.. When you have the vinyl in your machine, make sure to have a long tail of thread. Hold on the the tail when you start sewing the vinyl. This will help pull the vinyl through your machine.
  2. Try making your stitch length a little longer. Test out the length on a piece of scrap vinyl.
  3. Be careful where you place your pins! Pins leave holes in vinyl.. Only pin in the seam allowances
  4. Struggling with attaching the thin bias tape to the vinyl? Try using a small piece of Wonder Tape under the bias tape. It will hold the tape in place and keep your sanity in check. Easy!

Let’s get started!

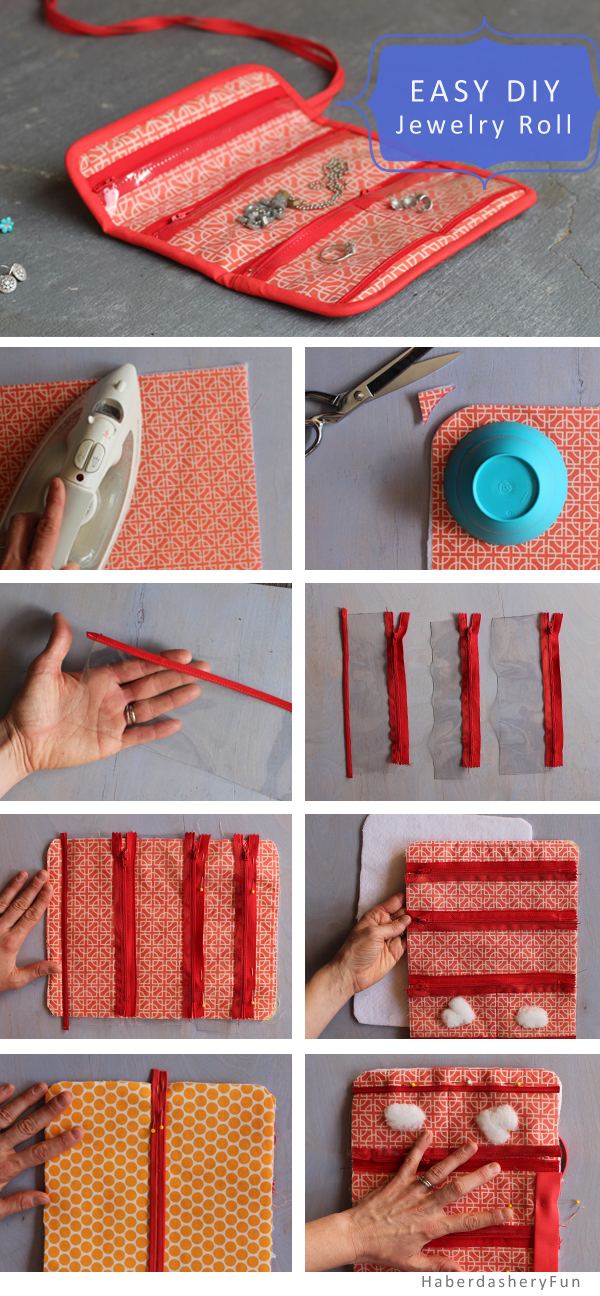
  1. Cut 4 rectangles measuring 8-1/2″ x 11″. Cut 1 from the outer and lining fabrics and 2 from the batting. Fuse the batting to the back side of the outer and lining fabrics.
  2. Round all corners. Find a circular template and trace using the disappearing ink pen. Cut each corner off.
  3. Cut 3 strips from the clear vinyl. Cut 2 measuring 3″ x 9″ and 1 measuring 2″ x 9″. Cut 9″ from the double fold bias tape. Place the tape piece along a long edge of the 3″ vinyl strip and stitch down using your sewing machine. Note that this is the bottom pocket piece for the jewelry roll.
  4. Using a zipper foot, sew each zipper to a vinyl strip. Place the vinyl ON TOP of the zipper tape and against the teeth. Stitch as closely as possibly, make sure that the zipper can still open. All zipper tabs need to pull from the same side.
  5. Lay vinyl strips onto fabric and stitch each piece down one at at time. Start with the bottom 3″ vinyl strip. Measure 3/4″ from bottom edge and pin down along the zipper tape. Make sure to always sew along the TOP edge of the zipper tape. Double check each time that the pocket can be opened and something can be placed inside. Important!
  6. Place the lining and the outer fabric wrong sides together.
  7. Turn over to have outer fabric facing up. Pin the 2 straps at the top edge. Center at the middle. Stitch down with a SMALL 1/4″ seam allowance
  8. Pin the binding to the side of roll. Raw edges should be aligned. Stitch down with a 1/4″ seam allowance. Leave a 1″ tail at beginning and end.  Tuck binding inside the tail and stitch down again. Turn binding to other side of roll to cover raw edges and stitch in place. Ta- Dah!! You’re done!

Ok.. So I missed a few steps.. How to cut the binding.. How to sew the straps.. And why are there cotton balls under the vinyl??

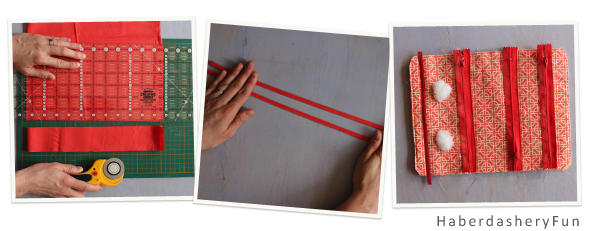
  • Click here to see my easy tutorial on cutting binding strips. For this project you need to cut binding 2-1/2″ x 40″
  • Click here to see another tutorial on sewing straps. For this project you need to cut a strap 1″ x 70″
  • Cotton balls…? YES.. Use cotton balls as place holders for your earrings. Place under the vinyl to help determine the pocket size. Keep inside, place into your sewing machine and topstitch a straight line.

Well that’s it. Let me know if you have any questions. Remember, there is a PDF is available  to download over at the Pellon Projects website. This has more detailed steps than above.  If you sew this jewelry roll I would love to see images of your completed project. Happy Holidays!

Related Posts Plugin for WordPress, Blogger...

52 Comments

« Fabric Stash Friday
Quick Tip.. Wonder Clips »

Comments

  1. Ceil says

    December 17, 2013 at 11:39 am

    Looks great but can’t find it at Pellon Projects. Please provide a link. Thank you 🙂

    Reply
    • Haberdashery Fun says

      December 17, 2013 at 2:37 pm

      Hi Ceil. Thanks for dropping by. I just added the link to the post. Here it is: http://www.pellonprojects.com/projects/mini-jewelry-roll/

      Reply
  2. Ceil says

    December 17, 2013 at 2:38 pm

    Just received an email from Pellon. Here’s the address for others who have been looking: http://pellonprojects.wordpress.com/2013/12/17/a-handmade-holiday-2013-mini-jewelry-roll/

    Reply
    • Haberdashery Fun says

      December 17, 2013 at 3:02 pm

      You are awesome! Thank you. Let me know how it goes.. Would love to see photos of your finished roll 🙂

      Reply
  3. Ann says

    December 17, 2013 at 8:46 pm

    So cute! It’s so tough to come up with gifts for teens – I think these would be great

    Reply
    • Haberdashery Fun says

      December 19, 2013 at 1:01 pm

      Thanks Ann. I didn’t think about teens, but you are right. They could pick out their own colors/fabrics and make it really personal.

      Reply
  4. Jeni says

    December 27, 2013 at 9:32 am

    Very cute! I might be able to handle this!

    Reply
    • Haberdashery Fun says

      December 27, 2013 at 9:54 am

      Hi- thanks for stopping by. It is actually quite easy.. Pellon Projects has the PDF you can download. I’d love to see images of your finished project!

      Reply
  5. Anne Weaver says

    December 27, 2013 at 11:06 am

    I love it!!! And you totally called me on my baggie jewelry packing. ha! I’ve linked to your tutorial over at Craft Gossip:
    http://sewing.craftgossip.com/tutorial-mini-jewelry-roll-organizer/2013/12/27/
    –Anne

    Reply
    • Haberdashery Fun says

      December 27, 2013 at 2:09 pm

      Thanks Anne! I think a lot of people have ziplock baggie habits.. I know most of my friends do, myself included 🙂

      Reply
  6. Amy @ Marvelous Mommy says

    December 28, 2013 at 4:03 pm

    This is SO adorable! Just like your blog! I love all the great photos too! Thanks for the great tutorial! You were featured today from the Create Link Inspire party! http://www.marvelousmommy.com/2013/12/7-useful-sewing-tutorials/

    Reply
    • Haberdashery Fun says

      December 28, 2013 at 9:42 pm

      Hi – thank you for the feature!

      Reply
  7. Diane @ Vintage Zest says

    December 31, 2013 at 12:01 am

    You have been featured on Do Tell Tuesday this week! Feel free to grab a button and link up this week –> http://www.vintagezest.com/2013/12/do-tell-tuesday-4.html

    Congrats!

    Reply
    • Haberdashery Fun says

      December 31, 2013 at 8:40 am

      Hi – Wow. Thank you very much!

      Reply
  8. Tori says

    December 31, 2013 at 12:10 am

    Awesome project Marni! Thanks for the tutorial! I have been wanting to make something like this for my mom. So this is absolutely perfect! I am featuring you this week on Do Tell Tuesday. I hope you have a wonderful and fun New Year!! 🙂

    Reply
    • Haberdashery Fun says

      December 31, 2013 at 8:41 am

      Hi Tori – Thank you very much! have an awesome NYE!

      Reply
  9. claire says

    January 3, 2014 at 5:50 pm

    Thank you for linking up @ Craft, Create & Inspire last week, your awesome project is featured this week..

    Stop by the linky party tomorrow and grab a featured button !!

    Looking forward to seeing your awesome projects from this week

    Claire @ Live Love Create x

    Reply
    • Haberdashery Fun says

      January 3, 2014 at 9:24 pm

      Hi Claire – Thank you for the feature!

      Reply
  10. Angela says

    January 3, 2014 at 9:20 pm

    This is the cutest little thing, i think i need to whip up a bunch of them for gifts. thanks! http://www.handmadeintheheartland.com/

    Reply
    • Haberdashery Fun says

      January 3, 2014 at 9:24 pm

      Hi – thank you for stopping by. I agree that they would make great gifts. I already have a few friends asking!!

      Reply
  11. Rainbow loom bands says

    February 13, 2014 at 7:10 pm

    I blog frequently and I really appreciate your content.
    This article has really peaked my interest. I am going
    to bookmark your site and keep checking for new information about once a week.

    I opted in for your Feed too.

    Reply
  12. Judy Nolan says

    February 23, 2014 at 1:47 pm

    Thanks for providing this tutorial! I made a roll for my smaller crochet tools this weekend, and you can read about it here (and see the photos): http://www.judy-nolan.com/2014/02/23/mini-organizer-for-crochet-tools/

    Reply
  13. Jennifer @ Ellison Lane says

    March 13, 2014 at 6:23 pm

    Thanks for linking up! Super cute jewelry bag!

    Reply
  14. Elo says

    April 10, 2014 at 5:25 am

    How cute is this one too! I have to sew one of these as well. I’m so glad I discovered your blog, packed with so many great ideas! Thanks!

    Reply
  15. Bailey says

    May 29, 2014 at 8:40 pm

    I made one! I love it!

    See it here – http://baileymarieandme.weebly.com/blog/diy-jewelry-roll

    Thanks
    -Bailey @ BaileyMarieandMe

    Reply
    • Haberdashery Fun says

      May 29, 2014 at 9:33 pm

      Thanks for letting me know about your project. i just stopped by your blog and the jewelry roll looks fabulous!!

      Reply

Trackbacks

  1. Tutorial: Mini jewelry roll organizer | Making-Money-With-Crafts says:
    December 27, 2013 at 12:08 pm

    […] pockets to hold necklaces or brooches, and two smaller pockets that will hold earrings or rings.  Go to Haberdashery Fun to get her […]

    Reply
  2. Weekend DIYs: Mini Jewelry Rolls, Confetti Poppers, & More - Official Stylehaul Blog says:
    December 28, 2013 at 2:01 am

    […] c/o Haberdashery Fun […]

    Reply
  3. 7 Useful Sewing Tutorials « Create Link Inspire Features « Marvelous Mommy says:
    December 28, 2013 at 3:41 pm

    […] How to Make a Mini Jewelry Roll from Haberdashery Fun […]

    Reply
  4. Do Tell Tuesday #4 | Lil' Mrs. Tori says:
    December 31, 2013 at 12:06 am

    […] Mini Jewelry Roll // Haberdashery Fun […]

    Reply
  5. December Round up | Haberdashery Fun says:
    January 1, 2014 at 9:26 am

    […] from December…? Shopping in NYC [finding an array of colored zippers at Mood!!], creating my Mini Jewelry Roll for Pellon Projects and their Handmade Holidays series and sewing my 1st Christmas stockings from […]

    Reply
  6. Linky Thursday on Friday | Stacy Sews says:
    January 3, 2014 at 3:49 am

    […] Keep your jewelry organized when you travel, store, or just to keep organized with this jewelry roll tutorial. […]

    Reply
  7. DIY Mini Jewelry Rolls | Shelterness says:
    January 6, 2014 at 4:43 pm

    […] make sure to have a long tail of thread. Hold on the tail when you start sewing the vinyl. Read the whole instruction here and make the rolls for the girls! And don’t forget to put some cool jewelry […]

    Reply
  8. DIY... Make A Vinyl and Fabric Cosmetic Pouch | Haberdashery Fun says:
    January 8, 2014 at 11:38 am

    […] one. Then fill it with all your goodies. If you want to see other projects I made with vinyl, click here for my mini jewelry roll and here for my velcro zipper […]

    Reply
  9. DIY Mini Jewelry Rolls | DI1 says:
    January 10, 2014 at 8:06 am

    […] Read the full tutorial here. […]

    Reply
  10. shoutout sunday! the first one in 2014! - A girl and a glue gun says:
    January 12, 2014 at 8:42 am

    […] haberdashery fun […]

    Reply
  11. Fabric Scrap Projects | Block Party #22 - Making the World Cuter says:
    January 26, 2014 at 9:00 pm

    […] Decorations | Jewelry Holder | Left Over Fabric Ideas | Art Travel Case | Little Pouch | Hexagon Coaster | Tote Bag | Colorful […]

    Reply
  12. Join the Block Party and link up your recent blog posts. | Eat Fit says:
    January 26, 2014 at 10:14 pm

    […] Decorations | Jewelry Holder | Left Over Fabric Ideas | Art Travel Case    Little Pouch | Hexagon Coaster | Tote Bag | […]

    Reply
  13. Make A Mini Jewelry Roll | Addicted 2 Fun: Interesting Pictures, Inspiration , Quotes & Content that Matters! says:
    April 10, 2014 at 11:15 am

    […] Make A Mini Jewelry Roll Heading out this holiday season? Make this mini jewelry roll. Small enough for your purse or a weekend tote bagTo Learn “Make A Mini Jewelry Roll” DIY & Crafts click here […]

    Reply
  14. 16 DIY Tutorials for Travel Kits, Journals and More | College Millionaires says:
    June 17, 2014 at 7:03 am

    […] Tutorial: haberdasheryfun […]

    Reply
  15. Pellon Launches Legacy Products in Australia | Haberdashery Fun says:
    October 2, 2014 at 9:51 am

    […] can see my full tutorial on the jewelry roll here. Let me know if you have any questions. Happy […]

    Reply
  16. DIY Gifts for $5 says:
    November 11, 2014 at 2:36 pm

    […] Mini Jewelry Roll from Haberdashery Fun […]

    Reply
  17. Travel Jewelry Roll Tutorial | reviewwanted says:
    January 27, 2015 at 5:49 pm

    […] DIY.. Make A Mini Jewelry Roll | Haberdashery Fun – Miniature in size, this jewelry roll is perfect for your handbag or weekend tote. Make this today!… […]

    Reply
  18. Trucos y elementos DIY para tus viajes | tips4yourtrips says:
    November 10, 2015 at 6:29 pm

    […] +Funda para bisuteria: ¿Te interesa? Descubre como hacerlo tu mismo con haberdasheryfun […]

    Reply
  19. DIY Projects and Crafts for People with Wanderlust – DIYs.com says:
    April 14, 2016 at 7:14 am

    […] Traveling is no reason to leave all of your accessories at home! Keep them glam and untangled with this mini jewelry roll instead of just throwing them in loose. You don’t want to lose anything nice!(Source: Haberdashery Fun) […]

    Reply
  20. 12+ Sewing Themed Jewelry Pieces - Swoodson Says says:
    April 27, 2018 at 11:47 pm

    […] you sew yourself, maybe make a handmade jewelry pouch or DIY roll-up jewelry case to go with one of these! Etsy has a whole Mother’s Day gifts section to peruse if jewelry […]

    Reply
  21. 36 Really Practical Gifts for Avid Travelers and Vegabonds - Dodo Burd says:
    July 16, 2018 at 6:46 pm

    […] Diy Make A Mini Jewelry Roll […]

    Reply
  22. Keeping Jewelry Safe and Organized While Traveling - Organize-It Blog says:
    August 26, 2019 at 7:01 am

    […] tightly and tie the ends with a bit of string or yarn. If you’re feeling ambitious, you can break out the sewing machine and add some […]

    Reply
  23. Last Minute Gift Ideas – On Williams Street says:
    December 11, 2019 at 10:03 am

    […] Jewelry roll: http://haberdasheryfun.com/diy-projects/diy-make-a-mini-jewelry-roll […]

    Reply
  24. Beach Coverup Dress – MADE EVERYDAY says:
    March 5, 2020 at 2:13 pm

    […] This jewelry case sewn by my friend Susan for the lookbook is too cute.  And how purrrrfect do the petals look cut on the bias like that?? (tutorial here) […]

    Reply
  25. 15 Insanely Creative DIY Travel Projects and Gifts to Make Right Now - Patrizia Wish says:
    April 12, 2020 at 9:05 pm

    […] you bring a lot of jewelry with you, this mini jewelry roll tutorial from Haberdashery Fun is a great way to keep them organized. It can also be used at home to store your essential jewelry […]

    Reply
  26. 15 Insanely Creative DIY Travel Projects and Gifts to Make Right Now | Entrepreneur.ca says:
    April 22, 2020 at 9:09 am

    […] you bring a lot of jewelry with you, this mini jewelry roll tutorial from Haberdashery Fun is a great way to keep them organized. It can also be used at home to store your essential jewelry […]

    Reply

Leave a Reply to Make A Mini Jewelry Roll | Addicted 2 Fun: Interesting Pictures, Inspiration , Quotes & Content that Matters! Cancel reply

Your email address will not be published. Required fields are marked *

This site uses Akismet to reduce spam. Learn how your comment data is processed.

About me


Hi there - I'm Marni Weaver. A sewer, a sometimes quilter and a lover of fabric design. I started this blog to share my ideas. Come Join the Fun
shop now

Popular Categories

project for baby fabric projects seasonal projects fat quarter projects sewing tips and tricks inspiration

Categories

  • Applique
  • Baby
  • Bags and Pouches
  • Color
  • DIY Projects
  • Fabric
  • Fabric Design
  • Fat Quarter Projects
  • Home Decor
  • Inspiration
  • Just for Fun
  • Kids
  • No Sew
  • Patterns
  • Print On Fabric
  • Quilting
  • Scrap Fabric Projects
  • Seasonal
  • Sewing Tips & Tricks

Lovely sponsors

Recent Comments

  • Make Nine in 2021 – Sew, Bake, Snap on DIY.. Reversible Fabric Storage Bin
  • 26 Diy placemats ideas - Perfect Table Setting on DIY.. Heart Shaped Placemats Tutorial For Sew Mama Sew
  • More Free Tote Patterns | on Reversible 1 Hour Tote Pattern
  • Collapsible Kraft-Tex Bowl on DIY.. Collapsible Fabric Bowls
  • Haberdashery Fun on DIY.. Reversible Fabric Storage Bin

Projects Elsewhere

find me on Pellon Projects sew mama sew contributor

momtastic contributor

Pinterest

Visit Marni@Haberdashery Fun's profile on Pinterest.
Follow on Bloglovin

I'm Reading

  • Cluck Cluck Sew
  • Cooking Dangerously
  • In Color Order
  • Jen Hewitt
  • Jolly Jabber
  • Karly Spalding Photography
  • Leigh Laurel Studios
  • Lindsay Sews
  • Lotta Jansdotter
  • Love Patchwork and Quilting Magazine
  • Made
  • Making It Lovely
  • Noodle-Head
  • Polka Dot Chair
  • Sharon Holland Designs
  • Silhouette America Blog
  • Silhouette Design Store
  • The Purl Bee
  • The Purple Fig

Press:

Stitch Winter 2014

haberdashery_fun

I made the most glorious little Kraft-tex journal I made the most glorious little Kraft-tex journal cover over the holidays.  Not only do I love the color of the month for December (blue turquoise), but the texture of my journal is like aged leather and looks durable and rugged. Did you know Kraft-tex is actually paper??? My cover was simple to make and is just one rectangular piece of Kraft-tex, folded over at the ends and topstitched. Thats it.❤️

You can check @ctpublishing for other projects and more info.
.
.
.
#haberdasheryfun #haberdasheryfunpatterns #krafttex #krafttexuniversity #krafttexstyle #ctpublishing #isew #isewlation
Highlights from 2020. Glad it’s complete. Upward Highlights from 2020. Glad it’s complete. Upward and onward. What are you creating for the year ahead? Here’s to making 2021 a creative, fun, adventurous and graceful year.
What a fun class! Thank you to the participants in What a fun class! Thank you to the participants in my first zoom block printing class. It was an amazing group of people coming together with a common goal - sharing their love of print and pattern design.

My hubby snapped a few pictures during the workshop. I’m normally a “hider outer”, but thought this was a perfect opportunity to say Hi.  Even if it is looking down and away from the camera. 🤪

I will be hosting another block printing zoom workshop mid January. Come one come all. DM or email me for details.
.
.
.
#coffeewithhaberdasheryfun #blockprintingworkshop #zoomclass #pdfpattern #haberdasheryfun #haberdashery 
#blockprint #blockprinting #isew #fabricdesign #surfacepatterndesign #zoomsewingclass #zoomdesignclass
You’ve printed some fabric.. now what?? Build or You’ve printed some fabric.. now what?? Build or buy a frame and make yourself some easy wall art = ✔️

Want to learn how to block print? Grab a cup of coffee, a few supplies and join me for a free zoom class this Sunday, Dec 13th at 11am ( Eastern Time Zone ).

Check my recent blog post for the supply list. If you want to come and just hang out and watch, that’s ok too. DM or email me for details.
.
.
#haberdashery #blockprint #coffeewithhaberdasheryfun #PDF 
#isew #haberdasheryfun #curvyzipperpouch #fabricdesign 
#surfacedesign #haberdasheryfunpatterns #creativehappylife
Want to learn how to block print? I’m hosting a Want to learn how to block print? I’m hosting a free zoom class and the supply list is now up on my blog. You can DM me or send an email to marni@haberdasheryfun.com to join this free class. Click on the link in my bio to go to my blog.

Sunday, December 13 at 11am Est time zone.

.
#haberdashery #haberdasheryfun #blockprinting #pdfpattern #haberdasheryfunpatterns #coffeewithhaberdasheryfun #fabricdesign #blockprint
Follow on Instagram

Copyright © 2021 · Klar theme by Crimson Pear :: web & surface design