Haberdashery Fun

  • Home
  • About
    • Look Book
  • Contact
    • Collaborate?
  • Tutorials
  • Shop
    • Email
    • Facebook
    • Instagram
    • Pinterest

Keep up to date with the latest posts!

DIY.. Straps, Straps and Straps!

in DIY Projects, Sewing Tips & Tricks on 30/08/13

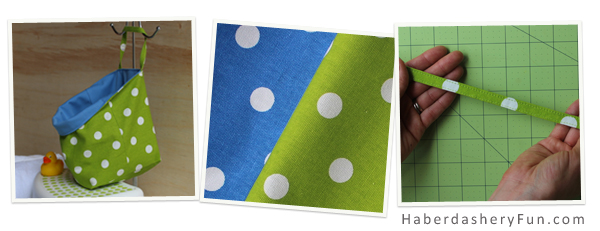
I posted my bath tote earlier this week. What a great home for all those rubber duckies!  So far we have used this little bag almost every night. It has been fun making a game out of cleaning up the bath toys. It was super easy to sew, if you want to check it out, you can see the tutorial here.

I showed the sewing steps for the bag.  To finish the straps, I sent everyone over to a strap tutorial I posted a few months ago.  I had the images from when I was making the bag, so I thought why not share an updated and easy strap tutorial.

Materials Needed:

  1. Fabric
  2. Quilting ruler
  3. Rotary cutter – Fiskars or Olfa brand
  4. Cutting mat
  5. Sewing supplies – thread, pins and sewing machine
  6. Iron and ironing board

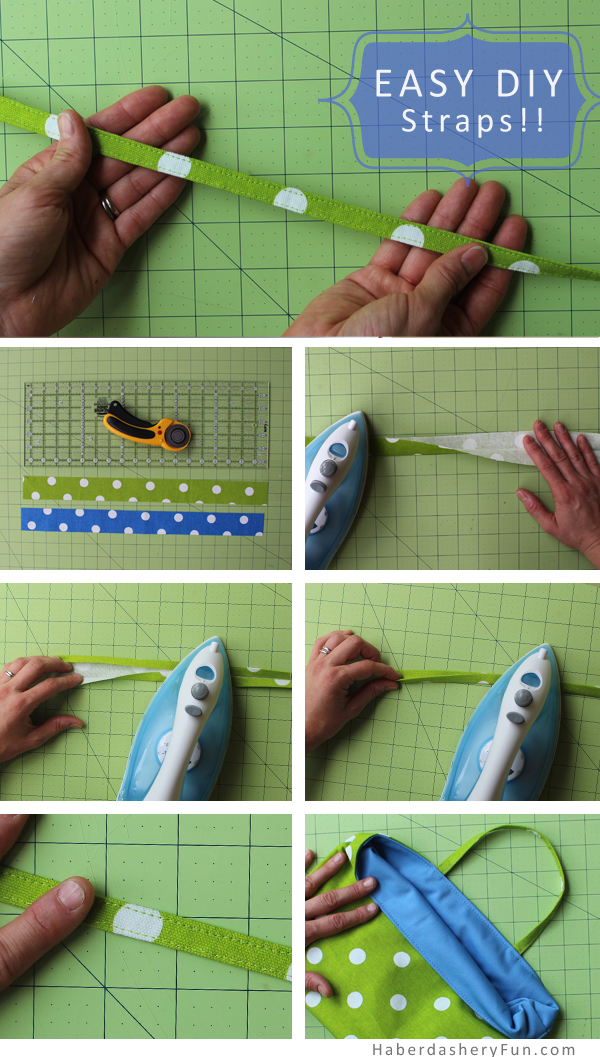
  1. Cut your fabric into 2 long pieces – you can cut your fabric really fast when you use a rotary cutter. For this project, my straps where skinny – 1 3/4″W x 10″L
  2. Fold the fabric in half along the length and press with your iron
  3. Fold again – this time fold each side towards the center seam.  Press again
  4. Fold again along the initial fold. Press the fold. Your strap is almost complete
  5. Place the strap into your sewing machine and edgestitch along each side
  6. Now you can add to you to your handbag, storage bin, etc. Pin and sew into place

Have a great long weekend!  Into the month of September we go..

Related Posts Plugin for WordPress, Blogger...

6 Comments

« DIY.. Toy Bath Bag
DIY.. Tradeshow Badge Holder »

Trackbacks

  1. DIY.. Tradeshow Badge Holder | Haberdashery Fun says:
    September 3, 2013 at 2:06 pm

    […] iron. This will clean finish the edges. While you are ironing, develop your strap. Check out here for my easy strap making […]

    Reply
  2. DIY.. Mini Book Tote and Journal Cover | Haberdashery Fun says:
    September 17, 2013 at 3:58 pm

    […] my strap making tutorial here. Cut your strap piece in half.  Turn and fold each end 1/4″ and press. Pin down to the […]

    Reply
  3. DIY.. On The Go Baby Changing Pad | Haberdashery Fun says:
    October 9, 2013 at 11:12 am

    […] Sew your binding and strap pieces. I created easy tutorials for both… check out the binding tutorial here and the strap tutorial here […]

    Reply
  4. DIY.. Halloween Candy Bowl | Haberdashery Fun says:
    October 24, 2013 at 9:12 am

    […] your strap together. I have a great strap tutorial and you can check it out here. Place straps under top edge and pin in place. Stitch the straps […]

    Reply
  5. DIY.. Make A Mini Jewelry Roll | Haberdashery Fun says:
    December 17, 2013 at 11:11 am

    […] Click here to see another tutorial on sewing straps. For this project you need to cut a strap 1″ x 70″ […]

    Reply
  6. DIY.. Fabric Bin With Handles | Haberdashery Fun says:
    June 17, 2014 at 7:58 am

    […] Step 6 –  Sew your staps.. I’ve made plenty of straps here on my blog.. Check out my super duper easy tutorial here. […]

    Reply

Leave a Reply to DIY.. Make A Mini Jewelry Roll | Haberdashery Fun Cancel reply

Your email address will not be published. Required fields are marked *

This site uses Akismet to reduce spam. Learn how your comment data is processed.

About me


Hi there - I'm Marni Weaver. A sewer, a sometimes quilter and a lover of fabric design. I started this blog to share my ideas. Come Join the Fun
shop now

Popular Categories

project for baby fabric projects seasonal projects fat quarter projects sewing tips and tricks inspiration

Categories

  • Applique
  • Baby
  • Bags and Pouches
  • Color
  • DIY Projects
  • Fabric
  • Fabric Design
  • Fat Quarter Projects
  • Home Decor
  • Inspiration
  • Just for Fun
  • Kids
  • No Sew
  • Patterns
  • Print On Fabric
  • Quilting
  • Scrap Fabric Projects
  • Seasonal
  • Sewing Tips & Tricks

Lovely sponsors

Recent Comments

  • Make Nine in 2021 – Sew, Bake, Snap on DIY.. Reversible Fabric Storage Bin
  • 26 Diy placemats ideas - Perfect Table Setting on DIY.. Heart Shaped Placemats Tutorial For Sew Mama Sew
  • More Free Tote Patterns | on Reversible 1 Hour Tote Pattern
  • Collapsible Kraft-Tex Bowl on DIY.. Collapsible Fabric Bowls
  • Haberdashery Fun on DIY.. Reversible Fabric Storage Bin

Projects Elsewhere

find me on Pellon Projects sew mama sew contributor

momtastic contributor

Pinterest

Visit Marni@Haberdashery Fun's profile on Pinterest.
Follow on Bloglovin

I'm Reading

  • Cluck Cluck Sew
  • Cooking Dangerously
  • In Color Order
  • Jen Hewitt
  • Jolly Jabber
  • Karly Spalding Photography
  • Leigh Laurel Studios
  • Lindsay Sews
  • Lotta Jansdotter
  • Love Patchwork and Quilting Magazine
  • Made
  • Making It Lovely
  • Noodle-Head
  • Polka Dot Chair
  • Sharon Holland Designs
  • Silhouette America Blog
  • Silhouette Design Store
  • The Purl Bee
  • The Purple Fig

Press:

Stitch Winter 2014

haberdashery_fun

I made the most glorious little Kraft-tex journal I made the most glorious little Kraft-tex journal cover over the holidays.  Not only do I love the color of the month for December (blue turquoise), but the texture of my journal is like aged leather and looks durable and rugged. Did you know Kraft-tex is actually paper??? My cover was simple to make and is just one rectangular piece of Kraft-tex, folded over at the ends and topstitched. Thats it.❤️

You can check @ctpublishing for other projects and more info.
.
.
.
#haberdasheryfun #haberdasheryfunpatterns #krafttex #krafttexuniversity #krafttexstyle #ctpublishing #isew #isewlation
Highlights from 2020. Glad it’s complete. Upward Highlights from 2020. Glad it’s complete. Upward and onward. What are you creating for the year ahead? Here’s to making 2021 a creative, fun, adventurous and graceful year.
What a fun class! Thank you to the participants in What a fun class! Thank you to the participants in my first zoom block printing class. It was an amazing group of people coming together with a common goal - sharing their love of print and pattern design.

My hubby snapped a few pictures during the workshop. I’m normally a “hider outer”, but thought this was a perfect opportunity to say Hi.  Even if it is looking down and away from the camera. 🤪

I will be hosting another block printing zoom workshop mid January. Come one come all. DM or email me for details.
.
.
.
#coffeewithhaberdasheryfun #blockprintingworkshop #zoomclass #pdfpattern #haberdasheryfun #haberdashery 
#blockprint #blockprinting #isew #fabricdesign #surfacepatterndesign #zoomsewingclass #zoomdesignclass
You’ve printed some fabric.. now what?? Build or You’ve printed some fabric.. now what?? Build or buy a frame and make yourself some easy wall art = ✔️

Want to learn how to block print? Grab a cup of coffee, a few supplies and join me for a free zoom class this Sunday, Dec 13th at 11am ( Eastern Time Zone ).

Check my recent blog post for the supply list. If you want to come and just hang out and watch, that’s ok too. DM or email me for details.
.
.
#haberdashery #blockprint #coffeewithhaberdasheryfun #PDF 
#isew #haberdasheryfun #curvyzipperpouch #fabricdesign 
#surfacedesign #haberdasheryfunpatterns #creativehappylife
Want to learn how to block print? I’m hosting a Want to learn how to block print? I’m hosting a free zoom class and the supply list is now up on my blog. You can DM me or send an email to marni@haberdasheryfun.com to join this free class. Click on the link in my bio to go to my blog.

Sunday, December 13 at 11am Est time zone.

.
#haberdashery #haberdasheryfun #blockprinting #pdfpattern #haberdasheryfunpatterns #coffeewithhaberdasheryfun #fabricdesign #blockprint
Follow on Instagram

Copyright © 2021 · Klar theme by Crimson Pear :: web & surface design