Haberdashery Fun

  • Home
  • About
    • Look Book
  • Contact
    • Sponsor/ Ads
  • Tutorials
  • Shop
    • Email
    • Facebook
    • Instagram
    • Pinterest

Keep up to date with the latest posts!

Holiday DIY – Make An Easy Apron

in DIY Projects, Fabric on 22/12/12

This DIY project is for your favorite cook, dog lover or both..

I created this project with a good friend in mind – she is a a busy mom, a great cook and is the owner of a very unique dog.  I have know them both for many years.  Her dog Benny is quite the character and I thought he would be the perfect model for my 2012 Happy Holidays Apron.

This apron is super easy to make.  It is a great gift for someone special in your life – it is useful, personalized and sure to make the recipient smile for years to come.

Top Header image Apron 600px copy

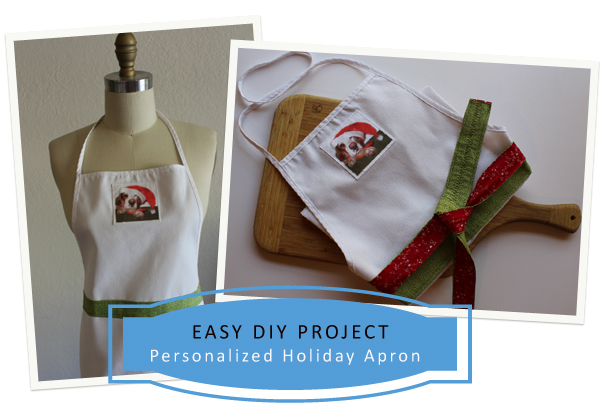
This project was made with a store bought apron.  You can choose how much or little you want to customize the apron.  My whole project didn’t break the bank – store bought apron, fabric from my closet and image transfer paper [ I had to buy the paper].  To update the apron, I chose to add colorful waist ties and a fun picture of my friend’s dog .
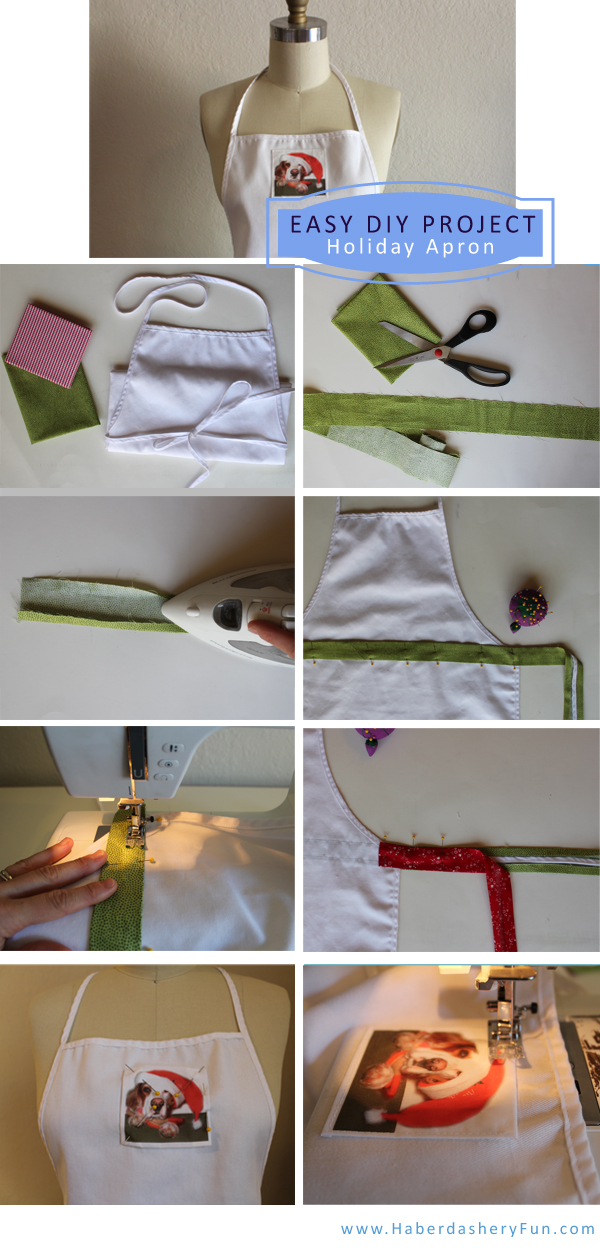
Materials needed:

  • Store bought apron
  • 2 colors of fabric
  • Image to transfer onto fabric
  • Transfer paper
  • Pins, needles, sewing machine, iron, ironing board

8 easy steps:

  1. Gather materials.  I bought the apron from Joann Fabric and Craft Stores for under $5.00.  I usually  like to sew everything, but the apron was inexpensive and made this DIY project something even a non sewer could do..
  2. Measure the length of the apron from 1 waist tie end to the other end.  Using that measurement – cut out 2 long strips of fabric 2 1/4″ wide by the length measurement.  Cut 1 strip in your front/self fabric and another in your back/lining fabric.
  3. Turn and press the seam allowance of the straps approximately 1/4″.  Do this for both front and back pieces.
  4. Pin down at the waist across the front of the apron.  Make sure the strap is level at the waist from side seam to side seam.  Note -new strap should also be level with the original apron waist ties.
  5. Sew down the strap from side seam to side seam.
  6. Pin the back/lining strap to front strap. Starting at the side seams – sew the front and back straps together.
  7. Transfer the image onto your fabric. There are a few options for transferring the image. You can use Avery products or The Electric Quilt Company.  Cut the image to size leaving at least a 1/4″ seam allowance around all sides.  Press and turn seam allowances under.  Pin dto chest area of apron. Make sure the image is aligned with the top edge.
  8. Sew down the 4 sides of your image.

That’s it – Happy Holidays everyone.

Related Posts Plugin for WordPress, Blogger...

1 Comment

« DIY.. Make A Baby Bib
Holiday DIY – Make Wine Tags »

Comments

  1. ruusaan says

    December 24, 2012 at 12:59 pm

    Like! a perfect project for the beginner sewer!! well thought out!

    Reply

Leave a Reply Cancel reply

Your email address will not be published. Required fields are marked *

About me


Hi there - I'm Marni Weaver. A sewer, a sometimes quilter and a lover or fabric design. I started this blog to share my ideas. Come Join the Fun
shop now

Popular Posts

  • DIY.. Reversible Fabric Storage Bin DIY.. Reversible Fabric Storage Bin I'm addicted to making fabric storage bins.  How about...
  • DIY.. Quilted Color Pop Zipper Pouch DIY.. Quilted Color Pop Zipper Pouch Last week I finally had a few spare moments to sit...
  • DIY.. Reversible 1 Hour Tote DIY.. Reversible 1 Hour Tote This tote is the perfect size as a grab and go bag.  It...
  • DIY.. Fabric Bin With Handles DIY.. Fabric Bin With Handles Alright! It's time for another storage bin tutorial. ...
  • DIY.. A - Frame Organizer DIY.. A – Frame Organizer September is National Sewing Month.  Today I'm hanging...
  • Sew A Hooded Baby Towel Sew A Hooded Baby Towel This is the perfect sewing project for a new mom. ...
  • DIY.. Make A Baby Bib DIY.. Make A Baby Bib The countdown is on.  I hope you are all having a wonde...

Popular Categories

project for baby fabric projects seasonal projects fat quarter projects sewing tips and tricks inspiration

Categories

  • Applique
  • Baby
  • Bags and Pouches
  • Color
  • DIY Projects
  • Fabric
  • Fat Quarter Projects
  • Home Decor
  • Inspiration
  • Just for Fun
  • Kids
  • No Sew
  • Patterns
  • Print On Fabric
  • Quilting
  • Scrap Fabric Projects
  • Seasonal
  • Sewing Tips & Tricks

Lovely sponsors

Recent Comments

  • 71 DIY Organization Ideas to Get Your Life in Order | Shutterfly on DIY.. A – Frame Organizer
  • Sew A Set of Pouches | Haberdashery Fun on Sew.. A Curvy Zipper Pouch
  • Haberdashery Fun on DIY Heart Shaped Burp Cloths
  • Haberdashery Fun on DIY.. Fabric Bin With Handles
  • Mary Rod on DIY Heart Shaped Burp Cloths

Projects Elsewhere

find me on Pellon Projects sew mama sew contributor

momtastic contributor

Pinterest

Visit Marni@Haberdashery Fun's profile on Pinterest.
Follow on Bloglovin

I'm Reading

  • Cluck Cluck Sew
  • Cooking Dangerously
  • In Color Order
  • Jolly Jabber
  • Karly Spalding Photography
  • Leigh Laurel Studios
  • Lindsay Sews
  • Lotta Jansdotter
  • Love Patchwork and Quilting Magazine
  • Made
  • Making It Lovely
  • Noodle-Head
  • Polka Dot Chair
  • Sharon Holland Designs
  • Silhouette America Blog
  • Silhouette Design Store
  • The Purl Bee
  • The Purple Fig
  • Windam Fabrics

Press:

Stitch Winter 2014

Follow on Instagram

Copyright © 2018 · Klar theme by Crimson Pear :: web & surface design