Haberdashery Fun

  • Home
  • About
    • Look Book
  • Contact
    • Collaborate?
  • Tutorials
  • Shop
    • Email
    • Facebook
    • Instagram
    • Pinterest

Keep up to date with the latest posts!

DIY.. Make A Travel Jewelry Roll

in Fat Quarter Projects on 09/08/13

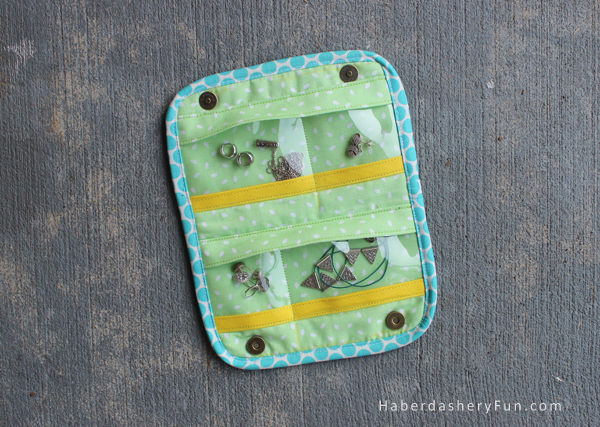
I am travelling yet again.  I’m headed to Atlanta then Greenville, SC and then back to Atlanta. Phew, even the thought tires me out. I was packing my earrings and necklaces in ziplock baggies and realized that it was time to sew something to hold them in. I decided on the spot that I should finally make a jewelry roll!

I wanted the holder to be small. When I travel for work, I don’t bring alot of extra stuff. I usually forget to pack earrings OR just wear one pair OR pack everything in my change change purse and hope I don’t lose anything.

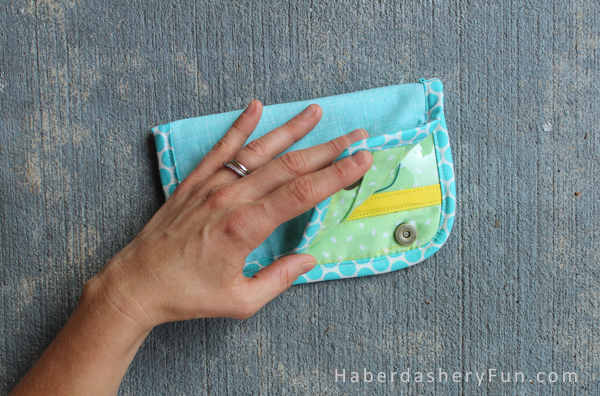
My inspiration was a letter size piece of paper folded in half. Perfect travel size – easy to pack, small enough for just a few pairs of earrings and quick to sew.

Here is what you need to get started:

  1. Fabric – 3 different colors/patterns [ inside, outside and binding]. This is a great fat quarter project
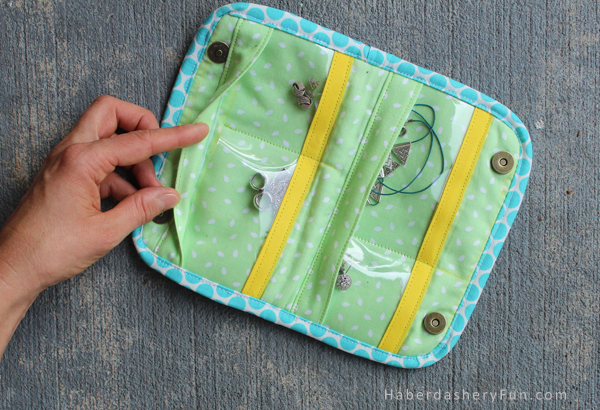
  2. Clear vinyl
  3. Binding – for the bottom of vinyl
  4. Fusible batting –  Pellon TP971F
  5. Interfacing – Pellon Shape Flex
  6. Quilting Ruler
  7. Rotary cutter
  8. Cutting mat
  9. Marking pen
  10. Sewing materials – thread, scissors, pins
  11. Magnetic snaps
  12. Cotton balls – yes cotton balls!!

Wondering about the cotton balls?  When I was developing the vinyl pockets I inserted a cotton ball as a place holder for my earrings and necklaces.  The cotton balls helped form the pocket. They also made sewing the pockets much easier.  I kept the cotton inside as sewed each seam/vinyl pocket down into place… Great idea, right?

I am travelling for the next 10 days and thought I would road test the jewelry roll before sending out the DIY steps.. My husband saw it sitting on the kitchen table and really loved it. But I prefer to give it a test drive and see what works/doesn’t work before getting too excited over it.  So far I’m pretty happy with it.. But I’m sure something will pop up that needs to be fixed.

I made this in just a few short hours. After my travel schedule slows down, I will post a tutorial on the jewelry roll. Until then, let me know if you have any questions or comments.

Happy sewing!

Related Posts Plugin for WordPress, Blogger...

11 Comments

« Mollie Makes Travelcard Wallet
Sewing Supplies 101 »

Comments

  1. Weslie says

    August 12, 2013 at 8:20 am

    Found you over at Craftgawker. New fan of your blog. I like this project. You make it look easy. I have never sewn with vinyl before. Is it hard? Where do I find it?

    Reply
    • Haberdashery Fun says

      August 12, 2013 at 2:49 pm

      Hi thanks for stopping by. I bought my clear vinyl at Joann Fabric. You can buy it by the yard. It can be a little tricky to sew with, as the vinyl can be slippery. With this project, I used binding on the edges of the vinyl, so it was very easy to sew with. Let me know how it goes.

      Reply
  2. Anna says

    August 13, 2013 at 8:57 am

    Thanks for sharing. Found you over at Craftgawker

    Reply
  3. Krista @ the happy housie says

    August 23, 2013 at 10:34 am

    Wow, that looks amazing! I am seriously impressed… it would make a beautiful gift too!

    Reply
    • Haberdashery Fun says

      August 24, 2013 at 12:38 pm

      Hi Krista. Thanks for stopping by. I have had a few requests already. Great idea. Christmas is right around the corner 🙂

      Reply
  4. sew~amy says

    October 14, 2013 at 8:29 am

    Hi, I love this jewelry holder bag and think it would be a great gift for my mom for the Holidays. I see a list of the supplies but I don’t see instructions. Is there a tutorial for it? Is it there and I’m just missing it? Thank you for your help. You’ve got some mad sewing skills! I’ve enjoyed your blog.

    Reply
    • Haberdashery Fun says

      October 14, 2013 at 11:17 am

      Hi Amy,

      Thank you for your comment on my sewing skills!! It made my day – seriously. I wanted to road test the holder before I sent out the tutorial. There are a few things I’m going to change. I will work on the updated holder and get the tutorial up mid November. Hope this is ok? I will keep you posted as to when it goes up.

      Reply
  5. Becky says

    August 6, 2015 at 11:18 pm

    I really love this style best. Would you mind sharing the instructions on how to make one exactly like this one? I think this style will work best for me.
    Thanks a bunch

    Reply
    • Haberdashery Fun says

      August 7, 2015 at 4:29 pm

      Hi becky,

      Thanks for the email. I have a tutorial in the works for a jewelry holder like this one. I’ll reach out and email you when it’s ready.

      Thanks for reaching out – Marni

      Reply
      • Becky says

        August 8, 2015 at 7:39 pm

        Thanks so much I am really looking forward to hearing from u!

        Reply

Trackbacks

  1. DIY.. Make A Mini Jewelry Roll | Haberdashery Fun says:
    December 17, 2013 at 11:02 am

    […] little jewelry roll was inspired by a DIY post from a few months ago. Last August I made a travel jewelry roll, but didn’t provide the DIY steps. Quite a few people commented and emailed asking for the […]

    Reply

Leave a Reply Cancel reply

Your email address will not be published. Required fields are marked *

This site uses Akismet to reduce spam. Learn how your comment data is processed.

About me


Hi there - I'm Marni Weaver. A sewer, a sometimes quilter and a lover of fabric design. I started this blog to share my ideas. Come Join the Fun
shop now

Popular Categories

project for baby fabric projects seasonal projects fat quarter projects sewing tips and tricks inspiration

Categories

  • Applique
  • Baby
  • Bags and Pouches
  • Color
  • DIY Projects
  • Fabric
  • Fabric Design
  • Fat Quarter Projects
  • Home Decor
  • Inspiration
  • Just for Fun
  • Kids
  • No Sew
  • Patterns
  • Print On Fabric
  • Quilting
  • Scrap Fabric Projects
  • Seasonal
  • Sewing Tips & Tricks

Lovely sponsors

Recent Comments

  • Quilted Ripstop Reversible Tote | Haberdashery Fun on Quick Tip.. Sewing Boxed Corners
  • Make Nine in 2021 – Sew, Bake, Snap on DIY.. Reversible Fabric Storage Bin
  • 26 Diy placemats ideas - Perfect Table Setting on DIY.. Heart Shaped Placemats Tutorial For Sew Mama Sew
  • More Free Tote Patterns | on Reversible 1 Hour Tote Pattern
  • Collapsible Kraft-Tex Bowl on DIY.. Collapsible Fabric Bowls

Projects Elsewhere

find me on Pellon Projects sew mama sew contributor

momtastic contributor

Pinterest

Visit Marni@Haberdashery Fun's profile on Pinterest.
Follow on Bloglovin

I'm Reading

  • Cluck Cluck Sew
  • Cooking Dangerously
  • In Color Order
  • Jen Hewitt
  • Jolly Jabber
  • Karly Spalding Photography
  • Leigh Laurel Studios
  • Lindsay Sews
  • Lotta Jansdotter
  • Love Patchwork and Quilting Magazine
  • Made
  • Making It Lovely
  • Noodle-Head
  • Polka Dot Chair
  • Sharon Holland Designs
  • Silhouette America Blog
  • Silhouette Design Store
  • The Purl Bee
  • The Purple Fig

Press:

Stitch Winter 2014

haberdashery_fun

My 5 yr old modeling the latest print from Sunday’s block printing zoom workshop. It’s fun to try to draw, carve and print all the while teaching and sharing over zoom. The prints made during these workshops aren’t perfect, but they sure are fun and memorable to create. Thank you to the small group of participants in attendance this Sunday, teaching these workshops has been good for my soul. 
.
Details soon to come for next month’s / May workshop. For more information email - marni@haberdasheryfun.com
.
#haberdashery #haberdasheryfunpatterns #haberdasheryfun #zoomworkshop #haberdasheryfunclasses #pdfpatterns #isew #printandpattern #printmaking #surfacepatterndesign #zoomclasses #isewbags #printmakersofinstagram
My next workshop is here! Have you wanted to lea My next workshop is here! 

Have you wanted to learn to block print and don’t know where to start? This is the perfect intro class and you will be up and running in 1 hour. 

Sunday, April 11th 
11am- 12pm EST
Space is limited.

Email me at marni@haberdasheryfun.com for details.

#zoomclasses #pdfpattern #isew #haberdashery #haberdasheryfun #haberdasheryfunpatterns #haberdasheryfunclasses #pdf #sewing
Day 22 of #marchmeetthemaker2021 is “Hands”. . Day 22 of #marchmeetthemaker2021 is “Hands”.
.
My 5yr old loves to snoop and to go through my stuff. He especially loves my block printing supples, recently found my stash of stamps and lined them up.  When I saw my handiwork from over the years, I thought it would make a fun picture. 
.
.
#marchmeetthemaker #mmtm #speedballart #mmtm2021 #haberdashery #haberdasheryfun #blockprinting #haberdasheryfunpatterns #pdfpattern #isewlation #speedycarve 
#isewbags #isew #zoomclasses #haberdasheryfunclasses #printandpattern #printmakersofinstagram
Day 18 for #marchmeetthemaker2021 was “color”. Day 18 for #marchmeetthemaker2021 was “color”. I often look at people’s Instagram accounts where the colors are soft, muted and soothing. I say to myself ..Oooh. I want my Instagram feed to look like that. But the reality is, I love ❤️ ❤️ ❤️ color. 
.
.
#marchmeetthemaker #mmtm2021 #mmtm #pdfpattern #haberdashery #haberdasheryfun  #isewbags #haberdasheryfunpatterns #isew #konasolids #dollarspotfinds #dollarspot
Day 16 prompt for #marchmeetthemaker2021 is “Fro Day 16 prompt for #marchmeetthemaker2021 is “From The Archives”.. I first posted this picture 2 years ago. ❤️ the red and the simplicity of the print. If you have attended one of my zoom block printing workshops, you may recognize the shapes? Super simple, yet mixed together they make such a fun modern print.
.
.
#marchmeetthemaker #mmtm #isew #haberdashery #isewbags #pdfpattern #surfacedesigners #haberdasheryfun #haberdasheryfunclasses #zoomclasses #learntoblockprint #lovetosew #haberdasheryfunpatterns #speedballart
Follow on Instagram

Copyright © 2021 · Klar theme by Crimson Pear :: web & surface design