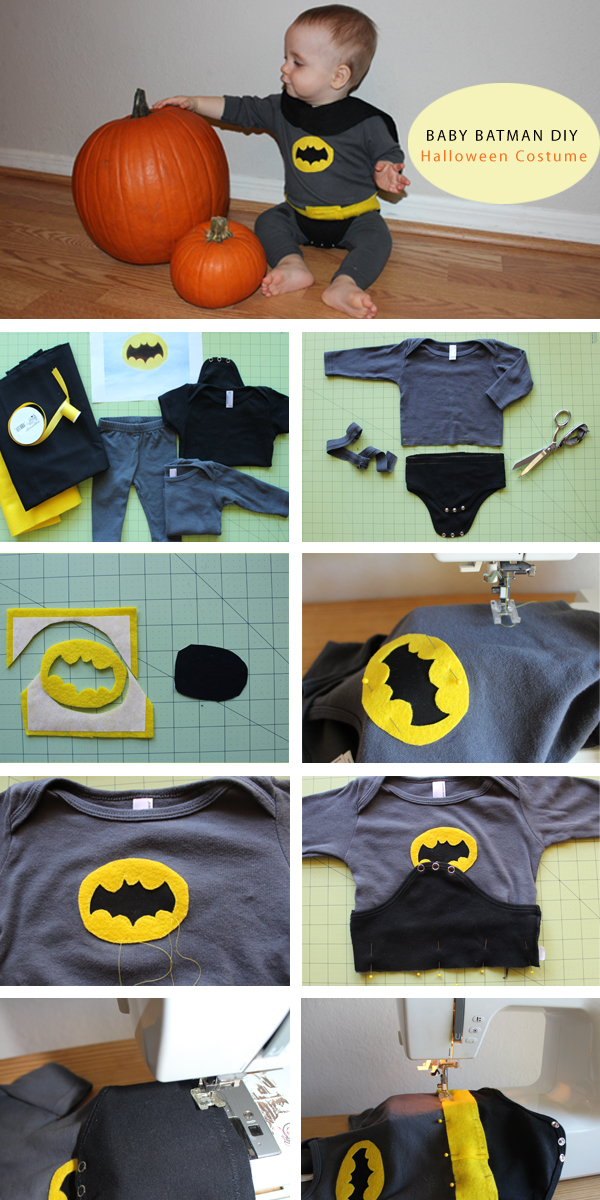
Happy Halloween everyone..
I was super inspired to make our 9 month old’s Halloween costume this year. I thought a vintage Adam West Batman was in order. Not only would this be fun to attempt to make.. It would be the perfect 1st Halloween costume for the little person in our family. Have you ever watched the TV show The Big Bang Theory? My older brother rivals Sheldon in his comic book, Sci Fi Movie/ TV show knowledge.. Let’s say some of that knowledge has rubbed off on the rest of the family.
The onesie, long sleeve shirt and leggings are all from American Apparel. Before you get your heart set on a specific superhero, check out the colors of onesies, shirts and legging that are available. You might need to mix and match to make one work. Luckily, the Adam West black and grey colors were easy to find with American Apparel.
Supplies Needed:
- Onesie, long sleeve shirt and leggings
- Black fabric
- Yellow felt
- Super Hero Logo
- Sewing Supplies
- Steam-A-Seam
- Fray Check – Optional. This depends on the quality of your felt
Alright, let’s get sewing..
1. Batman Logo – I found images of the Adam West Batman and logo on the Internet. Print out and trace onto your Steam A Seam. You will need to adjust the logo to the size of your onesie.
2. When you cut the onesie and long sleeve shirt – Measure the shirt/top and onesie/bottom on your baby and mark where they meet. Make sure you add a 1/2 seam allowance on the shirt/top and onesie/bottom. This is very important and easy to forget if you just start cutting away…
3. The Batman logo, belt, and belt buckle placement – iron on Steam-A-Seam to the back of the felt. This will help adhere to your fabric and not have them slip around when sewing. This also gives a bit of stability to the fabric.
4. Use fray check on the edges on the felt logo, belt and buckle. This depends on the quality of your felt. With cheaper felt, the edges tend to get ugly. Apply a bit of fray check and it will help secure everything, keeping them neat and tidy.
5. Cut the superhero logo out of the felt. Make sure to cut out the inside as well. Place this on top of the black fabric. Topstitch down onto your onesie – sew around the outside and the interior of the logo. Be patient to get an even stitch.
6. Sewing the shirt/top and and onesie/bottom together – place right sides togther and pin along edge. Use a zig zag stitch.
7. Belt placement – double check the belt placement on your baby before you stitch down the belt. I didn’t have an even front and back seam on Tanner, so it was good that I tested the costume first before I completed the belt.
8. LAST BUT NOT LEAST THE SUPER HERO CAPE! – this was not on the photo DIY, but is very easy to make. Trace your baby’s bib onto the black fabric, remember to add 1/2 seam alloawance all around the outside edge and cut out 2 pieces. Sew together, leave a a 2″ opening and turn inside out. Press edges flat. Create a closure with velcro and sew down, similar to the bib. NOTE FOR SAFETY – only use an easy off closure like velcro on the bib cape, you want the cape to come off super easy.
Have a great day.


Didn’t manage to tackle anything this year but will keep this in mind for next year. Super cute!!!
Very cute! My mom sews, but unfortunately I never caught the sewing bug. It will come in handy for you as a mother. When my mother lived close by she used to make my kids costumes.
hello,
the costume is adorable. very retro, and adam west would be proud.!!!
I need to learn to do that in a larger size 😉
Wonderful idea!
Ha!! Too bad. We needed a Robin this year. Next year I will think of one for you. Inluding snaps!
Love this!! Great job, it turned out so cute 🙂