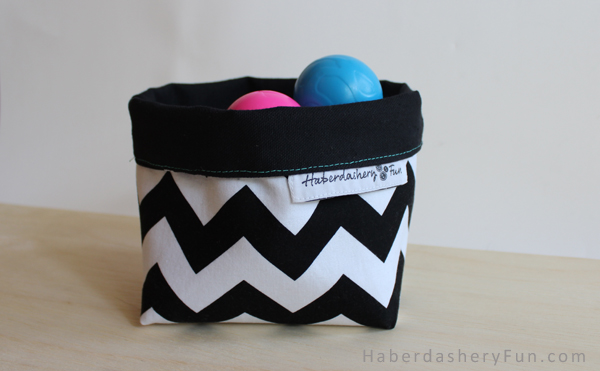
I love storage bins. This one is little and super sweet- perfect for small toys like trucks, cars, figurines and even balls [my house has a lot of balls laying around]. It would also be great in your kitchen or bathroom. Once you sew this little guy, size up the pattern and you can make storage bins for almost anything in your home.
The finished size is 5″ x 5 1/2″. You can roll the top edge down.. So make sure to use bright and colorful fabric.
This is super easy to make – 2 rectangles of fabric, a little sewing and you’re done!
Materials Needed:
- Fabric
- Fusible interfacing – Pellon SF 101 Shape-Flex
- Creative grids quilting ruler
- Clover quilt marking pen. Have you tried this pen? Try it, you will love it
- Sewing machine and sewing supplies
- Iron and ironing board
Let’s start sewing:
Step – 1
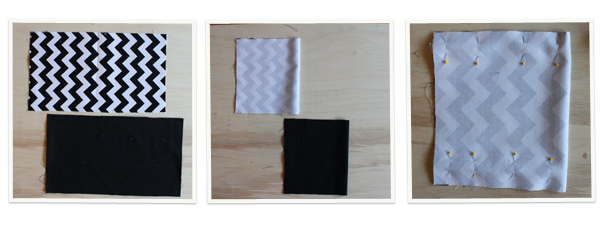
- Cut 2 pieces measuring 17″ x10″. This includes your seam allowance. I used cotton canvas fabric for both the lining and outside. I fused the cotton exterior fabric to give it more structure and have the ability to stand up on its own.
- Fold rectangles in half.
- Pin along each side and sew with a 1/4″ seam allowance.
- Press. Press seams while flat. Open and press again.
Step – 2
- Jiggle around so that your side seams are laying flat and facing upwards. You should have a point. Finger press to lay the seam flat. Using your ruler – measure 2″ up from the point. You also want a 45 degree angle along the side. Be as precise/finicky here as you can. These measurements help to make the bottom SQUARE.
- Mark a line with your pen.
- Pin. Repeat for the other 3 corners. Place into sewing machine and sew along the chalk line.
- Press.
Step – 3
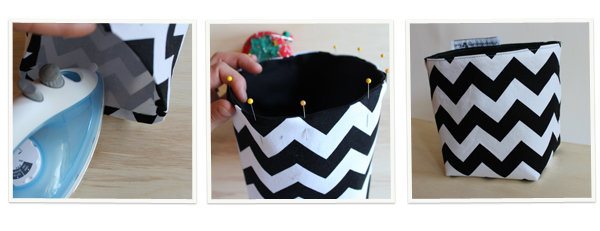
- Turn the top edge under 1/4″ and press. Do this for both.
- The outside fabric should now be right side facing out and the lining fabric should be right side facing in. Place the lining fabric into the outside fabric.
- Adjust and jiggle around so the corners sit together. Press the corners.
- The top edges should still be turned inwards, pin along top edge. Place into your sewing machine and edgstitch. Use a fun color, even a decorative stitch. I chose to use a contrasting color – Blue!!
- Press your top edge seam.
That’s it – your storage bin is complete.


Just saw your other post on the cotton canvas storage bins.. Thanks! Love your blog. This one looks super easy
I love the “Easy Fabric Storage Bin”,, and thought I’d make one. I’m having trouble understanding the instructions, steps 1, 2 & 3, At some point won’t I have to try and get the outside fabric, facing out, on the outside?
Any help will be appreciated,, thanks,, Penny
Hi Penny, Thanks for stopping by and leaving your question. I agree, that step didn’t make sense. I revised the post a little.
Here is a breakdown: (1) When you turn and iron the top edge, you will turn the outside fabric right side out.. So leave “facing out”. (2) The lining needs to face right side in. (3) Place the lining into the outside fabric. This basically completes the bin. (4) All you need to do now is stitch around the top edge and you are complete.
Hope this helps? Let me know if it doesn’t 🙂
Hi,, thank you for responding so quickly,,, I take it I fold the 1/4 seam twice,, because otherwise won’t I have a raw edge? thanks for you help,, Penny
Hi Penny, No. Turn only once. To clarify. 1) For the outside, turn and fold top edge inwards 1/4″. Press this fold with an iron. Repeat and do exactly the same for the lining. 2) Now place the lining bin into the outside bin [ outside bin has the “good” side facing outwards]. The top edge is clean [no raw edges] because we folded and enclosed both seams inside. 3) Pin around the top edge to help keep it closed when sewing. 4) Place this edge into your sewing machine and edgestitch with a 1/8″ seam allowance..
Let me know if this makes sense :). I’d love to see finished images of your bins!
Marni
I like and will make one for my self thanks
In step 2, when you say repeat for all four corners, do you mean two corners on the inner fabric and two corners on the outer fabric, or four on each?
Thanks for leaving a comment. I meant to say repeat for the other 3 corners. You square and box the 2 lining and the 2 outside/main corners.
Thank you so much for this, it is so cute! I tried it and my lil bin is super cute. Im new to sewing and this was such an easy project for beginners. I tagged you on instagram with my finished bin.
Thanks again 🙂
Oh that’s awesome! Thanks for letting me know. I’m happy it worked out for you! I didn’t see the tag on instagram, it could be that you are private. If you want to share on my Facebook page that would be great. https://www.facebook.com/HaberdasheryFun
Have a great day – Marni