Haberdashery Fun

  • Home
  • About
    • Look Book
  • Contact
    • Collaborate?
  • Tutorials
  • Shop
  • Freebie
  • Block Printing Course
    • Email
    • Facebook
    • Instagram
    • Pinterest

Keep up to date with the latest posts!

DIY.. Reversible Fabric Storage Bin

in DIY Projects, Fabric on 03/04/14

I’m addicted to making fabric storage bins.  How about you?

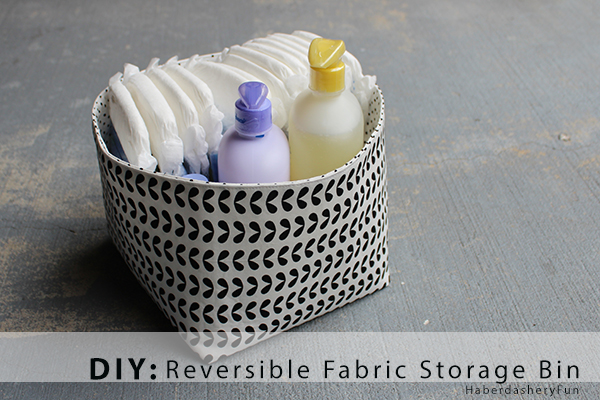
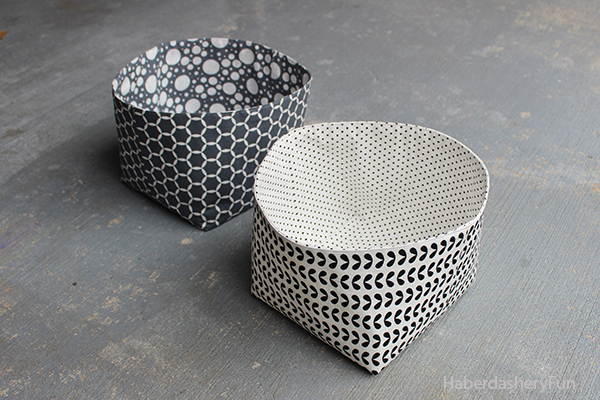
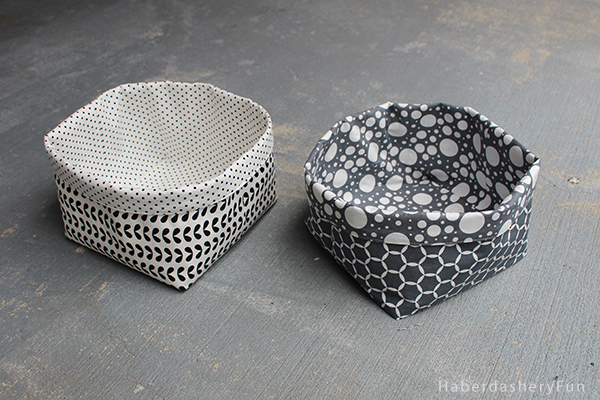
I made smaller versions of these last year and have always wanted larger ones. I finally had a few free hours to work on the pattern and get a few made. I love how they turned out and how they look with the top edge rolled down. And they are reversible too!

Wouldn’t they make an awesome baby shower or house warming gift? Fill it with a bunch of goodies and you are good to go..The only problem I see is that if you make one to give as a gift, you may decide to keep it at the last moment.  I’ve done this before.

The finished size is 8.5″L x 9″W x 7″H

Supplies Needed:

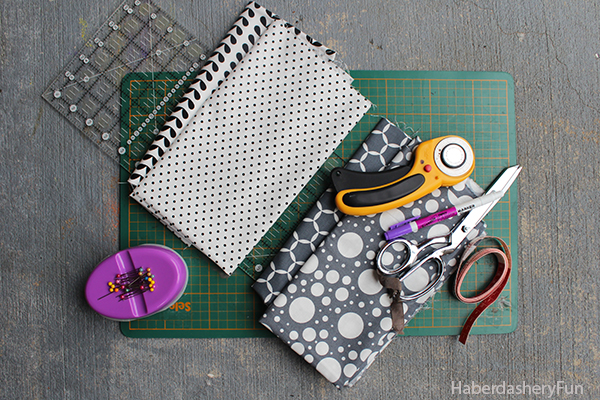
  1. Cotton fabric outside – 1/2 yard
  2. Cotton fabric lining – 1/2 yard
  3. Pellon Décor-Bond 809 – 1 yard
  4. Sewing machine and related supplies
  5. Rotary cutter, cutting mat, quilting rotary cutting ruler
  6. Disappearing ink pen
  7. Iron and ironing board

Before we get started, you will need to complete the following:

  1. Cut your fabric –  cut 2 rectangles measuring 18″ x 24″ from the outside and lining fabrics. Repeat and cut another 2 rectangles from the Pellon Décor-Bond 809.
  2. Fuse the Décor-Bond to the wrong side of the main and lining fabrics.

Alright, let’s get sewing your simple fabric bin!

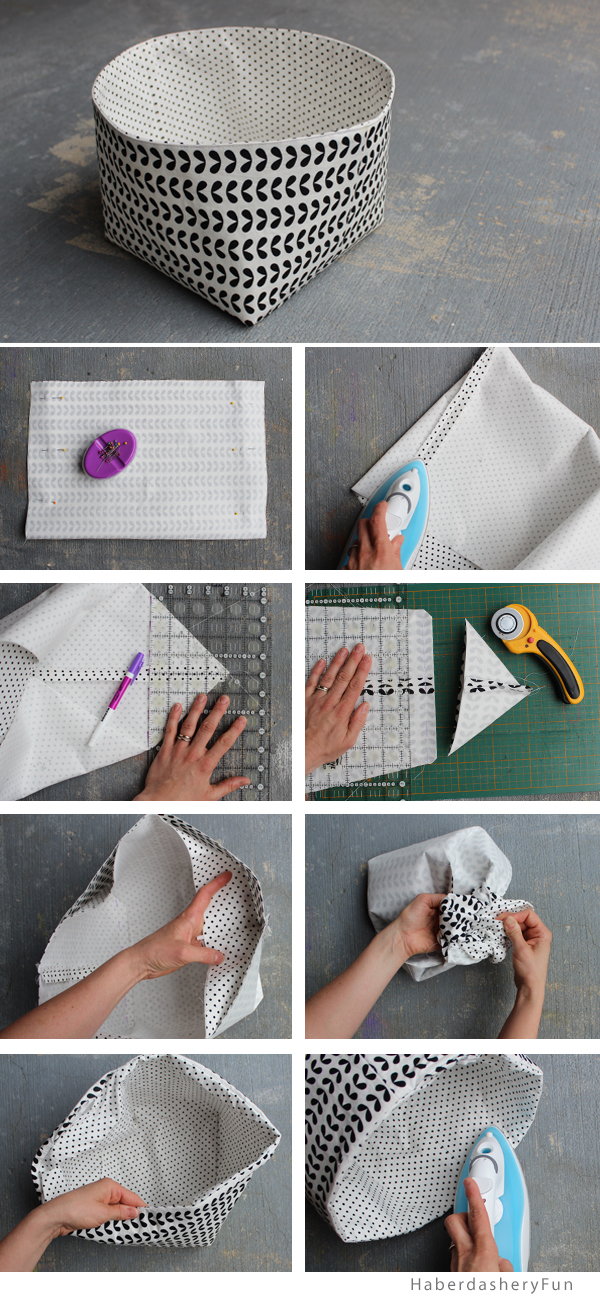
  1. Fold the rectangle in half, to measure 18″ x 12.” Pin along sides if needed. Place into sewing machine and stitch with a 1/2″ seam allowance.
  2. Press side seams while closed. Open and press again.
  3. Sew those boxed corners! Start with the main fabric. Wiggle the fabric around so that the side seams are facing upwards. Make a point and also make sure that the sides sit at a 45 degree angle.  Finger press any wrinkles out.  Measure 4″ upwards from the tip and mark a dashed line with a disappearing ink pen. Pin. Place into sewing machine and stitch following the dashed line. Backstitch. Repeat for the other side and again for the lining fabric.
  4. Place the quilting ruler onto the corner. Lay the ruler so you have a 1/2″ seam allowance. Cut along the ruler edge using a rotary cutter [ you will cut the tip off].  Repeat for the other side and again for the lining fabric.
  5. Turn project so they sit as bins. Main bin is facing right side in and lining bin is facing right side out.  Place the lining bin into the main bin. Wiggle the corners into place. Make sure side seams match up.  Pin around the top edge. Place into the sewing machine and stitch together with a 1/2″ seam allowance. Leave a 4″ opening near a side seam.  Press with an iron.
  6. Gently pull the bin through the 4″ opening.
  7. Wiggle the fabric into place. Roll down top edge to sit into place and make sure all corners match. Press along top edge with an iron, turn the 4″ opening seam allowance under. Press in place. Pin if needed. Place into the sewing machine and edgestitch along the entire top edge.
  8. Press the bin with an iron.

That’s it! Easy right? Well I have great news.. This project is available over at the Pellon Projects website. Click here to head on over to get the PDF. You can save the tutorial and print it later.

Want to sew other reversible projects? How about a great everyday bag? Click here for my Reversible Tote Tutorial.

Fabric reference.. I LOVE this fabric. I bought a bunch of coordinating fabric from this collection. It is from Moda Fabrics and called “Shades of Black” by Me and My Sister Designs.

118 Comments

« Riley Blake Union Jack Blog Tour
Quick Tip.. Working with Freezer Paper »

Comments

  1. Dorothy Baker says

    12/17/2015 at 9:13 am

    I love to store my stuff in boxes like those. I use them in the bathroom for my shampoos and shower gels, and I have one for my perfumes. Everything is very well organized and stored in a nice way:)

    Reply
  2. Sandra says

    05/13/2016 at 6:56 pm

    These could also be made out of “plabric” (fused plastic bags). For a eco-friendly version.

    Reply
  3. Sandra says

    05/13/2016 at 6:58 pm

    These could also be made out of “plabric” (fused plastic bags) for at least one of the sides. For a eco-friendly and also water-proof version.

    Reply
  4. Ido Walker says

    06/02/2016 at 1:22 pm

    Well, I hope you see this and reply back. I was wondering how to make a bigger box. Is there a formula to how much fabric to cut? I love how easy this is!

    Reply
    • Cee Jay says

      06/28/2016 at 5:02 pm

      Hi Ido

      The 18 inch x 24 inch makes the L: 8.5 inch x W: 9 inch x H: 7 inch size box. I’m going to increase that by making the 18 inch into 24 inch and the 24 inch into 30 inch, adding 6 inches to each measurement. I’m going to make a usable toile first and see what the finished size is. They will be great for a bathroom and I will line them with rip stop instead of fabric.

      Hope this helps.

      Cee Jay/defunct britain.

      Reply
      • Haberdashery Fun says

        07/01/2016 at 5:01 pm

        Thank you, Thank you Cee Jay!! I appreciate your responding to Ido Walker..

        Reply
        • Kym says

          08/22/2016 at 5:21 pm

          Did you ever make larger ones? I am interested in making some 11 x 10.5 x 10.5 and I’m not sure what size rectangle I need

          Reply
      • Kym says

        08/22/2016 at 5:37 pm

        What were the dimensions of your finished storage bin by adding 6 inches?

        Reply
  5. HG says

    09/17/2016 at 2:01 pm

    Thank you for the very easy tutorial. I made this box for office supplies on my desk since I use a table without a drawer.

    Reply
    • Haberdashery Fun says

      09/19/2016 at 12:11 am

      Hi – Thanks for letting me know about your project! 🙂 I would love to see images if you want to share via email or Instagram..

      Reply
      • Julie says

        09/30/2016 at 8:00 am

        Hello. I have made several of your fabric storage bins so far & I love them!! Thank you for sharing your pattern 🙂 I would like to make an extra large bin but I don’t know how much fabric I need to cut. I’ve converted the size from centimetres into inches so I would like my bin to be 16″ L x 9″ W x 8″ H. Can you tell me what size to cut my rectangle of fabric or how to calculate the size I need & also how much do I cut out of the corners please? Thank you.

        Reply
        • Haberdashery Fun says

          10/04/2016 at 12:28 pm

          Hi Julie,

          Sorry for the delay in getting back to you. We have a 6 month old baby in the house and things have been busy. Question on your bin dimensions.. Do you want a rectangular bin? Just to make sure I’m reading correctly – the dimension you have would make a rectangle [ 16″ L x 9″ W] and the bin would not be that tall [ 8″].. Pls let me know

          Marni

          Reply
  6. L.T. says

    03/24/2017 at 4:29 pm

    awesome tutorial! One question: are these washable or would that ruin the shape? Thanks in advance for your response!

    Reply
    • Haberdashery Fun says

      03/26/2017 at 4:28 pm

      Hi there. Thanks for coming by and leaving a comment. I would also love to see images of your finished project! They should be washable as they are fabric and interfacing. However, they are deloicate, so I would had wash with mild detergent. Let me know how it goes – Marni

      Reply
  7. Ammiel says

    06/08/2017 at 12:22 am

    At last a pattern I don’t have to purchase thank you so much

    Reply
    • Haberdashery Fun says

      06/14/2017 at 1:31 pm

      I’m so glad you found this tutorial! You will love this fabric bin. It’s fun and easy. Let me know how it goes and I would love to see finished images. If you share on social media, pls tag #haberdasheryfun and/or #haberdasheryfunpatterns

      Have a great day – Marni

      Reply
  8. Connie says

    01/16/2019 at 6:47 am

    Hi

    Thank’s for this great pattern. Just made my first one. Very easy to follow instructions. Will be making more as I’m addicted.

    Reply
    • Haberdashery Fun says

      07/30/2019 at 3:01 pm

      Thank you for letting me know! aren’t they fun to make?

      Reply
  9. Janet says

    11/08/2020 at 9:41 am

    Hello….I love these but always have like a bit of a brain glitch when it comes to putting things together. If I read the instructions right, do I fuse the interfacing on both pieces, the outer fabric and the lining? Or just the outer fabric? I’m a bit confused.
    Thank you so much!
    Janet

    Reply
    • Haberdashery Fun says

      11/30/2020 at 8:38 am

      Hello,

      You can do either. If you want a sturdier bin, I would suggest using interfacing on both the outside and inside. Make sure to put on the wrong side of the fabric

      Reply
« Older Comments

Trackbacks

  1. Um cestinho para a Mamis :) | Arte com Tecidos says:
    04/10/2015 at 7:37 pm

    […] É tão simples de fazer, acho que no menu ao lado vão encontrar outros tantos PAPs que ensinam a fazer esses “cestinhos” de tecido para guardar diversos tipos de trecos. Neste âqui tem fraldinhas e shampoos para o bebê, mas poderia ser, por exemplo, uma embalagem elegante e útil para o presente da Mamis que está para ser celebrada em breve…Um cestinho desse e o presentinho dentro, tipo sabonetes, um shampoo, fica legal, né? Ou qualquer outro presentinho, fica lindo demais! Você vai ver que tecidos bonitos são apresentados no tutorial. E a entretela auto colante vai na parte externa e interna, ok? No tutorial eles ensinam, mas não reparei nas fotos se estão empregando o material. Vai depender também da estrutura do tecido empregado. O PAP está AQUI […]

    Reply
  2. DIY Sewing Project that Will Save Your Money | beearchitects.com says:
    04/16/2015 at 7:52 pm

    […] from Apartment Therapy, Image credits: Lia Griffith; shelly; The Purl Bee; Make It & Love It; Haberdashery Fun; Ehow; Mollie Makes; Pretty Prudent; The 36th Ave; The Purl Bee; A Beautiful Mess; A Beautiful […]

    Reply
  3. Mother’s Day 2015: DIY Gift Ideas says:
    05/04/2015 at 12:08 pm

    […] fabric bins from Haberdashery Fun sew up in less than an hour. The tutorial has clear instructions and […]

    Reply
  4. The Creative Journey … says:
    05/18/2015 at 11:36 am

    […] https://haberdasheryfun.com/fabric/diy-reversible-fabric-storage-bin […]

    Reply
  5. Handmade ‘Baskets’ says:
    06/20/2015 at 11:22 pm

    […] used this tutorial to make two large baskets.  It’s a pretty easy to follow, step-by-step guide […]

    Reply
  6. Sew Mini Fabric Planter Bins | Haberdashery Fun says:
    06/25/2015 at 7:03 pm

    […] fabric bins on the brain? I have a bunch of tutorials you can try –  check out my reversible fabric bin OR my fabric bin with handles OR my round canvas fabric bin. If you have any questions, please […]

    Reply
  7. Fabric Storage Bins – Collected Hands Studios says:
    12/11/2015 at 4:03 pm

    […] patterns) on pinterest.  To create a box-shaped bin, I used a method similar to this tutorial: https://haberdasheryfun.com/fabric/diy-reversible-fabric-storage-bin.  My resulting bins measure 7.5″ tall and are 7″ wide by 4 inches […]

    Reply
  8. Lekker kerstcadeautje | onder de blauwe maan says:
    12/23/2015 at 5:49 am

    […] maakte een stoffen mandje met restjes stof. De handleiding vond ik bij Haberdashyfun.com. Ik maakte een eigen patroon met maten die passen bij de stofjes die ik nog over had. Voor de peter […]

    Reply
  9. 10 DIY Storage Boxes, Baskets And Containers - Simple Home DIY Ideas says:
    02/18/2016 at 9:40 am

    […] 5. This reversible fabric box could be used in the nursery – or the office, or the living room, and the list goes on.https://haberdasheryfun.com/fabric/diy… […]

    Reply
  10. DIY Sewing For Home - DIY Joy says:
    02/24/2016 at 5:55 pm

    […] haberdasheryfun […]

    Reply
  11. Awesome Crafty Sewing Projects says:
    03/09/2016 at 12:00 pm

    […] haberdasheryfun […]

    Reply
  12. 55 Sewing Projects to Make And Sell - DIY Joy says:
    04/03/2016 at 8:38 am

    […] haberdasheryfun […]

    Reply
  13. Fabric storage bin tutorial – sewing mania club says:
    06/06/2016 at 11:29 am

    […] Get tutorial Categories home decor, storage solutions […]

    Reply
  14. 70+ Awesome Sewing Projects - DIYCraftsGuru says:
    11/21/2016 at 9:54 pm

    […] haberdasheryfun […]

    Reply
  15. Cloth Basket | Crafts by Amy Elliott says:
    03/18/2017 at 10:13 am

    […] So, to get started, I used the basic basket idea from this blog post: https://haberdasheryfun.com/fabric/diy-reversible-fabric-storage-bin […]

    Reply
  16. Amazing Fabric Storage Bins - DIYCraftsGuru says:
    04/29/2017 at 8:15 am

    […] via haberdasheryfun.com […]

    Reply
  17. The Best DIY Fabric Storage Bins says:
    05/17/2017 at 8:23 am

    […] via haberdasheryfun.com […]

    Reply
  18. Sewing Projects for the Home: 50+ Ideas to Brighten Your Home – Sewing Essentials says:
    08/23/2017 at 9:53 pm

    […] Reversible Fabric Storage Bin […]

    Reply
  19. Sew A Round Canvas Fabric Bin | Haberdashery Fun says:
    10/19/2017 at 9:46 pm

    […] want to try a bin with handles and a square bottom, try this fabric bin tutorial. Here is a fun reversible fabric bin. And while we are at it, here is one with piping along the top edge. There are so many […]

    Reply
  20. Sew Extra Large Fabric Bins | Haberdashery Fun says:
    09/06/2018 at 11:08 am

    […] boxed corners will be slightly different than the original tutorial. For the Extra Large Bin measure inwards from the point 5″ and for the mini bin measure […]

    Reply
  21. 36 DIY Storage Baskets says:
    04/05/2019 at 11:53 am

    […] haberdasheryfun […]

    Reply
  22. Bath: 36 DIY Storage Baskets Guaranteed To Have You Stop Dreading Organization – ByNotio.com says:
    04/25/2019 at 1:28 pm

    […] haberdasheryfun […]

    Reply
  23. (bookhou) | DIY Fabric Basket: jezzeblog.blogspo ... | 2: haberdasheryfun.c ... | ... - Diy Fabric Basket says:
    06/24/2019 at 4:56 pm

    […] | DIY Stoffkorb: jezzeblog.blogspo … | 2: haberdasheryfun.c … | Griffe: haberdasheryfun.c […]

    Reply
  24. 10+ SEWING TUTORIALS FOR BEGINNERS - Barended says:
    06/28/2019 at 8:38 am

    […] DIY Reversible Fabric Storage Bin from Haberdashery Fun. […]

    Reply
  25. Best 27 Easy Diy Sewing Projects - Easy Diy Projects | DIY Opic -Your Favorite crafts, Diy Ideas says:
    09/26/2019 at 9:48 pm

    […] haberdasheryfun […]

    Reply
  26. 10 DIY Storage Fabric-DIY Home Decor - DIY Wiser says:
    01/02/2020 at 11:59 pm

    […] Make these to hold all your household goodies! Detail Here […]

    Reply
  27. 15 Amazing DIY Fabric Storage Bins and Organizers - DIYCraftsGuru says:
    11/16/2020 at 10:25 am

    […] Reversible Fabric Storage Bin | Tutorial: haberdasheryfun.com […]

    Reply
  28. Make Nine in 2021 – Sew, Bake, Snap says:
    01/08/2021 at 8:57 pm

    […] Smaller, rectangular storage – storage for stash bits and sewing patterns.  […]

    Reply

Leave a Reply Cancel reply

Your email address will not be published. Required fields are marked *

This site uses Akismet to reduce spam. Learn how your comment data is processed.

About me


Hi there - I'm Marni Weaver. A sewer, a sometimes quilter and a lover of fabric design. I started this blog to share my ideas. Come Join the Fun
shop now

Popular Categories

project for baby fabric projects seasonal projects fat quarter projects sewing tips and tricks inspiration

Categories

  • Applique
  • Baby
  • Bags and Pouches
  • Block Printing
  • Color
  • DIY Projects
  • Fabric
  • Fabric Design
  • Fat Quarter Projects
  • Home Decor
  • Inspiration
  • Just for Fun
  • Kids
  • No Sew
  • Patterns
  • Print On Fabric
  • Quilting
  • Scrap Fabric Projects
  • Seasonal
  • Sewing Tips & Tricks

Lovely sponsors

Recent Comments

  • HaberdasheryFun and an easy Kraft-tex sewing project | Haberdashery Fun on Collapsible Kraft-Tex Bowl
  • HaberdasheryFun and an easy Kraft-tex sewing project | Haberdashery Fun on Sewing With Kraft-Tex
  • 3 Simple Summer Sewing Tutorials | Haberdashery Fun on Sew A Canvas Zipper Pouch
  • 3 Simple Summer Sewing Tutorials | Haberdashery Fun on Sew Asymmetrical Color Block Totes Tutorial
  • 3 Simple Summer Sewing Tutorials | Haberdashery Fun on Sew A Baby Towel With A Hood

Projects Elsewhere

find me on Pellon Projects sew mama sew contributor

momtastic contributor

Pinterest

Visit Marni@Haberdashery Fun's profile on Pinterest.
Follow on Bloglovin

I'm Reading

  • Cluck Cluck Sew
  • Cooking Dangerously
  • In Color Order
  • Jen Hewitt
  • Jolly Jabber
  • Karly Spalding Photography
  • Leigh Laurel Studios
  • Lindsay Sews
  • Lotta Jansdotter
  • Love Patchwork and Quilting Magazine
  • Made
  • Making It Lovely
  • Noodle-Head
  • Polka Dot Chair
  • Sharon Holland Designs
  • Silhouette America Blog
  • Silhouette Design Store
  • The Purl Bee
  • The Purple Fig

Press:

Stitch Winter 2014

haberdashery_fun

Marni Weaver
Working on a commission and a request for the colo Working on a commission and a request for the color terracotta. I’m thinking the top right vs the bottom left. And funny enough, this fits perfectly for today’s #marchmeetthemaker prompt “decision”

#haberdasheryfun #100dayproject #marchmeetthemaker2023 #surfacepattern #terracottabowl #speedballink #textiledesigner #homedepotcolormatch #haberdasheryfunpatterns #blockprinting #blockprintedfabric #surfacepatterndesign #smallbusinesslife
Earlier today I was working on a new pattern and t Earlier today I was working on a new pattern and then realized that my table had legs. 😂 While I’m excited to share about my upcoming tote pattern release, this photo took me down memory lane. My sweet boy Arlo turns 7 this week. He is always by my side and has been my shadow since the day he was born❤️ . He is often in my studio, patiently waiting, photobombing a tutorial or playing w/ my supplies.

#haberdasheryfun #koifabric #rashidcolemanhale #rubystarsocietyfabric #haberdasheryfunpatterns #pdfpattern #marceetthemaker #marchmeetthemaker2023 #100dayproject #blockprintingmadeeasy
I love today's prompt "from idea to product" for # I love today's prompt "from idea to product" for #marchmeetthemaker. If you swipe, you can see the the original. I made that group of block print quite a few years ago and this pinwheel is a motif that I come back to all the time. 

Do you block print or make your own designs? What would you like to create with your patterns or prints? Have anything in mind?

#blockprintingmadeeasy #blockprinting #surfacepatterndesign #haberdasheryfun
#onlinecourses #chelseatakesshots #haberdasheryfunpatterns #makeshit #surfacepatterncommunity #whatsyourwhy #marchmeetthemaker2023 #100dayproject #dothe100dayproject #havefun #scandiboho.
Instagram post 18073744054322730 Instagram post 18073744054322730
Do you mix and match your handmade block prints an Do you mix and match your handmade block prints and your fabric stash?  I love this combo of champagne blush and turquoise. What would you make with it?

#haberdashery #modafabrics #gingiberfabric #modafabricsandsupplies #modafabric #meetthemaker2023 #modafabric 
#meetthemaker #100dayproject #haberdasheryfun #100dayproject2023 #blockprintingmadeeasy #blockprinting #cottoncanvas #speedballfabricink.
Follow on Instagram

Copyright © 2023 · Klar theme by Crimson Pear :: web & surface design

Copyright © 2023 · Klar on Genesis Framework · WordPress · Log in