Haberdashery Fun

  • Home
  • About
    • Look Book
  • Contact
    • Collaborate?
  • Tutorials
  • Shop
  • Workshops
    • Email
    • Facebook
    • Instagram
    • Pinterest

Keep up to date with the latest posts!

Sew An Easy Fabric Storage Bin

in DIY Projects, Fat Quarter Projects on 26/04/13

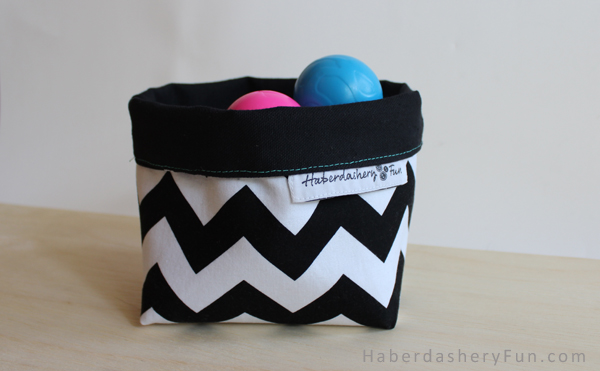
I love storage bins. This one is little and super sweet- perfect for small toys like trucks, cars, figurines and even balls [my house has a lot of balls laying around]. It would also be great in your kitchen or bathroom. Once you sew this little guy, size up the pattern and you can make storage bins for almost anything in your home.

The finished size is 5″ x 5 1/2″. You can roll the top edge down.. So make sure to use bright and colorful fabric.

This is super easy to make – 2 rectangles of fabric, a little sewing and you’re done!

Materials Needed:

  1. Fabric
  2. Fusible interfacing – Pellon SF 101 Shape-Flex
  3. Creative grids quilting ruler
  4. Clover quilt marking pen. Have you tried this pen? Try it, you will love it
  5. Sewing machine and sewing supplies
  6. Iron and ironing board

Let’s start sewing:

Step –  1

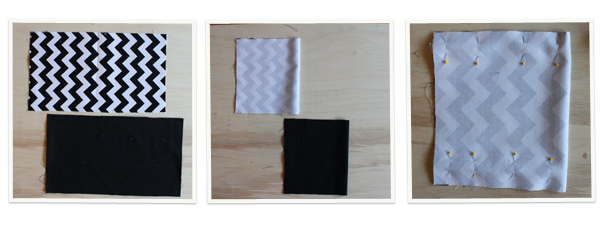
  1. Cut 2 pieces measuring 17″ x10″.  This includes your seam allowance.  I used cotton canvas fabric for both the lining and outside. I fused the cotton exterior fabric to give it more structure and have the ability to stand up on its own.
  2. Fold rectangles in half.
  3. Pin along each side and sew with a 1/4″ seam allowance.
  4. Press. Press seams while flat. Open and press again.

Step –  2

  1. Jiggle around so that your side seams are laying flat and facing upwards. You should have a point. Finger press to lay the seam flat. Using your ruler – measure 2″ up from the point.  You also want a 45 degree angle along the side.  Be as precise/finicky here as you can. These measurements help to make the bottom SQUARE.
  2. Mark a line with your pen.
  3. Pin. Repeat for the other 3 corners.  Place into sewing machine and sew along the chalk line.
  4. Press.

Step – 3

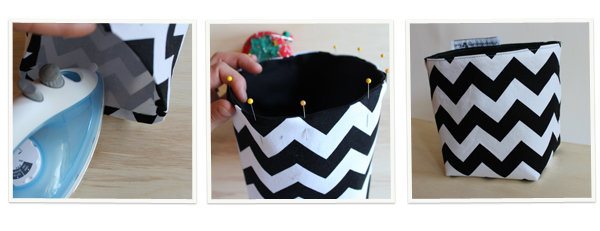
  1. Turn the top edge under 1/4″ and press. Do this for both.
  2. The outside fabric should now be right side facing out and the lining fabric should be right side facing in.  Place the lining fabric into the outside fabric.
  3. Adjust and jiggle around so the corners sit together. Press the corners.
  4. The top edges should still be turned inwards, pin along top edge. Place into your sewing machine and edgstitch. Use a fun color, even a decorative stitch. I chose to use a contrasting color – Blue!!
  5. Press your top edge seam.

That’s it – your storage bin is complete.

18 Comments

« Stay Tuned For Storage Bins
DIY.. Cotton Canvas Storage Bin »

Comments

  1. Karly Thorne says

    05/02/2013 at 11:50 am

    Just saw your other post on the cotton canvas storage bins.. Thanks! Love your blog. This one looks super easy

    Reply
  2. Penny Moring says

    10/28/2013 at 10:24 pm

    I love the “Easy Fabric Storage Bin”,, and thought I’d make one. I’m having trouble understanding the instructions, steps 1, 2 & 3, At some point won’t I have to try and get the outside fabric, facing out, on the outside?

    Any help will be appreciated,, thanks,, Penny

    Reply
    • Haberdashery Fun says

      10/29/2013 at 9:37 am

      Hi Penny, Thanks for stopping by and leaving your question. I agree, that step didn’t make sense. I revised the post a little.

      Here is a breakdown: (1) When you turn and iron the top edge, you will turn the outside fabric right side out.. So leave “facing out”. (2) The lining needs to face right side in. (3) Place the lining into the outside fabric. This basically completes the bin. (4) All you need to do now is stitch around the top edge and you are complete.

      Hope this helps? Let me know if it doesn’t 🙂

      Reply
      • Penny Moring says

        10/29/2013 at 9:47 pm

        Hi,, thank you for responding so quickly,,, I take it I fold the 1/4 seam twice,, because otherwise won’t I have a raw edge? thanks for you help,, Penny

        Reply
        • Haberdashery Fun says

          10/29/2013 at 10:27 pm

          Hi Penny, No. Turn only once. To clarify. 1) For the outside, turn and fold top edge inwards 1/4″. Press this fold with an iron. Repeat and do exactly the same for the lining. 2) Now place the lining bin into the outside bin [ outside bin has the “good” side facing outwards]. The top edge is clean [no raw edges] because we folded and enclosed both seams inside. 3) Pin around the top edge to help keep it closed when sewing. 4) Place this edge into your sewing machine and edgestitch with a 1/8″ seam allowance..

          Let me know if this makes sense :). I’d love to see finished images of your bins!
          Marni

          Reply
  3. Marsha Hicks says

    01/07/2014 at 10:10 am

    I like and will make one for my self thanks

    Reply
  4. Deborah says

    08/02/2014 at 12:58 pm

    In step 2, when you say repeat for all four corners, do you mean two corners on the inner fabric and two corners on the outer fabric, or four on each?

    Reply
    • Haberdashery Fun says

      08/03/2014 at 9:04 am

      Thanks for leaving a comment. I meant to say repeat for the other 3 corners. You square and box the 2 lining and the 2 outside/main corners.

      Reply
  5. erica says

    02/24/2015 at 12:32 am

    Thank you so much for this, it is so cute! I tried it and my lil bin is super cute. Im new to sewing and this was such an easy project for beginners. I tagged you on instagram with my finished bin.
    Thanks again 🙂

    Reply
    • Haberdashery Fun says

      02/24/2015 at 8:00 am

      Oh that’s awesome! Thanks for letting me know. I’m happy it worked out for you! I didn’t see the tag on instagram, it could be that you are private. If you want to share on my Facebook page that would be great. https://www.facebook.com/HaberdasheryFun

      Have a great day – Marni

      Reply

Trackbacks

  1. DIY.. Toy Bath Bag | Haberdashery Fun says:
    08/27/2013 at 8:31 am

    […] really easy to make. I had made a smaller version a few months ago. You can see the post here.  I made this bag a lot larger so that it could fit all the […]

    Reply
  2. DIY.. Reversible Fabric Storage Bin | Haberdashery Fun says:
    04/03/2014 at 11:27 am

    […] made smaller versions of these last year and have always wanted larger ones. I finally had a few free hours to work on the pattern and get a […]

    Reply
  3. DIY.. Fabric Bin With Handles | Haberdashery Fun says:
    06/17/2014 at 7:58 am

    […] Well, that’s it! Super easy right? Want to see other storage bin tutorials? My reversible bin was way more popular than I thought it would be. You can check it out here. A smaller version is also available here. […]

    Reply
  4. Inspiration: Stash busters projects - Stitch-N-Smile says:
    08/21/2015 at 9:05 am

    […] storage boxes – How adorable are these from Haberdashery Fun? Now I need them everywhere in the […]

    Reply
  5. Sew Extra Large Fabric Bins | Haberdashery Fun says:
    09/06/2018 at 11:08 am

    […] to the full tutorial HERE and HERE for step-by-step instructions and […]

    Reply
  6. DIY.. Toy Bath Bag - Every Thing Home says:
    02/07/2020 at 9:48 pm

    […] really easy to make. I made a smaller version a few months ago. You can see the post here.  This bath bag is a lot larger so I can fit all the […]

    Reply
  7. 20 Creative DIY Storage Bin Ideas - DIY & Crafts says:
    01/05/2022 at 6:12 am

    […] haberdasheryfun […]

    Reply
  8. How To Sew A Fabric Bin | Haberdashery Fun says:
    09/07/2023 at 6:50 pm

    […] about my first storage bin 10 years ago! Crazy right? This blog post was developed from that post. Click Here to see that original post. Times […]

    Reply

Leave a Reply Cancel reply

Your email address will not be published. Required fields are marked *

This site uses Akismet to reduce spam. Learn how your comment data is processed.

About me


Hi there - I'm Marni Weaver. A sewer, a sometimes quilter and a lover of fabric design. I started this blog to share my ideas. Come Join the Fun
shop now

Popular Categories

project for baby fabric projects seasonal projects fat quarter projects sewing tips and tricks inspiration

Categories

  • Applique
  • Baby
  • Bags and Pouches
  • Block Printing
  • Color
  • DIY Projects
  • Fabric
  • Fabric Design
  • Fat Quarter Projects
  • Home Decor
  • Inspiration
  • Just for Fun
  • Kids
  • No Sew
  • Patterns
  • Print On Fabric
  • Quilting
  • Scrap Fabric Projects
  • Seasonal
  • Sewing Tips & Tricks

Lovely sponsors

Recent Comments

  • How To Sew A Fabric Bin | Haberdashery Fun on Sew An Easy Fabric Storage Bin
  • Make The Alma Tote In Fun Colors | Haberdashery Fun on New – The Alma Tote Pattern
  • New Tote Bag Sewing Pattern Coming Soon! | Haberdashery Fun on New – The Alma Tote Pattern
  • New – The Alma Tote Pattern | Haberdashery Fun on Sew A Reversible Tote
  • Easy Little Kid Sewing Project | Haberdashery Fun on DIY.. Make Monster Inspired Face Cloths

Projects Elsewhere

find me on Pellon Projects sew mama sew contributor

momtastic contributor

Pinterest

Visit Marni@Haberdashery Fun's profile on Pinterest.

I'm Reading

  • Cluck Cluck Sew
  • Cooking Dangerously
  • In Color Order
  • Jen Hewitt
  • Jolly Jabber
  • Karly Spalding Photography
  • Leigh Laurel Studios
  • Lindsay Sews
  • Lotta Jansdotter
  • Love Patchwork and Quilting Magazine
  • Made
  • Making It Lovely
  • Noodle-Head
  • Polka Dot Chair
  • Sharon Holland Designs
  • Silhouette America Blog
  • Silhouette Design Store
  • The Purl Bee
  • The Purple Fig

Press:

Stitch Winter 2014

haberdashery_fun

Marni Weaver
Thank you to all who attended my first “Design F Thank you to all who attended my first “Design Fabric & Sew A Pouch” workshop on Sunday. You never know what may happen with a live zoom workshop. Magic always happens and I love to seeing what gets created!

FYI.. I have another workshop like this at the end of the month on Saturday Oct28 2pm-4pm( via zoom)

+Want to make something fun? 
+Want to learn to block print?
+Want to design your own fabric and sew something?

Come and join the fun! Beginners welcome. You just need sewing experience for later when you see the pouch. The link to register is in my profile.

#haberdasheryfun #haberdasheryfunprints #surfacepattern #dashpattern #blockprinting #blockprintedtextiles #blockprintedfabric #haberdasheryfunprints #fatquarterproject #pdfsewingpatterns
I gave myself a few minutes this morning to carve I gave myself a few minutes this morning to carve another 1” stamp. There is something magical about a quiet morning with a cup of coffee and an open door open that lets in the cool fall weather. 🍁 

#haberdasheryfun #haberdasheryfunpatterns #haberdasheryfunprints #blockprinting #blockprintmadeeasy #versafineclair #versafineclairinks #surfacepatterndesign
I had so much fun yesterday that I gave myself 20m I had so much fun yesterday that I gave myself 20mins today to get creative with another 1” stamp. Added yesterdays stamp in the mix. 

What do you do for self care and wellness? Do you put times into your calendar or just wing it each day? I am practicing adding time each day for a walk (or even two) and some form of relaxation.

#haberdasheryfun #haberdasheryfunpatterns #blockprintingmadeeasy #fatquarterproject #haberdasheryfunprints #blockprints #blockprintedfabric #blockprintedfabrics #surfacepatterndesign #spoonflower #spoonflowerfabric #versafineclair #versafineink
What do you do to get out of your head? I go for a What do you do to get out of your head? I go for a lot of walks, take a lot of showers (weird I know) and block print.

Today was one of those days, so I grabbed a small 1” stamp and made a quick print. It’s super simple, but I like how it turned out. 

#haberdasheryfun #blockprintingonfabric #blockprintingmadeeasy #blockprinting #fatquarterprojects #haberdasheryfunpatterns #haberdasheryfunprints #fabricdesign #surfacepatterndesign #spoonflower #badcaseofthemondays #blockprinted #versafineclair #versafineink
I often have people ask me.. what do I sew with th I often have people ask me.. what do I sew with the fabric I just block printed? 

Introducing.. the Dash Pouch. This pouch is included with my upcoming workshop called “Design fabric and sew a pouch”. 

There are 2 dates. Oct 1 and Oct 28, come join me and let’s have some fun. Link in profile has all the details.

#fatquarters #fatquarterproject #haberdasheryfun #haberdasheryfunpatterns #blockprintingonfabric #blockprintedteatowel #blockprintingmadeeasy
Follow on Instagram

Copyright © 2023 · Klar theme by Crimson Pear :: web & surface design

Copyright © 2023 · Klar on Genesis Framework · WordPress · Log in