Haberdashery Fun

  • Home
  • About
    • Look Book
  • Contact
    • Collaborate?
  • Tutorials
  • Shop
  • Freebie
    • Email
    • Facebook
    • Instagram
    • Pinterest

Keep up to date with the latest posts!

DIY.. Cotton Canvas Storage Bin

in DIY Projects, Fabric on 30/04/13

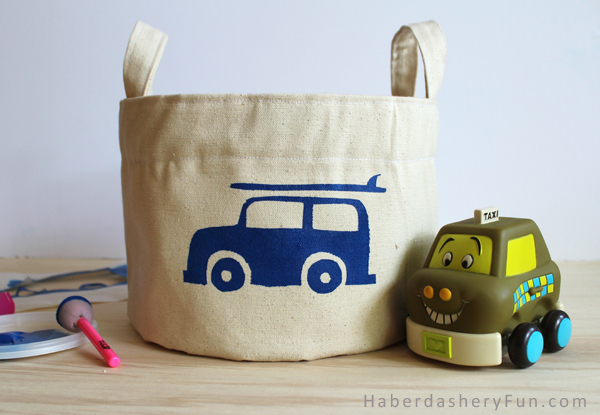
This one is super cute.

Like many of my projects, I have wanted to create a toy inspired storage bin for awhile.  I just needed the time and reason to develop it.  We had a birthday party last weekend and I had planned on sewing it to hold the gift card.  Unfortunately, I didn’t finish the project in time for the party.. So, I got to keep it.. Smile.

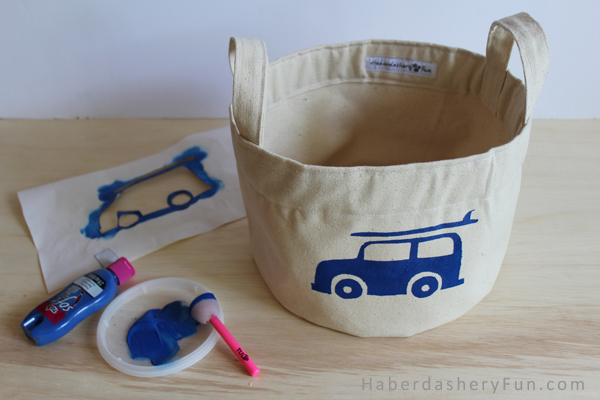
This is the perfect size for storing almost anything.  The diameter of the bottom is 9″ and the height is 7 1/2″.

Project level – medium sewing skills needed.  While this project isn’t overly hard to sew, the maneuvering of the bin through your machine can be tedious. You should also double check whether your machine can sew cotton canvas fabric before taking this project on.

Materials Needed:

  1. Cotton duck fabric/ cotton canvas
  2. Fusible interfacing – optional. This helps make the cotton duck even sturdier
  3. Webbing – optional. You can use this around the top edge instead of the interfacing
  4. Sewing machine and sewing supplies
  5. Iron and ironing board
  6. Freezer paper, fabric paint, sponges – The Tulip Brand works great

Ok. Let’s get sewing..
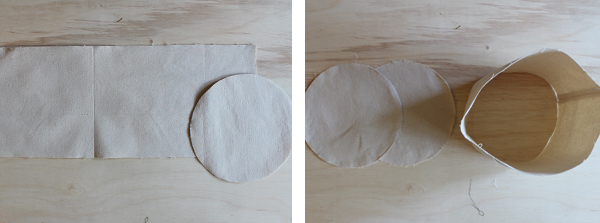
Step – 1

  1. Cut out your fabric – similar to my post on fabric wine covers, you will need 2 bottom pieces and 2 side pieces. If you plan to use interfacing, fuse all pattern pieces
  2. Sew the rectangle/side pieces together with a 1/2″ SA
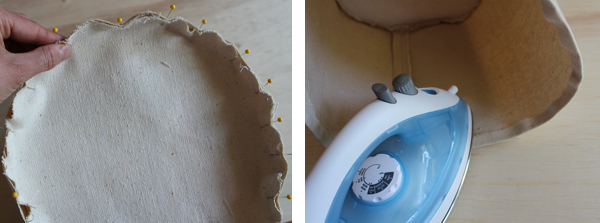
Step – 2

  1. Pin each bottom piece to each side.  Stitch together with a 1/2″ SA
  2. Turn and press down the top edge 1/2″
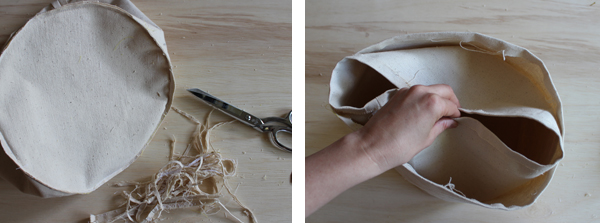
Step – 3

  1. Trim off the bottom seam allowances to around 1/4″
  2. Turn one of the bucket pieces right side out and leave the other right side in. Place the right side in bucket into the other
  3. Jiggle around until the bottom seams match up
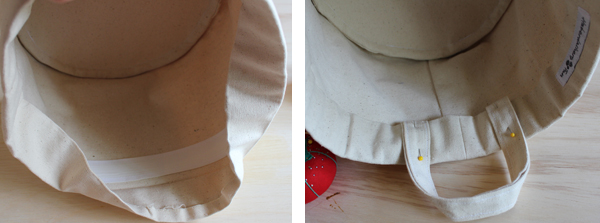
Step – 4

  1. Fold top edge down into bucket once more. Folded edge size can vary – 2″ works well
  2. Cut your webbing to size and place under the top edge – Optional
  3. Place your straps under the top edge and pin
  4. Place into your sewing machine. Edgestitch around the top, move down 2″ and stitch around the bin once more. This will hold the folded edge in place
  5. Press!

Steps for the Car – Freezer Paper Steps:

Note – I would strongly suggest doing the freezer paper steps FIRST.. Just in case you make a mistake, you won’t ruin a finished project.

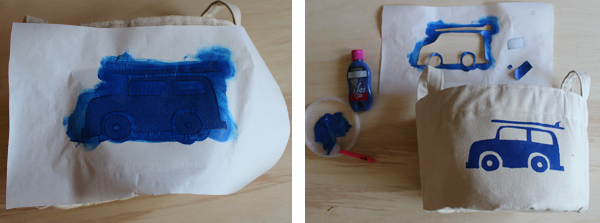
  1. For detailed steps on how to screen print with freezer paper, check out my dino tote bag post here
  2. Iron your freezer paper image down onto the fabric. Dip your sponge into the paint and brush onto your fabric. Work quickly and cover the open area evenly
  3. Do not goop the paint on the fabric. While the ink is still slightly wet, gently peel off the freezer paper

Have fun and happy sewing!

Related Posts Plugin for WordPress, Blogger...

37 Comments

« Sew An Easy Fabric Storage Bin
DIY.. Easy Strap Making Technique »

Comments

  1. Laura @ The Experimental Home says

    05/02/2013 at 11:11 am

    So cute! This really caught my eye, because that little green taxi is one of my son’s favorite toys. But I am so happy I came to look, because I wouldn’t have guessed you made the storage bin (I was figuring on a stencil tutorial). A bunch of similar ones would look so cute in a play room. Pinning!

    Reply
    • Haberdashery Fun says

      05/03/2013 at 10:29 am

      Hi – thank you so much for dropping by and the comments. I agree a row of these would be adorable.. Would work for anything – dog toys, bathroom/front door storage, etc

      Reply
  2. Karly Thorne says

    05/02/2013 at 11:48 am

    LOVE!! What are the dimensions of the top / the rectangle piece? I would like to attemp making these for my dog toys

    Reply
  3. Lisa says

    05/02/2013 at 11:55 am

    Thanks. This is great! Do you think regular cotton fabric would work?

    Reply
    • Haberdashery Fun says

      05/05/2013 at 11:53 am

      Hi – I think using cotton canvas gives this storage bin stability. You could always use a regular fabric on the outside [or printed duck fabric] and then the cotton canvas for the lining.

      Reply
  4. rob jackson says

    05/04/2013 at 10:20 am

    amazing! i love your blog….as its well thought out, and its put together very nicely

    Reply
  5. Samantha D says

    05/07/2013 at 10:34 am

    Very cute! Love the stencil!

    And…it’s not SO bad that you had to keep this one for yourself either! =)

    Sam
    http://cooksandcreates.blogspot.com/

    Reply
    • Haberdashery Fun says

      05/07/2013 at 11:25 am

      Thanks for stopping by. I agree on keeping the container, but now I have become a project hoarder..

      Reply
  6. Tori says

    05/07/2013 at 8:31 pm

    This turned out too cute! I love the stencil. Thanks for linking up to Tell Me Tuesday! I might try it this weekend!

    Reply
  7. Krista @thehappyhousie says

    05/08/2013 at 11:40 pm

    Wow!! This is way beyond my skill level but it looks absolutely incredible and I wish I could make it myself. Amazing job:)
    Krista

    Reply
    • Haberdashery Fun says

      05/09/2013 at 3:07 pm

      Hi – thanks for stopping by. It is actually quite easy to sew and make..OR you could always buy the storage bin and stencil on a design

      Reply
  8. Laraine Weavr says

    05/09/2013 at 7:00 pm

    I love the bag, useful and very creative. The truck design is so cute, eye catching, and
    perfect for little fellas. Nicely put together instructions, clear and precise.
    Laraine

    Reply
  9. Kelly says

    05/15/2013 at 8:32 am

    Absolutely LOVE this!! You rocked that storage bin… Thanks so much for partying with us last week at LLR 🙂 You’ll be featured tonight!! xo

    Reply
    • Haberdashery Fun says

      05/15/2013 at 9:02 am

      Thank you so much Kelly! I look foward to seeing the feature.

      Reply
  10. Felie says

    05/16/2013 at 10:35 pm

    How fun! I just may have to add this to my ever growing list of to dos! I love making my own items it’s not only cheaper, but more personal, not to mention great bragging rights when it’s complete!

    Reply
  11. andrea says

    06/26/2013 at 7:32 am

    Wow, this storage bin is looking very nice that you have made by your own hands, i love this diy cotton canvas storage bin making project and want to do that shortly, now i have bookmarked this project. 🙂

    Thanks for sharing..

    Reply
    • Haberdashery Fun says

      06/29/2013 at 12:07 pm

      Thank you so much for the comment! I hope you attempt to make the tote. Once you get the hang of it, they are really fun to make.

      Reply
  12. Debora Cadene says

    10/29/2013 at 7:32 pm

    Hi, I love this idea, but after reading the instructions twice, I seem to be blind as to the cut measurements/pattern. Is it here or someplace else? This would be awsome to hold the fabric alphabet letters for a toddler.

    Debbie.

    Reply
    • Haberdashery Fun says

      10/30/2013 at 12:30 pm

      Hi,Thanks for stopping by and leaving a comment.

      I didn’t provide a pattern or measurements for this one. However, you I just made a very similar Halloween fabric candy bowl that has measurements. This candy bowl is also featured on Pellon and if you check out their website, they have a downloadable PDF that has FULL instructions and also the bottom template. The candy bowl is shallow, so you need to make the rectangle taller.

      Link to my fabric candy bowl – https://haberdasheryfun.com/diy-projects/diy-halloween-candy-bowl

      Link to Pellon Projects Designer – http://www.pellonprojects.com/projects/halloween-candy-bowl/

      Please let me know if you have any more questions. I’d love to see images of your project. Thanks!

      Reply
  13. Kelley says

    04/21/2014 at 4:51 pm

    Beautiful work. Love your stencil (clean lines), and the tote is great. Thanks for sharing.

    Reply
  14. divya sharma says

    03/08/2017 at 4:29 am

    My DAUGHTER love this and I made 4 for her. She is very happy now. Thanks for sharing this blog.

    Reply
  15. Susan Lee says

    05/16/2017 at 11:28 am

    I’m going to make these for our play room! We have a ton of little toys lying around and these would be PERFECT. I found a website with affordable canvas options https://www.canvasetc.com/product-category/cotton-duck-canvas-fabric/ and it looks like they have 10% off at checkout!

    Reply
    • Haberdashery Fun says

      05/16/2017 at 7:36 pm

      HI Susan,

      Thats awesome. Thanks for stoping by. I made this a few years ago and it is STILL in use holding all my son’s little toys that I find laying around. Let me know how it goes and if you have any questions. I would love to see pictures of the finished bins- Marni

      Reply

Trackbacks

  1. DIY.. Easy Strap Making Technique | Haberdashery Fun says:
    05/02/2013 at 8:13 am

    […] straps fun again, if it was ever really fun.  I used this method while sewing my last post on the cotton canvas storage bins  and the straps were a […]

    Reply
  2. {Reader Tutorial} Cotton Canvas Storage Bin | And Sew We Craft says:
    05/05/2013 at 4:31 am

    […] This cute tutorial is from Haberdashery Fun! […]

    Reply
  3. Bloom Designs says:
    05/15/2013 at 11:22 pm

    […] DIY Cotton Canvas Storage Bins by Haberdashery Fun […]

    Reply
  4. DIY Love | live laugh linky #61 - live. laugh. rowe says:
    05/16/2013 at 12:21 am

    […] Home Base five:: DIY Barstool Desk @ Liz Marie Blog six:: DIY Poppy Tea Pot @ La Gang a Nat seven:: DIY Cotton Canvas Storage Bin @ Haberdashery Fun eight:: Ballard Inspired Seagrass Vases @ Decorated […]

    Reply
  5. DIY.. Party Plate Storage Tote | Haberdashery Fun says:
    06/25/2013 at 12:25 pm

    […] I made a version of this storage bin before, but a few readers commented that it looked hard to make. So I revamped the sewing steps and made it MUCH easier.  you can  see the original post here.  […]

    Reply
  6. 30 Awesome DIY Storage Furniture says:
    08/18/2013 at 4:40 am

    […] cotton canvas storage bin (via haberdasheryfun) […]

    Reply
  7. Design Your House With This Cute Storage Bin says:
    07/29/2014 at 7:09 am

    […]  Haber Dashery Fun  […]

    Reply
  8. Top 3 Fabric Storage Bin Tutorials | Haberdashery Fun says:
    08/19/2014 at 3:52 pm

    […] Cotton Canvas Storage Bin […]

    Reply
  9. Sew Mini Fabric Planter Bins | Haberdashery Fun says:
    06/26/2015 at 12:26 am

    […] you can try –  check out my reversible fabric bin OR my fabric bin with handles OR my round canvas fabric bin. If you have any questions, please let me know. I love hearing about it […]

    Reply
  10. 15 Awesome DIY Storage Bins for You to Make | Interior Design Blogs says:
    07/19/2015 at 5:53 am

    […] 9. A DIY Cotton Canvas Bin with Screen Print Done through Freezer Paper Image via: haberdasheryfun […]

    Reply
  11. Amazing Interior Design 15 Awesome DIY Storage Bins for You to Make says:
    07/26/2015 at 12:12 am

    […] 9. A DIY Cotton Canvas Bin with Screen Print Done through Freezer Paper Image via: haberdasheryfun […]

    Reply
  12. Build Your Own Toy Storage – June T Ramsey says:
    06/25/2016 at 4:30 am

    […] would be great for toys in our toy closet ana white build a brook laundry make your own puzzle. Diy.. How to make a cotton canvas storage bin. Make this fun cotton canvas storage i have wanted to create a toy inspired storage this storage. […]

    Reply
  13. Build Your Own Toy Storage – Hans F Ramsey says:
    06/25/2016 at 4:39 am

    […] Build your own giant lego toybox! Free step by step plans! Crates, storage, toys, other projects. Diy.. How to make a cotton canvas storage bin. Make this fun cotton canvas storage bin. This storage bin is looking very nice that you have made […]

    Reply
  14. Sew Heart Shaped Baby Burp Cloths | Haberdashery Fun says:
    07/21/2016 at 5:53 pm

    […] Canvas toy bins […]

    Reply

Leave a Reply Cancel reply

Your email address will not be published. Required fields are marked *

This site uses Akismet to reduce spam. Learn how your comment data is processed.

About me


Hi there - I'm Marni Weaver. A sewer, a sometimes quilter and a lover of fabric design. I started this blog to share my ideas. Come Join the Fun
shop now

Popular Categories

project for baby fabric projects seasonal projects fat quarter projects sewing tips and tricks inspiration

Categories

  • Applique
  • Baby
  • Bags and Pouches
  • Block Printing
  • Color
  • DIY Projects
  • Fabric
  • Fabric Design
  • Fat Quarter Projects
  • Home Decor
  • Inspiration
  • Just for Fun
  • Kids
  • No Sew
  • Patterns
  • Print On Fabric
  • Quilting
  • Scrap Fabric Projects
  • Seasonal
  • Sewing Tips & Tricks

Lovely sponsors

Recent Comments

  • Make A Simple Block Print Tote Bag | Haberdashery Fun on DIY.. Colorful Dish Towel Tote Bags
  • Make A Simple Block Print Tote Bag | Haberdashery Fun on Sew Asymmetrical Color Block Totes Tutorial
  • Make A Block Printed ToteBag | Haberdashery Fun on Sew A Reversible Tote
  • Make A Block Printed ToteBag | Haberdashery Fun on Quick Tip.. Sewing Boxed Corners
  • 20 Creative DIY Storage Bin Ideas - DIY & Crafts on Sew An Easy Fabric Storage Bin

Projects Elsewhere

find me on Pellon Projects sew mama sew contributor

momtastic contributor

Pinterest

Visit Marni@Haberdashery Fun's profile on Pinterest.
Follow on Bloglovin

I'm Reading

  • Cluck Cluck Sew
  • Cooking Dangerously
  • In Color Order
  • Jen Hewitt
  • Jolly Jabber
  • Karly Spalding Photography
  • Leigh Laurel Studios
  • Lindsay Sews
  • Lotta Jansdotter
  • Love Patchwork and Quilting Magazine
  • Made
  • Making It Lovely
  • Noodle-Head
  • Polka Dot Chair
  • Sharon Holland Designs
  • Silhouette America Blog
  • Silhouette Design Store
  • The Purl Bee
  • The Purple Fig

Press:

Stitch Winter 2014

haberdashery_fun

Marni Weaver
I have a drawer where I keep all of my block print I have a drawer where I keep all of my block printed papers and have often wondered.. “What the heck do I do with all of these”.

How about you?

I recently found a bunch of  tutorials over at @modpodgerocks and thought it would be fun to make wood coasters with my block prints. They turned out better than expected and so I thought to share with you.

Want more info? I created a blog post. See the link in my profile for the blog post and details. 

Day27/100 #100dayproject #dothehundreddayproject #100daysofsimpleshapes #haberdasheryfun #blockprintingmadesimple #onlineclasses #zoomworkshops #haberdasheryfunpatterns #haberdasheryfunclasses #handmadestamp #modpodge #modpodgecrafts #decoupageart #decoupagelovers #blockprintedbyhand
I’m sharing about how to frame your block printe I’m sharing about how to frame your block printed fabric on my blog today. Day 26/100 #100dayproject 

If you have ever thought you would like to learn how to block print… I have a course for you. It is called Block Printing Made Easy. It is all about the basics - working with simple shapes, design prompts and getting creative on paper and fabric.

This is an online course and starts on Monday, May 30. There are 3 modules with videos and also included in the course are 3 live zoom workshops. The videos are self paced, so the good news is you can cruise through them or take all the time you need.

The course is $97 USD.

See the link in my profile for additional details on the course( breakdown on each module) and to also access to my blog post.

#dothe100dayproject #haberdasheryfun 
#blockprintingmadeeasy #100daysofsimpleshapes #zoomclasses #haberdasheryfunpatterns #speedballfabricink #handmadefabrics #dothe100dayproject2022 #100dayproject2022 #handmadestamps #blockprintedfabric #ikeahacks #ikeaframes
Goodbye triangles, hello circles. I’m working Goodbye triangles, hello circles. 

I’m working on a project, so I printed a bunch of small fabric squares with my new circle stamp. Such a simple yet effective stamp.

I am launching an online course called “Block Printing Made Easy? Want to learn to block print? The course starts in two weeks (5/30). Want more info? See the link in my profile to join the waitlist and also to view the course details. 

Day 25/100 #100dayproject 

#dothe100dayproject #dothe100dayproject2022 #haberdasheryfun #haberdasheryfunpatterns #pdfpattern #blockprinting #blockprintingonfabric #blockprintingmadeeasy #blockprintingworkshop #speedballfabricink #konacottonsolids #speedballart
I’ve got one more triangle print to share and I I’ve got one more triangle print to share and I think that’s a wrap. Simple and easy. The pin cushion on that right that was gifted to me from my grandmother Mor Mor really takes the stage in my opinion 

The circle shape is next. I’m excited to work with no corners and see what will unfold.

Day 24/100
#haberdashery #100dayproject 
#100daysofsimpleshapes #blockprintingmadeeasy #dothe100dayproject #dothe100dayproject2022 
#haberdasheryfun #ikeahacks #konacotton #konacottonsolids 
#speedballfabricink #blockprinting #easyblockprint #haberdasheryfunpatterns #haberdasheryfunclasses
A mash up of triangle stamps I created so far duri A mash up of triangle stamps I created so far during the #100dayproject.
 
Who knew the triangle shape could be so much fun? I have had a blast the last playing around with it - both dissecting the shape and putting it back together. 

Which one is your favorite?

I can’t believe I am saying this, but Im ready to move on to a new shape. One that is more soft and organic. Next up, the circle!
Day 23/100

#100daysofsimpleshapes 
#haberdashery 
#blockprinting 
#blockprintingonfabric 
#blockprintingmadeeasy 
#haberdasheryfun
#speedballfabricink #speedballink #fatquarters 
#handmade #dothe100dayproject2022 
#100dayproject2022
Follow on Instagram

Copyright © 2022 · Klar theme by Crimson Pear :: web & surface design

Copyright © 2022 · Klar on Genesis Framework · WordPress · Log in