Haberdashery Fun

  • Home
  • About
    • Look Book
  • Contact
    • Collaborate?
  • Tutorials
  • Shop
  • Freebie
    • Email
    • Facebook
    • Instagram
    • Pinterest

Keep up to date with the latest posts!

DIY.. Easy Strap Making Technique

in Sewing Tips & Tricks on 02/05/13

When it comes to the end of a handbag or sewing project, do you hate making the straps?  For some reason I hate it.   It makes me crazy – attaching the safety pin and pulling the strap through itself.. only to have the safety pin come undone.  And then you have to repeat the steps all over again..

I just learned a SUPER easy technique that makes sewing straps fun again, if it was ever really fun.  I used this method while sewing my last post on the cotton canvas storage bins  and the straps were a breeze.

Sewing straps as easy as 1-2-3..

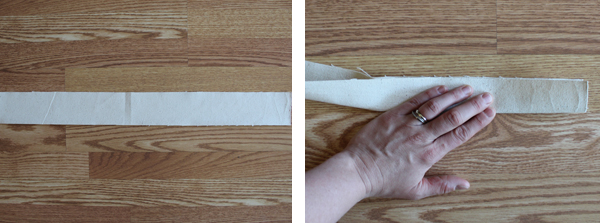
1. Cut your fabric into the desired size.  Leave more than enough for the length.  I like to play around with my straps and you can cut the straps down to size at the end

2. Fold in half and press

3. Turn a 1/4″ edge towards the center seam and fold.  Do this for each side
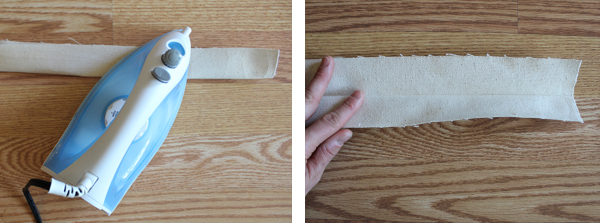
4. Press each edge

5. Fold again along the first fold. Press closed.. You are almost finished with your straps!

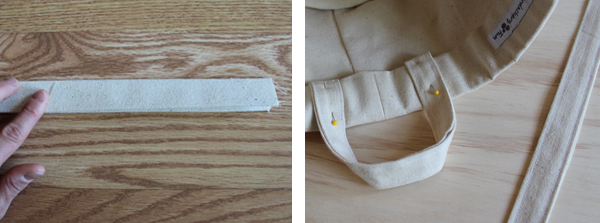
6. Place into your sewing machine and edgestitch along each side.. that’s it – strap complete!

Happy Sewing!

Related Posts Plugin for WordPress, Blogger...

6 Comments

« DIY.. Cotton Canvas Storage Bin
Product Review.. Little Monsters Pillow »

Comments

  1. Karly Thorne says

    05/02/2013 at 11:51 am

    I’m going to make the cotton canvas storage bin.. so thanks for this tutorial. Super easy

    Reply

Trackbacks

  1. DIY.. Party Plate Storage Tote | Haberdashery Fun says:
    06/25/2013 at 12:29 pm

    […] Cut and sew your straps. I have a GREAT strap making tutorial.. To see the easy steps, check it out here […]

    Reply
  2. DIY.. Thank-You Wine Tote | Haberdashery Fun says:
    07/29/2013 at 11:59 am

    […] your straps. I have an awesome strap making tutorial here.  After you have pressed the straps, place into your sewing machine and edgestitch both sides. Your […]

    Reply
  3. DIY.. Toy Bath Bag | Haberdashery Fun says:
    08/27/2013 at 8:53 am

    […] Twist the bottom of the bag.  Jiggle it around so that your side seams are laying flat and facing upwards. You should have a point.  Using your creative grids ruler – measure 3″ down from the point and draw a line.  You also want a 45 degree angle along the side. Be as precise/finicky as you can. Place into your sewing machine and stitch along the line. While you sew this line, also sew your straps. I have an awesome strap tutorial and you can see it here […]

    Reply
  4. DIY.. Straps, Straps and Straps | Haberdashery Fun says:
    08/30/2013 at 10:24 am

    […] showed the sewing steps for the bag.  To finish the straps, I sent everyone over to a strap tutorial I posted a few months ago.  I had the images from when I was making the bag, so I thought why […]

    Reply
  5. DIY.. Make A Daycare Mesh Pouch | Haberdashery Fun says:
    10/29/2013 at 11:10 pm

    […] your straps. I have an awesome strap making tutorial here.  Once you have completed the straps, insert your D Ring end and the clip end into the side seam […]

    Reply

Leave a Reply Cancel reply

Your email address will not be published. Required fields are marked *

This site uses Akismet to reduce spam. Learn how your comment data is processed.

About me


Hi there - I'm Marni Weaver. A sewer, a sometimes quilter and a lover of fabric design. I started this blog to share my ideas. Come Join the Fun
shop now

Popular Categories

project for baby fabric projects seasonal projects fat quarter projects sewing tips and tricks inspiration

Categories

  • Applique
  • Baby
  • Bags and Pouches
  • Block Printing
  • Color
  • DIY Projects
  • Fabric
  • Fabric Design
  • Fat Quarter Projects
  • Home Decor
  • Inspiration
  • Just for Fun
  • Kids
  • No Sew
  • Patterns
  • Print On Fabric
  • Quilting
  • Scrap Fabric Projects
  • Seasonal
  • Sewing Tips & Tricks

Lovely sponsors

Recent Comments

  • Make A Simple Block Print Tote Bag | Haberdashery Fun on DIY.. Colorful Dish Towel Tote Bags
  • Make A Simple Block Print Tote Bag | Haberdashery Fun on Sew Asymmetrical Color Block Totes Tutorial
  • Make A Block Printed ToteBag | Haberdashery Fun on Sew A Reversible Tote
  • Make A Block Printed ToteBag | Haberdashery Fun on Quick Tip.. Sewing Boxed Corners
  • 20 Creative DIY Storage Bin Ideas - DIY & Crafts on Sew An Easy Fabric Storage Bin

Projects Elsewhere

find me on Pellon Projects sew mama sew contributor

momtastic contributor

Pinterest

Visit Marni@Haberdashery Fun's profile on Pinterest.
Follow on Bloglovin

I'm Reading

  • Cluck Cluck Sew
  • Cooking Dangerously
  • In Color Order
  • Jen Hewitt
  • Jolly Jabber
  • Karly Spalding Photography
  • Leigh Laurel Studios
  • Lindsay Sews
  • Lotta Jansdotter
  • Love Patchwork and Quilting Magazine
  • Made
  • Making It Lovely
  • Noodle-Head
  • Polka Dot Chair
  • Sharon Holland Designs
  • Silhouette America Blog
  • Silhouette Design Store
  • The Purl Bee
  • The Purple Fig

Press:

Stitch Winter 2014

haberdashery_fun

Marni Weaver
I have a drawer where I keep all of my block print I have a drawer where I keep all of my block printed papers and have often wondered.. “What the heck do I do with all of these”.

How about you?

I recently found a bunch of  tutorials over at @modpodgerocks and thought it would be fun to make wood coasters with my block prints. They turned out better than expected and so I thought to share with you.

Want more info? I created a blog post. See the link in my profile for the blog post and details. 

Day27/100 #100dayproject #dothehundreddayproject #100daysofsimpleshapes #haberdasheryfun #blockprintingmadesimple #onlineclasses #zoomworkshops #haberdasheryfunpatterns #haberdasheryfunclasses #handmadestamp #modpodge #modpodgecrafts #decoupageart #decoupagelovers #blockprintedbyhand
I’m sharing about how to frame your block printe I’m sharing about how to frame your block printed fabric on my blog today. Day 26/100 #100dayproject 

If you have ever thought you would like to learn how to block print… I have a course for you. It is called Block Printing Made Easy. It is all about the basics - working with simple shapes, design prompts and getting creative on paper and fabric.

This is an online course and starts on Monday, May 30. There are 3 modules with videos and also included in the course are 3 live zoom workshops. The videos are self paced, so the good news is you can cruise through them or take all the time you need.

The course is $97 USD.

See the link in my profile for additional details on the course( breakdown on each module) and to also access to my blog post.

#dothe100dayproject #haberdasheryfun 
#blockprintingmadeeasy #100daysofsimpleshapes #zoomclasses #haberdasheryfunpatterns #speedballfabricink #handmadefabrics #dothe100dayproject2022 #100dayproject2022 #handmadestamps #blockprintedfabric #ikeahacks #ikeaframes
Goodbye triangles, hello circles. I’m working Goodbye triangles, hello circles. 

I’m working on a project, so I printed a bunch of small fabric squares with my new circle stamp. Such a simple yet effective stamp.

I am launching an online course called “Block Printing Made Easy? Want to learn to block print? The course starts in two weeks (5/30). Want more info? See the link in my profile to join the waitlist and also to view the course details. 

Day 25/100 #100dayproject 

#dothe100dayproject #dothe100dayproject2022 #haberdasheryfun #haberdasheryfunpatterns #pdfpattern #blockprinting #blockprintingonfabric #blockprintingmadeeasy #blockprintingworkshop #speedballfabricink #konacottonsolids #speedballart
I’ve got one more triangle print to share and I I’ve got one more triangle print to share and I think that’s a wrap. Simple and easy. The pin cushion on that right that was gifted to me from my grandmother Mor Mor really takes the stage in my opinion 

The circle shape is next. I’m excited to work with no corners and see what will unfold.

Day 24/100
#haberdashery #100dayproject 
#100daysofsimpleshapes #blockprintingmadeeasy #dothe100dayproject #dothe100dayproject2022 
#haberdasheryfun #ikeahacks #konacotton #konacottonsolids 
#speedballfabricink #blockprinting #easyblockprint #haberdasheryfunpatterns #haberdasheryfunclasses
A mash up of triangle stamps I created so far duri A mash up of triangle stamps I created so far during the #100dayproject.
 
Who knew the triangle shape could be so much fun? I have had a blast the last playing around with it - both dissecting the shape and putting it back together. 

Which one is your favorite?

I can’t believe I am saying this, but Im ready to move on to a new shape. One that is more soft and organic. Next up, the circle!
Day 23/100

#100daysofsimpleshapes 
#haberdashery 
#blockprinting 
#blockprintingonfabric 
#blockprintingmadeeasy 
#haberdasheryfun
#speedballfabricink #speedballink #fatquarters 
#handmade #dothe100dayproject2022 
#100dayproject2022
Follow on Instagram

Copyright © 2022 · Klar theme by Crimson Pear :: web & surface design

Copyright © 2022 · Klar on Genesis Framework · WordPress · Log in