Haberdashery Fun

  • Home
  • About
    • Look Book
  • Contact
    • Collaborate?
  • Tutorials
  • Shop
    • Email
    • Facebook
    • Instagram
    • Pinterest

Keep up to date with the latest posts!

DIY.. A – Frame Organizer

in DIY Projects, Fabric on 11/09/14

September is National Sewing Month.  Today I’m hanging with Jo-Ann Fabrics, Pellon and #SewYourStyle..

Sew An A Frame Fabric Organizer HaberdasheryFun

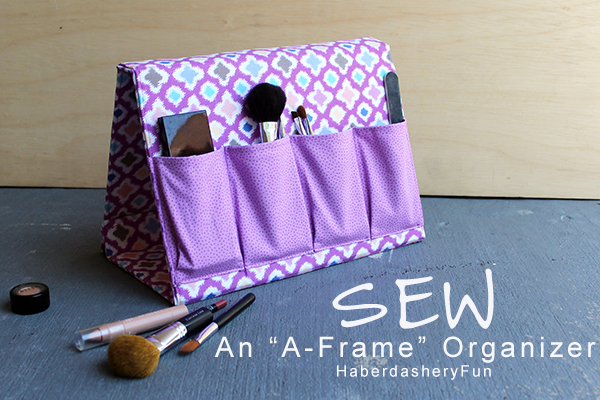
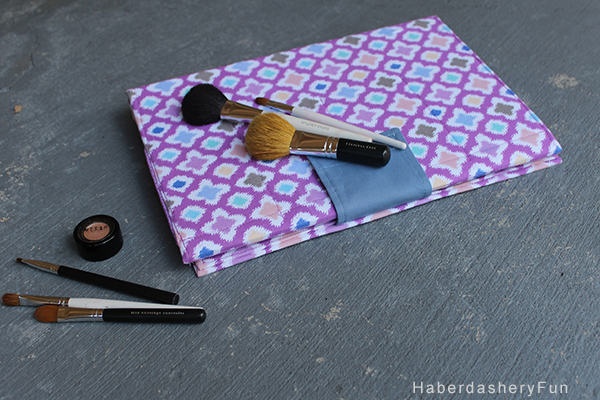
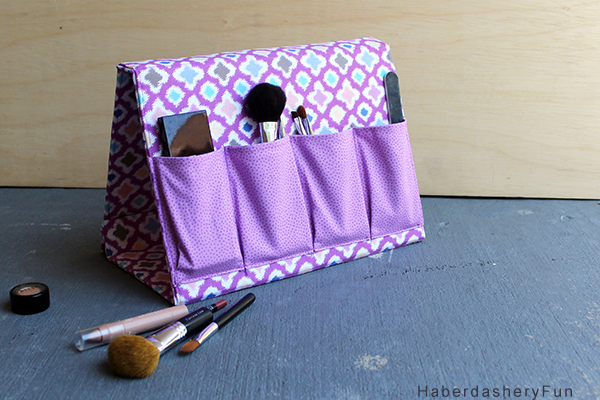
I’m happy to be sharing my A-Frame Organizer. I made one a few months ago and have been itching to sew another and share the tutorial. It’s like a fabric binder, but folds into an “A” shaped frame and has 4 pockets. Perfect for storing your make-up, brushes, pens, pencils, markers and even your sewing tools..  Oh how the list goes on.

So #SewYourWhat.. ? This is an amazing contest put on by Jo-Ann Fabrics and is sponsored by Pellon, my favorite “Magic in the Middle people”.

The contest is all month long.  All you have to do is sew something non-quilted, non-traditional and out of quilting fabric. Then upload a photo of your project to the contest page. You could win a bunch of cool stuff.  It’s that easy.

Gift giving season is coming up. Have a special someone in college? Why not make this for their dorm room?  Sew it in their favorite colors.

Materials needed:

  1. Fabric – 1/2 yard each – 2 colors
  2. Scrap fabric – 2 colors
  3. 1 yard Pellon  Peltex 71F – Single Sided Fusible Ultra Firm Stabilizer
  4. Velcro –  Soft & Flexible Sew-On Fasteners or Sticky Back for Fabrics – 1 box
  5. Fabric glue
  6. Wonder Clips – Have you tried these from the Clover brand?
  7. Disappearing fabric ink pen
  8. Rotary cutter, quilting ruler and cutting mat
  9. Sewing supplies
  10. Sewing machine
  11. Iron and ironing board

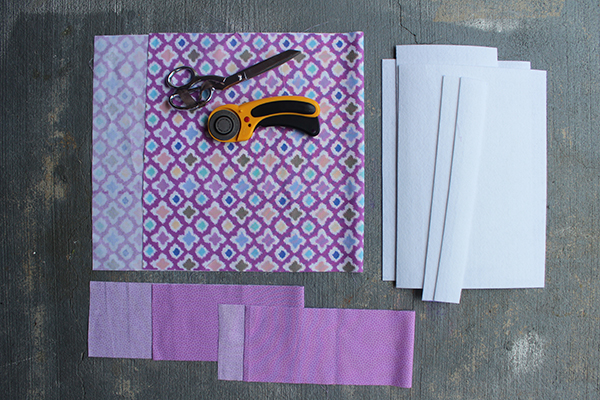
Before we get started you will need to cut the following pieces:

  1. Pellon Peltex 71F  –  Cut 4 rectangles measuring 13″L x 9″W [ side], cut 2 rectangles measuring 13″L x 1 1/4″W [ top], cut 2 rectangles measuring 13″L x 6″W [base], Cut 2 rectangles measuring 13″L x 1 1/2″W [bottom flap]. Note: Depending on how sturdy you want your A-Frame, you may also want to cut and fuse 1 more set of rectangles out of Pellon Deco Fuse. Iron on below each piece of the Pellon Peltex 71F.
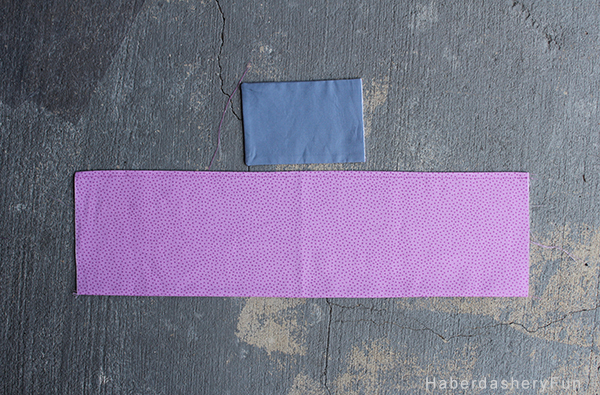
  2. Fabric 1 – Main and lining – Cut 2 rectangles measuring 29″L x 14″W
  3. Fabric 2 – Pocket – Cut 2 rectangles measuring 18″ L x 5 1/2″W
  4. Fabric 3 – Front tab – Cut 2 rectangles measuring 5 1/2″L x 4″ W
  5. Velcro – Cut 1 strip 13″ long, cut 1 strip 3″ long

Let’s get sewing:

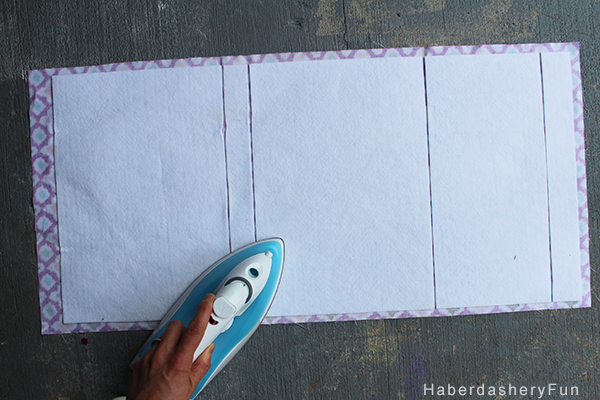
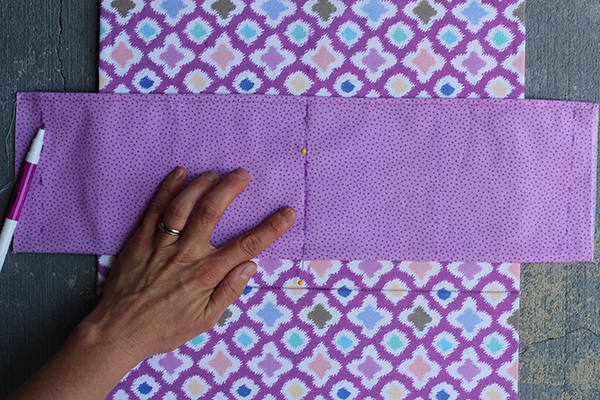
Lay the Pellon Peltex pieces on the backside of the main fabric.  The fusible side should be facing the backside of the fabric.  There should be a 1/2″ seam allowance around the outside of the Pellon Peltex pieces. There should be a scant 1/8″ between the interior pieces of Pellon Peltex. Lay the Pellon Peltex pieces in the following order: bottom flap, base, side, top, side. Repeat and iron the Pellon Peltex pieces to the backside of the lining fabric.

Turn and fold the edges towards the back of the fabric and Pellon. Use fabric glue to hold the seam allowances in place. Repeat for the lining fabric.

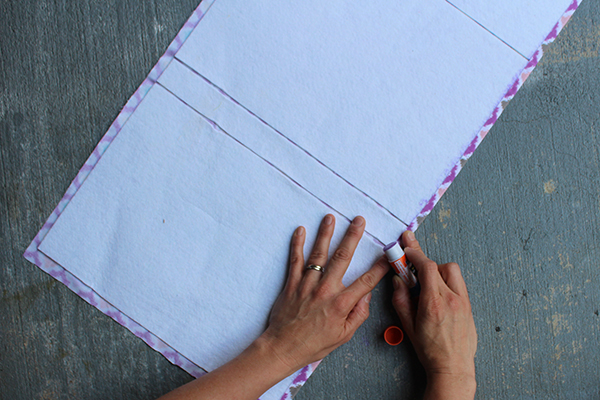
Place the main and lining together, wrong sides facing. Use Wonder Clips to hold the edges in place. Find the 1/8″ gap between the Pellon pieces and mark a line with the disappearing fabric ink pen. Place into sewing machine and stitch the main and lining pieces together. Repeat and stitch together at each 1/8″ gap. Do not sew the perimeter together just yet.

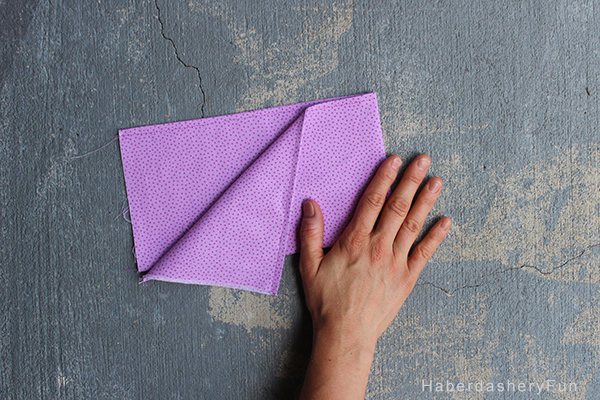
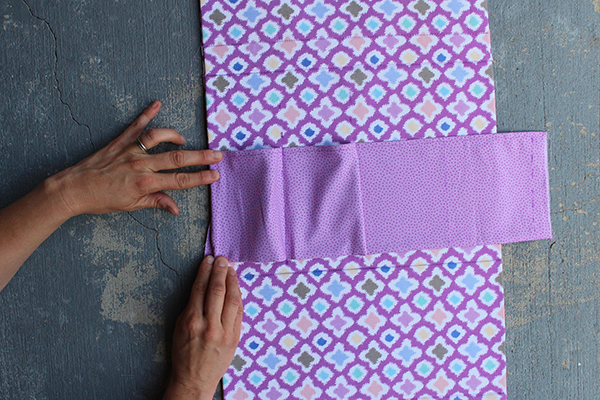
Place the 2 rectangles for the pocket pieces right sides together. Pin along the ling edge. Place into your sewing machine and sew together with a 1/2″ seam allowance. Press the seams. Pull through itself and press seams again. Repeat  and sew the front tab together. Press. Topstitch along the edges.

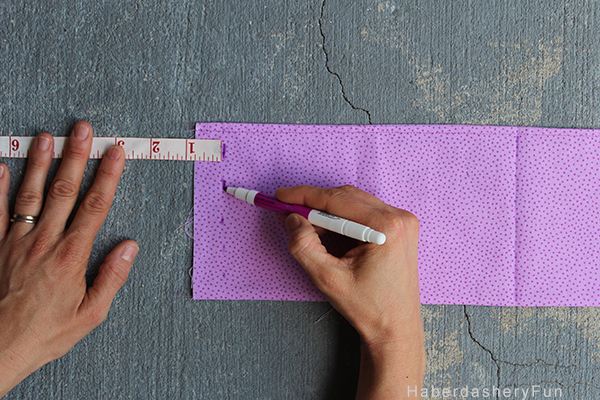
Fold the pocket piece in half. Mark a dashed line at the top and bottom with the disappearing fabric pen.  Measure inwards 3/4″ from each side seam and mark again with a disappearing fabric ink pen. Fin the middle of each side and mark with the disappearing fabric in pen.

Lay the organizer on your work space, lining side facing up. Bottom flap is at the bottom.  Measure upwards  1″ from the side piece nearest the bottom flap. Place the pocket down. Center and Pin.  Stitch in place along the dashed line. Now find the mid way point between the center and the side seam. Mark with the pen and pin the pocket in place. Stitch in place along the dashed line.

Insert the pocket side seams between the organizer main and  lining pieces. Stop at the 3/4″ mark. Pin in place. Stitch down just along the pocket side. Repeat for the other side of the organizer.

Create inverted pleats at each stitch line. Roll and turn under the excess fabric. Pin in place at the stitched line. Repeat along the pocket. Place into your sewing machine and stitch along the bottom edge. Press.

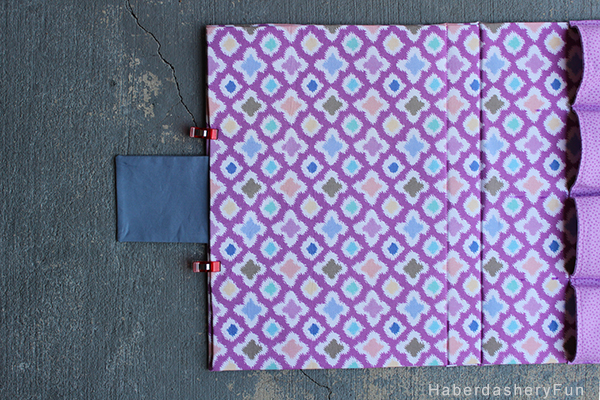
Insert the flap between the organizer main and  lining pieces. Hold in place with the Wonder Clips. Place into sewing machine and stitch around the perimeter of the organizer.

Open velcro strips. Place the loop side of the 13″ strip on the bottom flap lining side. Stitch down. Place the hook side of the 13″ strip front side of the organizer. Stitch in place. open the 3″ Strip. Place the loop side of the 3″ strip on the flap and match placement for the hook side on the outside of the organizer. Stitch in place.

That’s it. Happy Sewing. Remember to head on over to the contest and upload your project.

Want more daily HaberdasheryFun? Come find me here on social media:

Twitter

Instagram

Pinterest

Facebook

51 Comments

« DIY.. Quilted Color Pop Zipper Pouch
Around The World Blog Hop »

Comments

  1. Ann says

    09/11/2014 at 10:18 am

    So cool! And how did you know that organizing my toiletry cupboard is my current A1 priority?

    Reply
    • Haberdashery Fun says

      09/11/2014 at 10:21 am

      Ha Ha.. isn’t that the truth? You should see my drawers 🙂

      Reply
  2. Anne Weaver says

    09/12/2014 at 10:36 am

    Brilliant!! I need to make some of these!!! I’ve got a Craft Gossip post scheduled for later this morning that links to your tutorial:
    http://sewing.craftgossip.com/tutorial-fold-up-a-frame-organizer/2014/09/12/
    –Anne

    Reply
  3. AJ says

    09/12/2014 at 6:23 pm

    Love the organizer and especially the fabrics you picked! Gonna have to pin this to make down the road. =D

    As an aside: I checked that URL for the Joann/Pellon contest and there’s nothing there? Do you know if it’s the wrong URL?

    Reply
    • Haberdashery Fun says

      09/13/2014 at 9:23 am

      Let me look into this and get back to you.

      Reply
    • Haberdashery Fun says

      09/14/2014 at 1:56 pm

      Hi Again. I checked the URL and it takes you to a Facebook page. You upload your project image there. Good luck 🙂

      Reply
  4. Cheryl@ Sew Can Do says

    09/22/2014 at 2:35 pm

    Really useful idea and great that it folds flat when needed. Thanks for linking to the Craftastic Monday party at Sew Can Do!

    Reply
    • Haberdashery Fun says

      09/22/2014 at 2:59 pm

      Thank you Cheryl!

      Reply
  5. Ren says

    09/23/2014 at 9:10 am

    This is brilliant! Love it.

    Reply
  6. Ashley says

    09/26/2014 at 5:41 pm

    Hey thank you for putting this up. So creative and such a great idea!! love it. Glad to have found this from the Serenity Now Linkup today

    Reply
    • Haberdashery Fun says

      09/26/2014 at 9:22 pm

      Hi – thanks you so much for the comment. It was a lot of fun to make 🙂

      Reply
  7. Emily says

    09/27/2014 at 8:01 am

    I want one of these!! I haven’t tried that Pellon stabilizer before, looks amazing! Thanks for sharing at the Create Link Inspire party. You are being featured at Nap-Time Creations this weekend and I’ve spread your project around my social media… Hop on over and check it out. Happy Weekend! Emily

    Reply
    • Haberdashery Fun says

      09/29/2014 at 12:57 pm

      Thanks Emily!Give the Pellon stabilizer a try.. it is a lot of fun. I’ve made collapsible bowls as well with it.

      Reply
  8. Javeriya says

    09/27/2014 at 9:21 am

    This is AWESOME! Pinning it up, I HAVE to make one.

    Reply
    • Haberdashery Fun says

      09/29/2014 at 12:58 pm

      Thank you so much! Have a great week.

      Reply
  9. Toni Horsley says

    11/28/2014 at 10:57 am

    Just great, going to make a couple. Many thanks for your creative ideas

    Reply
  10. Demetria says

    08/28/2015 at 12:33 pm

    I want to make one of these. I do have a question though. When it comes to the first part of sewing I’m confused on where exactly you are talking about to sew. It’s after you mark for the 1/8″ gap. Then you said “Place into sewing machine and stitch the main and lining pieces together. Repeat and stitch together at each 1/8″ gap. Do not sew the perimeter together just yet.” I understand sewing down the 1/8″ gap lines but where exactly before that if Im not supposed to do the perimeter? Help,Please!?!

    Reply
    • Haberdashery Fun says

      09/02/2015 at 1:50 pm

      HI Demetria – I’m sorry for the delay in responding. I’ve been out of the country with limited access to the internet. Let me look into your question and get right back to you – Marni

      Reply
      • Paula says

        10/19/2015 at 9:25 pm

        I am also trying this out….. I am stuck on the sewing part. Do I have to sew between each section of the pellon? If so I cant. It wont fit in my sewing machine. There’s not enough room between my needle and the arm thingy on the right side.

        Reply
        • Haberdashery Fun says

          10/20/2015 at 10:14 am

          Hi Paula,

          Thank you for your comment and glad you are trying this out. it is not totally necessary that you sew between the pieces of Pellon, however sewing between them helps holds it all place. I would try to sew as much as possible. Can you shift it around to get in between everything? You can also try rolling it to get it to fit.

          Let me know how it goes.
          Marni

          Reply
  11. Kylie Turbeville says

    06/21/2019 at 11:31 pm

    Do you think Think this would also hols colored pencis

    Reply
  12. Hailey says

    06/16/2020 at 12:27 pm

    I’m making this with my grandmother and I am so excited! I’m going to give it to my cousin as a gift.

    Reply
    • Haberdashery Fun says

      06/28/2020 at 6:31 pm

      Hi Haily – Yay! That is awesome. Keee me posted and share your results on social media 🙂

      Reply

Trackbacks

  1. Tutorial: Fold-up A-frame organizer – Sewing says:
    09/12/2014 at 1:45 pm

    […] DIY A-Frame Organizer, by Haberdashery Fun […]

    Reply
  2. DIY.. Color Pop Zipper Pouch | Haberdashery Fun says:
    09/18/2014 at 10:55 am

    […] it for today. Let me know how it goes. Come back on Thursday.. I’m sharing my Fabric A-Frame Organizer as part of the #SewYourStyle Jo-Ann and Pellon blog […]

    Reply
  3. Creative DIY Craft Projects Ideas & Inspiration says:
    09/25/2014 at 9:19 am

    […] DIY A FRAME ORGANIZER […]

    Reply
  4. #SewYourStyle | pellonprojects says:
    09/29/2014 at 3:31 pm

    […] from top L: Midwestern Girl, Haberdashery Fun, Scattered Thoughts of a Crafty Mom, Trinkets in Bloom, In My Own Style, Made to be a Momma, […]

    Reply
  5. Do Tell Tuesday #43 - Lil' Mrs. Tori says:
    09/30/2014 at 12:01 am

    […]  A Frame Organizer // Haberdashery Fun –  Awesome organizer and would make a great present for the holidays! […]

    Reply
  6. September Round up | Haberdashery Fun says:
    09/30/2014 at 10:57 am

    […] A-Frame Fabric Organizer – participation with Jo-Ann Fabrics and Pellon #SewYourStyle […]

    Reply
  7. 20 gifts to sew for teens (that they'll actually like!) + a giveaway - It's Always Autumn says:
    10/17/2014 at 8:00 am

    […] 7. Makeup organizer from Haberdashery Fun […]

    Reply
  8. 101 Gifts to Sew for all ages ideas - Believe&Inspire says:
    11/23/2014 at 12:36 am

    […] DIY.. A – FRAME ORGANIZER […]

    Reply
  9. Top 5 Sewing Posts from 2014 | Haberdashery Fun says:
    01/06/2015 at 5:51 pm

    […] A-Frame Organizer […]

    Reply
  10. Friday Finds–1/23/2015 | QuiltMouse says:
    01/23/2015 at 8:10 am

    […] originally not made for sewing supplies, here is a tutorial for a cute A-Frame organizer.  This can be modified for your sewing supplies – just adjust the sizes of the pockets to […]

    Reply
  11. Friday Favorites–Gifts to Make for Mom | Crafty Staci says:
    05/01/2015 at 12:35 pm

    […] Mom likes to travel, this A Frame Organizer from Haberdashery Fun would make a great addition to her […]

    Reply
  12. DIY Fabric Frame Organizer – New Craft Works says:
    05/19/2015 at 2:24 am

    […] Haberdeshary Fun is sharing a tutorial on this cute fabric frame organizer on their blog https://www.haberdasheryfun.com You may not know that purple is my favourite colour so, this organizer took my eyes right away. If you are having difficult time organizing your make up tools on the dressing table then this will be a perfect idea to keep organized them there. Read the tutorial with illustrations HERE. […]

    Reply
  13. Ideas para organizar tu maquillaje | multitasking|girls says:
    05/25/2015 at 12:34 pm

    […] haberdasheryfun.com […]

    Reply
  14. Sew a Folding Tool Stand - Free Sewing Tutorial from Haberdashery Fun! | PatternPile.com says:
    07/08/2015 at 9:42 am

    […] See the Folding Tool Stand and Case – Free Sewing Tutorial […]

    Reply
  15. 17 Incredible DIY Storage Solutions For People With Small Spaces | World inside pictures says:
    02/17/2016 at 3:47 pm

    […]  source […]

    Reply
  16. These 22 DIY Makeup Storage Ideas Will Have Your Vanity Thanking You says:
    09/26/2016 at 11:52 am

    […] at Haberdashery Fun, you’ll learn how to grab some fabric and create a framed piece of organization. This too is […]

    Reply
  17. DIY Makeup Storage Ideas says:
    09/27/2016 at 2:48 pm

    […] at Haberdashery Fun, you’ll learn how to grab some fabric and create a framed piece of organization. This too is a […]

    Reply
  18. 31 Cute Things to Sew for Girls - DIY Joy says:
    01/10/2017 at 11:45 am

    […] haberdasheryfun […]

    Reply
  19. 21 Easy Sewing Projects for Your Trendy Teens | DIY Projects says:
    01/27/2017 at 8:33 am

    […] Image via haberdasheryfun […]

    Reply
  20. 71 DIY Organization Ideas to Get Your Life in Order | Shutterfly says:
    03/01/2018 at 7:27 pm

    […] your makeup in a cute grab and go case like Haberdashery Fun so that you’re always prepared to get ready on the go if […]

    Reply
  21. 25+ Very Best Gifts to Sew - Start sewing gifts today! says:
    04/10/2018 at 3:43 pm

    […] A-Frame Makeup Organizer via Haberdashery Fun […]

    Reply
  22. 15 Easy Sewing Projects You Can Give As Gifts For Your Teens - Style Motivation says:
    07/18/2018 at 4:12 pm

    […] Makeup organizer from Haberdashery Fun […]

    Reply
  23. 15 Easy Sewing Projects You Can Give As Gifts For Your Teens – chuckiesblog says:
    07/18/2018 at 6:22 pm

    […] Makeup organizer from Haberdashery Fun […]

    Reply
  24. 71 DIY Organization Ideas to Get Your Life in Order – Frugal Overload says:
    03/10/2019 at 1:50 pm

    […] your makeup in a cute grab and go case like Haberdashery Fun so that you’re always prepared to get ready on the go if […]

    Reply
  25. A-Frame Organizer Free Sewing Pattern says:
    12/08/2019 at 7:23 pm

    […] A-Frame Organizer […]

    Reply
  26. 34 Best DIY Makeup Organizer/Storage Ideas ⋆ DIY Crafts says:
    04/04/2020 at 8:00 am

    […] Organize your makeup tools and accessories also in a style using this A-frame makeup organizer that is made of fabric, Pellon Peltex and also with Velcro and is really something super praise-worthy and adorable to look at! This handsome self-standing makeup organizer would just rock on every makeup dresser and would also make a great gift to a friend or family member! This is here actually a sewing project as you have to sew also the fabric pockets! Complete project tutorial and instructions here haberdasheryfun […]

    Reply
  27. 34 Quick DIY Gifts To Sew For Friends and Family says:
    09/14/2020 at 1:40 am

    […] haberdasheryfun […]

    Reply
  28. 20 Easy DIY Makeup Organizer Ideas That Turn Mess Into Beauty says:
    10/01/2020 at 2:57 pm

    […] Tutorial: haberdasheryfun.com […]

    Reply

Leave a Reply Cancel reply

Your email address will not be published. Required fields are marked *

This site uses Akismet to reduce spam. Learn how your comment data is processed.

About me


Hi there - I'm Marni Weaver. A sewer, a sometimes quilter and a lover of fabric design. I started this blog to share my ideas. Come Join the Fun
shop now

Popular Categories

project for baby fabric projects seasonal projects fat quarter projects sewing tips and tricks inspiration

Categories

  • Applique
  • Baby
  • Bags and Pouches
  • Block Printing
  • Color
  • DIY Projects
  • Fabric
  • Fabric Design
  • Fat Quarter Projects
  • Home Decor
  • Inspiration
  • Just for Fun
  • Kids
  • No Sew
  • Patterns
  • Print On Fabric
  • Quilting
  • Scrap Fabric Projects
  • Seasonal
  • Sewing Tips & Tricks

Lovely sponsors

Recent Comments

  • How To Make Hand warmers | Haberdashery Fun on DIY.. Sew Heart Shaped Baby Burp Cloths
  • How To Make Hand warmers | Haberdashery Fun on How To Make Mini Heart Shaped Hand Warmers
  • Make Spooky Monster Inspired Face Cloths | Haberdashery Fun on DIY.. Make Monster Inspired Face Cloths
  • How To Sew A Fabric Bin | Haberdashery Fun on Sew An Easy Fabric Storage Bin
  • Make The Alma Tote In Fun Colors | Haberdashery Fun on New – The Alma Tote Pattern

Projects Elsewhere

find me on Pellon Projects sew mama sew contributor

momtastic contributor

Pinterest

Visit Marni@Haberdashery Fun's profile on Pinterest.

I'm Reading

  • Cluck Cluck Sew
  • Cooking Dangerously
  • In Color Order
  • Jen Hewitt
  • Jolly Jabber
  • Karly Spalding Photography
  • Leigh Laurel Studios
  • Lindsay Sews
  • Lotta Jansdotter
  • Love Patchwork and Quilting Magazine
  • Made
  • Making It Lovely
  • Noodle-Head
  • Polka Dot Chair
  • Sharon Holland Designs
  • Silhouette America Blog
  • Silhouette Design Store
  • The Purl Bee
  • The Purple Fig

Press:

Stitch Winter 2014

haberdashery_fun

Marni Weaver
I’m embracing the crazy today. Including the col I’m embracing the crazy today. Including the colors and imperfections in this print.😂

#3dottedpenguinscommunity #haberdasheryfun #blockprintingtechnique #blockprintinglove #versafineclair #pfeil
Joined Ali's @3dottedpenguinscommunity “Play” Joined Ali's @3dottedpenguinscommunity “Play” year-long challenge. It’s been fun and also tough pushing myself out of my comfort zone. I've started by exploring florals, plus experimenting with my style and color palette.

#3dottedpenguinscommunity #haberdasheryfun #blockprintingtechnique #blockprintinglove #versafineclair #pfeil
Another round of block printing, adding inverse st Another round of block printing, adding inverse stamp into the mix. 

#3dottedpenguinscommunity #haberdasheryfun #blockprintingtechnique #blockprintinglove #versafineclair #pfeil @3dottedpenguinscommunity
Quick print of a triangle block I've been working Quick print of a triangle block I've been working on. Plus a little music to go along w/ it.
#haberdasheryfun #blockprintinglove #3dottedpenguinscommunity #versafineink #blockprinting @3dottedpenguinscommunity
It’s a nice, cool spring morning in Atlanta. Wor It’s a nice, cool spring morning in Atlanta. Working through a new hexagon block and making prints. Added a little audio b/c Instagram said to do it. My kids had this song on repeat awhile back.
#blockprintinglove #3dottedpenguinscommunity #haberdasheryfun #blockprinting #surfacepatterndesign
Follow on Instagram

Copyright © 2025 · Klar theme by Crimson Pear :: web & surface design

Copyright © 2025 · Klar on Genesis Framework · WordPress · Log in