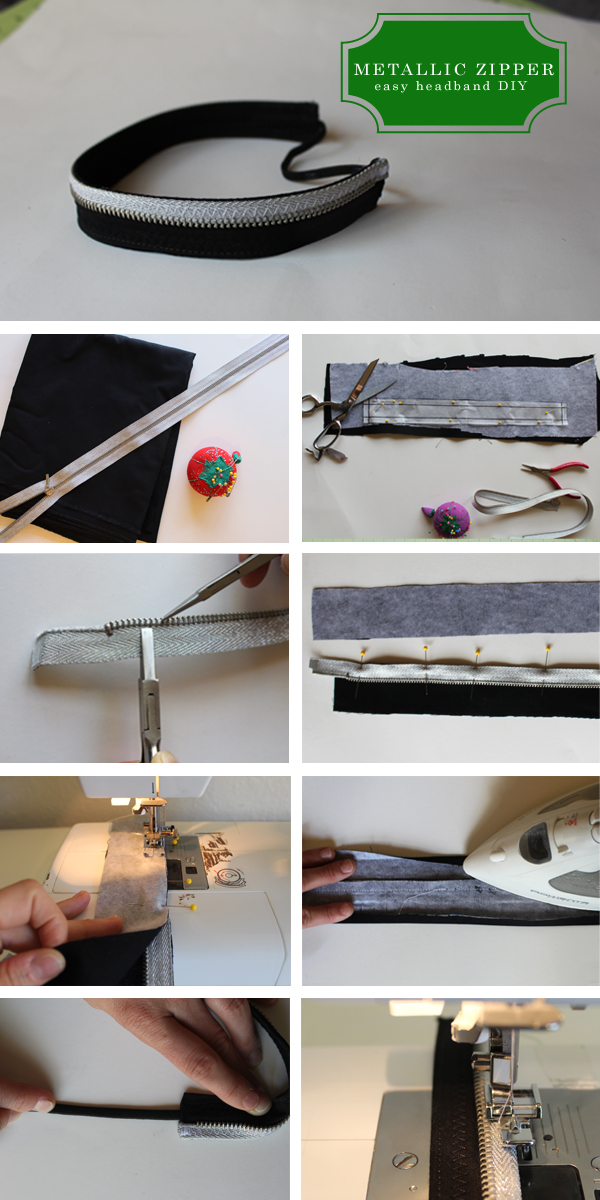
I was in New York last week for a footwear tradeshow. We launched our Fall 2013 footwear collection – I always love it when we start a new season! At the show, our designers gave a quick presentation on the Fall/Winter 2013 trends. One of my favorite trends was about the use of dark colors AND extreme hardware as embellishments – studs, spikes, buckles and zippers. Yes, zippers..!

The main reason that I loved this trend was it reinforced my current obsession with zippers! I had already planned to use a zipper for my first holiday DIY post. ..
So here it is, a project and gift for the fashionista in your life. I hope you enjoy making it as much as I did.
Materials needed:
- Fabric
- Interfacing
- Metal separating zipper in any color
- Elastic
- Pins, needles, thread, scissors, iron, ironing surface, sewing machine
- Needle nose pliers
8 easy steps:
- Gather materials
- Create your pattern and prepare your fabric. On a peice of fabric -draw a rectangle 15″ long x 1″ wide. Add a 1/4″ seam allowance around the outside edge. Fuse the back side of your fabric. Place the pattern on the front side of fabric and cut out 2 rectangles [ 1 – front/self and 1 -back/lining]
- Separate zipper. You will only use 1 side. Using pliers, gently pull off 5-8 metal teeth from each end of the zipper. Lay the zipper against pattern and double check there are no teeth approximately 1/2″ from each end. This will help to turn the ends of the zipper inwards.
- Line up the the zipper tape to the raw edge of the rectangle. Pin the zipper in place.
- Place right sides of fabric together. Sew down the length of the rectangle on the zipper side. Open the seam and pres flat.
- Turn edges and press a 1/4″ seam allowance. Placing wrong sides together, enclose the seam allowances and close the headband. Topstitch. Headband is nearly finished.
- Turn each end of the headband inwards and iron ends flat. Measure and cut the elastic to 7 inches. Insert 1/2″ inch of elastic into each end and stitch closed. Reinforce where the elastic is inserted.
- Stitch the on the front side of the headband. Be creative and use a decorative stitch like the zig zag stitch. This will also help reinforce the headband.
Voila! You are complete.. For an easier version of the headband – just take away the zipper detail and simply use a patterned fabric.


Great headband project! I just saw a bunch of expensive headbands at the mall and wanted to make my own! This is very simple and now I know how…
Really like this. I’m inspired by both of the headband projects you just posted. Can’t wait to see what you create next.