Haberdashery Fun

  • Home
  • About
    • Look Book
  • Contact
    • Collaborate?
  • Tutorials
  • Shop
  • Freebie
    • Email
    • Facebook
    • Instagram
    • Pinterest

Keep up to date with the latest posts!

Make your own magazine tote..

in Fabric on 21/01/13

Have you ever wanted to create a magazine totebag to carry all your stuff in..? Well if you can sew in a straight line and own a ruler.. then keep on reading.

This post is better late than never.  I promised this project last week, but I had a sick little baby munchkin to tend to.

I had alot of fun creating this and seeing it through to completion.  Last weekend I screen printed on the fabric.  Phase two was developing the bag.  Ryan, you won’t be going to Design Camp Atlanta bagless after all!


Materials needed:

  1. Fabric – I chose a lightweight cotton zig zag in 2 colors
  2. Drafting paper
  3. Pins, ruler, scissors, pencil
  4. Iron and ironing board
  5. Fusing – This is optional. Use fusing if you want the bag to be more substantial

8 easy steps:

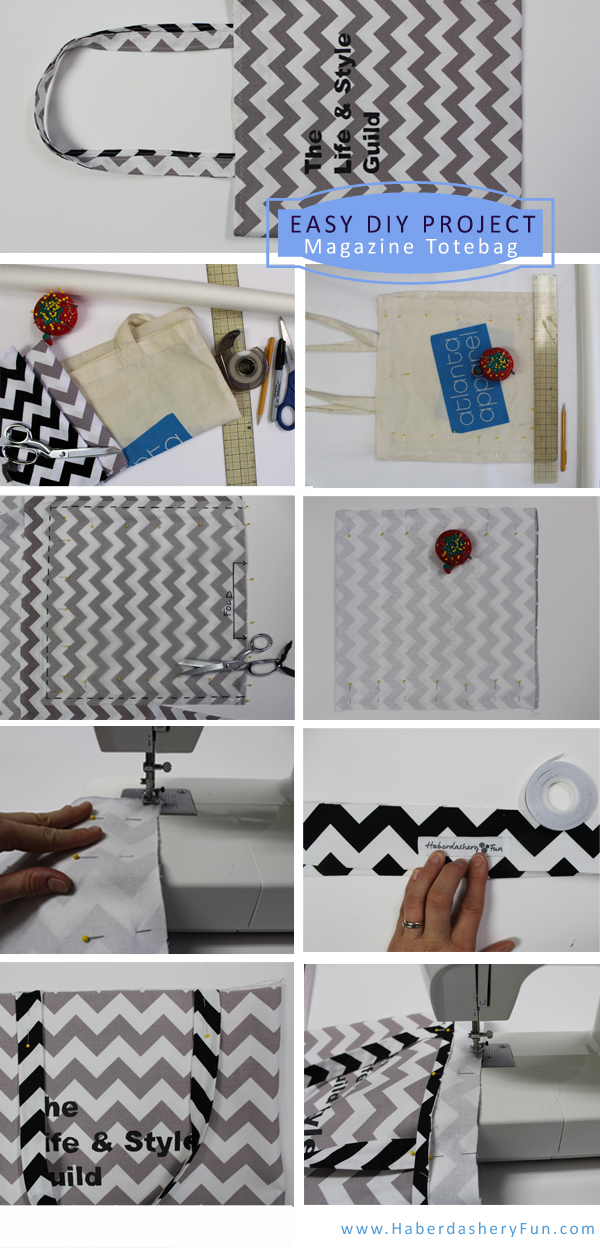
  1. Gather your materials.
  2. Create your pattern pieces. Do you have a magazine tote that you want to copy? I had a great sized one from the Atlanta Apparel Mart that I used.  Pin down your bag onto drafting paper and trace around it. Remember to add seam allowances.. I will show the steps for making this pattern in a later post.
  3. Cut all your pattern pieces. I had the following pieces – main pattern/bag, facing and straps.
  4. Pin your pieces together. Right sides face each other and pin along the seam edge.  Pin the length of the straps.
  5. Sew the side seams of the bag and facing.  Sew the length of the straps, both sides. You will be pulling the strap through itself. This is kind of a pain, but it will make the straps nice and uniform.  Use a hot iron and press your finished seams. Then open the seams and press again.. Do this for all pieces. Pressing always helps in the workmanship of your items.
  6. If you have a label, then sew onto your facing.  Double check your label placement.  It is super easy to sew your label upside down.
  7. Turn your bag right side out. Pin your straps to the top edge and right side of the fabric.  This is another area to double check placement.. You want to pin the straps so they are facing DOWN.   See picture for reference.
  8. Pin your facing at the top edge.  Right sides together. Sew along the top edge at the 1/2″ seam allowance.  Press, press press. Press the finished top edge seam all around.  Then turn the bag ight side out and press the facing into the bag.

That’s it. Your magazine tote is complete and you are ready to hit the road.

Related Posts Plugin for WordPress, Blogger...

3 Comments

« Screen print with freezer paper
Win my zig zag totebag.. »

Comments

  1. Ryan says

    01/22/2013 at 12:24 am

    It’s gorgeous, I cannot wait to flash that thing around in Atlanta next week. And…..I cannot wait to give a similar design away to one lucky reader this week for our big giveaway at TheLifeandStyleGuild.com. Marni, you rock!!!

    Reply
    • Haberdashery Fun says

      01/25/2013 at 8:03 am

      Can’t wait ti see pictures!

      Reply
      • Haberdashery Fun says

        01/25/2013 at 8:03 am

        Can’t wait to see pictures!

        Reply

Leave a Reply Cancel reply

Your email address will not be published. Required fields are marked *

This site uses Akismet to reduce spam. Learn how your comment data is processed.

About me


Hi there - I'm Marni Weaver. A sewer, a sometimes quilter and a lover of fabric design. I started this blog to share my ideas. Come Join the Fun
shop now

Popular Categories

project for baby fabric projects seasonal projects fat quarter projects sewing tips and tricks inspiration

Categories

  • Applique
  • Baby
  • Bags and Pouches
  • Block Printing
  • Color
  • DIY Projects
  • Fabric
  • Fabric Design
  • Fat Quarter Projects
  • Home Decor
  • Inspiration
  • Just for Fun
  • Kids
  • No Sew
  • Patterns
  • Print On Fabric
  • Quilting
  • Scrap Fabric Projects
  • Seasonal
  • Sewing Tips & Tricks

Lovely sponsors

Recent Comments

  • Make A Simple Block Print Tote Bag | Haberdashery Fun on DIY.. Colorful Dish Towel Tote Bags
  • Make A Simple Block Print Tote Bag | Haberdashery Fun on Sew Asymmetrical Color Block Totes Tutorial
  • Make A Block Printed ToteBag | Haberdashery Fun on Sew A Reversible Tote
  • Make A Block Printed ToteBag | Haberdashery Fun on Quick Tip.. Sewing Boxed Corners
  • 20 Creative DIY Storage Bin Ideas - DIY & Crafts on Sew An Easy Fabric Storage Bin

Projects Elsewhere

find me on Pellon Projects sew mama sew contributor

momtastic contributor

Pinterest

Visit Marni@Haberdashery Fun's profile on Pinterest.
Follow on Bloglovin

I'm Reading

  • Cluck Cluck Sew
  • Cooking Dangerously
  • In Color Order
  • Jen Hewitt
  • Jolly Jabber
  • Karly Spalding Photography
  • Leigh Laurel Studios
  • Lindsay Sews
  • Lotta Jansdotter
  • Love Patchwork and Quilting Magazine
  • Made
  • Making It Lovely
  • Noodle-Head
  • Polka Dot Chair
  • Sharon Holland Designs
  • Silhouette America Blog
  • Silhouette Design Store
  • The Purl Bee
  • The Purple Fig

Press:

Stitch Winter 2014

haberdashery_fun

Marni Weaver
I have a drawer where I keep all of my block print I have a drawer where I keep all of my block printed papers and have often wondered.. “What the heck do I do with all of these”.

How about you?

I recently found a bunch of  tutorials over at @modpodgerocks and thought it would be fun to make wood coasters with my block prints. They turned out better than expected and so I thought to share with you.

Want more info? I created a blog post. See the link in my profile for the blog post and details. 

Day27/100 #100dayproject #dothehundreddayproject #100daysofsimpleshapes #haberdasheryfun #blockprintingmadesimple #onlineclasses #zoomworkshops #haberdasheryfunpatterns #haberdasheryfunclasses #handmadestamp #modpodge #modpodgecrafts #decoupageart #decoupagelovers #blockprintedbyhand
I’m sharing about how to frame your block printe I’m sharing about how to frame your block printed fabric on my blog today. Day 26/100 #100dayproject 

If you have ever thought you would like to learn how to block print… I have a course for you. It is called Block Printing Made Easy. It is all about the basics - working with simple shapes, design prompts and getting creative on paper and fabric.

This is an online course and starts on Monday, May 30. There are 3 modules with videos and also included in the course are 3 live zoom workshops. The videos are self paced, so the good news is you can cruise through them or take all the time you need.

The course is $97 USD.

See the link in my profile for additional details on the course( breakdown on each module) and to also access to my blog post.

#dothe100dayproject #haberdasheryfun 
#blockprintingmadeeasy #100daysofsimpleshapes #zoomclasses #haberdasheryfunpatterns #speedballfabricink #handmadefabrics #dothe100dayproject2022 #100dayproject2022 #handmadestamps #blockprintedfabric #ikeahacks #ikeaframes
Goodbye triangles, hello circles. I’m working Goodbye triangles, hello circles. 

I’m working on a project, so I printed a bunch of small fabric squares with my new circle stamp. Such a simple yet effective stamp.

I am launching an online course called “Block Printing Made Easy? Want to learn to block print? The course starts in two weeks (5/30). Want more info? See the link in my profile to join the waitlist and also to view the course details. 

Day 25/100 #100dayproject 

#dothe100dayproject #dothe100dayproject2022 #haberdasheryfun #haberdasheryfunpatterns #pdfpattern #blockprinting #blockprintingonfabric #blockprintingmadeeasy #blockprintingworkshop #speedballfabricink #konacottonsolids #speedballart
I’ve got one more triangle print to share and I I’ve got one more triangle print to share and I think that’s a wrap. Simple and easy. The pin cushion on that right that was gifted to me from my grandmother Mor Mor really takes the stage in my opinion 

The circle shape is next. I’m excited to work with no corners and see what will unfold.

Day 24/100
#haberdashery #100dayproject 
#100daysofsimpleshapes #blockprintingmadeeasy #dothe100dayproject #dothe100dayproject2022 
#haberdasheryfun #ikeahacks #konacotton #konacottonsolids 
#speedballfabricink #blockprinting #easyblockprint #haberdasheryfunpatterns #haberdasheryfunclasses
A mash up of triangle stamps I created so far duri A mash up of triangle stamps I created so far during the #100dayproject.
 
Who knew the triangle shape could be so much fun? I have had a blast the last playing around with it - both dissecting the shape and putting it back together. 

Which one is your favorite?

I can’t believe I am saying this, but Im ready to move on to a new shape. One that is more soft and organic. Next up, the circle!
Day 23/100

#100daysofsimpleshapes 
#haberdashery 
#blockprinting 
#blockprintingonfabric 
#blockprintingmadeeasy 
#haberdasheryfun
#speedballfabricink #speedballink #fatquarters 
#handmade #dothe100dayproject2022 
#100dayproject2022
Follow on Instagram

Copyright © 2022 · Klar theme by Crimson Pear :: web & surface design

Copyright © 2022 · Klar on Genesis Framework · WordPress · Log in