Haberdashery Fun

  • Home
  • About
    • Look Book
  • Contact
    • Collaborate?
  • Tutorials
  • Shop
    • Email
    • Facebook
    • Instagram
    • Pinterest

Keep up to date with the latest posts!

Sew a Party Favor totebag

in Fabric on 05/03/13

Its been awhile since I posted a DIY sewing project.. I have been away for work attending tradeshow after tradeshow after tradeshow!  Everything is slowing down and I can now clear the dust off my sewing machine. Yay.

So here is my promised sewing tutorial for the cute party favor totebag.. 

Last week I showed how to screen print an image onto the face of the tote with freezer paper.  This week I’m showing how to sew the bag.  I hope to upload the pattern by the end of the week.  I’m very excited to finally share a pattern here! The bag is very easy to sew -just a few straight stitches and you have a charming little bag.

I’m switching up my images a little, so let me now what you think.  I hope someone makes these cute bags for an upcoming party.  If you do, I would love to see pictures of your bags and the party.

Ok – here we go…

Step 1: Gather your materials

  • Fabric
  • Pattern – soon found here
  • Webbing for straps – cut to desired length
  • Sewing materials – machine, pins, scissors, thread, iron and ironing board


 Step 2: Cut out your pattern

  • Find the grain line on your fabric and pin your pattern down
  • Cut out 2 pieces

Step 3:  Prepare the top edge

  • Fold down top edge 1/4″ and press
  • Fold over the top edge again, this time fold over 3/4″ and press.  This will enclose the 1/4″ that you originally folded over. You will now have a clean edge


Step 4:  Straps

  • Measure 3 1/2″ from each side seam and mark
  • At each mark, insert your webbing under the top edge.   This is the inital placement
  • Now fold the straps over the top edge

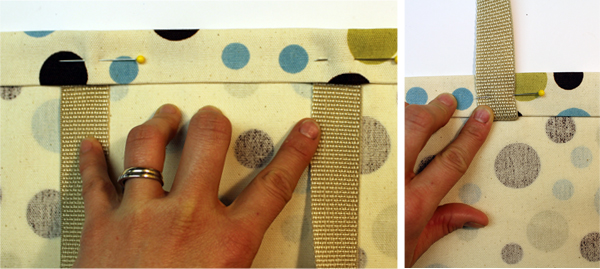
  • Pin each strap in place
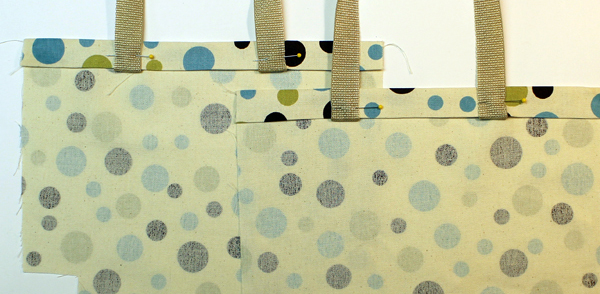
  • Edgestitch along the top and bottom edge.  Your choice,  sew with a straight stitch or with a decorative stitch

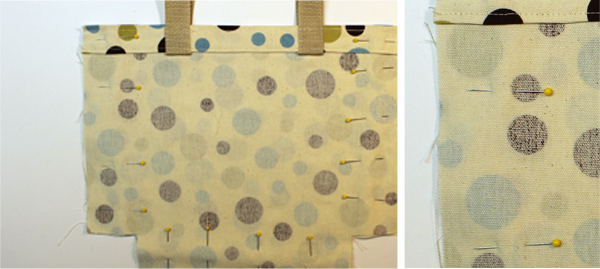
Step 5:  Sew the bag side seams and bottom

  • Place right sides together and pin along side seams and the bottom edge
  • Sew SS [ side seams] and bottom edge with a 1/2″ seam allowance 

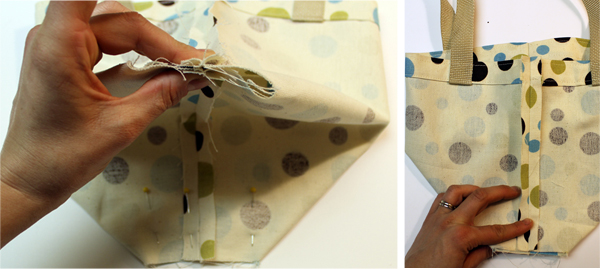
Step 6:  The bottom corners

  • The bag is almost complete. Your side seams and the bottom are finished
  • With the right sides still facing inwards, twist the bag slightly and match each side seam with the bottom seam

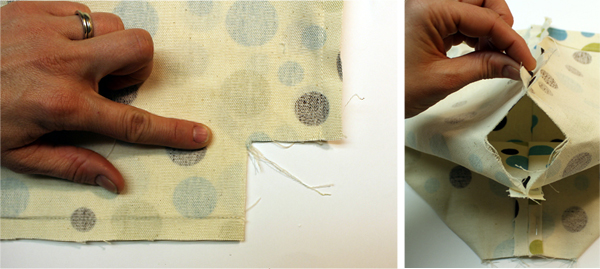
  • This will align the raw edges with each other and into a seam you will sew
  • Pin and sew with a 1/2″ seam allowance
  • Make sure to back stitch! This area needs to be very secure, it will hold all your goodies!

As always, press press press these seams and the corners of the bag. Give the entire bag a good press for quality and workmanship.

Voila – complete!

2 Comments

« Baby’s 1st Birthday!!? DIY Dino Printed Favor Bags
Dino Party Favor Totebag Pattern Now Available »

Comments

  1. ashley rachelle says

    03/06/2013 at 5:54 pm

    thanks for stopping by my blog and for your very kind comment! i love these little bags and i have never thought to make one as a party favor…so you’ve got the wheels in my head turning now! xo

    -ashley
    ashleyrachelle.com

    Reply
  2. Natasha says

    03/09/2013 at 3:07 pm

    Too cute!

    Reply

Leave a Reply to ashley rachelle Cancel reply

Your email address will not be published. Required fields are marked *

This site uses Akismet to reduce spam. Learn how your comment data is processed.

About me


Hi there - I'm Marni Weaver. A sewer, a sometimes quilter and a lover of fabric design. I started this blog to share my ideas. Come Join the Fun
shop now

Popular Categories

project for baby fabric projects seasonal projects fat quarter projects sewing tips and tricks inspiration

Categories

  • Applique
  • Baby
  • Bags and Pouches
  • Block Printing
  • Color
  • DIY Projects
  • Fabric
  • Fabric Design
  • Fat Quarter Projects
  • Home Decor
  • Inspiration
  • Just for Fun
  • Kids
  • No Sew
  • Patterns
  • Print On Fabric
  • Quilting
  • Scrap Fabric Projects
  • Seasonal
  • Sewing Tips & Tricks

Lovely sponsors

Recent Comments

  • How To Make Hand warmers | Haberdashery Fun on DIY.. Sew Heart Shaped Baby Burp Cloths
  • How To Make Hand warmers | Haberdashery Fun on How To Make Mini Heart Shaped Hand Warmers
  • Make Spooky Monster Inspired Face Cloths | Haberdashery Fun on DIY.. Make Monster Inspired Face Cloths
  • How To Sew A Fabric Bin | Haberdashery Fun on Sew An Easy Fabric Storage Bin
  • Make The Alma Tote In Fun Colors | Haberdashery Fun on New – The Alma Tote Pattern

Projects Elsewhere

find me on Pellon Projects sew mama sew contributor

momtastic contributor

Pinterest

Visit Marni@Haberdashery Fun's profile on Pinterest.

I'm Reading

  • Cluck Cluck Sew
  • Cooking Dangerously
  • In Color Order
  • Jen Hewitt
  • Jolly Jabber
  • Karly Spalding Photography
  • Leigh Laurel Studios
  • Lindsay Sews
  • Lotta Jansdotter
  • Love Patchwork and Quilting Magazine
  • Made
  • Making It Lovely
  • Noodle-Head
  • Polka Dot Chair
  • Sharon Holland Designs
  • Silhouette America Blog
  • Silhouette Design Store
  • The Purl Bee
  • The Purple Fig

Press:

Stitch Winter 2014

haberdashery_fun

Marni Weaver
Still experimenting with keeping the block printin Still experimenting with keeping the block printing, handmade feel in digital form. This one is a little rougher/less perfect, but still has the spirit ✨ Which one’s your pick—1 or 2.

#haberdasheryfun #versafineink #versafineclair #surfacepatterndesign
Who knew that one little stamp could do so much? # Who knew that one little stamp could do so much?
#haberdasheryfun #versafineink #versafineclair
Just added a new stamp pad to my collection—meet Just added a new stamp pad to my collection—meet Lilac Bloom! 💜 And before you ask… nope, this design is not a corn stalk. Are you a fan of this soft shade, or is it a bit too light for your taste?

#versafineclair #blockprints #surfacepatternprint #haberdasheryfunpatterns #surfacepatterndesign #pfeil
Atlanta feels like a steam room right now 🫠 so Atlanta feels like a steam room right now 🫠 so I’m manifesting cooler temps by reworking my Alberta Wild Rose block print into Evergreen.

#blockprinting #banffnationalpark #alberta #surfacepatterndesign #haberdasheryfun
#versafineclair
Ode to summer travels. Alberta wild rose stamp alo Ode to summer travels. Alberta wild rose stamp along with a few sketches. 

#blockprinting #banffnationalpark #alberta #surfacepatterndesign #haberdasheryfun 
@3dottedpenguinscommunity #versafineclair
Follow on Instagram

Copyright © 2025 · Klar theme by Crimson Pear :: web & surface design

Copyright © 2025 · Klar on Genesis Framework · WordPress · Log in