Haberdashery Fun

  • Home
  • About
    • Look Book
  • Contact
    • Collaborate?
  • Tutorials
  • Shop
    • Email
    • Facebook
    • Instagram
    • Pinterest

Keep up to date with the latest posts!

DIY.. Make A Travel Crayon Roll

in DIY Projects, Fat Quarter Projects on 09/07/13

My sweet baby is nearing the crayon and drawing age.  Time Flies.  Seems like it was just yesterday that I was telling my husband we were pregnant.. I was a crafty kid, so it brings me great joy to think of all the fun things we will soon make together.

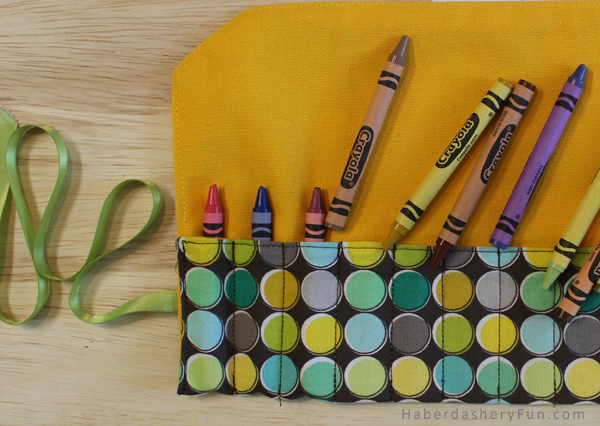
I was given a version of this crayon holder as a present and promptly lost it. With my little munchkin now picking up [ and eating crayons ], I thought it was time to make a new one. This one is from memory and I hope it does the original justice.

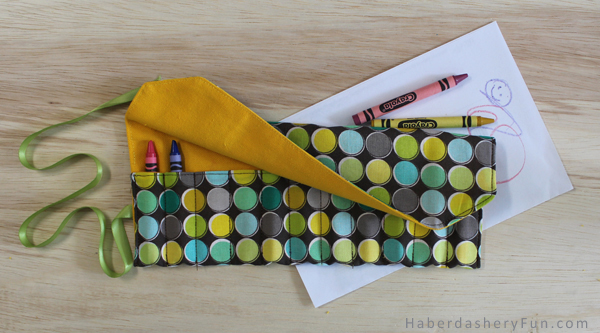
This is super simple to make and great for your purse or diaper bag. With summer travels, put a few pieces of paper in the car and you are good to go.

Sewing Materials:

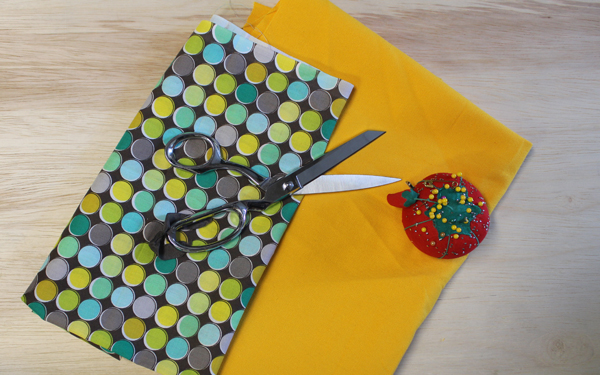
  1. Self / exterior fabric – the more colorful the better
  2. Lining / heavier fabric – I found cotton duck worked well. It gave the roll some stability. You could also use decorator weight fabric
  3. Ribbon, button
  4. Disappearing ink pen
  5. Sewing materials – scissors, thread, pins, needles
  6. Sewing machine, iron and ironing board
  7. Crayons!

Pattern Drafting Materials:

  1. Paper
  2. Ruler
  3. Pens

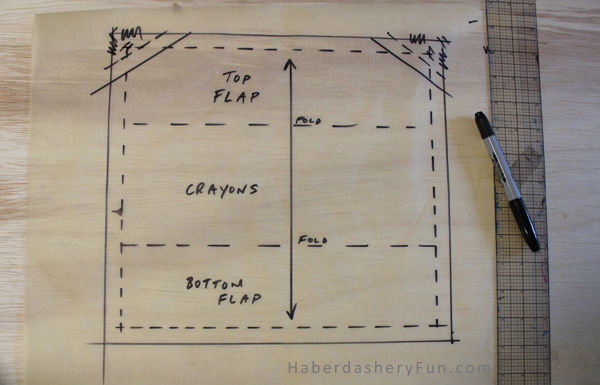
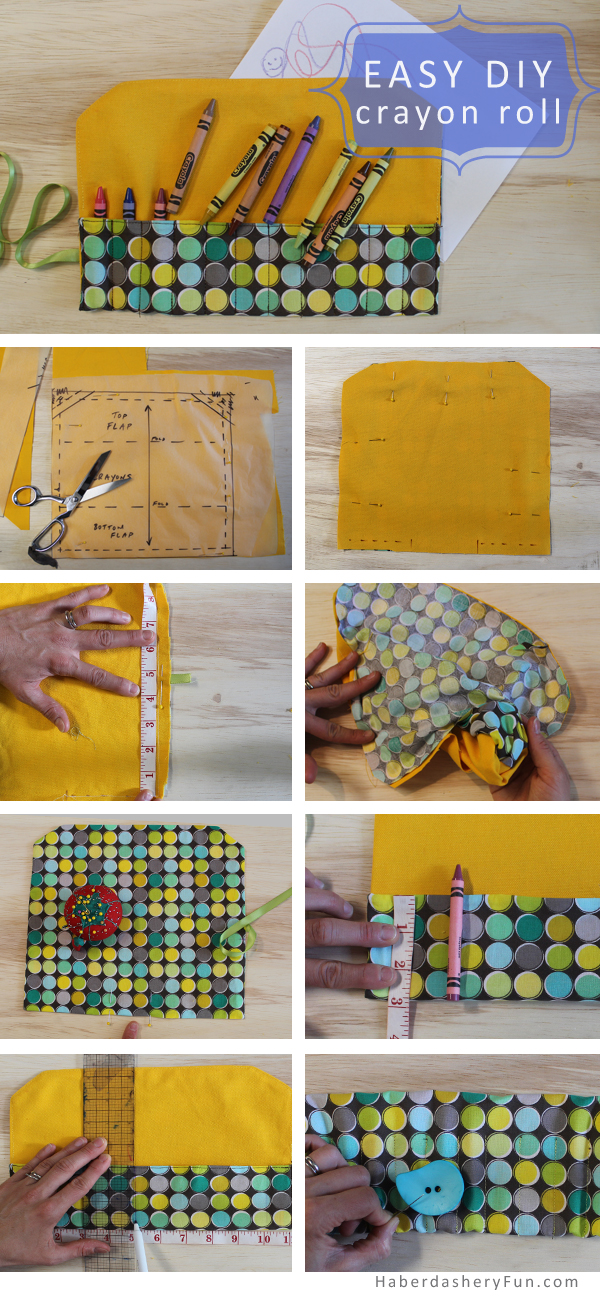
To develop your pattern – draw a rectangle measuring 11″ W x 10″H. Shave off at the side top flap corners to suit your design scheme. I chose to make my corners angled, but you could also round the corners. Add 1/2″ seam allowances to all sides.

8 Easy Steps:

  1. Cut out your pattern pieces – 1 for the self and 1 for the lining
  2. Place right right sides together and pin
  3. Measure 4 1/4″ up from the bottom seam and insert ribbon. Make sure to insert so the ribbon length is facing inwards and square the ribbon with the side seam. As the image above, you want approx 1/2″ SA sticking out
  4. Place into sewing machine.  Sew with a 1/2″ SA around the outside. Leave a 2-3″ opening at the bottom. Press.  While pressing to set your seams, also turn the 2-3″ bottom opening and press the seam upwards. This will help when you later sew the opening closed.
  5. Pull the roll rightside out and press the seams again. Pin the bottom opening closed. Edgestitch along the entire bottom edge. Backstitch at each end
  6. Fold bottom upwards to measure 2 3/4″ in height. Press the fold. Now edgestitch along each side seam.  This will make a little pouch. Backstitch at the top and bottom.  At this time, you can also edgestitch along the top edge
  7. Place a measuring tape along the bottom. Using  your disappearing ink pen and a ruler, mark at 1″ increments along the bottom seam. Place into your sewing machine and stitch following each ink line. You are now sewing the little spots for all the crayons. Make sure to backstitch at the top and bottom. Press
  8. Button – turn over to the backside. Place the button in the centre back area/near the vertical stitches. However, before sewing the button down, double check placement by rolling up the crayon roll. Handstitch the button in place.

Note – I chose not to use interfacing on the self fabric. I wanted the cotton fabric to have some give. As the roll gets used by little hands, the crayon slots will open up a little more.

close up 600px V3

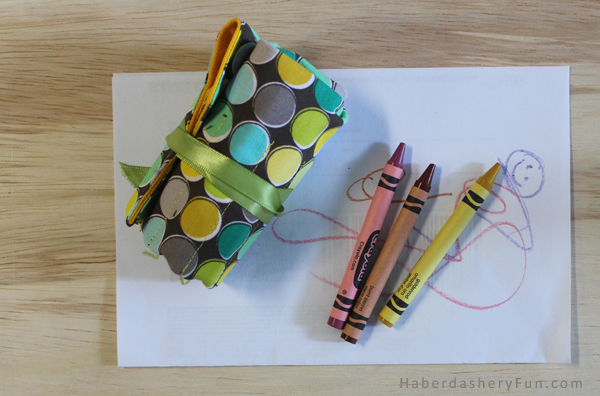
That’s it… I hope you enjoy sewing the crayon roll for your little one. Happy sewing

Related Posts Plugin for WordPress, Blogger...

25 Comments

« Behind The Scenes.. A Few Images
DIY.. Applique Something Fun! »

Comments

  1. Toni Garleson says

    July 16, 2013 at 8:35 am

    This is so neat. I’m going to make these as party favors for my upcoming daughter’s 5th birthday party. EASY diy steps to follow. Thank you

    Reply
    • Haberdashery Fun says

      July 16, 2013 at 9:52 am

      My mother in law wanted me make these for my baby’s 1st birthday party. But, I think a 5th birthday party is the perfect age!! The kids AND MOMS will really appreciate the party favor. They are super easy to make. You could finish them all over a weekend. Thanks for stopping by, I really appreciate your comments.

      Reply
  2. Trish says

    July 16, 2013 at 10:26 am

    That has got to be the most adorable thing! I’ve never seen anything like it. I love the fabric you used. The pics and steps make it less daunting to me for when I attempt this. My boys love colouring but the mess drives me nuts, I like how this keeps everything organized!

    Reply
  3. Vered says

    July 16, 2013 at 10:34 am

    Super cute and easy to make. Great idea!

    Reply
  4. Carla Malin says

    July 16, 2013 at 10:47 am

    I love this and it has so many other uses too – paint brushes for the kids or make-up brushes for mommy. Just saying!

    Reply
    • Haberdashery Fun says

      July 16, 2013 at 11:48 am

      Totally agree with your ideas!! I am on it and love it. I will keep you posted when I sew them up.. Thanks for stopping by, I really appreciate it.

      Reply
  5. Karli says

    July 16, 2013 at 11:21 am

    Love it!!! Great gift idea! And kids will LOVE it!! Really like how it rolls up and ties too.

    Reply
    • Haberdashery Fun says

      July 16, 2013 at 11:45 am

      Thanks for stopping by. This is super easy.. non sewers could whip one up in no time 🙂

      Reply
  6. Paula says

    July 16, 2013 at 1:38 pm

    Box crayons always get dumped out with my kids(and eaten) so something like this will give them a bit more control and hopefully easier to tidy up. Great idea and suggestion about paintbrushes!

    Reply
  7. Laraine says

    July 16, 2013 at 3:36 pm

    This little easily made package will be so useful for entertaining kids at restaurants, airports, waiting at Dr’s offices, where they want to get at their creative side and the crayons are not all smushed together in plastice containers. Terrific design, and so easily recognized by the wee user.

    Reply
    • Haberdashery Fun says

      July 16, 2013 at 4:19 pm

      Thank you! Such lovely comments and so very true! I appreciate your stopping by my blog.

      Reply
  8. Natasha says

    July 16, 2013 at 4:24 pm

    Loved this! The kids will love to!

    Reply
  9. rob jackson says

    July 17, 2013 at 11:14 am

    really well done! and as always, a creative little project & will keep the kids busy once its finished. thanks haberdashery!!!!

    Reply
  10. Karly Spalding says

    July 18, 2013 at 1:48 am

    This is such a good idea – perfect for restaurants or long car trips!

    Reply
  11. Dayla says

    July 18, 2013 at 6:56 pm

    Very cute and creative and easy to carry! Looks like you have lots of good ideas!

    Reply
  12. Bridget says

    January 18, 2014 at 6:47 am

    I would be interested in including this in a simple sewing tutorial round up on theSIMPLEmoms site. Could you please contact me about the use of one of your images for promotional purposes?

    Reply
    • Haberdashery Fun says

      January 18, 2014 at 12:31 pm

      Hi Bridget, Thanks for stopping by, Sounds great on the sewing round up. I will send you a quick email to touch base.

      Reply
  13. Melanie White says

    August 7, 2015 at 3:46 am

    Using these fabulous instructions to make name badge pouch for all the name badges I have for various organisations! Thank you – I wasn’t quite sure where to start but now have great instructions, I just need to adapt the size.

    Reply
    • Haberdashery Fun says

      August 7, 2015 at 4:29 pm

      Thanks Melanie – that’s great to hear. Have fun making them and let me know how it goes – Marni

      Reply

Trackbacks

  1. Keep crayons organized with this Travel Crayon Roll! | Go To Sew says:
    July 17, 2013 at 6:02 am

    […] Summertime means lots of travel for a lot of families…even if it’s just down the road to a local zoo. Car time can equal bored time for little kids. My son loves to draw while we’re driving – he observes what he sees and puts it on paper. Keeping art supplies organized in the car can be challenging…but the Travel Crayon Roll from Haberdashery Fun will sure help keep things together! Make one for your little artist with this simple, step by step tutorial. […]

    Reply
  2. Linky Thursday | Stacy Sews says:
    July 26, 2013 at 2:02 am

    […] Never lose a crayon in the carairplanetrain again with this handy travel crayon roll. […]

    Reply
  3. Pinselhülle / Wrap for paint brushes | Alltagsdiamanten says:
    March 2, 2014 at 8:28 am

    […] Pattern: http://haberdasheryfun.com […]

    Reply
  4. Crayon roll 2 | Alltagsdiamanten says:
    March 28, 2014 at 7:37 am

    […] Pattern: http://haberdasheryfun.com […]

    Reply
  5. Crayon Roll – Create with the FREE pattern here | says:
    April 29, 2014 at 10:58 pm

    […] can find all your instructions HERE from Haberdashery […]

    Reply
  6. 9 Clever & Crafty Back to School Ideas | Engineer Mommy says:
    August 27, 2015 at 7:08 am

    […] 8. Crayon Roll: Collect your crayons in this easy-to-make roll perfect for transporting crayons! via […]

    Reply

Leave a Reply to rob jackson Cancel reply

Your email address will not be published. Required fields are marked *

This site uses Akismet to reduce spam. Learn how your comment data is processed.

About me


Hi there - I'm Marni Weaver. A sewer, a sometimes quilter and a lover of fabric design. I started this blog to share my ideas. Come Join the Fun
shop now

Popular Categories

project for baby fabric projects seasonal projects fat quarter projects sewing tips and tricks inspiration

Categories

  • Applique
  • Baby
  • Bags and Pouches
  • Color
  • DIY Projects
  • Fabric
  • Fabric Design
  • Fat Quarter Projects
  • Home Decor
  • Inspiration
  • Just for Fun
  • Kids
  • No Sew
  • Patterns
  • Print On Fabric
  • Quilting
  • Scrap Fabric Projects
  • Seasonal
  • Sewing Tips & Tricks

Lovely sponsors

Recent Comments

  • Make Nine in 2021 – Sew, Bake, Snap on DIY.. Reversible Fabric Storage Bin
  • 26 Diy placemats ideas - Perfect Table Setting on DIY.. Heart Shaped Placemats Tutorial For Sew Mama Sew
  • More Free Tote Patterns | on Reversible 1 Hour Tote Pattern
  • Collapsible Kraft-Tex Bowl on DIY.. Collapsible Fabric Bowls
  • Haberdashery Fun on DIY.. Reversible Fabric Storage Bin

Projects Elsewhere

find me on Pellon Projects sew mama sew contributor

momtastic contributor

Pinterest

Visit Marni@Haberdashery Fun's profile on Pinterest.
Follow on Bloglovin

I'm Reading

  • Cluck Cluck Sew
  • Cooking Dangerously
  • In Color Order
  • Jen Hewitt
  • Jolly Jabber
  • Karly Spalding Photography
  • Leigh Laurel Studios
  • Lindsay Sews
  • Lotta Jansdotter
  • Love Patchwork and Quilting Magazine
  • Made
  • Making It Lovely
  • Noodle-Head
  • Polka Dot Chair
  • Sharon Holland Designs
  • Silhouette America Blog
  • Silhouette Design Store
  • The Purl Bee
  • The Purple Fig

Press:

Stitch Winter 2014

haberdashery_fun

I made the most glorious little Kraft-tex journal I made the most glorious little Kraft-tex journal cover over the holidays.  Not only do I love the color of the month for December (blue turquoise), but the texture of my journal is like aged leather and looks durable and rugged. Did you know Kraft-tex is actually paper??? My cover was simple to make and is just one rectangular piece of Kraft-tex, folded over at the ends and topstitched. Thats it.❤️

You can check @ctpublishing for other projects and more info.
.
.
.
#haberdasheryfun #haberdasheryfunpatterns #krafttex #krafttexuniversity #krafttexstyle #ctpublishing #isew #isewlation
Highlights from 2020. Glad it’s complete. Upward Highlights from 2020. Glad it’s complete. Upward and onward. What are you creating for the year ahead? Here’s to making 2021 a creative, fun, adventurous and graceful year.
What a fun class! Thank you to the participants in What a fun class! Thank you to the participants in my first zoom block printing class. It was an amazing group of people coming together with a common goal - sharing their love of print and pattern design.

My hubby snapped a few pictures during the workshop. I’m normally a “hider outer”, but thought this was a perfect opportunity to say Hi.  Even if it is looking down and away from the camera. 🤪

I will be hosting another block printing zoom workshop mid January. Come one come all. DM or email me for details.
.
.
.
#coffeewithhaberdasheryfun #blockprintingworkshop #zoomclass #pdfpattern #haberdasheryfun #haberdashery 
#blockprint #blockprinting #isew #fabricdesign #surfacepatterndesign #zoomsewingclass #zoomdesignclass
You’ve printed some fabric.. now what?? Build or You’ve printed some fabric.. now what?? Build or buy a frame and make yourself some easy wall art = ✔️

Want to learn how to block print? Grab a cup of coffee, a few supplies and join me for a free zoom class this Sunday, Dec 13th at 11am ( Eastern Time Zone ).

Check my recent blog post for the supply list. If you want to come and just hang out and watch, that’s ok too. DM or email me for details.
.
.
#haberdashery #blockprint #coffeewithhaberdasheryfun #PDF 
#isew #haberdasheryfun #curvyzipperpouch #fabricdesign 
#surfacedesign #haberdasheryfunpatterns #creativehappylife
Want to learn how to block print? I’m hosting a Want to learn how to block print? I’m hosting a free zoom class and the supply list is now up on my blog. You can DM me or send an email to marni@haberdasheryfun.com to join this free class. Click on the link in my bio to go to my blog.

Sunday, December 13 at 11am Est time zone.

.
#haberdashery #haberdasheryfun #blockprinting #pdfpattern #haberdasheryfunpatterns #coffeewithhaberdasheryfun #fabricdesign #blockprint
Follow on Instagram

Copyright © 2021 · Klar theme by Crimson Pear :: web & surface design