Haberdashery Fun

  • Home
  • About
    • Look Book
  • Contact
    • Collaborate?
  • Tutorials
  • Shop
  • Freebie
    • Email
    • Facebook
    • Instagram
    • Pinterest

Keep up to date with the latest posts!

DIY.. Applique On A Baby Bib

in Applique, DIY Projects on 13/11/13

I shared my baby bib pattern with you all on Monday. It brought back a lot of memories. Wow time flies! Maybe it’s time to have another baby..? Scary thought. Middle of the night feedings, early mornings, no sleep, bottles, bottles and dish pan hands…

After writing the post for the bib I realized that have a friend’s baby shower coming up. It became the perfect opportunity to sew another bib. I thought it would be fun to appliqué the first letter of the baby’s name on the front.. I added a cute little crown for extra pizzazz.

Materials Needed:

  1. 2 colors cotton fabric
  2. Terry towel to match
  3. Velcro
  4. Fusible Web – Pellon EZ Steam works great
  5. Sewing materials and sewing machine
  6. Iron and ironing board
  7. Pen and paper

Here is the quick and easy on sewing a baby bib:

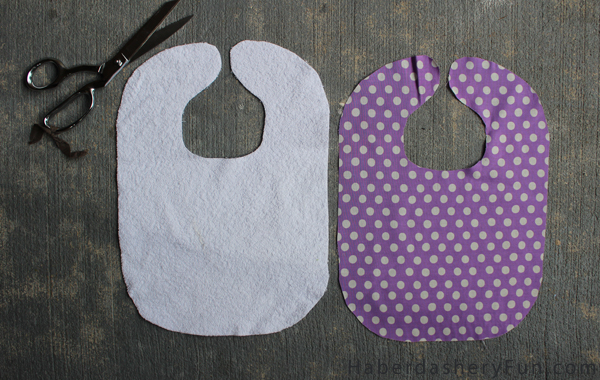
Download my pattern, click here for the pattern. The pattern is in 2 pieces, so you will need to tape the paper together. Cut 1 piece from your main fabric and another from the terry towel.

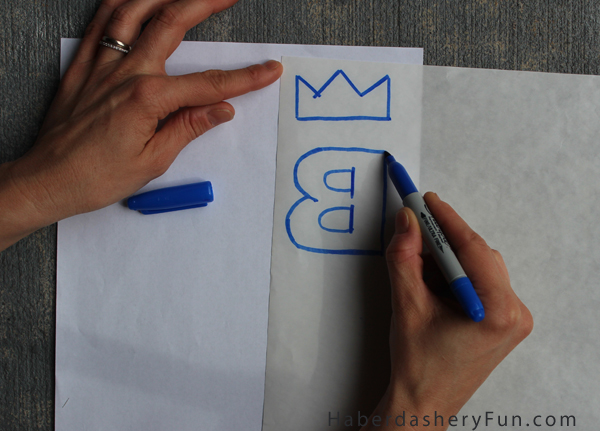
Print your letter. For my bib pattern, a 250 font size works nicely. Trace the letter in REVERSE. Not sure why? Trace the letter the regular way and you will see.. I promise once you trace the letter the wrong way, adhere it onto the fusible web, cut the letter out.. Ugh, you’ll remember this step each time.

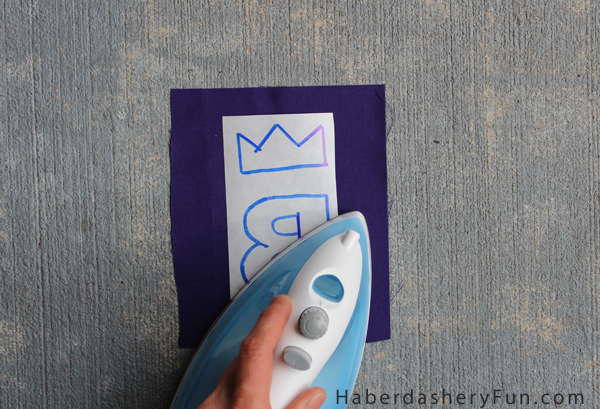
Iron the fusible web onto your solid fabric.

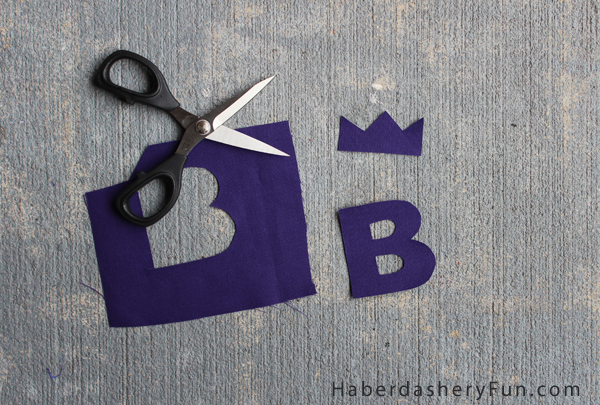
Carefully cut out your letter and symbol.

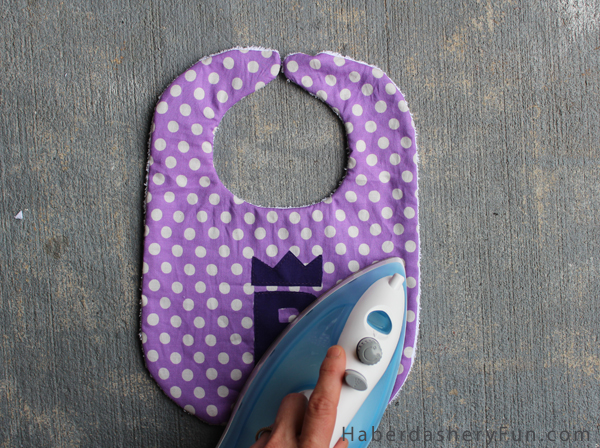
Peel the backing off and stick to the fabric. Make note of the 3/8″ seam allowances and the bib’s center. Once you like the placement, iron to set in place. Place into your sewing machine and appliqué around the edges. I chose to use a straight stitch, but went around the letter and crown 2 times.

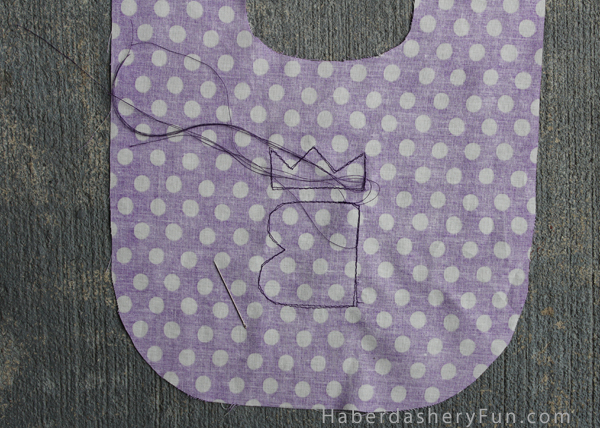
Pull your threads to the back. This is optional. I don’t like little threads hanging around looking messy.

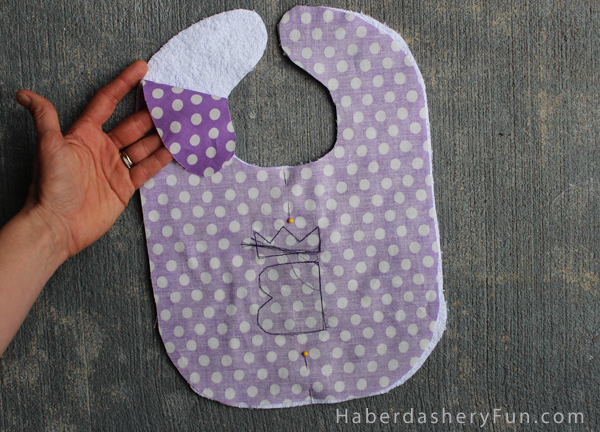
Set right sides together and pin. Place into sewing machine and stitch with a 3/8″ seam allowance. Leave a 2″ – 3″ opening at the bottom.

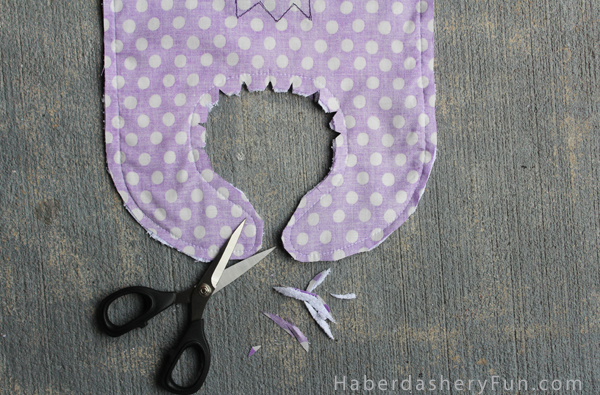
Trim the tips of the bib. Notch the inside edge of the bib.

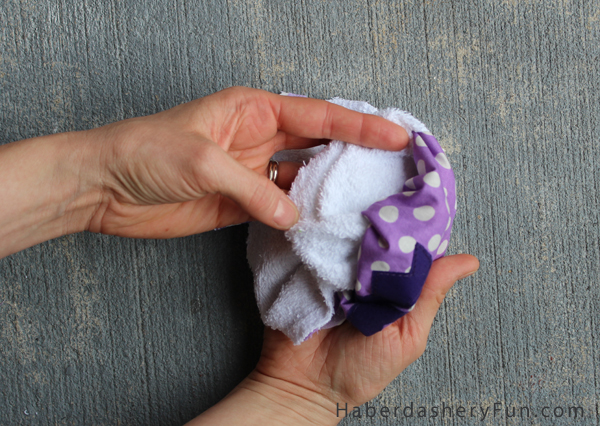
Pull the bib right side out.

Press, press, press the bib.  Jiggle the curves into place and iron again to set the seams. Turn under the bottom opening seam allowance and iron the seam. Pin. Place into sewing machine and topstitch around the outside edge of the bib.  For the velcro, place the soft side onto the fabric and the hard side onto the terry towel. You don’t want the terry towel getting caught in the velcro when opening and closing the bib. Stitch around the edges and secure with an X.

I chose to place my label in the bottom opening.. If you don’t have a label, insert a small piece of satin ribbon. Babies love labels!!

That’s it!! Super easy, right? Check back in on Friday, I will be sharing an even EASIER matching burp cloth. Burp cloth and bib, this makes a perfect combination.  Hello cool baby shower gift, Hello awesome Christmas present..

Happy Sewing.

Related Posts Plugin for WordPress, Blogger...

6 Comments

« Baby Bib Pattern Now Available
Sew A Super Easy Baby Burp Cloth »

Comments

  1. Sue says

    11/13/2013 at 6:57 pm

    This is adorable! Do you have to sew the letter after you use the steam-a-seam stuff? Or is this so it stays when you wash it?

    Reply
    • Haberdashery Fun says

      11/13/2013 at 8:40 pm

      Hi Sue. Can’t believe you are going to have a baby any day now!! I would still stitch around the outside of the bib after you set it with an iron. When an item is washed a lot [like a bib] I think it’s a good idea to stitch down.

      Reply
  2. Angela Jackson says

    11/13/2014 at 7:35 am

    The bibs would have been great if you used a snap button instead of a velcro. A velcro can be easily pulled off by the baby.

    http://ghcbibs.com

    Reply

Trackbacks

  1. DIY..Baby Bib Pattern Now Available | Haberdashery Fun says:
    11/13/2013 at 3:37 pm

    […] Click this link to appliqué on the bib’s front – Baby bib appliqué […]

    Reply
  2. DIY.. Easy Baby Birp Cloth | Haberdashery Fun says:
    11/15/2013 at 11:51 am

    […] from earlier this week. You can access the bib pattern here and see the sewing/applique tutorial here. I suggest using matching fabric when you make the birp cloth. Together they make bib an awesome […]

    Reply
  3. DIY Baby Bib Trio | Haberdashery Fun says:
    12/23/2015 at 3:10 pm

    […] items? Check out my tutorial for an on the go changing pad, bath toy bag and a great tutorial on appliquéing this baby bib [ plus a burp […]

    Reply

Leave a Reply Cancel reply

Your email address will not be published. Required fields are marked *

This site uses Akismet to reduce spam. Learn how your comment data is processed.

About me


Hi there - I'm Marni Weaver. A sewer, a sometimes quilter and a lover of fabric design. I started this blog to share my ideas. Come Join the Fun
shop now

Popular Categories

project for baby fabric projects seasonal projects fat quarter projects sewing tips and tricks inspiration

Categories

  • Applique
  • Baby
  • Bags and Pouches
  • Block Printing
  • Color
  • DIY Projects
  • Fabric
  • Fabric Design
  • Fat Quarter Projects
  • Home Decor
  • Inspiration
  • Just for Fun
  • Kids
  • No Sew
  • Patterns
  • Print On Fabric
  • Quilting
  • Scrap Fabric Projects
  • Seasonal
  • Sewing Tips & Tricks

Lovely sponsors

Recent Comments

  • Make A Simple Block Print Tote Bag | Haberdashery Fun on DIY.. Colorful Dish Towel Tote Bags
  • Make A Simple Block Print Tote Bag | Haberdashery Fun on Sew Asymmetrical Color Block Totes Tutorial
  • Make A Block Printed ToteBag | Haberdashery Fun on Sew A Reversible Tote
  • Make A Block Printed ToteBag | Haberdashery Fun on Quick Tip.. Sewing Boxed Corners
  • 20 Creative DIY Storage Bin Ideas - DIY & Crafts on Sew An Easy Fabric Storage Bin

Projects Elsewhere

find me on Pellon Projects sew mama sew contributor

momtastic contributor

Pinterest

Visit Marni@Haberdashery Fun's profile on Pinterest.
Follow on Bloglovin

I'm Reading

  • Cluck Cluck Sew
  • Cooking Dangerously
  • In Color Order
  • Jen Hewitt
  • Jolly Jabber
  • Karly Spalding Photography
  • Leigh Laurel Studios
  • Lindsay Sews
  • Lotta Jansdotter
  • Love Patchwork and Quilting Magazine
  • Made
  • Making It Lovely
  • Noodle-Head
  • Polka Dot Chair
  • Sharon Holland Designs
  • Silhouette America Blog
  • Silhouette Design Store
  • The Purl Bee
  • The Purple Fig

Press:

Stitch Winter 2014

haberdashery_fun

Marni Weaver
I have a drawer where I keep all of my block print I have a drawer where I keep all of my block printed papers and have often wondered.. “What the heck do I do with all of these”.

How about you?

I recently found a bunch of  tutorials over at @modpodgerocks and thought it would be fun to make wood coasters with my block prints. They turned out better than expected and so I thought to share with you.

Want more info? I created a blog post. See the link in my profile for the blog post and details. 

Day27/100 #100dayproject #dothehundreddayproject #100daysofsimpleshapes #haberdasheryfun #blockprintingmadesimple #onlineclasses #zoomworkshops #haberdasheryfunpatterns #haberdasheryfunclasses #handmadestamp #modpodge #modpodgecrafts #decoupageart #decoupagelovers #blockprintedbyhand
I’m sharing about how to frame your block printe I’m sharing about how to frame your block printed fabric on my blog today. Day 26/100 #100dayproject 

If you have ever thought you would like to learn how to block print… I have a course for you. It is called Block Printing Made Easy. It is all about the basics - working with simple shapes, design prompts and getting creative on paper and fabric.

This is an online course and starts on Monday, May 30. There are 3 modules with videos and also included in the course are 3 live zoom workshops. The videos are self paced, so the good news is you can cruise through them or take all the time you need.

The course is $97 USD.

See the link in my profile for additional details on the course( breakdown on each module) and to also access to my blog post.

#dothe100dayproject #haberdasheryfun 
#blockprintingmadeeasy #100daysofsimpleshapes #zoomclasses #haberdasheryfunpatterns #speedballfabricink #handmadefabrics #dothe100dayproject2022 #100dayproject2022 #handmadestamps #blockprintedfabric #ikeahacks #ikeaframes
Goodbye triangles, hello circles. I’m working Goodbye triangles, hello circles. 

I’m working on a project, so I printed a bunch of small fabric squares with my new circle stamp. Such a simple yet effective stamp.

I am launching an online course called “Block Printing Made Easy? Want to learn to block print? The course starts in two weeks (5/30). Want more info? See the link in my profile to join the waitlist and also to view the course details. 

Day 25/100 #100dayproject 

#dothe100dayproject #dothe100dayproject2022 #haberdasheryfun #haberdasheryfunpatterns #pdfpattern #blockprinting #blockprintingonfabric #blockprintingmadeeasy #blockprintingworkshop #speedballfabricink #konacottonsolids #speedballart
I’ve got one more triangle print to share and I I’ve got one more triangle print to share and I think that’s a wrap. Simple and easy. The pin cushion on that right that was gifted to me from my grandmother Mor Mor really takes the stage in my opinion 

The circle shape is next. I’m excited to work with no corners and see what will unfold.

Day 24/100
#haberdashery #100dayproject 
#100daysofsimpleshapes #blockprintingmadeeasy #dothe100dayproject #dothe100dayproject2022 
#haberdasheryfun #ikeahacks #konacotton #konacottonsolids 
#speedballfabricink #blockprinting #easyblockprint #haberdasheryfunpatterns #haberdasheryfunclasses
A mash up of triangle stamps I created so far duri A mash up of triangle stamps I created so far during the #100dayproject.
 
Who knew the triangle shape could be so much fun? I have had a blast the last playing around with it - both dissecting the shape and putting it back together. 

Which one is your favorite?

I can’t believe I am saying this, but Im ready to move on to a new shape. One that is more soft and organic. Next up, the circle!
Day 23/100

#100daysofsimpleshapes 
#haberdashery 
#blockprinting 
#blockprintingonfabric 
#blockprintingmadeeasy 
#haberdasheryfun
#speedballfabricink #speedballink #fatquarters 
#handmade #dothe100dayproject2022 
#100dayproject2022
Follow on Instagram

Copyright © 2022 · Klar theme by Crimson Pear :: web & surface design

Copyright © 2022 · Klar on Genesis Framework · WordPress · Log in