Haberdashery Fun

  • Home
  • About
    • Look Book
  • Contact
    • Collaborate?
  • Tutorials
  • Shop
  • Freebie
  • Block Printing Course
    • Email
    • Facebook
    • Instagram
    • Pinterest

Keep up to date with the latest posts!

DIY.. Make A Baby Bib

in Baby, DIY Projects on 17/12/12

The countdown is on.  I hope you are all having a wonderful December.

My 3rd Happy Holidays project is near and dear to my heart, although I never thought I would be saying that about sewing baby bibs!  The cute little model is my 10 month old Tanner.  He seems to like the bib, right?

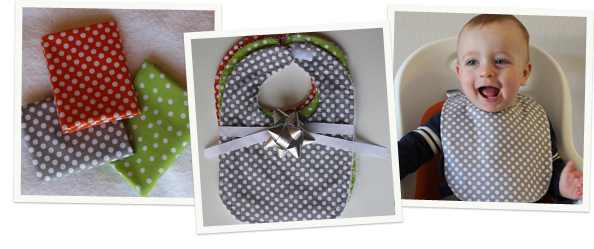
There are many “trio” gifts out there right now – especially with little makeup bags.  Your bibs will look cute when made from matching fabric and wrapped up with a ribbon.  I felt this was the perfect project to jump on board the trio trend.

Materials needed:

  1. 3 fat quarters of matching/ combination fabric
  2. Terry towel to match
  3. Velcro strips to match
  4. Top stitching thread
  5. Sewing machine and related supplies
  6. Iron and ironing board

UPDATE.. The bib pattern is now available. Click on the link to download the pattern HaberdasheryFun-Baby-Bib-Pattern.pdf

Please note that the bib is on the larger size. My son is 10 months old and fits him. Might be a tad long on a newborn.
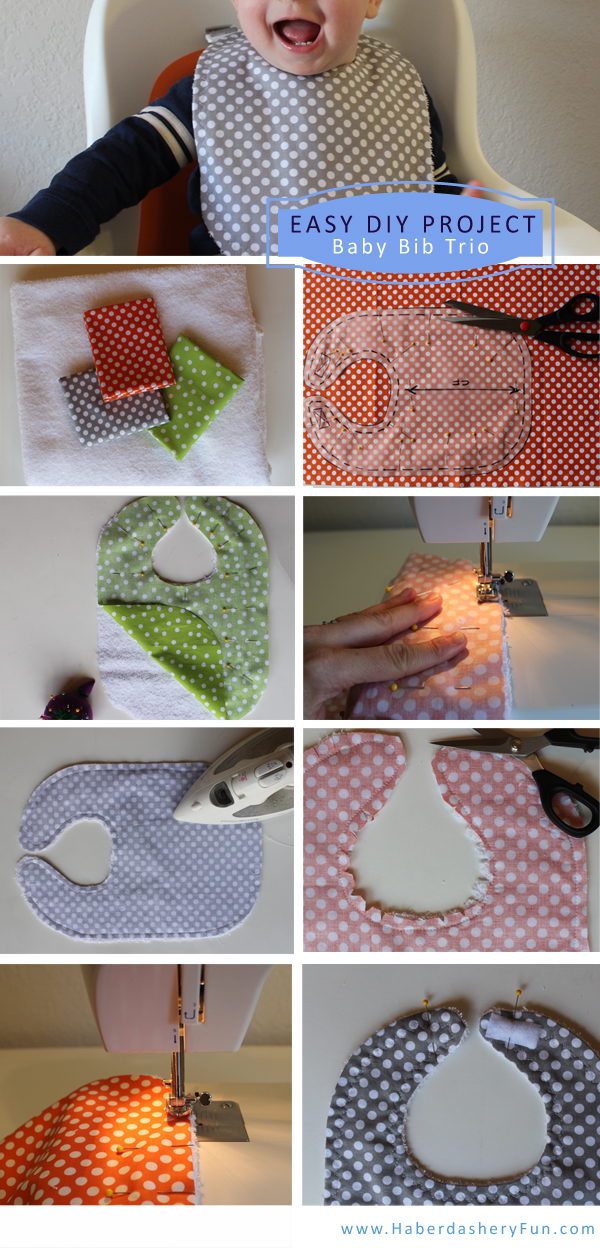
8 easy steps:

  1. Gather materials.  You can make 2 bibs out of 1 fat quarter.  Make sure the fabric matches somehow. Find prints that are fun and modern.  Wash the terry towel so it has a soft hand to it.  Either print pattern the pattern I will be sharing or trace an existing baby bib that you have on hand.  If you are tracing a bib – remember to ADD 1/4″ – 1″2″ seam allowance all the way around..
  2. Pin down bib pattern onto 1st fabric and cut out.  For each bib you will need to cut 1 of the self/ colorful fabric and 1 of the terry towel.  Repeat cutting 3 times for the trio.
  3. Pin the bibs together – right sides facing each other.
  4. Sew the bib along the outside edge.  Leave a 2″ opening at the bottom of the bib. This will be where you turn the bib into itself and make it right side out.
  5. Press the seams.  This helps with the quality aspect of your bibs.  Remember to press as you sew.
  6. Notch the inside neck edge.  This helps with the extra fabric and the curve.  Then clip the outside curve edges.  This will also help with the curves when you turn your fabric right side out. Remember to only notch and clip shallow into the seam allowances – DO NOT cut into your stitch lines..
  7. Turn right side out and press seams again.  Top stitch along the outside edge using a decorative stitch. I chose a zig zag stitch.
  8. Velcro placement.  Cut your Velcro into 1″ strips.  Place at top corner/neck area and pin down.  Double check your placement is correct – 1 side of the Velcro is on fabric side and the other is on the terry towel side… Also, make sure the hard Velcro side is sewn down onto the terry towel side and the soft Velcro side is sewn onto the fabric side.  This will will ensure the Velcro doesn’t pull at the terry towel.

Want to sew more baby items? Check out my tutorial for an on the go changing pad, bath toy bag and a great tutorial on appliquéing this baby bib [ plus a burp cloth].

That’s it – Happy sewing!!

21 Comments

« Happy Holidays DIY.. Naughty vs Nice Pillow
Holiday DIY – Make An Easy Apron »

Comments

  1. tanya nargolcski says

    12/24/2012 at 12:53 pm

    great project!! never knew it was so easy! I am making one as soon as christmas is over!!

    Reply
  2. phyllis says

    07/19/2013 at 7:04 pm

    i love the bib but i cant find the pattern , did i over look .

    Reply
    • Haberdashery Fun says

      07/24/2013 at 10:30 am

      Hi Phyllis, Thank you for reaching out. I didn’t post a pattern on the bib. I traced an existing bib that I had on hand.. I hope this helps.

      Reply
      • Tracey says

        08/25/2013 at 6:07 pm

        I would love to try this but don’t have a pattern or baby bib to trace. Hope you are able to post your pattern – I thought I read that you were going to be posting one in your directions!

        Reply
        • Haberdashery Fun says

          08/25/2013 at 8:54 pm

          Hi- Thanks for stopping by. You are the second person to request the pattern, so you have convinced me and I will get a pattern up!! 🙂 I will work on it and have something in the next 2 weeks. I will let you know when it is available. Thanks again. Marni

          Reply
          • Kim says

            10/16/2013 at 1:10 pm

            I love your bibs. I am looking for the pattern. Did it expire? I’m going to make it but before putting it together I’m going to machine embroider on it.

          • Haberdashery Fun says

            10/16/2013 at 7:07 pm

            HI – thanks for stopping by. No, the bib pattern didn’t expire. I haven’t had the chance to get it up online yet.. I will get it up very soon – promise!! I ahve had too many requests for it. Also,I think it is a great idea to do the embroidery first.. Just in case.. 🙂

  3. Mehnaz says

    10/24/2013 at 1:17 pm

    About what size were your bibs (how many can you make from a fat quarter)?

    Reply
    • Haberdashery Fun says

      10/24/2013 at 1:26 pm

      Hi – great news! I will have the bib pattern to share in about 2 weeks! I will email you when it is up. Not including the lining [terry towel], you can make 2 bibs from a fat quarter.

      Reply
  4. Trudy Carey says

    11/05/2013 at 10:17 am

    Hi there, can you please send me your pattern too when u have it ready. Such a great idea and personal touch!

    Reply
    • Haberdashery Fun says

      11/05/2013 at 10:36 am

      HI – for sure. I have it ready and will be sharing it on my blog next week 🙂 . I’m super excited to see what everyone comes up with. I’m thinking of starting a HaberdasheryFun flickr group so I can see everyone’s projects

      Reply
  5. Angela Jackson says

    11/07/2014 at 3:35 am

    The bibs would have been great if a snap closure was used. The velcro is just gonna get pulled off easily.

    http://ghcbibs.com

    Reply
  6. Dorothy-Ann says

    09/12/2015 at 9:42 am

    What do you mean by “3 fat fabric”? I would like to make the bib, but like others, I am looking for a pattern. Thanks.

    Reply
    • Haberdashery Fun says

      09/12/2015 at 10:21 am

      Hi Dorothy-Ann,

      Thank you for stopping by. It looks like a typo and What I meant to say was — 3 fat quarters of matching or combination fabric. The pattern is available on the blog as a downloadable PDF. You just need to click on the link to the pattern, it’s right under the materials section.

      Let me know if you have any questions and I’d love to see your finished bibs! 🙂

      Marni

      Reply

Trackbacks

  1. No Fail Baby Bib Tutorial | Go To Sew says:
    02/02/2013 at 8:17 am

    […] A baby bib is a great beginner sewing project. Practice sewing straight lines, curves and topstitching with this no fail baby bib tutorial from Haberdashery Fun. […]

    Reply
  2. DIY..Baby Bib Pattern Now Available | Haberdashery Fun says:
    11/11/2013 at 9:32 am

    […] Click this link for the tutorial – Baby bib sewing steps […]

    Reply
  3. Adorable DIY Baby Bibs - Step-by-Step Tutorials | For Women says:
    01/19/2014 at 11:21 am

    […] DIY and photo credit to: https://haberdasheryfun.com […]

    Reply
  4. Spring Awakening | Liligo Life says:
    04/08/2014 at 2:33 pm

    […] used a pdf pattern from a pinterest search for bibs. The pattern and instructions are really clear and easy to […]

    Reply
  5. 5 Best DIY Baby Gifts | You Put it Up says:
    07/17/2014 at 4:55 pm

    […] (source) […]

    Reply
  6. Have Your Cake & Wear it Too – Sewing Notes says:
    02/02/2016 at 11:16 pm

    […] Haberdashery offers a clear and precise pattern and directions for a bib, as well as patterns for a changing pad ands burp […]

    Reply
  7. Sew Heart Shaped Baby Burp Cloths | Haberdashery Fun says:
    07/21/2016 at 5:45 pm

    […] Baby Bibs […]

    Reply

Leave a Reply Cancel reply

Your email address will not be published. Required fields are marked *

This site uses Akismet to reduce spam. Learn how your comment data is processed.

About me


Hi there - I'm Marni Weaver. A sewer, a sometimes quilter and a lover of fabric design. I started this blog to share my ideas. Come Join the Fun
shop now

Popular Categories

project for baby fabric projects seasonal projects fat quarter projects sewing tips and tricks inspiration

Categories

  • Applique
  • Baby
  • Bags and Pouches
  • Block Printing
  • Color
  • DIY Projects
  • Fabric
  • Fabric Design
  • Fat Quarter Projects
  • Home Decor
  • Inspiration
  • Just for Fun
  • Kids
  • No Sew
  • Patterns
  • Print On Fabric
  • Quilting
  • Scrap Fabric Projects
  • Seasonal
  • Sewing Tips & Tricks

Lovely sponsors

Recent Comments

  • Easy Little Kid Sewing Project | Haberdashery Fun on DIY.. Make Monster Inspired Face Cloths
  • Easy Little Kid Sewing Project | Haberdashery Fun on DIY.. Easy Toddler Apron
  • HaberdasheryFun and an easy Kraft-tex sewing project | Haberdashery Fun on Collapsible Kraft-Tex Bowl
  • HaberdasheryFun and an easy Kraft-tex sewing project | Haberdashery Fun on Sewing With Kraft-Tex
  • 3 Simple Summer Sewing Tutorials | Haberdashery Fun on Sew A Canvas Zipper Pouch

Projects Elsewhere

find me on Pellon Projects sew mama sew contributor

momtastic contributor

Pinterest

Visit Marni@Haberdashery Fun's profile on Pinterest.
Follow on Bloglovin

I'm Reading

  • Cluck Cluck Sew
  • Cooking Dangerously
  • In Color Order
  • Jen Hewitt
  • Jolly Jabber
  • Karly Spalding Photography
  • Leigh Laurel Studios
  • Lindsay Sews
  • Lotta Jansdotter
  • Love Patchwork and Quilting Magazine
  • Made
  • Making It Lovely
  • Noodle-Head
  • Polka Dot Chair
  • Sharon Holland Designs
  • Silhouette America Blog
  • Silhouette Design Store
  • The Purl Bee
  • The Purple Fig

Press:

Stitch Winter 2014

haberdashery_fun

Marni Weaver
Block and paper print from Saturday’s workshop. Block and paper print from Saturday’s workshop. This was a fun workshop to lead. Such an awesome group with great questions and engagement. Many new friends to follow here on IG❤️

Thank you to everyone who signed up or attended a workshop this Spring. 

I love teaching about simple shapes. It really is eye opening when you start deconstructing a repeat pattern into super simple shapes!

My block printing made easy online class starts today with module 1 out now. It will be offered again this August. More workshops and details to come. 

#haberdasheryfun #blockprintingmadeeasy #simpleshapes #surfacepattern #surfacepatterndesign #memademay2023 #100dayproject #100dayproject2023 #easycarve #haberdasheryfunclasses
One more, one more.. I had so much fun, I’m offe One more, one more.. I had so much fun, I’m offering one more workshop for the spring season.

This Saturday, May 20th @ 10am est. Come join the fun!

I love teaching the basics to block printing using simple shapes. Feel like you can’t draw? thats ok, I have a guided worksheet that we use. 

If you cant make the workshop and want a deep dive into block printing, my online course starts this Monday, May 22. It’s a 3 week adventure with self paced video modules, worksheets and Saturday Live Q&As

Link in profile has details for the free workshop and my course.

#haberdasheryfun #blockprintingmadeeasy #simpleshapes #memademay2023 #blockprintingsimpleshapes #surfacepatterndesign #100dayproject #100dayproject2023 #memademay #konacotton #konacottonsolids
Sharing a few simple blocks from the last few week Sharing a few simple blocks from the last few weeks of workshops. I had a blast teaching these workshops. So I am now considering adding one more workshop this week. Should it be daytime or in the evening? I would love to hear your thoughts.

TBD on date and time, will share more details here and a sign up page in the next few days.

#blockprinting #blockprintingmadeeasy #haberdasheryfun #haberdasheryfunpatterns #surfacepatterndesign #memdemay2023 #100dayproject2023 #100dayptoject #haberdasheryfunclasses #printwithspeedball
What a fun workshop yesterday. Thanks to all who j What a fun workshop yesterday. Thanks to all who joined and gave their  time and energy. We had participants from South Africa to Austria to Canada and here in the US. I love it b/c I am from Alberta Canada and live in Atlanta.

My workshops are only an hour and we have alot to accomplish.. but I love hearing where are from and what they are up to! 

We even had a brief appearance from the cutest 11mos old ❤️🎉 

I played with the same shape the last 3 workshops and had fun seeing what could be made with the half moon shape. Now what yo do next?? Sew something or have fun with them in illustrator 

#haberdasheryfun #haberdasheryfunpatterns #onlineclasses #blockprintingmadeeasy #memademay2023 #100dayproject #100dayproject2023 #surfacepatterndesign #blockprintedfabric #konacotton #konacottonsolids
I’m hosting one last workshop this week. Come jo I’m hosting one last workshop this week. Come join in for some fun creating block prints with simple shapes. 

Can’t draw? Don’t feel inspired or imaginative?? That’s ok. I promise block printing can be fun and easy.

Sign up details in the link in my profile. See you Wednesday ❤️

#haberdasheryfun #blockprintingmadeeasy #haberdasheryfunpatterns #zoomclasses #surfacepatterndesign #memademay2023 #100dayproject #blockprinting #fabricdesign #fabricdesigner #blockprinted
Follow on Instagram

Copyright © 2023 · Klar theme by Crimson Pear :: web & surface design

Copyright © 2023 · Klar on Genesis Framework · WordPress · Log in