Haberdashery Fun

  • Home
  • About
    • Look Book
  • Contact
    • Collaborate?
  • Tutorials
  • Shop
  • Freebie
  • Block Printing Course
    • Email
    • Facebook
    • Instagram
    • Pinterest

Keep up to date with the latest posts!

DIY.. Velcro Kids Activity Bag

in Bags and Pouches, DIY Projects on 28/08/14

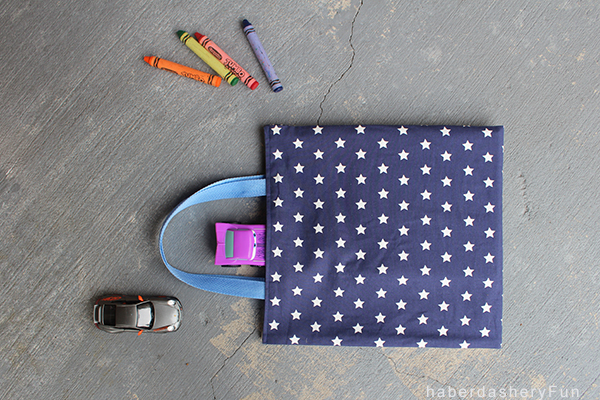
My husband and I like to dine out and usually bring our 2 1/2 year old son Tanner with us. Over the last 12 months it has gone from an easy dinner to total chaos.

We always bring a bag stuffed full of goodies for his entertainment. It’s messy and irritates us everytime we use it. For quite some time I’ve envisioned sewing a special bag that keeps everything nice and neat. The sides would “open” and be secured with strips of VELCRO® Brand product.  Tanner could see everything inside because of clear pockets.

So with another family night looming on the horizon, I knew it was the perfect time to get my project rolling!
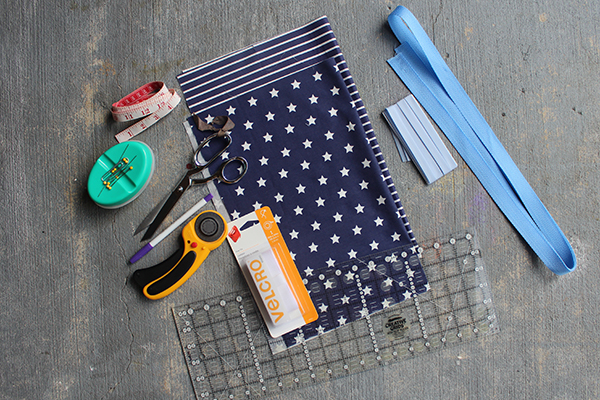
 

Materials needed:

  1. Cotton fabric – 2 colors, 1/2 yard of each
  2. Fusible interfacing – Pellon SF works great, 1/2 yard
  3. VELCRO® Brand Soft & Flexible Sew-On Fasteners – 1 box
  4. Clear vinyl – 8 gauge, 1/2 yard
  5. Webbing for straps – 1/2 yard
  6. Bias tape – store bought or home-made
  7. Sewing supplies
  8. Disappearing fabric ink pen
  9. Cutting mat, rotary cutter and quilting ruler
  10. Wonder clips – optional
  11. Sewing machine
  12. Iron and ironing board

Before we get started you will need to do the following:

Cut your pieces:

  1. Main and lining fabric – cut 2 rectangles measuring 29″ L x 13-1/2″W
  2. Fusible interfacing – cut 2 pieces measuring 29″ L x 13-1/2″W
  3. Clear vinyl – cut 1 piece measuring 22″L x 13-1/2″W
  4. VELCRO® Brand Soft & Flexible Sew-On Fasteners  – cut 2 pieces 12″ long
  5. Webbing – cut 2 pieces 16″ long
  6. Bias binding – cut 2 pieces 13-1/2″ long

Fuse the interfacing to the wrong sides of the main and lining fabrics.

Alright, let’s get started:

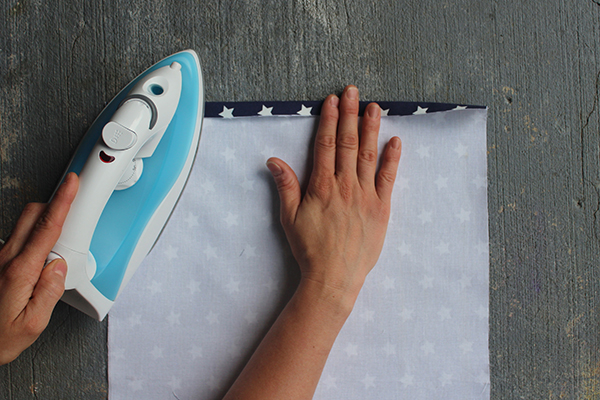
Step 1-  Turn and fold 1/2″  the short ends of both the main and lining pieces. Press in place with an iron.

Step 2 – Place the clear vinyl onto your working surface. Along the longer edge, measure inwards 5/8″ and make a small mark. Continue along the entire length and mark a very light dashed line. Open up the VELCRO® tape. At the 5/8″ dashed line, place one side of the VELCRO® tape. Continue on the same side and now place the other side of the VELCRO® tape. Secure with a pin. Place into your sewing machine and stitch the VELCRO® down. Repeat for the other side.

Step 3 – Now place the bias tape along each short side. Cover the VELCRO® ends. Place into your sewing machine and sew down. Cut off any extra bias tape off each end.

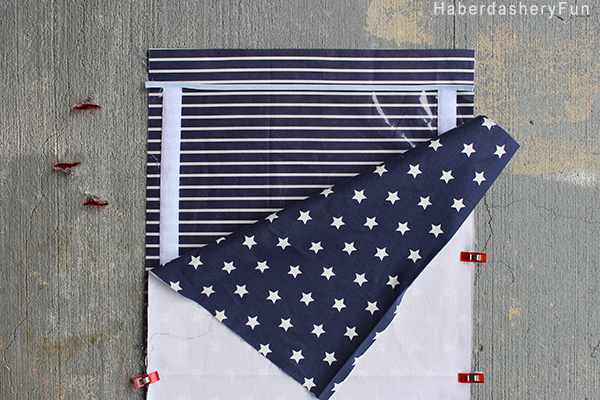
Step 4- Sandwich your materials. Lay the lining fabric down on your working surface, right side facing up. Next lay the vinyl rectangle down.  The right sides of the VELCRO® tape should be facing the lining fabric. Lastly, lay the main fabric on top of the vinyl. Main fabric should be facing right side down. Use wonder clips or pin in place. Remember that pins will leave holes in the vinyl, so pin carefully.

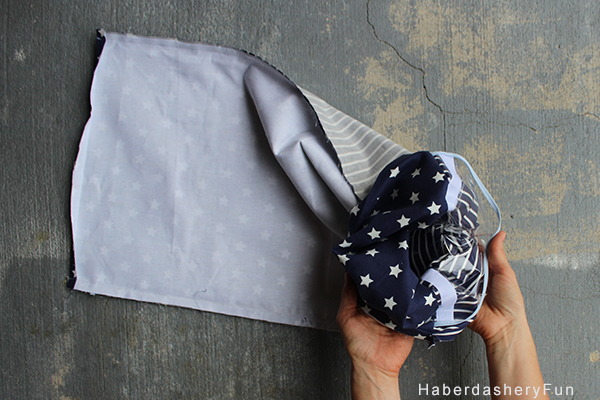
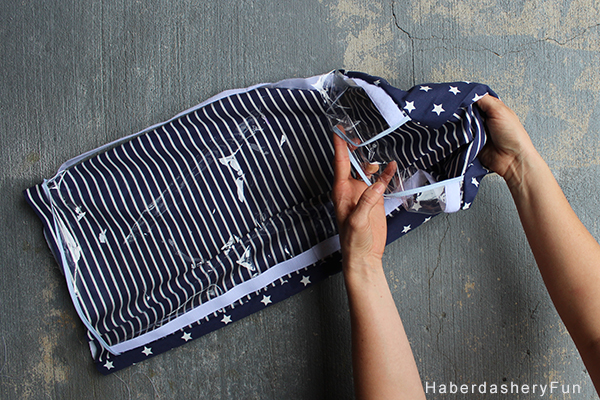
Step 5 – Place into your sewing machine and stitch the long sides together with a 1/2″ seam allowance. Backstitch at each end. Gently pull the fabric right side out. Smooth in place.

Step6b

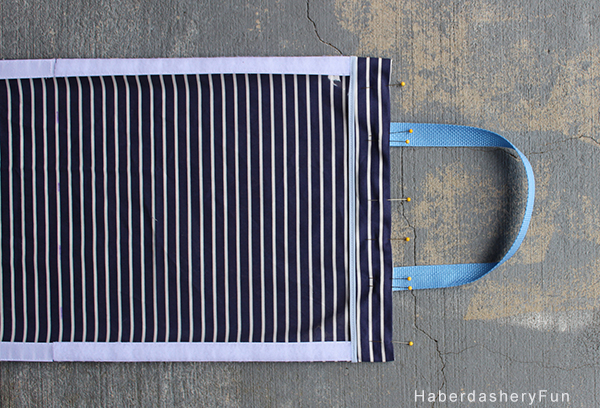
Step 6 – Decide on strap length. Make sure each short end is still folded under 1/2″. Measure inwards 3″ from each side and insert the webbing strap. Pin in place. Stitch along the end to secure the straps. Repeat for the other side.

Step 7 – Fold and find the centre of the bag. It should be where the VELCRO® tape ends and begins. Place a ruler down along the center and mark a dashed line. Place into your sewing machine and stitch following the line. This completes the bottom of the bag and the stitch line will hold all your goodies securely in each side.

That’s it.  A super easy project and a perfect bag for a family on the go! VELCRO® Brand provided me with the materials for this post, but all opinions are my own. If you remember from many previous blog posts.. I use their products quite often and love sewing with them.

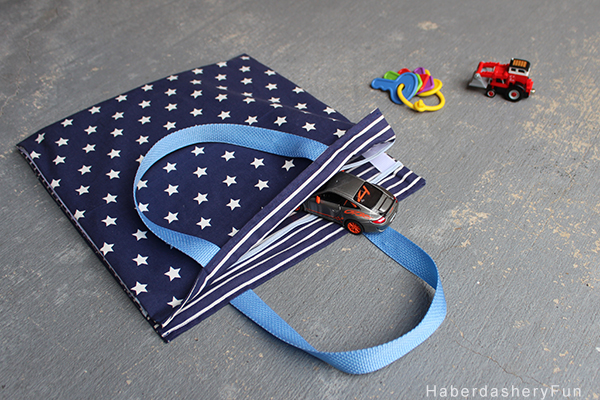
Fabric – I LOVE this fabric, so I thought I would share the info.. It’s from Dear Stella Designs and the fabric collection is called “Seaworthy”.

Happy Sewing!

18 Comments

« Inspired By.. Dear Stella Designs
August Round Up »

Comments

  1. Anne Weaver says

    08/29/2014 at 5:00 pm

    This is SOOO smart!! I’ve got a Craft Gossip post scheduled for tomorrow morning that links to your tutorial:
    http://sewing.craftgossip.com/tutorial-kids-activity-bag-with-velcro-sides/2014/08/30/
    –Anne

    Reply
  2. Alexis @ Persia Lou says

    09/03/2014 at 10:40 pm

    What a great idea! And it turned out so cute! Thank you so much for sharing with us at The Makers. 🙂

    Reply
  3. Mari says

    09/13/2014 at 6:51 pm

    Great share! Saved to my must try folder 🙂

    Reply
    • Haberdashery Fun says

      09/14/2014 at 1:40 pm

      Thank you. It’s super easy to sew and really handy.

      Reply
  4. Ren says

    09/14/2014 at 8:43 am

    THIS IS FABULOUS! I love the bag and the fabrics you used for it.

    I would love for you to join us and link up at Inspire Us Thursday: Sew Needle Stitch Hook on The Inspired Wren.

    Reply
    • Haberdashery Fun says

      09/14/2014 at 1:40 pm

      Thanks for stopping by and leaving a comment. I will stop by for sure

      Reply
  5. Toys says

    06/20/2015 at 7:41 am

    Very shortly this web site will be famous among all blogging visitors, due to it’s nice posts

    Reply
  6. www.imemoji.com says

    08/05/2015 at 6:43 am

    Great information. Lucky me I recently found your blog by chance (stumbleupon).
    I have bookmarked it for later!

    Reply
  7. what is adsense safe traffic says

    09/08/2015 at 11:36 pm

    Hi there to every body, it’s my first go to see
    of this website; this blog carries amazing and truly excellent data designed for readers.

    Reply

Trackbacks

  1. Inspired By.. Dear Stella Designs | Haberdashery Fun says:
    08/28/2014 at 9:49 am

    […] with Tanner in mind, so it makes me happy that he actually likes it! I’m sharing an easy kids activity bag tutorial with the stars and stripes on it tomorrow. A post is in the works with the boats and fishies… […]

    Reply
  2. Tutorial: Kids activity bag with Velcro sides – Sewing says:
    08/30/2014 at 9:33 am

    […] DIY Velcro Kids Activity Bag, by Haberdashery Fun […]

    Reply
  3. August Round Up | Haberdashery Fun says:
    09/02/2014 at 10:37 am

    […] Velcro Kids Activity Bag – Collaboration with the Velcro Brand […]

    Reply
  4. 7 Awesome Fabric Projects #CreateLinkInspire « Create Link Inspire Features « Marvelous Mommy says:
    09/13/2014 at 5:55 pm

    […] 7. DIY Velcro Kids Activity Bag […]

    Reply
  5. Frugal Crafty Home Blog Hop #93 says:
    09/14/2014 at 9:01 pm

    […] DIY Velcro Kids Activity Bag […]

    Reply
  6. 25 Sewing Gifts For Kids - Lil' Mrs. Tori says:
    10/06/2014 at 7:02 am

    […] Velcro Kids Activity Bag // Haberdashery Fun […]

    Reply
  7. DIY.. Top 5 Vinyl Sewing Projects | Haberdashery Fun says:
    10/14/2014 at 9:33 am

    […] Velcro and Vinyl Kids Activity Bag […]

    Reply
  8. DIY Projects to make for Kids {Bewitchin' Projects} - Artsy Momma says:
    01/18/2015 at 12:08 pm

    […] DIY Kids Activity Bag – make this to use in the home or on-the-go! […]

    Reply
  9. Velcro Activity Bag - Sewtorial says:
    05/20/2015 at 10:00 am

    […] this Velcro Activity Bag by Haberdashery Fun is a dream. It features VELCRO® for easy opening and it’s lined with clear vinyl for easy […]

    Reply

Leave a Reply Cancel reply

Your email address will not be published. Required fields are marked *

This site uses Akismet to reduce spam. Learn how your comment data is processed.

About me


Hi there - I'm Marni Weaver. A sewer, a sometimes quilter and a lover of fabric design. I started this blog to share my ideas. Come Join the Fun
shop now

Popular Categories

project for baby fabric projects seasonal projects fat quarter projects sewing tips and tricks inspiration

Categories

  • Applique
  • Baby
  • Bags and Pouches
  • Block Printing
  • Color
  • DIY Projects
  • Fabric
  • Fabric Design
  • Fat Quarter Projects
  • Home Decor
  • Inspiration
  • Just for Fun
  • Kids
  • No Sew
  • Patterns
  • Print On Fabric
  • Quilting
  • Scrap Fabric Projects
  • Seasonal
  • Sewing Tips & Tricks

Lovely sponsors

Recent Comments

  • HaberdasheryFun and an easy Kraft-tex sewing project | Haberdashery Fun on Collapsible Kraft-Tex Bowl
  • HaberdasheryFun and an easy Kraft-tex sewing project | Haberdashery Fun on Sewing With Kraft-Tex
  • 3 Simple Summer Sewing Tutorials | Haberdashery Fun on Sew A Canvas Zipper Pouch
  • 3 Simple Summer Sewing Tutorials | Haberdashery Fun on Sew Asymmetrical Color Block Totes Tutorial
  • 3 Simple Summer Sewing Tutorials | Haberdashery Fun on Sew A Baby Towel With A Hood

Projects Elsewhere

find me on Pellon Projects sew mama sew contributor

momtastic contributor

Pinterest

Visit Marni@Haberdashery Fun's profile on Pinterest.
Follow on Bloglovin

I'm Reading

  • Cluck Cluck Sew
  • Cooking Dangerously
  • In Color Order
  • Jen Hewitt
  • Jolly Jabber
  • Karly Spalding Photography
  • Leigh Laurel Studios
  • Lindsay Sews
  • Lotta Jansdotter
  • Love Patchwork and Quilting Magazine
  • Made
  • Making It Lovely
  • Noodle-Head
  • Polka Dot Chair
  • Sharon Holland Designs
  • Silhouette America Blog
  • Silhouette Design Store
  • The Purl Bee
  • The Purple Fig

Press:

Stitch Winter 2014

haberdashery_fun

Marni Weaver
Working on a commission and a request for the colo Working on a commission and a request for the color terracotta. I’m thinking the top right vs the bottom left. And funny enough, this fits perfectly for today’s #marchmeetthemaker prompt “decision”

#haberdasheryfun #100dayproject #marchmeetthemaker2023 #surfacepattern #terracottabowl #speedballink #textiledesigner #homedepotcolormatch #haberdasheryfunpatterns #blockprinting #blockprintedfabric #surfacepatterndesign #smallbusinesslife
Earlier today I was working on a new pattern and t Earlier today I was working on a new pattern and then realized that my table had legs. 😂 While I’m excited to share about my upcoming tote pattern release, this photo took me down memory lane. My sweet boy Arlo turns 7 this week. He is always by my side and has been my shadow since the day he was born❤️ . He is often in my studio, patiently waiting, photobombing a tutorial or playing w/ my supplies.

#haberdasheryfun #koifabric #rashidcolemanhale #rubystarsocietyfabric #haberdasheryfunpatterns #pdfpattern #marceetthemaker #marchmeetthemaker2023 #100dayproject #blockprintingmadeeasy
I love today's prompt "from idea to product" for # I love today's prompt "from idea to product" for #marchmeetthemaker. If you swipe, you can see the the original. I made that group of block print quite a few years ago and this pinwheel is a motif that I come back to all the time. 

Do you block print or make your own designs? What would you like to create with your patterns or prints? Have anything in mind?

#blockprintingmadeeasy #blockprinting #surfacepatterndesign #haberdasheryfun
#onlinecourses #chelseatakesshots #haberdasheryfunpatterns #makeshit #surfacepatterncommunity #whatsyourwhy #marchmeetthemaker2023 #100dayproject #dothe100dayproject #havefun #scandiboho.
Instagram post 18073744054322730 Instagram post 18073744054322730
Do you mix and match your handmade block prints an Do you mix and match your handmade block prints and your fabric stash?  I love this combo of champagne blush and turquoise. What would you make with it?

#haberdashery #modafabrics #gingiberfabric #modafabricsandsupplies #modafabric #meetthemaker2023 #modafabric 
#meetthemaker #100dayproject #haberdasheryfun #100dayproject2023 #blockprintingmadeeasy #blockprinting #cottoncanvas #speedballfabricink.
Follow on Instagram

Copyright © 2023 · Klar theme by Crimson Pear :: web & surface design

Copyright © 2023 · Klar on Genesis Framework · WordPress · Log in