Haberdashery Fun

  • Home
  • About
    • Look Book
  • Contact
    • Collaborate?
  • Tutorials
  • Shop
    • Email
    • Facebook
    • Instagram
    • Pinterest

Keep up to date with the latest posts!

Screen print with freezer paper

in DIY Projects, Print On Fabric on 14/01/13

This has been a fun project to work on.

Ryan over at The Life and Style Guild is going to Design Camp Atlanta at the end of the month.  She asked me to create magazine totes for her team to carry.  We decided on a grey/white chevron print [ “Chevron”.. fancy work for zig zag..].  She then asked me to print their name “The Life and Style Guild” on the totes..

I wasn’t sure how I was going to print their business name and still have it look professional.  I am a perfectionst.  Not only is it important for my projects to look good, but to also have quality workmanship.

Sooo, I googled “printing on fabric” and searched everywhere on the Internet.  I found multiple approaches, but the method I read most about was using freezer paper.  Interesting!  I wasn’t sure how this would come out.

Check out the 6 easy steps below:
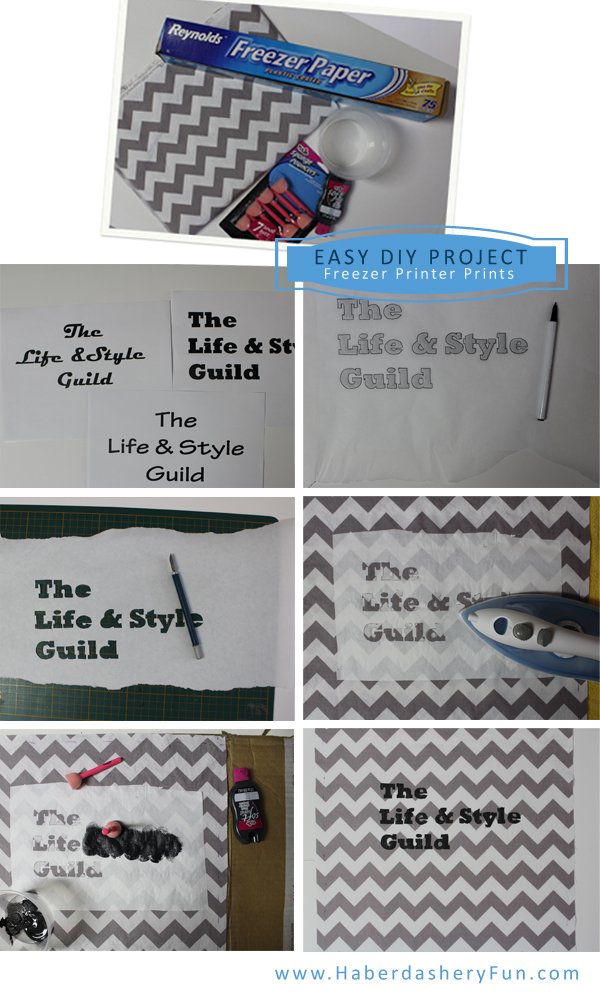
Materials Needed:

  1. Renolds freezer paper
  2. Tulip paint.  This brand comes in a variety of colors and is fairly inexpensive
  3. Sponges. I broke down and bought the Tulip sponges. You can find cheap sponges for under 50 cents.. But I liked the flat end to the Tulip sponges.
  4. Fabric
  5. Iron and ironing surface
  6. X-acto knife and cutting board
  7. Cardboard
  8. Image, words, logo to screen print

6 Easy Steps:

1. Gather your materials – Buy paint, sponges and fabric. Find an image you want to print on your fabric.  I printed out the words “The Life and Style Guild” a few times to get the right look. This was going to be on a totebag, so the size and layout was important to consider. Prewash your fabric.

2.  Place the word or image under the freezer paper. Shiny size down/matte side up. Trace onto the matte side. Use a marker – a sharpie works really well.

3.  Using your X-acto knife carefully, CAREFULLY cut out your image or word.  Make sure to have exact corners and don’t criss cross at the corners with a cut. This will cause paint to bleed and you won’t have precise edges or corners. Remember to save the inside of your letters – for example the inside of the e, a or or.. As you cut along, if your knife cut is wiggly – this will show when you paint on the fabric. Try to be as precise as possible. Practice if needed..

4.  Press your fabric nice and flat. Place the freezer paper onto the fabric shiny side down. With a hot iron, press the paper in place. Make sure to lift and press as you go. If you pull and iron, you may crinkle the letters.  Add the inside of the letters – e, a, or and iron again..

5.  Prep your painting area. Place a piece of cardboard under your fabric.  Get your sponges ready, open your fabric paint and squeeze into a container.  I would suggest doing a test run on a piece of muslin before starting on your real fabric.  I didn’t do this and my first try looked like total crap.. ugh, $12 a yard fabric!! Dab the sponge into the paint.  Get rid of the excess paint and lightly dab the fabric.  After the first dab on the fabric, I found it best to lightly brush the sponge over the fabric. remember again to only use a little paint, otherwise you will have goopy, thick edges and it may run.

6.  Carefully peel the freezer paper off your fabric WHILE the paint is still wet.

Voila – Freezer paper image complete!!

Stay tuned as I complete the totebags and share the remainder of this DIY project

3 Comments

« Neon notions found!
Make your own magazine tote.. »

Comments

  1. Ryan says

    01/15/2013 at 12:33 am

    Wow! Incredible design Marni. I would be honored to carry that around Design Camp ATL.
    You rock!

    Reply
  2. Erin says

    01/23/2013 at 12:34 am

    Do you know of the paint will hold up to machine washing? I wanted to paint a onsie but I want it to last through more than one use.

    Reply
    • Haberdashery Fun says

      01/23/2013 at 8:24 am

      Hi Erin,

      The brand “Tulip” works very well. You can buy it at Michaels. They have many colors and applications mostly geared towards fabric -they even have fabric spary paint and fabric markers. Plus it isn’t overly expensive at $2-3 a bottle. Hope this helps! 🙂

      Reply

Leave a Reply to Erin Cancel reply

Your email address will not be published. Required fields are marked *

This site uses Akismet to reduce spam. Learn how your comment data is processed.

About me


Hi there - I'm Marni Weaver. A sewer, a sometimes quilter and a lover of fabric design. I started this blog to share my ideas. Come Join the Fun
shop now

Popular Categories

project for baby fabric projects seasonal projects fat quarter projects sewing tips and tricks inspiration

Categories

  • Applique
  • Baby
  • Bags and Pouches
  • Block Printing
  • Color
  • DIY Projects
  • Fabric
  • Fabric Design
  • Fat Quarter Projects
  • Home Decor
  • Inspiration
  • Just for Fun
  • Kids
  • No Sew
  • Patterns
  • Print On Fabric
  • Quilting
  • Scrap Fabric Projects
  • Seasonal
  • Sewing Tips & Tricks

Lovely sponsors

Recent Comments

  • How To Make Hand warmers | Haberdashery Fun on DIY.. Sew Heart Shaped Baby Burp Cloths
  • How To Make Hand warmers | Haberdashery Fun on How To Make Mini Heart Shaped Hand Warmers
  • Make Spooky Monster Inspired Face Cloths | Haberdashery Fun on DIY.. Make Monster Inspired Face Cloths
  • How To Sew A Fabric Bin | Haberdashery Fun on Sew An Easy Fabric Storage Bin
  • Make The Alma Tote In Fun Colors | Haberdashery Fun on New – The Alma Tote Pattern

Projects Elsewhere

find me on Pellon Projects sew mama sew contributor

momtastic contributor

Pinterest

Visit Marni@Haberdashery Fun's profile on Pinterest.

I'm Reading

  • Cluck Cluck Sew
  • Cooking Dangerously
  • In Color Order
  • Jen Hewitt
  • Jolly Jabber
  • Karly Spalding Photography
  • Leigh Laurel Studios
  • Lindsay Sews
  • Lotta Jansdotter
  • Love Patchwork and Quilting Magazine
  • Made
  • Making It Lovely
  • Noodle-Head
  • Polka Dot Chair
  • Sharon Holland Designs
  • Silhouette America Blog
  • Silhouette Design Store
  • The Purl Bee
  • The Purple Fig

Press:

Stitch Winter 2014

haberdashery_fun

Marni Weaver
Still experimenting with keeping the block printin Still experimenting with keeping the block printing, handmade feel in digital form. This one is a little rougher/less perfect, but still has the spirit ✨ Which one’s your pick—1 or 2.

#haberdasheryfun #versafineink #versafineclair #surfacepatterndesign
Who knew that one little stamp could do so much? # Who knew that one little stamp could do so much?
#haberdasheryfun #versafineink #versafineclair
Just added a new stamp pad to my collection—meet Just added a new stamp pad to my collection—meet Lilac Bloom! 💜 And before you ask… nope, this design is not a corn stalk. Are you a fan of this soft shade, or is it a bit too light for your taste?

#versafineclair #blockprints #surfacepatternprint #haberdasheryfunpatterns #surfacepatterndesign #pfeil
Atlanta feels like a steam room right now 🫠 so Atlanta feels like a steam room right now 🫠 so I’m manifesting cooler temps by reworking my Alberta Wild Rose block print into Evergreen.

#blockprinting #banffnationalpark #alberta #surfacepatterndesign #haberdasheryfun
#versafineclair
Ode to summer travels. Alberta wild rose stamp alo Ode to summer travels. Alberta wild rose stamp along with a few sketches. 

#blockprinting #banffnationalpark #alberta #surfacepatterndesign #haberdasheryfun 
@3dottedpenguinscommunity #versafineclair
Follow on Instagram

Copyright © 2025 · Klar theme by Crimson Pear :: web & surface design

Copyright © 2025 · Klar on Genesis Framework · WordPress · Log in