Haberdashery Fun

  • Home
  • About
    • Look Book
  • Contact
    • Collaborate?
  • Tutorials
  • Shop
  • Freebie
    • Email
    • Facebook
    • Instagram
    • Pinterest

Keep up to date with the latest posts!

Sew A Colorful Pom Pom Table Runner

in DIY Projects on 25/08/20

I am re-sharing this oldie, but goodie post on a table runner I once made. This sewing project is super easy to make and will inject color and vibrancy into your home.

I originally shared this pom pom table runner a few years ago. I have had quite a few people reach out and ask about it, as the original tutorial was shared on another website that seems to be taken down. So, I thought I would repost the tutorial again today.

This is a fun and easy tutorial for a table runner with pom pom on the ends. Also a perfect stash buster.  Get more info at HaberdasheryFun and how to sew a colorful pom pom table runner.

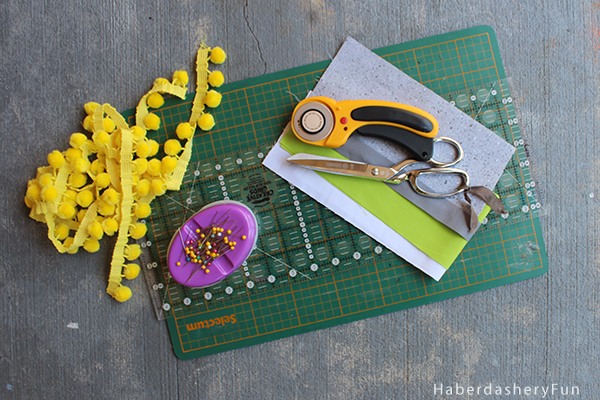
This project is a perfect stash buster. Here are the materials needed to make the pom pom runner:

  1. Runner front –  4 colors of cotton fabric, 1/4 yard or fat quarter each
  2. Backing  – 1 color cotton fabric, 1/2 yard
  3. Pom Pom trim – 2 yards
  4. Sewing machine and related supplies
  5. Rotary cutter, cutting mat and ruler
  6. Iron and ironing board

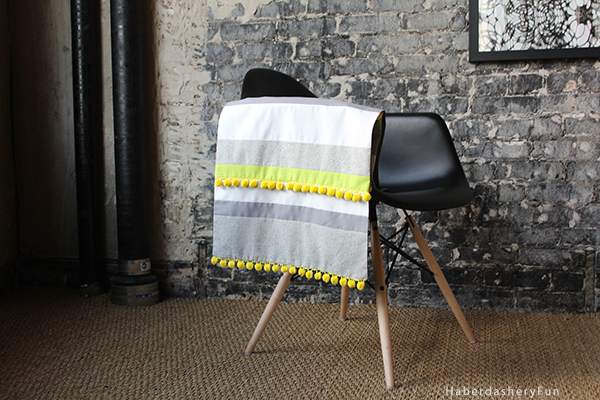
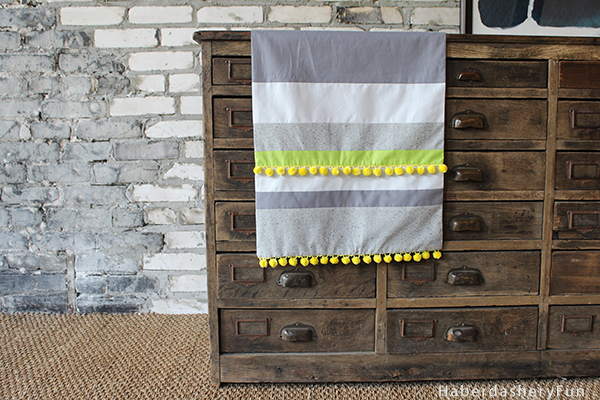
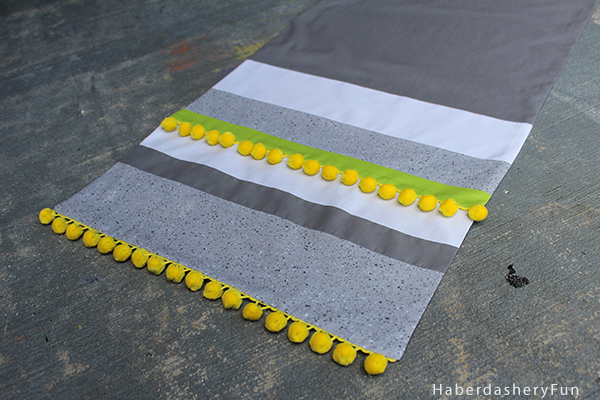
The runner has a large middle square with sides consisting of 6 colorful strips. Each side has 2 rows of pom poms. The pom poms are inserted at each end and  also into strip 3. Piece the colors  together to your liking!  Aside from piecing the strips together and inserted the pom poms, there is no set formula for the colors.. So have lots of fun making this runner!

If you want your runner to be skinnier, make the 17″ length shorter.

Ok, let’s start sewing.

Step 1: Cut the middle square to be 17″ x 17″. Cut 12 strips that are  17″ in length. They can be all the same width or cut into varying widths.

Step 2: Lay the fabric pieces into the order/color arrangement desired. Placement doesn’t really matter, just as long as you like the look of it!

Step 3: Cut pom pom trim into 4 pieces. Each piece should be approx 17″ in length. Lay the pom pom trim into the assortment.

Step 4: Start at one end. Place 2 fabric strips right side together. Pin. Place into sewing machine and sew along the long edge with a 1/4″ seam allowance. Press seam with an iron. Open seams and press again. Repeat again and sew on the next strip of fabric.

Step 5: Insert Pom Pom between next strip. Lay the pom pom trim on the seam allowance of the single strip. The pom pom trim should face inwards. Pin in place.  Adjust the needle position on your sewing machine. Stitch the pom pom trim down,stitch as close to the pom pom trim inside edge as possible [ approximately a 1/2″ seam allowance]. Press with an iron.

Step 6: Place the next strip on top and sandwich the pom pom trim. Pin in place. Place into sewing machine and stitch together. Follow your previous stitch. Press the seam. Open seams and press again.

Step 7: Finish piecing the one side of the runner. Repeat again and sew the strips for the other side of the runner. Sew each end to the middle square.

Step 8: Insert Pom Pom into ends – Lay the pom pom trim on each end of the runner. Pom Poms should be facing inwards. Pin in place.  Adjust the needle position so it can easily stitch around the pom poms. Stitch as close to the pom pom trim inside edge as possible [ approximately a 1/2″ seam allowance]. Press with an iron.

Step 9: Make sure that there are no pom poms in the side seam allowance. If a pom pom falls within the 1/2″ seam allowance, cut it off.

Step 10: Lay the finished runner front onto backing fabric. Cut the backing to fit the front dimensions. Adjust the backing and runner front so they are right sides facing.  Pin along the outside edge. Place into sewing machine and stitch together with a 1/2 seam allowance. Leave a 4″ opening. Press seams.

Step 11: Pull the runner right side out through the opening.

Step 12: Wiggle corners into place. Turn under the seam allowances at the opening. Press with an iron.

Step 13: Handstitch the opening closed or topstitch around the entire outside edge.

Let me know how it goes and I hope this table runner inspires a colorful and crafty endeavor!

Related Posts Plugin for WordPress, Blogger...

Add a Comment

« Sewing With Kraft-Tex
Easy Kraft-tex Receipt + Coupon Pouch »

Leave a Reply Cancel reply

Your email address will not be published. Required fields are marked *

This site uses Akismet to reduce spam. Learn how your comment data is processed.

About me


Hi there - I'm Marni Weaver. A sewer, a sometimes quilter and a lover of fabric design. I started this blog to share my ideas. Come Join the Fun
shop now

Popular Categories

project for baby fabric projects seasonal projects fat quarter projects sewing tips and tricks inspiration

Categories

  • Applique
  • Baby
  • Bags and Pouches
  • Block Printing
  • Color
  • DIY Projects
  • Fabric
  • Fabric Design
  • Fat Quarter Projects
  • Home Decor
  • Inspiration
  • Just for Fun
  • Kids
  • No Sew
  • Patterns
  • Print On Fabric
  • Quilting
  • Scrap Fabric Projects
  • Seasonal
  • Sewing Tips & Tricks

Lovely sponsors

Recent Comments

  • Make A Simple Block Print Tote Bag | Haberdashery Fun on DIY.. Colorful Dish Towel Tote Bags
  • Make A Simple Block Print Tote Bag | Haberdashery Fun on Sew Asymmetrical Color Block Totes Tutorial
  • Make A Block Printed ToteBag | Haberdashery Fun on Sew A Reversible Tote
  • Make A Block Printed ToteBag | Haberdashery Fun on Quick Tip.. Sewing Boxed Corners
  • 20 Creative DIY Storage Bin Ideas - DIY & Crafts on Sew An Easy Fabric Storage Bin

Projects Elsewhere

find me on Pellon Projects sew mama sew contributor

momtastic contributor

Pinterest

Visit Marni@Haberdashery Fun's profile on Pinterest.
Follow on Bloglovin

I'm Reading

  • Cluck Cluck Sew
  • Cooking Dangerously
  • In Color Order
  • Jen Hewitt
  • Jolly Jabber
  • Karly Spalding Photography
  • Leigh Laurel Studios
  • Lindsay Sews
  • Lotta Jansdotter
  • Love Patchwork and Quilting Magazine
  • Made
  • Making It Lovely
  • Noodle-Head
  • Polka Dot Chair
  • Sharon Holland Designs
  • Silhouette America Blog
  • Silhouette Design Store
  • The Purl Bee
  • The Purple Fig

Press:

Stitch Winter 2014

haberdashery_fun

Marni Weaver
Test print and then fabric. Are you an all over ra Test print and then fabric. Are you an all over random print or a linear structured print person? 

I always say to myself that I’m going to create a random print and then go straight for a structured layout.

#blockprintingmadeeasy #haberdashery #haberdasheryfun #blockprinting #simpleshapesmadefun #fatquarterproject #100daysofsimpleshapes #dothe100dayproject #dothe100dayproject2022 #speedballfabricink #konacottonsolids #haberdasheryfunpatterns #100dayproject2022 #handmadestamp #blockprintedfabric #blockprintedtextiles #100daysofsimpleshapes #blickartmaterials  Day 30/100
Simple and effective. I’m still cruising thru th Simple and effective. I’m still cruising thru the #100dayproject and my simple shapes prompts.

Here is our friend the square with simple lines cut thru it.

#blockprinting #100dayproject2022 #blockprintingmadeeasy #simpleshapesarefun #100daysofsimpleshapes #dothe100dayproject #haberdashery #haberdasheryfunpatterns #haberdasheryfun #handmadestamps #blockprintedfabric #fatquarterproject #fatquarters #speedballfabricink Day29/100
Anyone else have an assistant who gets into everyt Anyone else have an assistant who gets into everything, makes a mess and then sits under the desk doing nothing??

#haberdashery #marriedtorealestate 
#hgtvhome #hgtvdesign 
#haberdasheryfun #egyptsherrod #egyptsherroddesign #rebeccazajac #haberdasheryfunpatterns #chelseatakesshots #blockprintingmadeeasy #blockprintedfabric #hgtvdreamhome #hgtvhome #hgtvmakeover
There are only a few more days until my online blo There are only a few more days until my online block printing course starts! Have you wanted give block printing a try? 

Well… Come on over and spend the next 3 weeks with me. The link in my profile will take you to my sales page with all the details- what to expect, lesson breakdown, material list, frequently asked questions and the option to register.

Would love to see you in class. 

#blockprintingmadeeasy #onlineclasses
#haberdasheryfun ##100daysofsimpleshapes #dothe100dayproject #100dayproject2022 #haberdasheryfunpatterns #blockprintedfabric #handmade #handmadefabric #blockprinting #surfacepatterndesign #chelseatakesshots #immersion2020 Day28/100
I have a drawer where I keep all of my block print I have a drawer where I keep all of my block printed papers and have often wondered.. “What the heck do I do with all of these”.

How about you?

I recently found a bunch of  tutorials over at @modpodgerocks and thought it would be fun to make wood coasters with my block prints. They turned out better than expected and so I thought to share with you.

Want more info? I created a blog post. See the link in my profile for the blog post and details. 

Day27/100 #100dayproject #dothehundreddayproject #100daysofsimpleshapes #haberdasheryfun #blockprintingmadesimple #onlineclasses #zoomworkshops #haberdasheryfunpatterns #haberdasheryfunclasses #handmadestamp #modpodge #modpodgecrafts #decoupageart #decoupagelovers #blockprintedbyhand
Follow on Instagram

Copyright © 2022 · Klar theme by Crimson Pear :: web & surface design

Copyright © 2022 · Klar on Genesis Framework · WordPress · Log in