Haberdashery Fun

  • Home
  • About
    • Look Book
  • Contact
    • Collaborate?
  • Tutorials
  • Shop
  • Freebie
  • Block Printing Course
    • Email
    • Facebook
    • Instagram
    • Pinterest

Keep up to date with the latest posts!

Riley Blake Designs Blog Tour.. Quilted Cotton Mini Back Pack

in DIY Projects, Fabric on 24/06/14

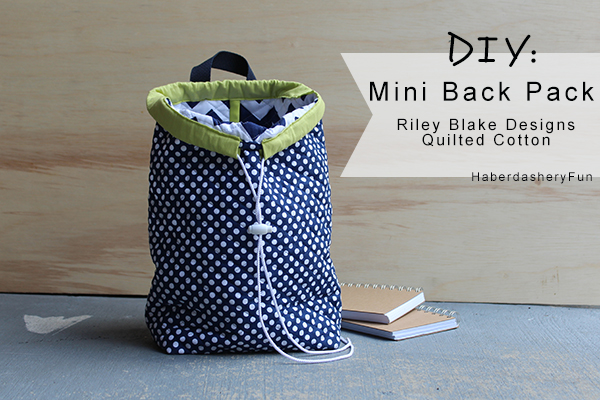
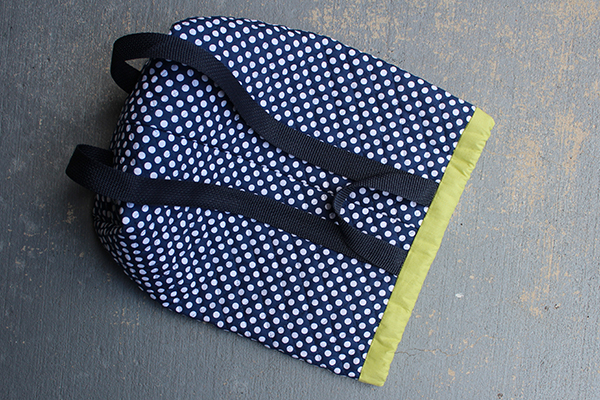
Today is my turn on the Riley Blake Designs Quilted Cotton Blog Tour.. I’m super excited to be sharing a mini back pack tutorial. The bag was sewn from their new quilted cotton collection.

I’ve wanted to make a mini back pack for awhile. The Riley Blake Designs Blog Tour turned out to be the perfect opportunity to try one out. And drive myself a little bonkers at the same time..

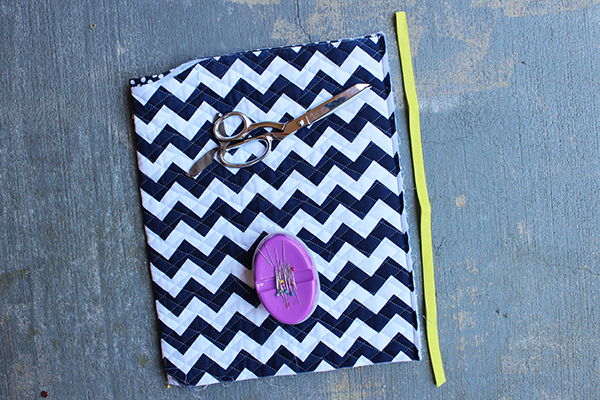
Because the fabric was 2 sided, I decided to bind the seams with a pop of color. I went back and forth on whether to have a zipper or not. At the last minute I chose to use a colorful drawstring at the top. I love how the lime green jumps out from the navy dots.

Finished size  – 8″L x 4.5″W x 13″H
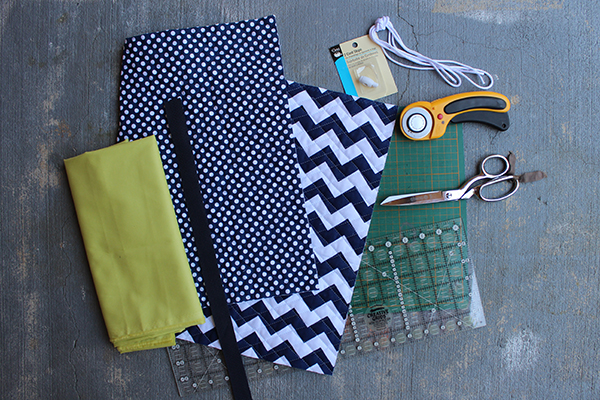
Materials:

  1. Riley Blake Quilted Cotton – 1 yard
  2. Solid cotton fabric
  3. Bias tape – store bought or home made
  4. Webbing – optional. You can also make your own straps
  5. Cord stopper
  6. Cording – at least 1 yard
  7. Disappearing fabric ink pen
  8. Rotary cutter, cutting mat and ruler
  9. Sewing machine and related supplies
  10. Iron and ironing board

Before we get started you will need to do the following:

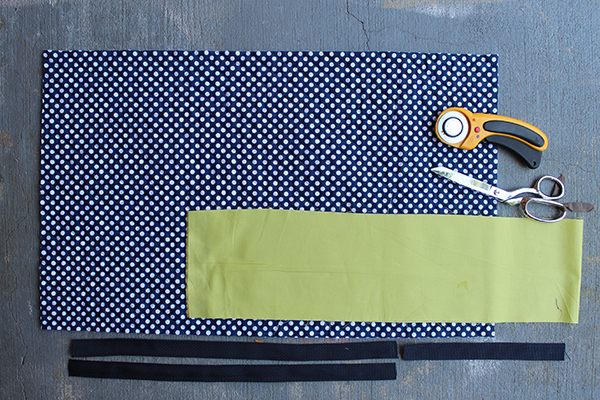
  1. Cut your fabric – From the quilted cotton fabric, cut a rectangle measuring 26″L x 16″W. From the solid cotton fabric, cut a rectangle measuring 27″L x 6″W [casing].
  2. Cut your straps – Cut the webbing into 2 long strips. Determine the strap length desired and measure on yourself or child. For this mini back pack tutorial I chose a 23″ strap length. Cut another piece of webbing measuring 10″ long [back tab].
  3. Bias tape –  You will need bias tape to cover the seams. Either cut your bias tape or use store bought bias tape [I used store bought to save time].

Ok, let’s start sewing..

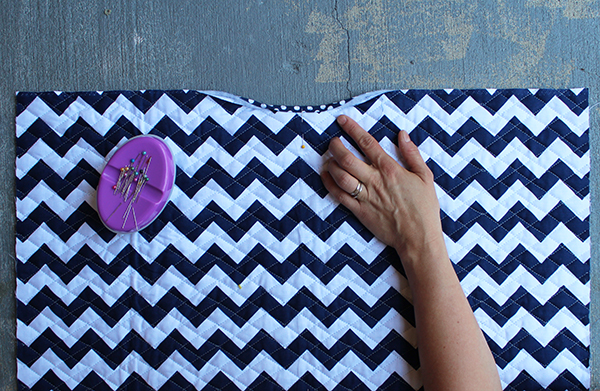
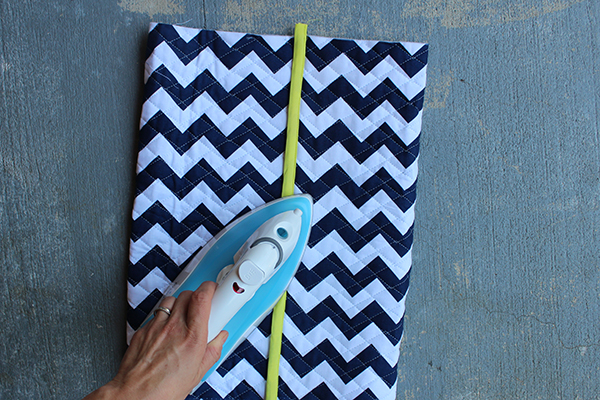
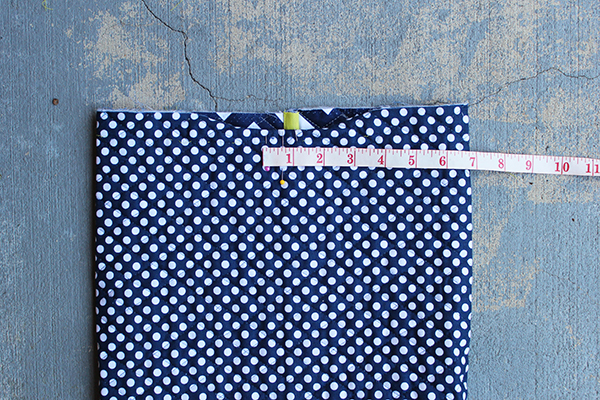
Step 1 – Place the quilted fabric rectangle on your work surface, wrong side facing up. Fold in half to find the centre [ CF] and then place a pin at the top and bottom edge. Turn and fold the top edge 1/4″. Note – only fold the top edge over about 1 1/2″ in length. Press. Turn and fold another 1/4″. Pin. Place into sewing machine and stitch down.

Step 2 – Fold the rectangle in half. It should now measure 13″L x 16W”. Pin along the edge. Place into your sewing machine and stitch together with a 1/4″ seam allowance. Press. Cut enough bias tape to cover the seam allowance. Cover seam allowance with the bias tape.

Step 3 – You will now have the first part of your bag complete. Turn the fabric so that the bound seam is aligned with the pins you placed at CF top and bottom. Note – this seam is now the center back seam. Press the seam in place. Trim any bias tape that hangs over the ends.

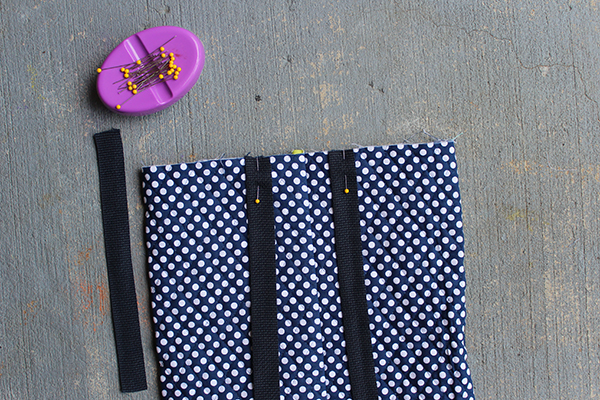
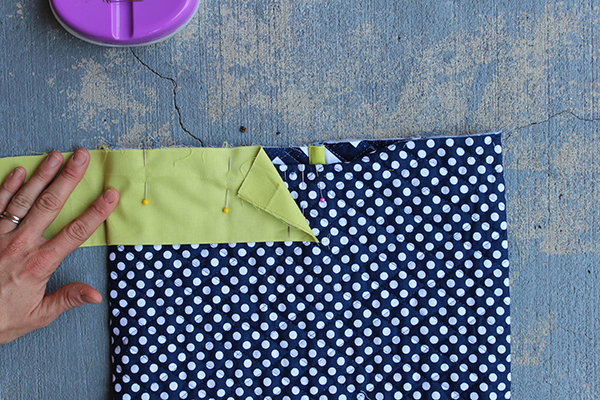
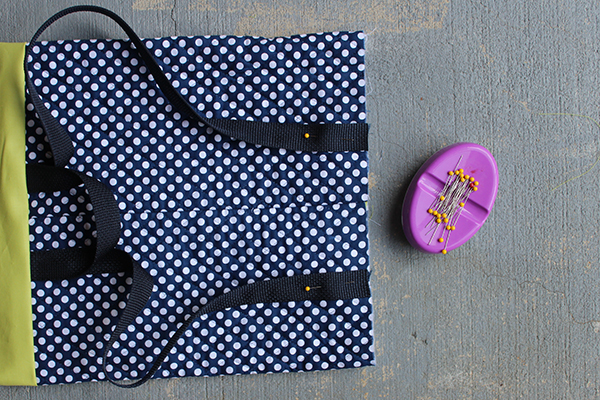
Step 4 – Turn the bag right side out with the CB seam facing upwards. Measure out 1″ from the CB seam top edge. Repeat for the other side and mark with pin or fabric marker. Pin each 20″ length strap in place. Raw edges should match raw edges.

Step 5 – Now lay the 10″ strap on top. There should be a loop and this forms the back tab.  Pin. Place into your sewing machine and stitch down with a scant 1/4″ stitch.

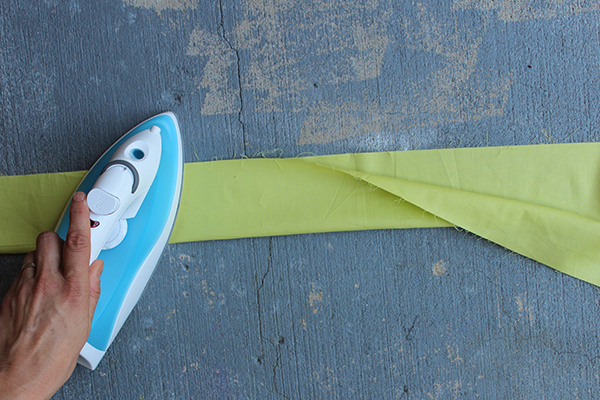
Step 6 – Fold the 6″ W solid cotton rectangle in half, it should now measure 27″L x 3″W. Press. This becomes the casing.

Step 7 – Mark a 1″ line at the end of the casing. Finger press a fold at the line.

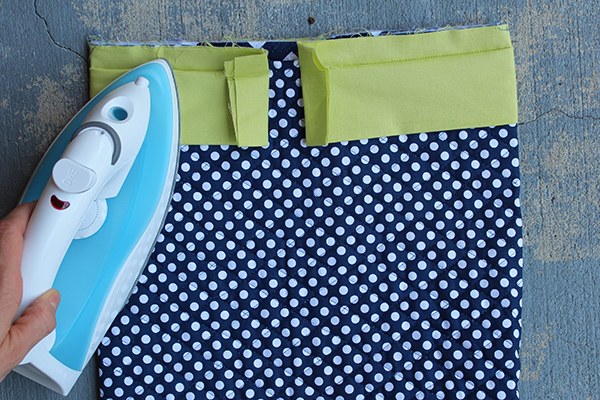
Step 8 – Measure 1/2″ outwards from CF and mark each side with a pin. This is where the casing stops at CF. Next lay the casing along the top edge, match raw edges to raw edges. The fold should sit at the 1/2″ pin mark. Pin around the entire top edge. Pin OVER top the straps on the backside. When you get to CF again, stop at the 1/2″ mark. Make sure to fold the casing back at a 1″ mark. You may need to trim excess fabric. Place into your sewing machine and stitch the casing down with a 3/4″ – 7/8″ seam allowance. Note – before you start sewing, double check where the CF top edge is rolled/sewn down. You want to sew the casing in place and have the stitch EVEN around the top edge. The bottom of the rolled edge is the stitch line. Press with an iron. Do not touch the webbing with the iron.

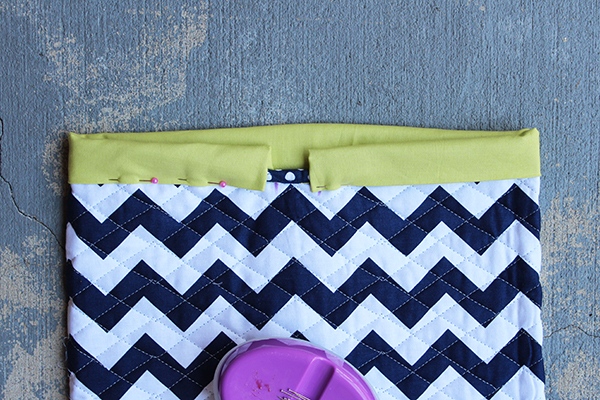
Step 9 –  Turn the bag so it is wrong side out. Now turn and fold the casing towards the wrong side/inside. Pin. Place into your sewing machine and stitch in place and/or stitch in the ditch.

Step 10 – You are on the home stretch! Turn the bag to face right side out again. At the bottom edge, measure out 2-3″ from the CB seam. Repeat for the other side. At each mark, pin the bottom of each 23″ length strap in place. Raw edges match raw edges.

Step 11 –  Turn the bag wrong side out again. Pin the bottom seam together. Place into your sewing machine and stitch together with a 1/4″ seam allowance. Before you bind the seam, make sure that your straps sit straight. If you like the strap placement, it’s ok to move forward and bind the bottom seam. Now it’s time to sew those boxed corners! Wiggle the bag around and have the bottom lay flat. You want to make points as in the image above. Double check that the sides sit at a 45 degree angle.  Finger press any wrinkles out.  Measure 2″ upwards from the tip and mark a line with a disappearing ink pen. Pin. Place into sewing machine and stitch following the dashed line. Repeat for the other side.  Place the quilting ruler onto the corner. Lay the ruler so you have a 1/4″ seam allowance. Cut along the ruler edge using a rotary cutter and cut the tip off.  Repeat for the other side.  Bind the seams.

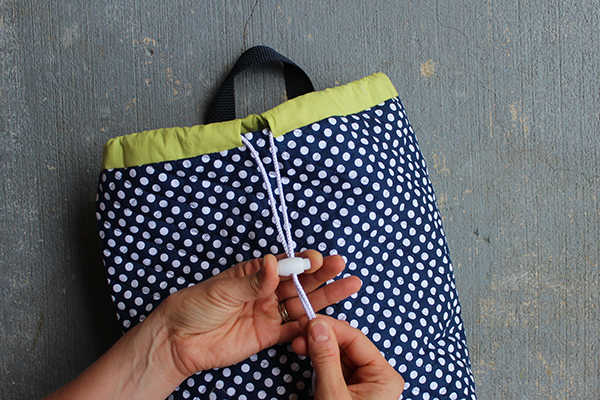
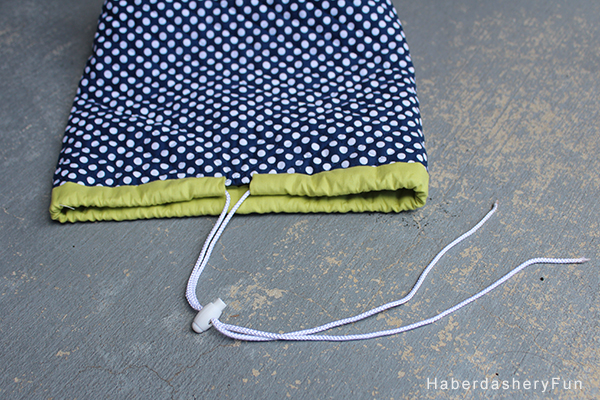
Step 12 – Turn the bag right side out again.. Place a pin at the end of your cord and insert into the casing. Pull the pin/cord through until it comes out the other side. Insert into the cord stopper. If you are having trouble, try placing tape on the ends of the cord. You may need to jiggle it around a bit. Don’t get frustrated.. Test out that the drawstring works and then cut the cord to a desired length. If you don’t like how the cord ends fray, use a lighter and burn the ends just a tad.

That’s it!  If you want to get super fancy, you could add a D Ring and a slider to each strap and make them adjustable..

Head on over to the Riley Blake Designs website and check out the entire collection. Not only are the prints for the quilted cotton fun, but the fabric is amazing to sew with.

Make sure to check out the rest of the blog tour. I’m pretty honored to be on the same tour with these amazing blogs:

6/5 – Jedi Craft Girl

6/10 – Nancy Zieman

6/ 12 – The Sassy Quilter

6/17 – Just Let Me Quilt

6/19 – Simple Simon and Company

6/26 – Sew We Quilt

7/1 – Jina Barney Designz

7/3 – Leigh Laurel Studio

7/7 – Riley Blake Designs

Happy Sewing!

31 Comments

« Hello Zippers..
Fabric Stash.. »

Comments

  1. Carol says

    06/24/2014 at 10:45 am

    Cute little backpack! I love those fabrics and colors…thanks for the tutorial! :O)

    Reply
  2. ananda says

    06/24/2014 at 3:33 pm

    this is just gorgeous! i love the quilted polka dots fabric and the green around the drawstring! thank you marni for inspiring! =)

    Reply
  3. mdmsamm says

    06/24/2014 at 5:45 pm

    Took me awhile to find you …was not sure where to leave a comment…persistence…lol
    lovely tutorial…lovely photos….lovely choice of fabrics….that green makes it POP>..

    Reply
    • Haberdashery Fun says

      06/24/2014 at 8:54 pm

      Thank you so much for the persistence and leaving a comment 🙂 Have a great evening.

      Reply
  4. Anne Weaver says

    06/24/2014 at 6:51 pm

    I love this bag!!! The double sided quilted cotton is PERFECT for a bag!! I’ve got a Craft Gossip post scheduled for tomorrow morning that links to your tutorial:
    http://sewing.craftgossip.com/tutorial-quilted-cotton-mini-backpack/2014/06/25/
    –Anne

    Reply
    • Haberdashery Fun says

      06/24/2014 at 8:53 pm

      HI Anne,
      Great – thank you so much.

      Reply
  5. Paula@The Sassy Quilter says

    06/24/2014 at 11:24 pm

    How cute!!! Great tutorial…even for a non-bag maker like me:) I love the pop color you used too. That would be great for vacation or the beach. Love it!

    Reply
  6. onel says

    06/25/2014 at 2:14 am

    What a cute backpack! I’ve marked this in my “to do” sewing list for the upcoming summer break! Thanks a lot for the tutorial!

    Reply
  7. Nancy says

    06/25/2014 at 3:03 am

    Oh is this Sweet! I have a lot of planned projects for the colors, so glad you chose them because they look Great!! Thank~You for the wonderful Tutorial!

    Huggs, Nancy

    Reply
    • Haberdashery Fun says

      06/26/2014 at 10:18 am

      Thanks Nancy! The bag would be even better with some D-rings and sliders for adjustability.. Have a great day.

      Reply
  8. Jane says

    06/25/2014 at 11:34 am

    This is so nice because the regular drawstring backpacks really dig into my shoulders with just a few items in them. Having straps will alleviate that problem!

    Reply
  9. Karin @ Leigh Laurel Studios says

    06/29/2014 at 9:23 am

    Love it, Marni! I’m already thinking of umpteen other uses for this quilted cotton. Is lime becoming your signature color? 🙂

    Reply
  10. Roopini says

    07/02/2014 at 12:41 pm

    Lovely back pack with nice chevron print. Thanks for the tutorial 🙂

    Reply
    • Haberdashery Fun says

      07/02/2014 at 4:06 pm

      Thank you for stopping by 🙂

      Reply
  11. Lyn Kaufmann says

    07/03/2014 at 11:22 pm

    Love this cute idea. Double sided fabric makes the project so much fun! This would be a great learning project for my daughter, who is dying to learn to sew. Thank you for the beautiful step by step instructions.

    Reply
  12. Debra Kay Neiman says

    07/08/2014 at 4:45 pm

    My granddaughter would love this. crystalbluern at onlineok dot com

    Reply
  13. Lori Morton says

    07/08/2014 at 7:47 pm

    Thanks for this easy & fun Tutorial!! Am teaching my Grangirlie (she is 7) to sew this Summer…and think this will be a cool one to do together! : )

    Reply
    • Haberdashery Fun says

      07/09/2014 at 10:27 am

      Thanks for stopping by and leaving a comment. I think you both will love the backpack and I agree it is a great tutorial for you and your granddaughter. One thing to note #1) Before you cut the straps, double check the strap length on your granddaughter #2) Double check the overall length of the backpack before you bind the seams. You can adjust the length by cutting the rectangle smaller. Let me know if you have any questions and have a great day

      Reply
  14. Annette Deardurff says

    07/08/2014 at 8:16 pm

    Love the back pack! Great job!

    Reply
    • Haberdashery Fun says

      07/09/2014 at 10:27 am

      Thank you so much!

      Reply

Trackbacks

  1. June Round Up | Haberdashery Fun says:
    07/01/2014 at 9:34 am

    […] Riley Blake Quilted Cotton Mini Back Pack – I was fortunate to be on the Quilted Cotton Blog Tour for Riley Blake Designs.. I spent way to long dreaming about my mini back pack and luckily all that humming and hawing worked out. I have another yard of this glorious fabric so stay tuned for more tutorials! If you haven’t seen the fabric yet, head on over to Riley Blake Designs. […]

    Reply
  2. Work it Wednesday with Features says:
    07/16/2014 at 8:56 am

    […] Quilted Cotton Mini Back Pack from Haberdashery Fun // Ombre Watercolor Outdoor Sign from One Krieger Chick // Modern Coastal Studio Office Reveal from Simply Styling // RH Baby Rope Shelf Knock Off from Seeking Lavender Lane […]

    Reply
  3. Work It Wednesday - says:
    07/16/2014 at 9:11 am

    […] Quilted Cotton Mini Back Pack from Haberdashery Fun // Ombre Watercolor Outdoor Sign from One Krieger Chick // Modern Coastal Studio Office Reveal from Simply Styling // RH Baby Rope Shelf Knock Off from Seeking Lavender Lane […]

    Reply
  4. Inspired By.. Pops of Color | Haberdashery Fun says:
    09/04/2014 at 11:12 am

    […] few weeks ago I was a part of the Riley Blake Quilted Cotton Blog Tour. Their new quilted cotton collection is glorious. It is a double sided quilted cotton –  fun […]

    Reply
  5. DIY.. Color Pop Zipper Pouch | Haberdashery Fun says:
    09/10/2014 at 10:04 am

    […] quilted. It is a double sided quilted cotton from Riley Blake Designs.  I was part of their blog hop this July and had extra in my stash. I love that you just bind the seams and are good to […]

    Reply
  6. DIY Yellow zipper backpack | peravirens says:
    12/07/2014 at 4:21 pm

    […] Out of all the different tutorials I found, I made a choice to follow this little gem – click here. Although I said I’ll follow the tutorial, I couldn’t help myself and had to add some […]

    Reply
  7. Top 5 Sewing Posts from 2014 | Haberdashery Fun says:
    01/06/2015 at 7:05 pm

    […] Double Sided Quilted Cotton Mini Backpack […]

    Reply
  8. RBD Quilted Cotton Blog Tour: FINAL DAY! | Riley Blake Designs says:
    05/11/2016 at 7:02 pm

    […] 6/24 – Haberdashery Fun – Mini Backpack […]

    Reply
  9. RBD Quilted Cotton Blog Tour: Day 6 | Riley Blake Designs says:
    05/26/2016 at 10:23 am

    […] brought to you by Haberdashery Fun. Hop on over to her blog to see how to make this seriously cute Mini Back Pack. This would make a fantastic beginner project, and is so fast and easy to whip up, it will most […]

    Reply
  10. Riley Blake Designs Quilted Cotton Blog Tour | Riley Blake Designs says:
    05/26/2016 at 5:54 pm

    […] 6/24 – Haberdashery Fun – Mini Backpack […]

    Reply
  11. Work it Wednesday No. 56 | The Turquoise Home says:
    09/26/2016 at 3:58 pm

    […] Quilted Cotton Mini Back Pack from Haberdashery Fun // Ombre Watercolor Outdoor Sign from One Krieger Chick // Modern Coastal Studio Office Reveal from Simply Styling // RH Baby Rope Shelf Knock Off from Seeking Lavender Lane […]

    Reply

Leave a Reply Cancel reply

Your email address will not be published. Required fields are marked *

This site uses Akismet to reduce spam. Learn how your comment data is processed.

About me


Hi there - I'm Marni Weaver. A sewer, a sometimes quilter and a lover of fabric design. I started this blog to share my ideas. Come Join the Fun
shop now

Popular Categories

project for baby fabric projects seasonal projects fat quarter projects sewing tips and tricks inspiration

Categories

  • Applique
  • Baby
  • Bags and Pouches
  • Block Printing
  • Color
  • DIY Projects
  • Fabric
  • Fabric Design
  • Fat Quarter Projects
  • Home Decor
  • Inspiration
  • Just for Fun
  • Kids
  • No Sew
  • Patterns
  • Print On Fabric
  • Quilting
  • Scrap Fabric Projects
  • Seasonal
  • Sewing Tips & Tricks

Lovely sponsors

Recent Comments

  • HaberdasheryFun and an easy Kraft-tex sewing project | Haberdashery Fun on Collapsible Kraft-Tex Bowl
  • HaberdasheryFun and an easy Kraft-tex sewing project | Haberdashery Fun on Sewing With Kraft-Tex
  • 3 Simple Summer Sewing Tutorials | Haberdashery Fun on Sew A Canvas Zipper Pouch
  • 3 Simple Summer Sewing Tutorials | Haberdashery Fun on Sew Asymmetrical Color Block Totes Tutorial
  • 3 Simple Summer Sewing Tutorials | Haberdashery Fun on Sew A Baby Towel With A Hood

Projects Elsewhere

find me on Pellon Projects sew mama sew contributor

momtastic contributor

Pinterest

Visit Marni@Haberdashery Fun's profile on Pinterest.
Follow on Bloglovin

I'm Reading

  • Cluck Cluck Sew
  • Cooking Dangerously
  • In Color Order
  • Jen Hewitt
  • Jolly Jabber
  • Karly Spalding Photography
  • Leigh Laurel Studios
  • Lindsay Sews
  • Lotta Jansdotter
  • Love Patchwork and Quilting Magazine
  • Made
  • Making It Lovely
  • Noodle-Head
  • Polka Dot Chair
  • Sharon Holland Designs
  • Silhouette America Blog
  • Silhouette Design Store
  • The Purl Bee
  • The Purple Fig

Press:

Stitch Winter 2014

haberdashery_fun

Marni Weaver
Working on a commission and a request for the colo Working on a commission and a request for the color terracotta. I’m thinking the top right vs the bottom left. And funny enough, this fits perfectly for today’s #marchmeetthemaker prompt “decision”

#haberdasheryfun #100dayproject #marchmeetthemaker2023 #surfacepattern #terracottabowl #speedballink #textiledesigner #homedepotcolormatch #haberdasheryfunpatterns #blockprinting #blockprintedfabric #surfacepatterndesign #smallbusinesslife
Earlier today I was working on a new pattern and t Earlier today I was working on a new pattern and then realized that my table had legs. 😂 While I’m excited to share about my upcoming tote pattern release, this photo took me down memory lane. My sweet boy Arlo turns 7 this week. He is always by my side and has been my shadow since the day he was born❤️ . He is often in my studio, patiently waiting, photobombing a tutorial or playing w/ my supplies.

#haberdasheryfun #koifabric #rashidcolemanhale #rubystarsocietyfabric #haberdasheryfunpatterns #pdfpattern #marceetthemaker #marchmeetthemaker2023 #100dayproject #blockprintingmadeeasy
I love today's prompt "from idea to product" for # I love today's prompt "from idea to product" for #marchmeetthemaker. If you swipe, you can see the the original. I made that group of block print quite a few years ago and this pinwheel is a motif that I come back to all the time. 

Do you block print or make your own designs? What would you like to create with your patterns or prints? Have anything in mind?

#blockprintingmadeeasy #blockprinting #surfacepatterndesign #haberdasheryfun
#onlinecourses #chelseatakesshots #haberdasheryfunpatterns #makeshit #surfacepatterncommunity #whatsyourwhy #marchmeetthemaker2023 #100dayproject #dothe100dayproject #havefun #scandiboho.
Instagram post 18073744054322730 Instagram post 18073744054322730
Do you mix and match your handmade block prints an Do you mix and match your handmade block prints and your fabric stash?  I love this combo of champagne blush and turquoise. What would you make with it?

#haberdashery #modafabrics #gingiberfabric #modafabricsandsupplies #modafabric #meetthemaker2023 #modafabric 
#meetthemaker #100dayproject #haberdasheryfun #100dayproject2023 #blockprintingmadeeasy #blockprinting #cottoncanvas #speedballfabricink.
Follow on Instagram

Copyright © 2023 · Klar theme by Crimson Pear :: web & surface design

Copyright © 2023 · Klar on Genesis Framework · WordPress · Log in