Haberdashery Fun

  • Home
  • About
    • Look Book
  • Contact
    • Collaborate?
  • Tutorials
  • Shop
  • Freebie
    • Email
    • Facebook
    • Instagram
    • Pinterest

Keep up to date with the latest posts!

DIY.. Quilted Turkey Bread Basket

in Seasonal on 07/11/14

The holidays are inching closer and closer.. As a Canadian living in the USA, I love this time of year.  From mid November until Christmas there are so many festivities that it makes me giddy. Parties, TV specials, turkey, food, hot chocolate, wine ..

Timeless Treasure Turkey

Well hello turkey! Timeless Treasures and Pellon loved my Quilted Chicken Bread Basket from last year and asked me to come up with a Thanksgiving version.. I had to wrap my head around this one and find the differences between a turkey and a chicken. I wasn’t sure what this quilted version should look like. I googled “what do turkeys look like” [ yes, I did..] and came up with a bunch of images for inspiration. After I figured out what my turkey should look like, this became a lot of fun.

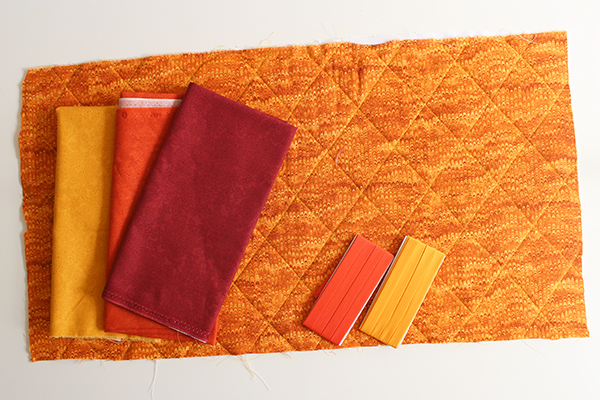
Timeless Treasures sent me a selection of their holiday line of fabric to use for this little guy.  Their gold patterned fabric was PERFECT for the turkey body while their tonal solids were great for everywhere else.

Materials Needed:

  1. 2 colors cotton fabric – 1/2 yard each
  2. Fabric scraps – for the features and tail
  3. 1/4″ elastic
  4. 2 small buttons for the eyes
  5. Double fold bias tape – home-made or store bought
  6. Rotary cutter, cutting mat and quilting ruler
  7. Chaco quilting marker
  8. Quilt basting spray
  9. Fusible Batting – Pellon TP971F
  10. Heavy Duty Wonder-Under
  11. Sewing machine and sewing supplies
  12. Iron and ironing board
  13. Small oval basket – no handles

A few things to consider before we get started…

  • This is more of a inspirational post.. Check out my full chicken tutorial from last November. You can also download the PDF version from the Pellon Projects website.
  • I quilted the turkey body and wing fabric. Want to quilt your own fabric?? No problem, check out my easy tutorial here.

Ok.. Let the fun begin.

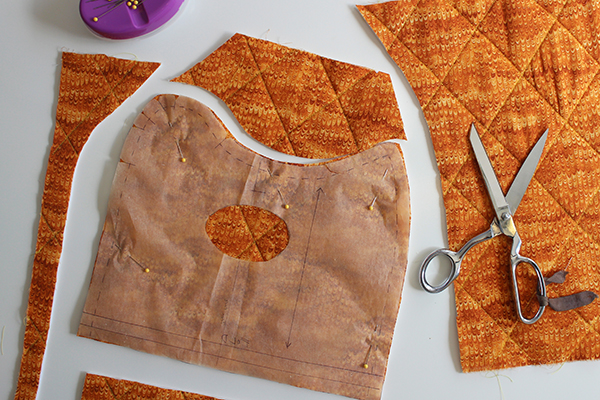
Step 1 – Lay the chicken and wing pattern pieces on the quilted material and cut out.. Important – mirror your pieces.

Step 2 – Cut bias tape for each wing and also the ovals. Pin, sew the bias tape around the oval and then tuck the tail under/towards the back and backstitch.

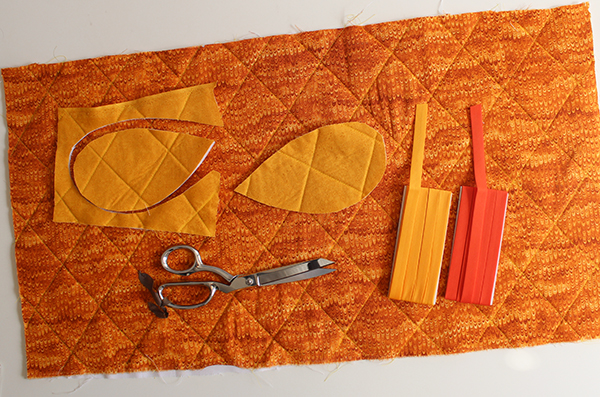
Step 3 – Make little fabric sandwiches for the face and tail pieces.. Cut out 2 small pieces of fabric, iron interfacing to one side and then place a piece of Wonder-Under on TOP of the interfacing. Peel the lining from the Wonder-Under and lay the other fabric scrap on top. Press together. “Sandwich”

Step 4 –  Cut the turkey face and tail pieces from the “sandwich” fabric. I used the chicken pattern pieces [found on the Pellon website] for reference and tweaked the details. Topstitch around the outside edge for stability.

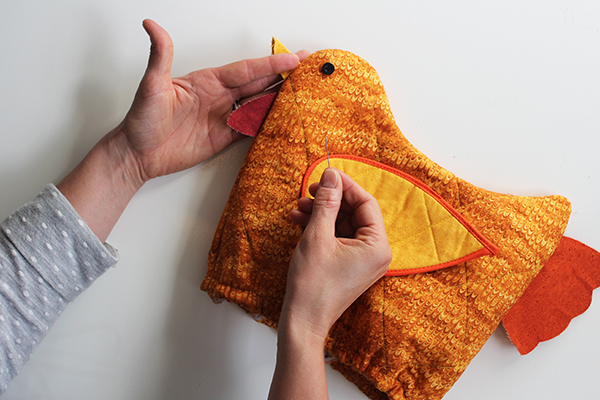
Step 5 – Fold the beak in half. Place the beak and wattle [ little dangly thing] pieces onto the turkey’s face. Place the tail at the back. Note that all pieces face INWARDS.. When you sew the turkey together and turn right side out, they will pop outwards.

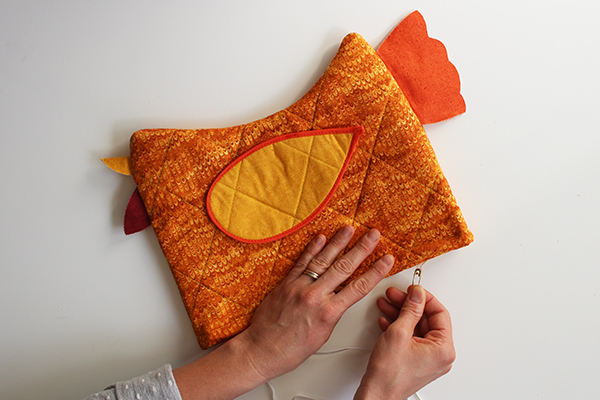
Step 6 – Pin the wing in place just above the oval. Adjust accordingly and make sure it fully covers the oval hole. Stitch down. Start the stitch approximately 1″ from the wing tip and end 1″ from the the oval center front. Repeat for the other wing.

Step 7 – Place turkey right sides together. Make sure the face and tail features do not sit in the 1/2″ seam allowance. Pin. Place into sewing machine and stitch with a 1/2″ seam allowance. Press seams. Measure and turn up bottom seam 1/2″. Pin. Place into sewing machine and edge stitch. Leave a small 1″ opening for the elastic. Turn right side out. Wiggle the corners into place. Press.

Step 8 – Cut approximately 15″ of elastic. Place a pin at one end and insert into the opening. Pull through entirely. Adjust gathers. Sew elastic together as well the the opening shut.

Step 9- Sew your button eyes in place.

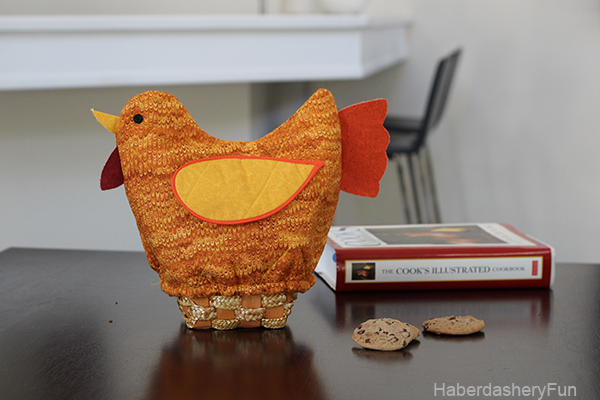
That’s it. While this is a bread basket cover.. think of all the different uses. I thought I’d try cookies this time around. Not sure the cookies will last in my house, my toddler found the turkey last night and sure had fun pulling a cookies out.

Happy Thanksgiving!

Related Posts Plugin for WordPress, Blogger...

9 Comments

« DIY.. Chalkboard & Fabric Door Banner
DIY.. Sew Heart Shaped Baby Burp Cloths »

Comments

  1. Karin @ Leigh Laurel says

    11/07/2014 at 11:21 am

    Love it, as usual! Hey. . . Cook’s Illustrated. . . I used to work there. 🙂

    Reply
    • Haberdashery Fun says

      11/07/2014 at 11:48 am

      Oh really? Wow. What did you do..? it’s my husband’s. He is the cook, not me.

      Reply
  2. kathylara says

    11/21/2014 at 8:46 am

    Those Turkey are as cute as a button, even cuter! Your daughter is sure to treasure this beauty.

    Reply
  3. Jenette Peek says

    08/08/2020 at 11:37 am

    This is cool I put play sand in a freezer ziplock bag and put it inside. I then sewed a piece on the bottom and stitched it closed and made it into a free stnading door stop. Great conversation piece. Thank you.

    Reply
    • Haberdashery Fun says

      08/25/2020 at 1:31 pm

      Wow! So cool and such a good idea! Thank you for sharing.

      Reply

Trackbacks

  1. Turkey Turkey! | pellonprojects says:
    11/07/2014 at 1:31 pm

    […] This year, we teamed up with Marni & Timeless Treasures to bring you a snazzy little rework of this easy-peasy tutorial. Introducing… the Turkey! […]

    Reply
  2. CraftCrave | DigiFree | CraftCrave says:
    11/07/2014 at 7:26 pm

    […] DIY.. Quilted Turkey Bread Basket – 1 freebie(s)? […]

    Reply
  3. Free pattern: Quilted Turkey Bread Basket – Sewing says:
    11/09/2014 at 7:34 pm

    […] DIY: Quilted Turkey Bread Basket, by Haberdashery Fun […]

    Reply
  4. Piece a Winter Berries Quilt! Create a Phrenology Head Pin Cushion! DIY Turkey Bread Basket! How to Trace an Embroidery Pattern! Make a Reusable Grocery Bag from Pillowcases! Vintage Inspired Cross Stitch Purse! Craft a Photo Night Light! Sculpt Your Pie says:
    11/16/2014 at 6:32 am

    […] https://haberdasheryfun.com/diy-projects/diy-quilted-turkey-bread-basket  […]

    Reply

Leave a Reply to Turkey Turkey! | pellonprojects Cancel reply

Your email address will not be published. Required fields are marked *

This site uses Akismet to reduce spam. Learn how your comment data is processed.

About me


Hi there - I'm Marni Weaver. A sewer, a sometimes quilter and a lover of fabric design. I started this blog to share my ideas. Come Join the Fun
shop now

Popular Categories

project for baby fabric projects seasonal projects fat quarter projects sewing tips and tricks inspiration

Categories

  • Applique
  • Baby
  • Bags and Pouches
  • Block Printing
  • Color
  • DIY Projects
  • Fabric
  • Fabric Design
  • Fat Quarter Projects
  • Home Decor
  • Inspiration
  • Just for Fun
  • Kids
  • No Sew
  • Patterns
  • Print On Fabric
  • Quilting
  • Scrap Fabric Projects
  • Seasonal
  • Sewing Tips & Tricks

Lovely sponsors

Recent Comments

  • 3 Simple Summer Sewing Tutorials | Haberdashery Fun on Sew A Canvas Zipper Pouch
  • 3 Simple Summer Sewing Tutorials | Haberdashery Fun on Sew Asymmetrical Color Block Totes Tutorial
  • 3 Simple Summer Sewing Tutorials | Haberdashery Fun on Sew A Baby Towel With A Hood
  • Make A Simple Block Print Tote Bag | Haberdashery Fun on DIY.. Colorful Dish Towel Tote Bags
  • Make A Simple Block Print Tote Bag | Haberdashery Fun on Sew Asymmetrical Color Block Totes Tutorial

Projects Elsewhere

find me on Pellon Projects sew mama sew contributor

momtastic contributor

Pinterest

Visit Marni@Haberdashery Fun's profile on Pinterest.
Follow on Bloglovin

I'm Reading

  • Cluck Cluck Sew
  • Cooking Dangerously
  • In Color Order
  • Jen Hewitt
  • Jolly Jabber
  • Karly Spalding Photography
  • Leigh Laurel Studios
  • Lindsay Sews
  • Lotta Jansdotter
  • Love Patchwork and Quilting Magazine
  • Made
  • Making It Lovely
  • Noodle-Head
  • Polka Dot Chair
  • Sharon Holland Designs
  • Silhouette America Blog
  • Silhouette Design Store
  • The Purl Bee
  • The Purple Fig

Press:

Stitch Winter 2014

haberdashery_fun

Block Printing
A big hello to everyone new around here. Thank you A big hello to everyone new around here.
Thank you for stopping by ❤️🎉

Did you know that along with all my block printing that I also sew? I have had a sewing blog for 10 years. If you are new to sewing or looking for tips and tricks, I’ve got the spot for you.

Head to the link in my profile and click sewing tutorials - blog. I even have a tutorial for this cross body tote over on my blog. 

#haberdasheryfun #haberdasheryfunpatterns #isewbags #surfacepatterndesigner #blockprintingmadeeasy #100daysofsimpleshapes #100dayproject #dothe100dayproject #haberdasheryfunonlineclasses #konacotton #canvasbags #speedballfabricink #simpleshapesarefun #blockprintmadeeasy
I’m back in my favorite Toronto kitchen so had t I’m back in my favorite Toronto kitchen so had to take a few block print photos. Continuing on with my simple prints theme and playing around with the heart block.

#haberdasheryfunpatterns #blockprinted #100daysofsimpleshapes #speedballfabricink #100daysproject #dothe100dayproject #blockprintedfabric #100daysofblockprinting #blockprintmadeeasy #blockprintingmadeeasy #100daysofsimpleprints #blockprintedfabric #haberdasheryfun Day 32/100
Happy Monday! We are back from vacation and I am s Happy Monday! We are back from vacation and I am still cruising thru my “simple circle” blockprint theme. This one is my favorite of the last group. Swipe to see it’s companions.

What are you working on?

#haberdasheryfun #haberdasheryfunpatterns #speedballink #100dayproject2022 #dothe100dayproject2022 #surfacedesigncommunity #surfacepatterndesign #handmadestamp #blockprintfabrics #blockprintedfabric #100daysofsimpleshapes #blockprintingmadeeasy #blockprintingmadesimple #fatquarterprojects #fatquarterproject #konacottonsolids #konacottons 

Day 31/100
Instagram post 18239908753108863 Instagram post 18239908753108863
Test print and then fabric. Are you an all over ra Test print and then fabric. Are you an all over random print or a linear structured print person? 

I always say to myself that I’m going to create a random print and then go straight for a structured layout.

#blockprintingmadeeasy #haberdashery #haberdasheryfun #blockprinting #simpleshapesmadefun #fatquarterproject #100daysofsimpleshapes #dothe100dayproject #dothe100dayproject2022 #speedballfabricink #konacottonsolids #haberdasheryfunpatterns #100dayproject2022 #handmadestamp #blockprintedfabric #blockprintedtextiles #100daysofsimpleshapes #blickartmaterials  Day 30/100
Follow on Instagram

Copyright © 2022 · Klar theme by Crimson Pear :: web & surface design

Copyright © 2022 · Klar on Genesis Framework · WordPress · Log in