Haberdashery Fun

  • Home
  • About
    • Look Book
  • Contact
    • Collaborate?
  • Tutorials
  • Shop
  • Freebie
  • Block Printing Course
    • Email
    • Facebook
    • Instagram
    • Pinterest

Keep up to date with the latest posts!

DIY.. Quilted Bread Basket Cover

in DIY Projects, Fabric on 25/11/13

This one is just in time to kick off the holidays!! These days it seems like all my seasonal posts come just in the nick of time. It’s not that I am a procrastinator.. I need more hours in every day. Don’t we all?

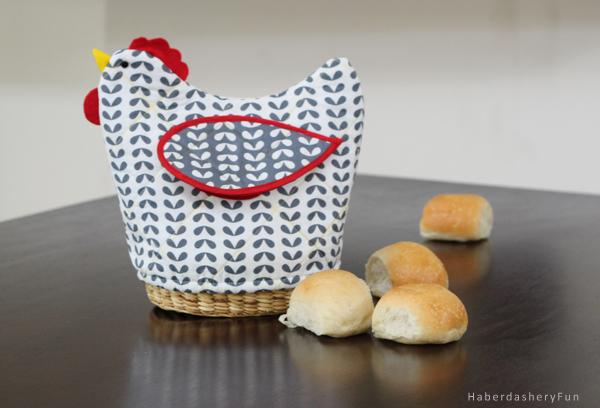
This funky little chicken isn’t just for the holidays. While the holidays are a great time to showcase it, why not use it all year? It is a great decorating piece. You can lift up a wing up and pull a dinner roll from inside the basket.  And this is really easy to make.  I know it looks a little hard.. But after you quilt the fabric, it’s just a few steps and then ta-da!

This tutorial is shared over at the Pellon Projects website.. Head on over to download the PDF. It has very detailed step by step instructions including the chicken template.

Materials Needed:

  1. Printed cotton fabric – 1/2 yard
  2. Solid cotton fabric – 1/2 yard
  3. Felt squares – 2 colors
  4. 1/4″ elastic
  5. 2 small buttons
  6. Double fold bias tape – home-made or store bought
  7. Rotary cutter, cutting mat and quilting ruler
  8. Chaco quilting marker
  9. Quilt basting spray
  10. Batting – Pellon TP971F Fusible works great
  11. Sewing machine and sewing supplies
  12. Iron and ironing board
  13. Small oval basket – no handles

Before we get started..

  1. I strongly suggest you quilt your own fabric. Please!!?? This chicken is way too cute to go and buy ugly quilted fabric.  No worries, I have an easy tutorial you can follow. You can check it out here.
  2. After reading my tutorial, adjust the grid/diamond shape to 2″.
  3. You will also need to back the quilt. Use quilt basting spray. Spray the solid fabric and gently lay onto the batting. This sandwiches the batting between the pattern fabric and the solid fabric. Now place into your sewing machine.. You are ready to quilt.
  4. The chaco marking pen leaves a mark.. But it isn’t permanent; it can be washed off.. You can see that my chicken still has little yellow lines on it.. It was my first sample in the real fabric, so I haven’t washed the lines off yet.

Let’s get sewing:

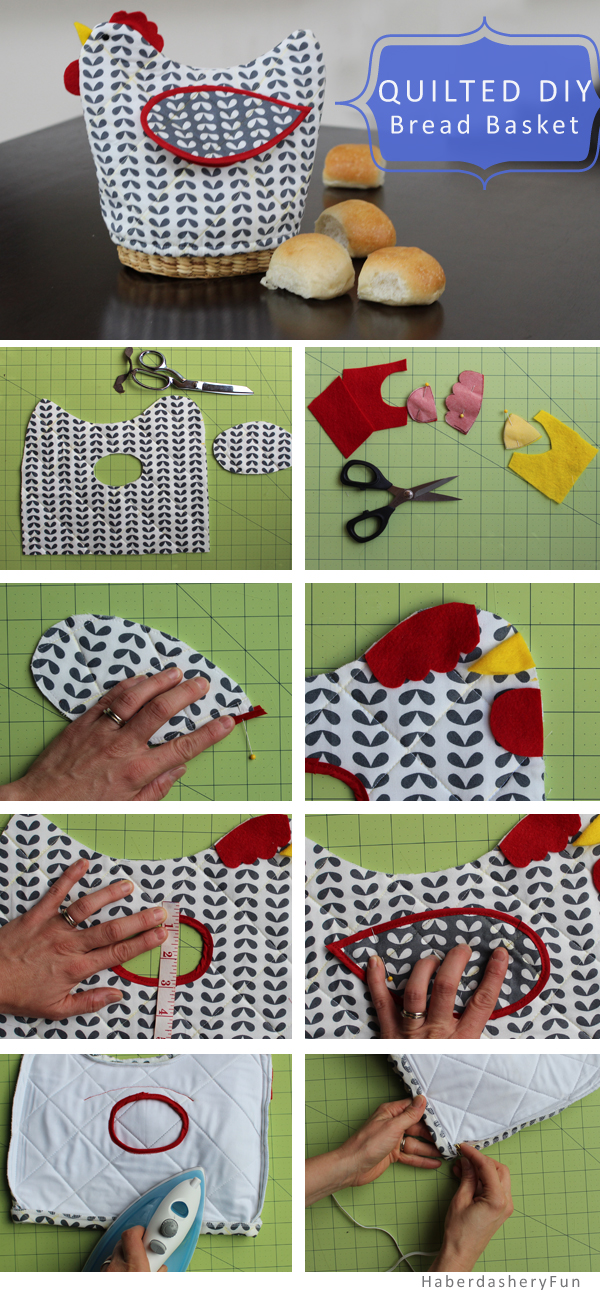
  1. Lay the chicken and wing pattern pieces on the quilted material and cut out.. Important – mirror the chicken pieces
  2. Cut out the wattle, comb and beak pieces from the felt squares
  3. Cut bias tape for each wing and also the ovals. Pin and then stitch in place. For the wings, leave a 1″ tail when pinning the bias tape down. Sew the bias tape around the oval and then tuck the tail under/towards the back and backstitch.
  4. Fold the beak in half. Place the wattle, comb and beak pieces onto the chicken’s face. The fold of the beak is on top. Note that all pieces face inwards..Seems weird, but trust me
  5. Measure and mark 5/8″ above the oval. Make a small mark with the chaco marking pen.
  6. Pin the wing in place. Adjust accordingly and place in the center of the chicken’s body.  The wing needs to fully cover the oval hole. Place into sewing machine and stitch down. Start the stitch approximately 1″ from the wing tip and end 1″ from the the oval center front. Repeat for the other wing
  7. Place right sides together. Pin. Place into sewing machine and stitch with a 1/2″ seam allowance. Press seams. Measure and turn up bottom seam 1/2″. Pin. Place into sewing machine and edge stitch. Leave a small 1″ opening for the elastic
  8. Cut approximately 15″ of elastic. Place a pin at one end and insert into the opening. Pull through entirely. Adjust gathers. Sew elastic together as well the the opening shut.

Fabric source.. “Shades of Black” by Me and My Sister Designs for Moda Fabrics.

Happy Thanksgiving!

39 Comments

« Sneak Peek.. Holiday Bread Basket Cover
Inspiration.. Circles »

Comments

  1. Laraine says

    11/26/2013 at 12:51 pm

    Very nice. I love the creative contrast you have done with the fabric, also love the rooster design.

    Reply
    • Haberdashery Fun says

      11/26/2013 at 12:54 pm

      Thanks Mom!! 🙂

      Reply
  2. rob jackson says

    11/26/2013 at 1:12 pm

    nice.

    another great project idea. keep em’ coming…..my wife just gets so excited each time a new project hits…..thanks and happy holidays from the Jackson’s

    Reply
  3. Mindi says

    11/26/2013 at 3:08 pm

    This is so cute!! What a fun idea, my kids would love it! And thanks for your sweet comment on my blog! I hope you have a wonderful Thanksgiving!

    Reply
    • Haberdashery Fun says

      11/26/2013 at 3:58 pm

      Hey Mindi, Thanks for stopping here at my blog.. Seriously, your photos are really fantastic! Have a great Thanksgiving as well. 🙂

      Reply
  4. Cuc says

    11/27/2013 at 11:35 pm

    This is such a cute idea! I wish I had someone to make this for as a gift for Christmas. Maybe I can make it for myself!

    Reply
  5. Kristina & Millie says

    11/30/2013 at 5:50 pm

    I love the chicken!! Great tutorial too. I would feel very comfortable making my own for sure so adding to my list of must makes! We would love you to link up to our Snickerdoodle Sunday @ 2crochethooks if you get a chance!

    Reply
    • Kristina & Millie says

      12/07/2013 at 1:12 pm

      Thank you for linking up to Snickerdoodle Sunday! I so love this little chicken and have added it to my list of must make!

      Reply
      • Haberdashery Fun says

        12/07/2013 at 7:54 pm

        Hi – thank you! You will LOVe making this little guy 🙂

        Reply
  6. T'onna says

    12/02/2013 at 12:12 am

    Wow! I love this basket cover! I think chickens are fun kitchen decor!

    Navy Wifey Peters @ Submarine Sunday Link Party

    Reply
    • Haberdashery Fun says

      12/02/2013 at 7:25 am

      Thanks for stopping by. I love this chicken as well :). I’ll come on over and check out your link party!

      Reply
  7. Hannah says

    12/02/2013 at 9:57 am

    I LOVE THIS! Pinning it and for sure wil be making for my Mum in the future! She will love it 😀

    Thanks for sharing!

    Hannah ♫
    Sew Lah Tea Dough

    Reply
    • Haberdashery Fun says

      12/02/2013 at 10:04 am

      Hi- Awesome.. Thank you so much! I’m sure your Mom will love it. After the quilting part, it is really easy to sew 🙂

      Reply
  8. natural maker mom at Satsuma Designs says

    12/02/2013 at 5:46 pm

    VERY chic(ken) bread basket cozy! Definitely want to try this for cozy weekend mornings. Thanks so much for the inspirations!

    Reply
    • Haberdashery Fun says

      12/03/2013 at 10:30 am

      hi – thank you for your kind comments!

      Reply
  9. Rina (Oomanoot) says

    12/03/2013 at 3:26 pm

    What a cute tutorial! I might try making a bigger version to cover my kitchen aid…

    (Visiting from Flamingo Toes link party)

    Reply
    • Haberdashery Fun says

      12/03/2013 at 4:28 pm

      Awesome! let me know how it goes and please send pictures of your finished chicken!! 🙂

      Reply
  10. Erica says

    12/04/2013 at 11:35 am

    This is just so creative and adorable! I love the fabric you used too with the reversed whites and greys.

    Reply
  11. Lyn Kaufmann says

    12/08/2013 at 9:43 pm

    Love this and think I need to make several! Thank you for sharing.

    Reply
  12. Trevor says

    12/26/2013 at 12:28 pm

    I definitely need one of these, super cute idea! I also liked Rina’s idea of making a bigger one to cover a Kitchen Aid mixer. Thanks for sharing this. Happy Holidays!

    Reply
    • Haberdashery Fun says

      12/27/2013 at 9:54 am

      Thanks Burger Nerd! I agree, would make an awesome kitchen aid cover!

      Reply
  13. Amanda says

    09/12/2014 at 12:00 pm

    I created your adorable Chicken Bread Basket Cover for my mom’s kitchen. I linked your page up to my post. Thank you so much for creating such a lovely pattern.

    http://www.kaleidoscopeofcolors.com/2014/09/chicken-sewing-crafts.html

    Reply
  14. Rachel Petersen says

    02/25/2017 at 6:28 pm

    Thank you for this post. Super cute project. I was just gifted a bunch of half finished ones and really appreciate your tutorial for finishing them off.

    Reply
  15. Broadway Fabrics says

    11/19/2020 at 11:27 am

    Wonderful fabric design.

    Reply

Trackbacks

  1. Fabric Inspiration - Shades of Black | Haberdashery Fun says:
    11/26/2013 at 11:50 am

    […] UPDATE.. You can see the quilted bread basket cover I made from this wonderful fabric here […]

    Reply
  2. 20 Handmade Gift Ideas {Link Party Features} I Heart Nap Time | I Heart Nap Time - Easy recipes, DIY crafts, Homemaking says:
    12/01/2013 at 12:18 pm

    […] DIY Bread Box Cover from Haberdashery Fun […]

    Reply
  3. November Round Up | Haberdashery Fun says:
    12/02/2013 at 10:03 am

    […] great part is that this funky little chicken has a pattern to go along with it. You can find my pattern and the PDF instructions over at the […]

    Reply
  4. Hobzy Hot 100 Bloggers: Haberdashery Fun | The Hobzy Blog says:
    04/05/2014 at 10:07 am

    […] make this one for the big Thanksgiving dinner (American friends) but this is a fantastic DIY from Haberdashery Fun for everyday […]

    Reply
  5. DIY Quilted Bread Basket Cover | Addicted 2 Fun: Interesting Pictures, Inspiration , Quotes & Content that Matters! says:
    04/10/2014 at 7:27 pm

    […] DIY Quilted Bread Basket Cover Pass the bread rolls!! Make this quilted chicken just in time to kick off the holidays.To Learn “DIY Quilted Bread Basket Cover” DIY & Crafts click here […]

    Reply
  6. DIY.. Quilted Turkey Bread Basket | Haberdashery Fun says:
    11/07/2014 at 10:48 am

    […] hello turkey! Timeless Treasures and Pellon loved my Quilted Chicken Bread Basket from last year and asked me to come up with a Thanksgiving version.. I had to wrap my head around […]

    Reply
  7. What We Loved This Week: Quilted Gift Ideas says:
    05/15/2015 at 9:21 am

    […] DIY Quilted Bread Basket Chicken from Haberdashery […]

    Reply
  8. Quilted Bread Basket Tutorial - Sewtorial says:
    05/19/2015 at 10:01 pm

    […] Forget those plain ol’ bread covers. Make a statement with this fun quilted bread basket tutorial by Haberdashery Fun. […]

    Reply
  9. 50 Pretty and Practical Things to Sew for the Kitchen | List Inspired says:
    07/08/2015 at 2:41 am

    […] Quilted Bread Basket Cover: Just in time for Thanksgiving.. Make this quilted chicken bread basket cover.. Pass the bread […]

    Reply
  10. Fabric Chicken Roundup - Sugar Bee Crafts says:
    02/13/2016 at 9:07 am

    […] Haberdashery Fun came up with the fabric chicken quilted bread basket! […]

    Reply
  11. 50 Free Quilting Patterns you Have to Make - Hobbycraft Blog says:
    06/15/2016 at 5:05 am

    […] Quilted Bread Basket Cover by Haberdashery Fun […]

    Reply
  12. Give Us Our Daily Bread Basket Covers – Coats Crafts US says:
    05/08/2017 at 9:52 am

    […] Image courtesy of haberdasheryfun.com […]

    Reply
  13. 17 Easy Things to Sew to Spice Up Your Kitchen - Ideal Me says:
    07/07/2017 at 5:29 am

    […] Via Haberdashery Fun […]

    Reply
  14. 19 EASY SEWING PROJECTS TO SPRUCE UP YOUR KITCHEN – DIY DIAL says:
    07/22/2018 at 10:28 am

    […] Tutorial via Haberdashery Fun […]

    Reply
  15. What We Loved This Week: Quilted Gift Ideas - Seams And Scissors says:
    06/08/2019 at 12:47 am

    […] DIY Quilted Bread Basket Chicken from Haberdashery […]

    Reply

Leave a Reply Cancel reply

Your email address will not be published. Required fields are marked *

This site uses Akismet to reduce spam. Learn how your comment data is processed.

About me


Hi there - I'm Marni Weaver. A sewer, a sometimes quilter and a lover of fabric design. I started this blog to share my ideas. Come Join the Fun
shop now

Popular Categories

project for baby fabric projects seasonal projects fat quarter projects sewing tips and tricks inspiration

Categories

  • Applique
  • Baby
  • Bags and Pouches
  • Block Printing
  • Color
  • DIY Projects
  • Fabric
  • Fabric Design
  • Fat Quarter Projects
  • Home Decor
  • Inspiration
  • Just for Fun
  • Kids
  • No Sew
  • Patterns
  • Print On Fabric
  • Quilting
  • Scrap Fabric Projects
  • Seasonal
  • Sewing Tips & Tricks

Lovely sponsors

Recent Comments

  • HaberdasheryFun and an easy Kraft-tex sewing project | Haberdashery Fun on Collapsible Kraft-Tex Bowl
  • HaberdasheryFun and an easy Kraft-tex sewing project | Haberdashery Fun on Sewing With Kraft-Tex
  • 3 Simple Summer Sewing Tutorials | Haberdashery Fun on Sew A Canvas Zipper Pouch
  • 3 Simple Summer Sewing Tutorials | Haberdashery Fun on Sew Asymmetrical Color Block Totes Tutorial
  • 3 Simple Summer Sewing Tutorials | Haberdashery Fun on Sew A Baby Towel With A Hood

Projects Elsewhere

find me on Pellon Projects sew mama sew contributor

momtastic contributor

Pinterest

Visit Marni@Haberdashery Fun's profile on Pinterest.
Follow on Bloglovin

I'm Reading

  • Cluck Cluck Sew
  • Cooking Dangerously
  • In Color Order
  • Jen Hewitt
  • Jolly Jabber
  • Karly Spalding Photography
  • Leigh Laurel Studios
  • Lindsay Sews
  • Lotta Jansdotter
  • Love Patchwork and Quilting Magazine
  • Made
  • Making It Lovely
  • Noodle-Head
  • Polka Dot Chair
  • Sharon Holland Designs
  • Silhouette America Blog
  • Silhouette Design Store
  • The Purl Bee
  • The Purple Fig

Press:

Stitch Winter 2014

haberdashery_fun

Marni Weaver
Working on a commission and a request for the colo Working on a commission and a request for the color terracotta. I’m thinking the top right vs the bottom left. And funny enough, this fits perfectly for today’s #marchmeetthemaker prompt “decision”

#haberdasheryfun #100dayproject #marchmeetthemaker2023 #surfacepattern #terracottabowl #speedballink #textiledesigner #homedepotcolormatch #haberdasheryfunpatterns #blockprinting #blockprintedfabric #surfacepatterndesign #smallbusinesslife
Earlier today I was working on a new pattern and t Earlier today I was working on a new pattern and then realized that my table had legs. 😂 While I’m excited to share about my upcoming tote pattern release, this photo took me down memory lane. My sweet boy Arlo turns 7 this week. He is always by my side and has been my shadow since the day he was born❤️ . He is often in my studio, patiently waiting, photobombing a tutorial or playing w/ my supplies.

#haberdasheryfun #koifabric #rashidcolemanhale #rubystarsocietyfabric #haberdasheryfunpatterns #pdfpattern #marceetthemaker #marchmeetthemaker2023 #100dayproject #blockprintingmadeeasy
I love today's prompt "from idea to product" for # I love today's prompt "from idea to product" for #marchmeetthemaker. If you swipe, you can see the the original. I made that group of block print quite a few years ago and this pinwheel is a motif that I come back to all the time. 

Do you block print or make your own designs? What would you like to create with your patterns or prints? Have anything in mind?

#blockprintingmadeeasy #blockprinting #surfacepatterndesign #haberdasheryfun
#onlinecourses #chelseatakesshots #haberdasheryfunpatterns #makeshit #surfacepatterncommunity #whatsyourwhy #marchmeetthemaker2023 #100dayproject #dothe100dayproject #havefun #scandiboho.
Instagram post 18073744054322730 Instagram post 18073744054322730
Do you mix and match your handmade block prints an Do you mix and match your handmade block prints and your fabric stash?  I love this combo of champagne blush and turquoise. What would you make with it?

#haberdashery #modafabrics #gingiberfabric #modafabricsandsupplies #modafabric #meetthemaker2023 #modafabric 
#meetthemaker #100dayproject #haberdasheryfun #100dayproject2023 #blockprintingmadeeasy #blockprinting #cottoncanvas #speedballfabricink.
Follow on Instagram

Copyright © 2023 · Klar theme by Crimson Pear :: web & surface design

Copyright © 2023 · Klar on Genesis Framework · WordPress · Log in