Haberdashery Fun

  • Home
  • About
    • Look Book
  • Contact
    • Collaborate?
  • Tutorials
  • Shop
  • Freebie
    • Email
    • Facebook
    • Instagram
    • Pinterest

Keep up to date with the latest posts!

DIY.. Toddler Luke Skywalker Flight Suit

in Seasonal on 30/10/13

Alright, after weeks of thinking, but no action..I sat my butt down and finally finished sewing my toddler’s Halloween costume. So here it is.. Hello Luke Skywalker!

It took me awhile to get motivated this year.  While I had been thinking about this costume for months, I was frozen at the thought of pattern drafting the flight suit.  The thought of fitting the garment on a squirmming toddler almost had me throw in the towel.  Then I had a brainwave.. Why not buy a pattern and alter it!? Umm Hello. Easy.

Another reason for the brain freeze, I had no idea how I was going to show the DIY steps. This would have added too much time to an already lengthy adventure. So instead, I’m showing images and comments on the garment pieces. If you have any questions, feel free to leave me a comment, I promise to get back to you.

Materials needed:

  1. Butterick Pattern #3244 – this pattern has pieces for a 1 piece jumpsuit, a hood and boots [ optional – I didn’t make these]
  2. Cotton fabric – Orange, white and black
  3. White fleece
  4. Felt squares – Black, white, grey, blue, light blue, white and red
  5. Black and white velcro
  6. White gros grain
  7. Sewing machine and related sewing supplies
  8. Iron and ironing board

Orange Flight Suit:

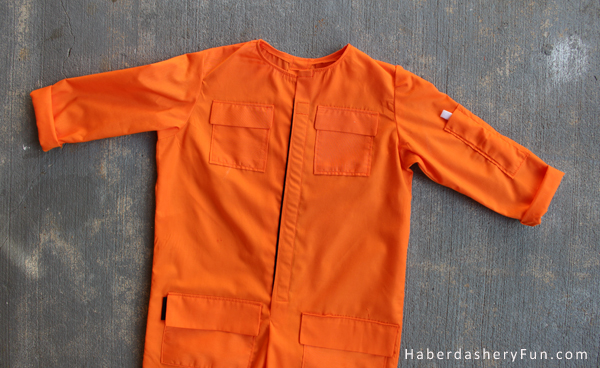
I used the Butterick Spaceman Pattern for the flight suit. I added the flap pockets and a few tabs. On the sleeves I made sure to add a pocket for the communication cylinders [white pen looking things]. Black velcro down center front added the extra kick the flight suit needed [otherwise it looked like a prison inmate’s outfit.. As per my brother].

White Flak Vest [non geek term.. “White Bib”]:

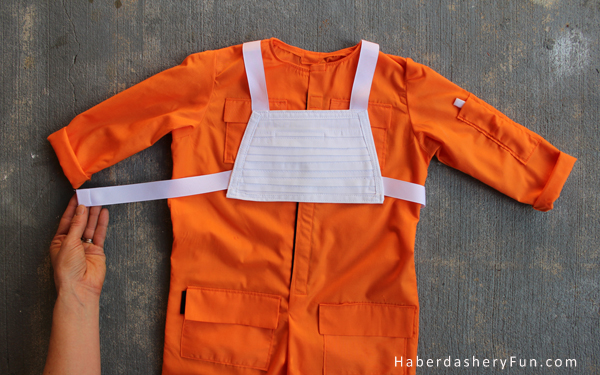
I pleated white fabric [about the size of a fat quarter] and then measured it against Tanner’s chest to get the size of the vest. Pleated pieces were used on the front and back. I made a lining piece that was slightly larger and wrapped it from the back to cover the raw edges. The vest fits over his head with velcro straps that are adjustable at the back. I wanted this to come off easy.

Grey Chest Box:

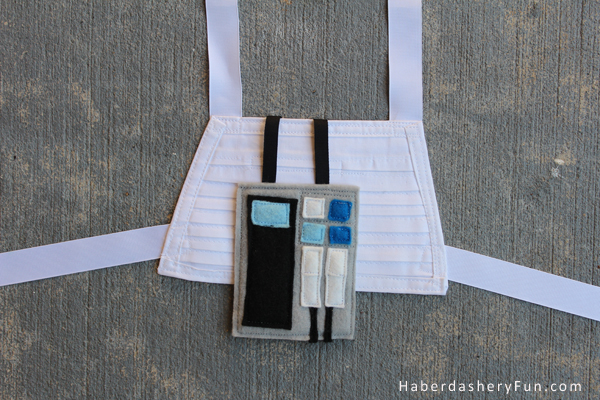
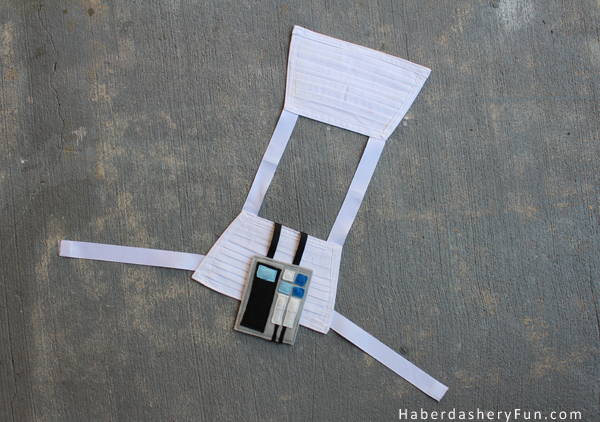
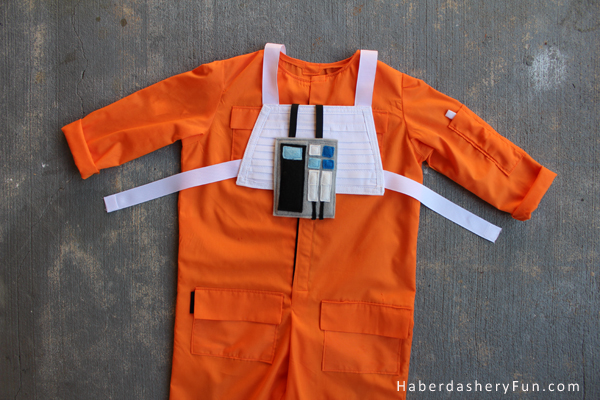
The grey box was made from felt squares. I made it puffy by sandwiching a few extra layers of felt  inside and then stitched it closed.  A variety of felt colors were used for the buttons. I attached this box to the vest.. I know, technically not correct.. But for a toddler’s costume, the less hanging straps the better. At least from a cautious Mom’s point of view.. The grey chest box also pulled the vest down, so I placed a piece of velcro at the center back to secure the vest in place.

If you want to see the inspiration for this costume.. Click here.  Happy Halloween 2013.


Related Posts Plugin for WordPress, Blogger...

15 Comments

« Halloween Inspiration 2013
October Round Up »

Comments

  1. Maurice says

    10/30/2013 at 2:31 pm

    Great craftsmanship! The attention to detail is superb. Lil’ guy traded in his Blaster Pistol for a tennis ball… safe alternative. Great job on this project – inspiring.

    Reply
  2. Valerie says

    10/30/2013 at 2:42 pm

    Love this! I’m now really inspired since its Oct 30th and still have no costume for my son. Though I dont have time to sew, I think I now know what im going to do….Thank you for the inspiration!

    Reply
    • Haberdashery Fun says

      10/31/2013 at 10:14 pm

      Thanks! Jagger’s Rambo costume turned out great. Until next year, right?

      Reply
  3. Ann says

    10/30/2013 at 7:53 pm

    Ummm … awesome!! My son is obsessed with Star Wars, so I may just have to attempt a Christmas Skywalker suit for him! Thanks!!

    Reply
    • Haberdashery Fun says

      10/30/2013 at 8:19 pm

      Thanks Ann! Keep me posted on how it goes 🙂

      Reply
  4. Aya says

    10/31/2013 at 8:52 am

    Think it is a great idea and with the detailed instructions makes it easy. Also, looks cool, comfortable and very good looking and the “model” outstanding!

    Reply
  5. Haley Kennedy says

    10/31/2013 at 9:17 am

    I am a poor judge —– but, it IS a very nice and attractive garment, and specially the wearer
    is a MAGNIFICENT grandson, full of p— and vinegar, interested in many activities around us.
    Papa Golson.

    Reply
  6. Nicole says

    10/31/2013 at 10:06 pm

    Turned out so cute… Thanks for sharing!

    Reply
  7. Laraine says

    11/05/2013 at 2:13 pm

    I love it. There are very many Star Wars fans who will love this. MAY THE FORCE BE WITH

    THEM, Cute kid too

    Reply
  8. andi says

    11/12/2013 at 3:22 pm

    This is awesome! Great idea to alter a pattern – why is it that we always try to make things harder than they need to be? 🙂

    Reply
  9. Liz says

    11/12/2013 at 6:10 pm

    What a lucky boy! He is going to have some fun costume parties ahead with you as his mom. This costume is awesome!

    Reply
    • Haberdashery Fun says

      11/13/2013 at 10:58 am

      Agh.. Thanks so much!! I do look forward to sewing one every year. My Mom made all of our costumes, so I’m looking forward to all that craziness each year!

      Reply
  10. Maggie says

    10/15/2014 at 1:30 pm

    Great job! I’m working on a Ghostbusters coverall for my toddler and was just looking for a little inspiration to start sewing -and I found it! thanks!

    Reply
    • Haberdashery Fun says

      10/16/2014 at 6:45 am

      Thanks for stopping by. Get a pattern for sure – it’s the easy route 🙂 The pattern will be a perfect start and then you can add all the extras to it.

      Reply

Trackbacks

  1. October Round Up | Haberdashery Fun says:
    11/02/2013 at 7:49 am

    […] bed and this color will be ignored for the next 9 months. Developing and sewing my toddler’s Luke Skywalker costume was pure enjoyment. I can’t believe it, but he got to wear it 4 times! So for all the time an […]

    Reply

Leave a Reply to Haley Kennedy Cancel reply

Your email address will not be published. Required fields are marked *

This site uses Akismet to reduce spam. Learn how your comment data is processed.

About me


Hi there - I'm Marni Weaver. A sewer, a sometimes quilter and a lover of fabric design. I started this blog to share my ideas. Come Join the Fun
shop now

Popular Categories

project for baby fabric projects seasonal projects fat quarter projects sewing tips and tricks inspiration

Categories

  • Applique
  • Baby
  • Bags and Pouches
  • Block Printing
  • Color
  • DIY Projects
  • Fabric
  • Fabric Design
  • Fat Quarter Projects
  • Home Decor
  • Inspiration
  • Just for Fun
  • Kids
  • No Sew
  • Patterns
  • Print On Fabric
  • Quilting
  • Scrap Fabric Projects
  • Seasonal
  • Sewing Tips & Tricks

Lovely sponsors

Recent Comments

  • Make A Simple Block Print Tote Bag | Haberdashery Fun on DIY.. Colorful Dish Towel Tote Bags
  • Make A Simple Block Print Tote Bag | Haberdashery Fun on Sew Asymmetrical Color Block Totes Tutorial
  • Make A Block Printed ToteBag | Haberdashery Fun on Sew A Reversible Tote
  • Make A Block Printed ToteBag | Haberdashery Fun on Quick Tip.. Sewing Boxed Corners
  • 20 Creative DIY Storage Bin Ideas - DIY & Crafts on Sew An Easy Fabric Storage Bin

Projects Elsewhere

find me on Pellon Projects sew mama sew contributor

momtastic contributor

Pinterest

Visit Marni@Haberdashery Fun's profile on Pinterest.
Follow on Bloglovin

I'm Reading

  • Cluck Cluck Sew
  • Cooking Dangerously
  • In Color Order
  • Jen Hewitt
  • Jolly Jabber
  • Karly Spalding Photography
  • Leigh Laurel Studios
  • Lindsay Sews
  • Lotta Jansdotter
  • Love Patchwork and Quilting Magazine
  • Made
  • Making It Lovely
  • Noodle-Head
  • Polka Dot Chair
  • Sharon Holland Designs
  • Silhouette America Blog
  • Silhouette Design Store
  • The Purl Bee
  • The Purple Fig

Press:

Stitch Winter 2014

haberdashery_fun

Marni Weaver
I have a drawer where I keep all of my block print I have a drawer where I keep all of my block printed papers and have often wondered.. “What the heck do I do with all of these”.

How about you?

I recently found a bunch of  tutorials over at @modpodgerocks and thought it would be fun to make wood coasters with my block prints. They turned out better than expected and so I thought to share with you.

Want more info? I created a blog post. See the link in my profile for the blog post and details. 

Day27/100 #100dayproject #dothehundreddayproject #100daysofsimpleshapes #haberdasheryfun #blockprintingmadesimple #onlineclasses #zoomworkshops #haberdasheryfunpatterns #haberdasheryfunclasses #handmadestamp #modpodge #modpodgecrafts #decoupageart #decoupagelovers #blockprintedbyhand
I’m sharing about how to frame your block printe I’m sharing about how to frame your block printed fabric on my blog today. Day 26/100 #100dayproject 

If you have ever thought you would like to learn how to block print… I have a course for you. It is called Block Printing Made Easy. It is all about the basics - working with simple shapes, design prompts and getting creative on paper and fabric.

This is an online course and starts on Monday, May 30. There are 3 modules with videos and also included in the course are 3 live zoom workshops. The videos are self paced, so the good news is you can cruise through them or take all the time you need.

The course is $97 USD.

See the link in my profile for additional details on the course( breakdown on each module) and to also access to my blog post.

#dothe100dayproject #haberdasheryfun 
#blockprintingmadeeasy #100daysofsimpleshapes #zoomclasses #haberdasheryfunpatterns #speedballfabricink #handmadefabrics #dothe100dayproject2022 #100dayproject2022 #handmadestamps #blockprintedfabric #ikeahacks #ikeaframes
Goodbye triangles, hello circles. I’m working Goodbye triangles, hello circles. 

I’m working on a project, so I printed a bunch of small fabric squares with my new circle stamp. Such a simple yet effective stamp.

I am launching an online course called “Block Printing Made Easy? Want to learn to block print? The course starts in two weeks (5/30). Want more info? See the link in my profile to join the waitlist and also to view the course details. 

Day 25/100 #100dayproject 

#dothe100dayproject #dothe100dayproject2022 #haberdasheryfun #haberdasheryfunpatterns #pdfpattern #blockprinting #blockprintingonfabric #blockprintingmadeeasy #blockprintingworkshop #speedballfabricink #konacottonsolids #speedballart
I’ve got one more triangle print to share and I I’ve got one more triangle print to share and I think that’s a wrap. Simple and easy. The pin cushion on that right that was gifted to me from my grandmother Mor Mor really takes the stage in my opinion 

The circle shape is next. I’m excited to work with no corners and see what will unfold.

Day 24/100
#haberdashery #100dayproject 
#100daysofsimpleshapes #blockprintingmadeeasy #dothe100dayproject #dothe100dayproject2022 
#haberdasheryfun #ikeahacks #konacotton #konacottonsolids 
#speedballfabricink #blockprinting #easyblockprint #haberdasheryfunpatterns #haberdasheryfunclasses
A mash up of triangle stamps I created so far duri A mash up of triangle stamps I created so far during the #100dayproject.
 
Who knew the triangle shape could be so much fun? I have had a blast the last playing around with it - both dissecting the shape and putting it back together. 

Which one is your favorite?

I can’t believe I am saying this, but Im ready to move on to a new shape. One that is more soft and organic. Next up, the circle!
Day 23/100

#100daysofsimpleshapes 
#haberdashery 
#blockprinting 
#blockprintingonfabric 
#blockprintingmadeeasy 
#haberdasheryfun
#speedballfabricink #speedballink #fatquarters 
#handmade #dothe100dayproject2022 
#100dayproject2022
Follow on Instagram

Copyright © 2022 · Klar theme by Crimson Pear :: web & surface design

Copyright © 2022 · Klar on Genesis Framework · WordPress · Log in