It has been quiet on my blog the last few weeks. I have been on the road for work. But, thank goodness, my work travel and tradeshow calendar are slowing down for the year. My life will be much calmer for the next 3 months. I am REALLY looking forward to some downtime!
Like many of my posts, I have wanted to make a wet bag for quite a some time. We live in Florida and it is hot all the time. Well, at least to me. I’m Canadian. Every Wednesday morning our toddler has playtime in the water feature at his daycare. When I pick him up at the end of the day, his wet clothes are tied in a garbage bag. It feels like such a waste of a garbage bag when I could sew something.. So, with work at a slower pace, it was the perfect time to whip up this project.
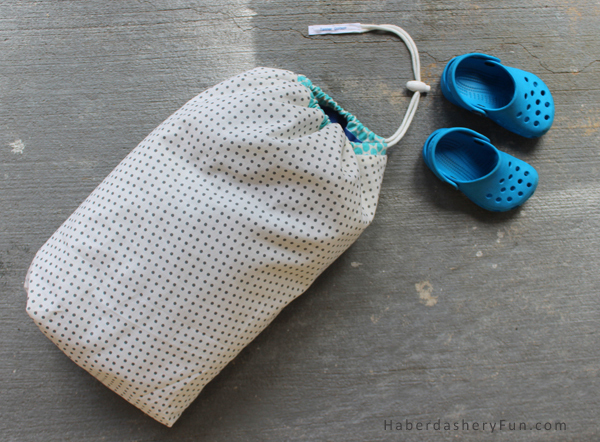
The bag was fairly easy to make and completed in a few hours. The hardest part was figuring out how to make a separate casing for the drawstring, as I wanted it to be a contrasting color. I’ve figured it out for you! The bag holds a toddler sized towel, swim shorts, swim top and a pair of water shoes. The bag is long and slender and the finished size is 15 1/2″H x 4″ W x 8″L.

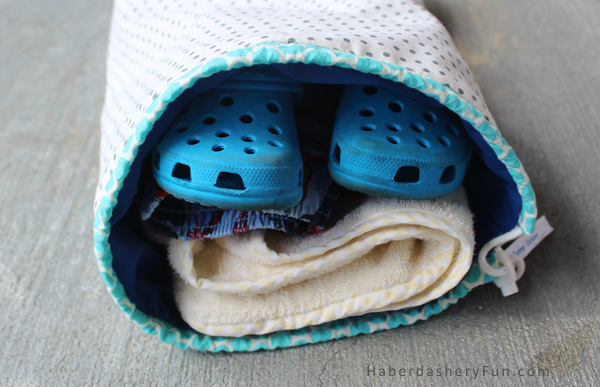
Although I created the bag for my toddler’s wet daycare clothes, it can be used for anthing – school, laundry, travel or even as an overnight bag.
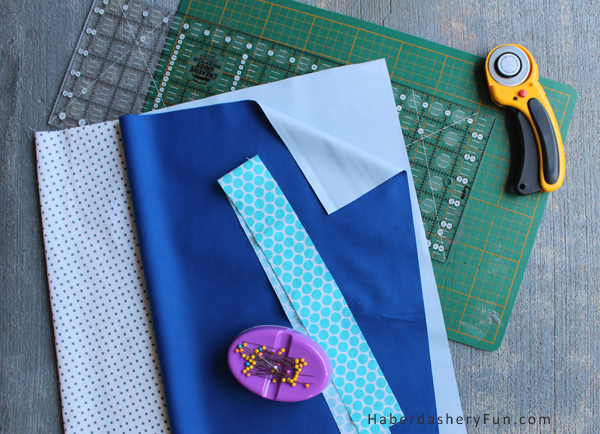
I used cotton for the outside and waterproof PUL fabric for the interior. I have used PUL fabric for a few projects now and really like working with it. I bought a 3 color pack from a brand called Babyville Boutique at Joann Fabric.
Materials Needed:
- Cotton fabric – 2 colors or patterns
- PUL fabric – Waterproof fabric. Check out the link above to the Babyville Boutique. This fabric is great for baby products and perfect for the lining
- 1-1/2 yards of string or cording
- Cord stops – optional
- Rotary cutter
- Cutting mat
- Quilting / Cutting ruler
- Sewing materials – pins, thread, sewing machine
- Disappearing ink pen
- Iron and ironing board
- Namemaker labels – optional
Before we get started, here are a few things to consider:
- Cotton Fabric – Cut 1 piece 24″L x 18″H. Second color/casing strip: cut 18 1/2″L x 2″H
- Lining Pattern – Cut 1 piece 24″L x 18″H.
- Pins and PUL – Keep your pining to a minimum. Pin only in the seam allowance or along the stitch line. The pins will make holes in the back/waterproof side of the fabric
- Iron and PUL – You can iron PUL fabric. I pressed my seams for this project. So, make sure to press as you go. However do NOT touch the waterproof side with your iron. Use steam to press the wrinkles out
- Sewing with PUL – When sewing with the PUL, make the stitch length a little longer. Sew with the coated side facing down as much as you can. The fabric will slide through your machine much easier
So let’s start sewing:
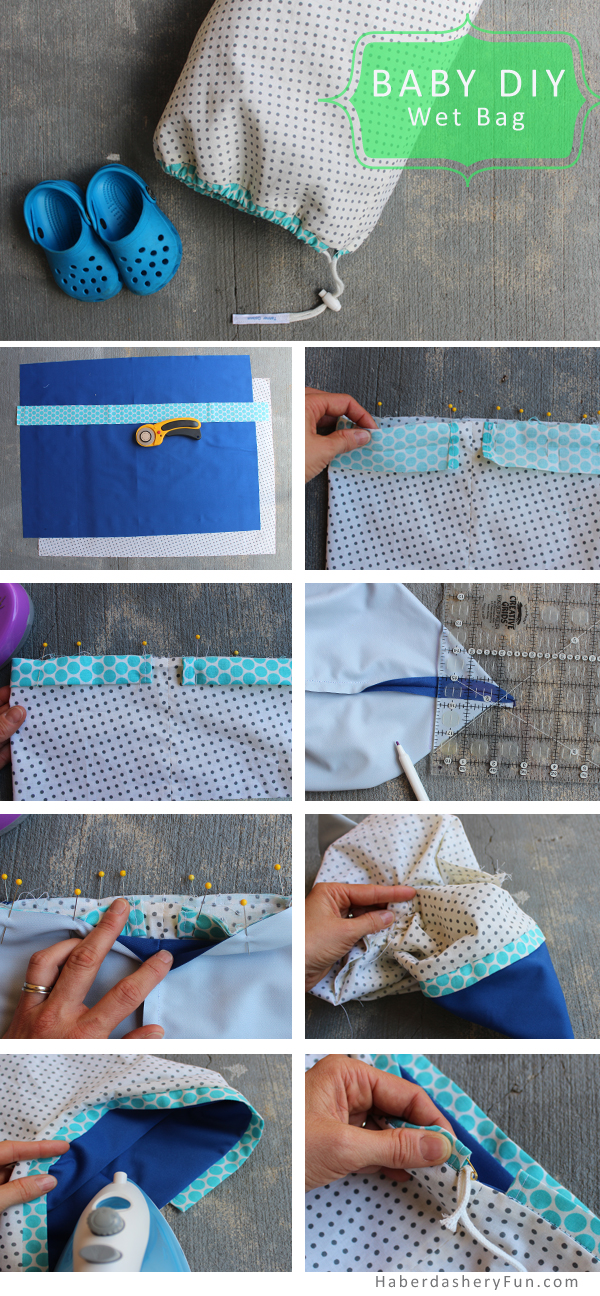
- Cut all three fabric pieces. Fold in half both the main and lining pieces lengthwise. Place into your sewing maching and sew the side seams and bottom seam with a 1/4″ SA. While sewing the self/cotton piece, leave a 2-3″ opening at the bottom seam
- Double fold the casing at each end 1/4″. Press and edgestitch closed. Pin the casing along the top edge of the self piece. Start pining at the side seam and leave 1/4″ gap. This is the casing opening. Make sure to place right sides AND raw edges together. Pin along the top edge. Place into your sewing machine and sew with a 1/4″ seam allowance
- Fold the casing upwards along the middle and iron. Match the raw edges again and pin in place. This creates your casing
- Square the bottom sides of both the self and lining. Twist the bottom of the bag. Jiggle it around so that your side seams are laying flat and facing upwards. You should have a point. Using your creative grids ruler – measure 2″ from the point and draw a line. You also want a 45 degree angle along the side. Place into your sewing machine and stitch along the line
- Turn the self right side out. The lining should be right side in. Pull the lining over the self and match at the top edge. Pin together. Place into your sewing machine and stitch along the top edge with a 1/4″ seam allowance. Backstitch. You will close this seam completely
- Pull the lining through the slit you left at the bottom self seam. This is a great time to stop and press all seams. With everything laying flat, place the bag into your sewing machine and topstitch along the casing edge. This seam holds the self and lining pieces together. Also remember to stitch closed the opening at bottom self seam
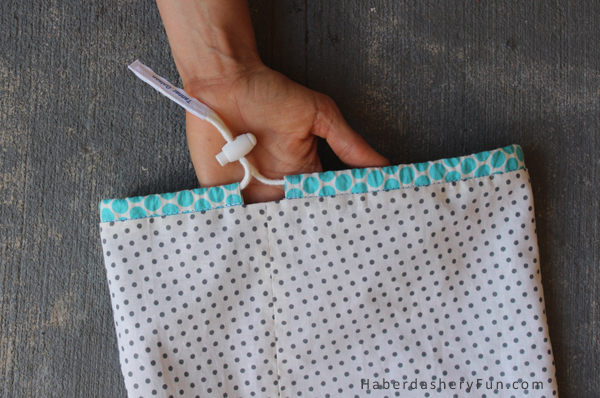
- Pin a safety pin at the end of the cord. Pull the cord through the casing. You can use a cord stop on the end to secure the straps. You can also just tie the cord in a knot to hold it all together. I used iron on Namemaker labels to finish the ends. This is a unique way to add a child’s name and label the daycare item properly. I just cut the label to size, sandwiched the cord and ironed it. I gave it a quick topstitch in my machine to secure the label
That’s it! What do you think? I love hearing if you are sewing my projects, please feel free to send pictures, leave a comment or email me through my contact page
Happy sewing!


Nice! So practical and fun. I especially like the detail of the name label. So you’re Canadian, eh? Where are you from? I’m only 1/4, but proud of it!
Hi – yes Canadian.. Originally from Edmonton, Alberta. Studied In Toronto, Ontario. Worked in New York, where I met my husband and landed up in Tampa!! Long ways from home 🙂
I love the contrast casing. So cute! I’ve never used PUL fabrics before. Looks cool!
Hi – thanks for stopping and your nice comment. I like the casing too :). PUL fabric is great. I bought a 3 color pack of it, so this is a great way to work with the fabric and different color options..
so many great uses for this! pinning!
Found you over at CraftGawker.. Love you stuff. Super cute AND different baby products!
This is a great tutorial! LOVE it! We’ve started a new link party for sewing over at Go To Sew. We’d love if you’d link up! http://gotosew.com/2013/09/brand-new-link-party-isew/
Hi Andrea, Thanks for the kind comment. Just added my link 🙂
Just want to make sure I fully understand, lining & self are separate until step 5 which is when you actually sew them together, right? Thanks for the tutorial, I’m excited to make this!
Hi – Thanks for stopping by. I am so happy to hear you are going to sew this!! Please email me pictures:) I’m thinking of starting a flickr group for everyone to share their projects. I’ll let you know when it is up.
For your question – Yes, until step 5 the lining and self are separate. In Step 1 – When you sew the self together make sure to leave a small opening at the bottom seam. When you sew self and lining together in step 5, you will close the top edge completely. You will pull the bag through this opening.. Hope this answers your question? Let me know if I haven’t been clear enough 🙂
Marni
This looks great but the dimensions are a bit small for my school kids needing a bigger wet bag for their swimming clothes and towels, as well as having the need to have a laundry bag for when they go for sleepovers and bring home two lots of dirty clothes (yesterday’s clothes and their night clothes!). Would this work if I doubled the measurements in this pattern?
Hi Eleanor – it should work out if you double the measurements. The bag is quite long, so if you double the measurements, it should work nicely for school age kids who have bigger stuff. Let me know how it goes or if you have questions. I’d love to see images of your finished product 🙂
Marni
How did you get the measurement of 15 1/2 inches long from a 24 inch cut of material. My is much longer than that!
Hi Jane, Sorry for the delay in getting back to you.. I’m not sure what part you are having an issue with.. Can you give a little more info?