Haberdashery Fun

  • Home
  • About
    • Look Book
  • Contact
    • Collaborate?
  • Tutorials
  • Shop
  • Workshops
    • Email
    • Facebook
    • Instagram
    • Pinterest

Keep up to date with the latest posts!

How To Sew Binding Strips Together..

in Sewing Tips & Tricks on 13/09/13

Are you making a quilt or a project that needs binding.. Have you cut your binding pieces, but need a few tips and tricks on how to sew the binding together..?  Read on my friend…

Materials needed:

  1. Fabric strips
  2. Disappearing ink pen
  3. Sewing supplies and sewing machine
  4. Rotary cutter and mat
  5. Iron and ironing board

This is super duper easy.. Now you can finish those pesky strips in just 8 steps:

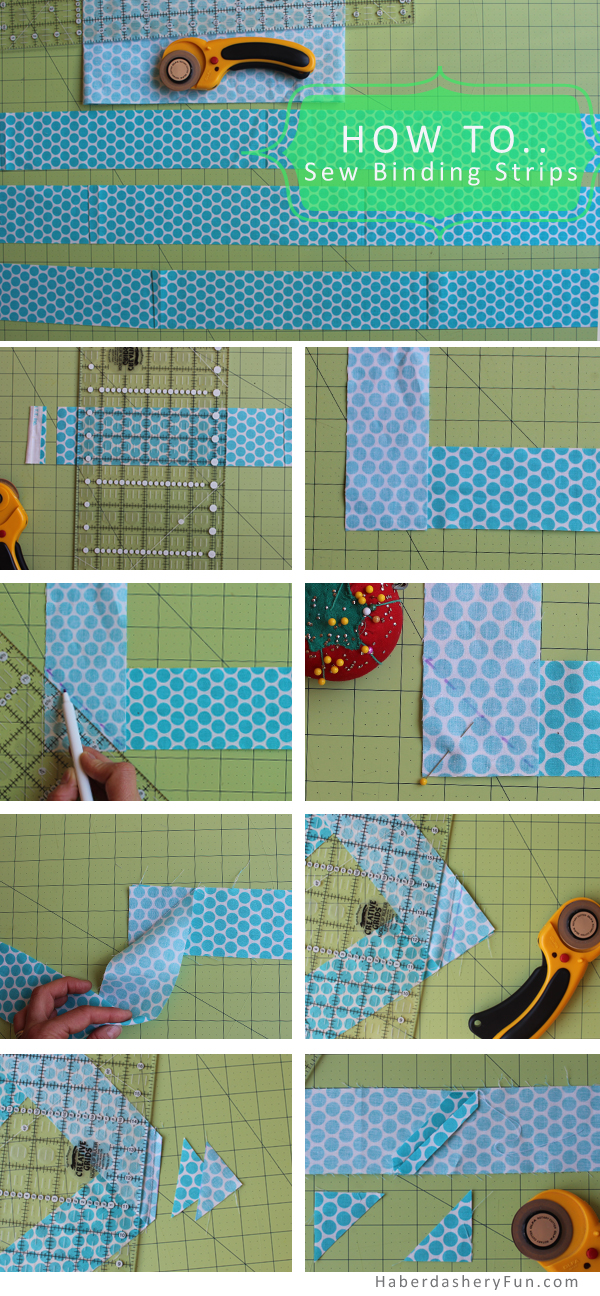
  1. Your pieces should be long and straight. You need to make sure the ends are even so you can sew them together.  Lay ruler on the fabric. The grid should line up with the bottom of your binding. Cut off the end with your rotary cutter. Repeat for each end
  2. Lay 2 pieces right sides facing and at a 90 degree angle. They are perpendicular to each other. See image for reference. Lay the ruler at a 45 degree angle and mark a stitching line with your disappearing ink pen
  3. Pin in place. Place into your sewing maching and stitch. Backstitch at each end
  4. Press the seams. Press closed and and then open and press again
  5. Open the 2 pieces to see if they make a continuous strip.. Right sides should be facing all the same way. Repeat steps above to join all your pieces together
  6. Now you need to trim off the seam allowance.  Not totally necessary, but this helps eliminate bulk in your project/binding.. Lay the binding so that right sides are facing and perpendicular to each other
  7. Move ruler to 1/4″ grid line and cut. You should have trimmed to a 1/4″ seam allowance. Repeat for the entire fabric strip. Press seam allowances open
  8. Voila, that’s it!

P.s..   Need additional help?  Wondering how to cut straight binding or use a rotary cutter..? I have created a few tutorials and you can see them here and here

Thanks for stopping by. Have a great weekend and happy sewing!

6 Comments

« Baby DIY.. Drawstring Wet Bag
DIY.. Mini Book Tote and Journal Cover »

Comments

  1. Erica says

    09/13/2013 at 11:38 am

    This is such an easy way to do this. MUCH easier than what I’ve been doing. 🙂

    Reply
  2. Sue says

    09/04/2015 at 6:39 pm

    MARNI! I cannot believe that I have never done this with binding. My blankets always look rather amateur but this has totally stepped my game up. And to think of all the blankets I have given away as gifts and how terrible the binding looks in comparison to doing it properly!!! Thanks for being such a star with all these tutorials!!!

    Reply

Trackbacks

  1. DIY... Monster Hooded Towel | Haberdashery Fun says:
    10/02/2013 at 11:28 am

    […] Sew the binding strips together – not sure how to do this? Check out my recent tutorial here […]

    Reply
  2. DIY.. On The Go Baby Changing Pad | Haberdashery Fun says:
    10/09/2013 at 10:59 am

    […] binding and strap pieces. I created easy tutorials for both… check out the binding tutorial here and the strap […]

    Reply
  3. First Time Sewing – Baby Quilt | Uncrafty Mommy says:
    07/14/2015 at 2:38 am

    […] give it a finished looked I used Haberdashery Fun’s instructions on how to sew on a border around my […]

    Reply
  4. Sew A Baby Towel With A Hood | Haberdashery Fun says:
    07/20/2017 at 2:01 pm

    […] Sew your binding into strips. Trim the seam allowance to be 1/4″.  Iron the seam. Open seam and iron again. Here is a tutorial on sewing binding together. […]

    Reply

Leave a Reply Cancel reply

Your email address will not be published. Required fields are marked *

This site uses Akismet to reduce spam. Learn how your comment data is processed.

About me


Hi there - I'm Marni Weaver. A sewer, a sometimes quilter and a lover of fabric design. I started this blog to share my ideas. Come Join the Fun
shop now

Popular Categories

project for baby fabric projects seasonal projects fat quarter projects sewing tips and tricks inspiration

Categories

  • Applique
  • Baby
  • Bags and Pouches
  • Block Printing
  • Color
  • DIY Projects
  • Fabric
  • Fabric Design
  • Fat Quarter Projects
  • Home Decor
  • Inspiration
  • Just for Fun
  • Kids
  • No Sew
  • Patterns
  • Print On Fabric
  • Quilting
  • Scrap Fabric Projects
  • Seasonal
  • Sewing Tips & Tricks

Lovely sponsors

Recent Comments

  • How To Sew A Fabric Bin | Haberdashery Fun on Sew An Easy Fabric Storage Bin
  • Make The Alma Tote In Fun Colors | Haberdashery Fun on New – The Alma Tote Pattern
  • New Tote Bag Sewing Pattern Coming Soon! | Haberdashery Fun on New – The Alma Tote Pattern
  • New – The Alma Tote Pattern | Haberdashery Fun on Sew A Reversible Tote
  • Easy Little Kid Sewing Project | Haberdashery Fun on DIY.. Make Monster Inspired Face Cloths

Projects Elsewhere

find me on Pellon Projects sew mama sew contributor

momtastic contributor

Pinterest

Visit Marni@Haberdashery Fun's profile on Pinterest.

I'm Reading

  • Cluck Cluck Sew
  • Cooking Dangerously
  • In Color Order
  • Jen Hewitt
  • Jolly Jabber
  • Karly Spalding Photography
  • Leigh Laurel Studios
  • Lindsay Sews
  • Lotta Jansdotter
  • Love Patchwork and Quilting Magazine
  • Made
  • Making It Lovely
  • Noodle-Head
  • Polka Dot Chair
  • Sharon Holland Designs
  • Silhouette America Blog
  • Silhouette Design Store
  • The Purl Bee
  • The Purple Fig

Press:

Stitch Winter 2014

haberdashery_fun

Marni Weaver
Thank you to all who attended my first “Design F Thank you to all who attended my first “Design Fabric & Sew A Pouch” workshop on Sunday. You never know what may happen with a live zoom workshop. Magic always happens and I love to seeing what gets created!

FYI.. I have another workshop like this at the end of the month on Saturday Oct28 2pm-4pm( via zoom)

+Want to make something fun? 
+Want to learn to block print?
+Want to design your own fabric and sew something?

Come and join the fun! Beginners welcome. You just need sewing experience for later when you see the pouch. The link to register is in my profile.

#haberdasheryfun #haberdasheryfunprints #surfacepattern #dashpattern #blockprinting #blockprintedtextiles #blockprintedfabric #haberdasheryfunprints #fatquarterproject #pdfsewingpatterns
I gave myself a few minutes this morning to carve I gave myself a few minutes this morning to carve another 1” stamp. There is something magical about a quiet morning with a cup of coffee and an open door open that lets in the cool fall weather. 🍁 

#haberdasheryfun #haberdasheryfunpatterns #haberdasheryfunprints #blockprinting #blockprintmadeeasy #versafineclair #versafineclairinks #surfacepatterndesign
I had so much fun yesterday that I gave myself 20m I had so much fun yesterday that I gave myself 20mins today to get creative with another 1” stamp. Added yesterdays stamp in the mix. 

What do you do for self care and wellness? Do you put times into your calendar or just wing it each day? I am practicing adding time each day for a walk (or even two) and some form of relaxation.

#haberdasheryfun #haberdasheryfunpatterns #blockprintingmadeeasy #fatquarterproject #haberdasheryfunprints #blockprints #blockprintedfabric #blockprintedfabrics #surfacepatterndesign #spoonflower #spoonflowerfabric #versafineclair #versafineink
What do you do to get out of your head? I go for a What do you do to get out of your head? I go for a lot of walks, take a lot of showers (weird I know) and block print.

Today was one of those days, so I grabbed a small 1” stamp and made a quick print. It’s super simple, but I like how it turned out. 

#haberdasheryfun #blockprintingonfabric #blockprintingmadeeasy #blockprinting #fatquarterprojects #haberdasheryfunpatterns #haberdasheryfunprints #fabricdesign #surfacepatterndesign #spoonflower #badcaseofthemondays #blockprinted #versafineclair #versafineink
I often have people ask me.. what do I sew with th I often have people ask me.. what do I sew with the fabric I just block printed? 

Introducing.. the Dash Pouch. This pouch is included with my upcoming workshop called “Design fabric and sew a pouch”. 

There are 2 dates. Oct 1 and Oct 28, come join me and let’s have some fun. Link in profile has all the details.

#fatquarters #fatquarterproject #haberdasheryfun #haberdasheryfunpatterns #blockprintingonfabric #blockprintedteatowel #blockprintingmadeeasy
Follow on Instagram

Copyright © 2023 · Klar theme by Crimson Pear :: web & surface design

Copyright © 2023 · Klar on Genesis Framework · WordPress · Log in