Haberdashery Fun

  • Home
  • About
    • Look Book
  • Contact
    • Collaborate?
  • Tutorials
  • Shop
    • Email
    • Facebook
    • Instagram
    • Pinterest

Keep up to date with the latest posts!

DIY.. Quilt Your Own Fabric

in DIY Projects, Sewing Tips & Tricks on 05/04/13

We have a nursery pillow from Dwell Studio.  The pillow is really lovely – small, quilted and super soft.  The muted colors fit our design scheme and I love the simple quilting detail.

A friend was recently visiting and we were sitting in my nursery talking about work, our careers and babies.  She saw the pillow and asked if  “we” could create something similar.  I thought about it and realized it was a great idea..  Not sure if it was more for her or me? Free stuff for her/ blog post for me..  Hmm.

Have you tried quilting your own fabric? It’s not that hard and gives such a nice touch to your projects.  I have a lot of people ask why I don’t just buy the quilted fabric.  Yes, this is available, but I think it can look cheap. I find that store bought quilted fabric can be hard and crispy.  Plus, I like selecting my own fabric colors and combinations. Quilting your own fabric gives you so many possibilities!

Materials Needed:

  1. Fabric of choice
  2. Fusible batting – Pellon TP971F  –  this is a great choice. One side is fusible, so you can iron it to your fabric
  3. Clover quilt marking pen – Love this!
  4. Creative grids quilting ruler
  5. Sewing materials – pins, thread, scissors, sewing machine

Before we get started, you will need to fuse the batting to the wrong side of your fabric.

Alright, here are the quick steps to quilting your fabric in a diamond pattern.

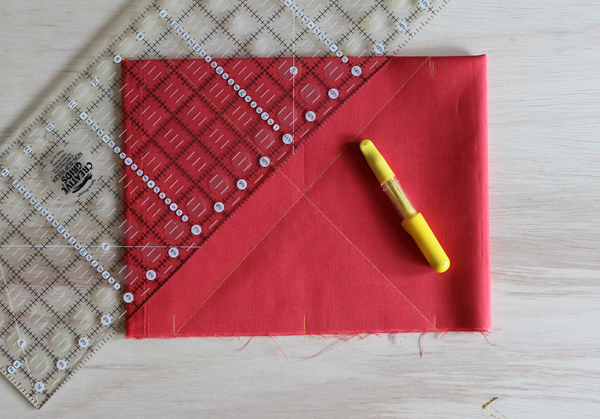
Step 1.  With the chalko marking pen – mark the center of the fabric at the top and bottom.  Move 6″ out from center and mark again at the top and bottom.  You have now created an X.

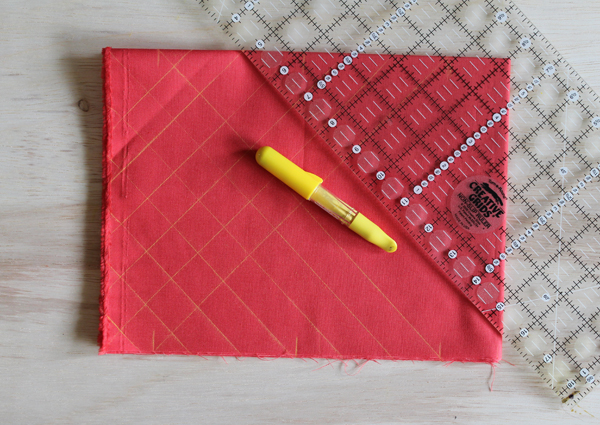
Step 2.  Decide on the size of your diamond shape.. I’m lazy and chose the 1″ mark so I wouldn’t have to think too much. Using your grid, follow the X lines and trace.

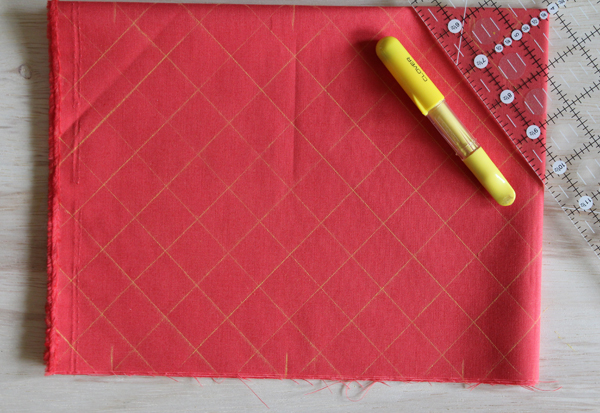
Step 3.  Grid the entire piece of fabric.

Step4.  Lengthen your stitch length to 3.  Place in sewing machine and stitch following your lines.

Ta- da!! Here is what is should look like..

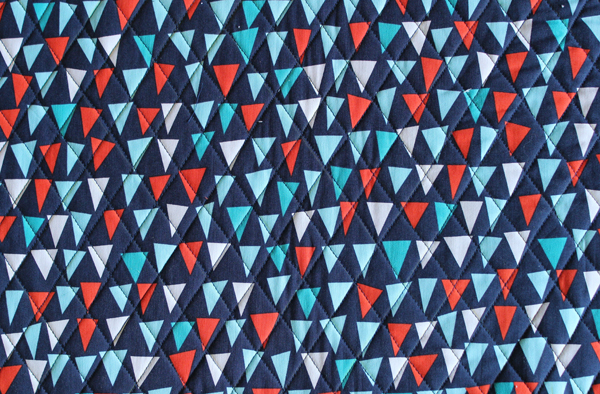
After you have tried the diamond pattern, why not try different patterns? Straight lines, uneven lines, wavy lines.. So many options and so little time.

Happy Sewing!

Related Posts Plugin for WordPress, Blogger...

10 Comments

« DIY.. Create Colorful Coasters
Inspired by Art Nouveau Florals »

Comments

  1. tina says

    April 6, 2013 at 9:53 am

    I am a quilter, but you provide great info here. I will continue to check you out!

    Reply
  2. Sarah Jane says

    April 13, 2013 at 9:45 pm

    Cute post. Easy tutorial to follow. Thanks for sharing

    Reply
  3. Kathy Laird says

    April 15, 2013 at 9:17 am

    This is awesome! Pinning!

    Reply
  4. Kathy says

    October 18, 2016 at 8:35 am

    Hi,

    I Just want to thank you for the tutorial on how th mark your fabric for a diamond pattern. this was very helpful. I am working on a tote bag project for my daughter. for her birthday which has to be done by Friday.

    Thanks again,

    Kathy

    Reply
  5. Kathy says

    October 20, 2016 at 9:10 am

    Why did you take my comment off? I don’t get it.

    Reply
    • Haberdashery Fun says

      October 20, 2016 at 5:11 pm

      Hi Kathy,

      I didn’t take your comment off, all comments have to get approved on the back end/dashboard before they go live on my site. I saw your original comment and thank you for the kind words. I had surgery on Sunday, have been in the hospital and only out today… Hope your daughter’s birthday goes well.

      Marni

      Reply

Trackbacks

  1. Quilt your own fabric with this fun tutorial! | Go To Sew says:
    April 10, 2013 at 11:00 am

    […] think of quilting your own fabric? This step by step tutorial from Haberdashery Fun shows you […]

    Reply
  2. DIY.. How to quilt your own fabric | Haberdashery Fun says:
    June 7, 2013 at 11:38 am

    […] Here are the easy steps to quilt your fabric in straight lines.  Check out my earlier blog post on quilting a diamond pattern.  […]

    Reply
  3. DIY..Quilted Bread Basket Chicken | Haberdashery Fun says:
    November 25, 2013 at 1:54 pm

    […] I strongly suggest you quilt your own fabric. Please!!  This chicken is way too cute to go and buy ugly quilted fabric.  No worries, I have an easy tutorial you can follow. You can check it out here. […]

    Reply
  4. DIY.. Quilted Turkey Bread Basket | Haberdashery Fun says:
    November 7, 2014 at 11:05 am

    […] I quilted the turkey body and wing fabric. Want to quilt your own fabric?? No problem, check out my easy tutorial here. […]

    Reply

Leave a Reply Cancel reply

Your email address will not be published. Required fields are marked *

This site uses Akismet to reduce spam. Learn how your comment data is processed.

About me


Hi there - I'm Marni Weaver. A sewer, a sometimes quilter and a lover of fabric design. I started this blog to share my ideas. Come Join the Fun
shop now

Popular Categories

project for baby fabric projects seasonal projects fat quarter projects sewing tips and tricks inspiration

Categories

  • Applique
  • Baby
  • Bags and Pouches
  • Color
  • DIY Projects
  • Fabric
  • Fabric Design
  • Fat Quarter Projects
  • Home Decor
  • Inspiration
  • Just for Fun
  • Kids
  • No Sew
  • Patterns
  • Print On Fabric
  • Quilting
  • Scrap Fabric Projects
  • Seasonal
  • Sewing Tips & Tricks

Lovely sponsors

Recent Comments

  • Make Nine in 2021 – Sew, Bake, Snap on DIY.. Reversible Fabric Storage Bin
  • 26 Diy placemats ideas - Perfect Table Setting on DIY.. Heart Shaped Placemats Tutorial For Sew Mama Sew
  • More Free Tote Patterns | on Reversible 1 Hour Tote Pattern
  • Collapsible Kraft-Tex Bowl on DIY.. Collapsible Fabric Bowls
  • Haberdashery Fun on DIY.. Reversible Fabric Storage Bin

Projects Elsewhere

find me on Pellon Projects sew mama sew contributor

momtastic contributor

Pinterest

Visit Marni@Haberdashery Fun's profile on Pinterest.
Follow on Bloglovin

I'm Reading

  • Cluck Cluck Sew
  • Cooking Dangerously
  • In Color Order
  • Jen Hewitt
  • Jolly Jabber
  • Karly Spalding Photography
  • Leigh Laurel Studios
  • Lindsay Sews
  • Lotta Jansdotter
  • Love Patchwork and Quilting Magazine
  • Made
  • Making It Lovely
  • Noodle-Head
  • Polka Dot Chair
  • Sharon Holland Designs
  • Silhouette America Blog
  • Silhouette Design Store
  • The Purl Bee
  • The Purple Fig

Press:

Stitch Winter 2014

haberdashery_fun

I made the most glorious little Kraft-tex journal I made the most glorious little Kraft-tex journal cover over the holidays.  Not only do I love the color of the month for December (blue turquoise), but the texture of my journal is like aged leather and looks durable and rugged. Did you know Kraft-tex is actually paper??? My cover was simple to make and is just one rectangular piece of Kraft-tex, folded over at the ends and topstitched. Thats it.❤️

You can check @ctpublishing for other projects and more info.
.
.
.
#haberdasheryfun #haberdasheryfunpatterns #krafttex #krafttexuniversity #krafttexstyle #ctpublishing #isew #isewlation
Highlights from 2020. Glad it’s complete. Upward Highlights from 2020. Glad it’s complete. Upward and onward. What are you creating for the year ahead? Here’s to making 2021 a creative, fun, adventurous and graceful year.
What a fun class! Thank you to the participants in What a fun class! Thank you to the participants in my first zoom block printing class. It was an amazing group of people coming together with a common goal - sharing their love of print and pattern design.

My hubby snapped a few pictures during the workshop. I’m normally a “hider outer”, but thought this was a perfect opportunity to say Hi.  Even if it is looking down and away from the camera. 🤪

I will be hosting another block printing zoom workshop mid January. Come one come all. DM or email me for details.
.
.
.
#coffeewithhaberdasheryfun #blockprintingworkshop #zoomclass #pdfpattern #haberdasheryfun #haberdashery 
#blockprint #blockprinting #isew #fabricdesign #surfacepatterndesign #zoomsewingclass #zoomdesignclass
You’ve printed some fabric.. now what?? Build or You’ve printed some fabric.. now what?? Build or buy a frame and make yourself some easy wall art = ✔️

Want to learn how to block print? Grab a cup of coffee, a few supplies and join me for a free zoom class this Sunday, Dec 13th at 11am ( Eastern Time Zone ).

Check my recent blog post for the supply list. If you want to come and just hang out and watch, that’s ok too. DM or email me for details.
.
.
#haberdashery #blockprint #coffeewithhaberdasheryfun #PDF 
#isew #haberdasheryfun #curvyzipperpouch #fabricdesign 
#surfacedesign #haberdasheryfunpatterns #creativehappylife
Want to learn how to block print? I’m hosting a Want to learn how to block print? I’m hosting a free zoom class and the supply list is now up on my blog. You can DM me or send an email to marni@haberdasheryfun.com to join this free class. Click on the link in my bio to go to my blog.

Sunday, December 13 at 11am Est time zone.

.
#haberdashery #haberdasheryfun #blockprinting #pdfpattern #haberdasheryfunpatterns #coffeewithhaberdasheryfun #fabricdesign #blockprint
Follow on Instagram

Copyright © 2021 · Klar theme by Crimson Pear :: web & surface design