Haberdashery Fun

  • Home
  • About
    • Look Book
  • Contact
    • Collaborate?
  • Tutorials
  • Shop
    • Email
    • Facebook
    • Instagram
    • Pinterest

Keep up to date with the latest posts!

DIY.. Easy Toddler Apron

in DIY Projects, Fat Quarter Projects on 10/06/14

Sew A Toddler Apron

main top

I’ve had 2 requests for toddler aprons in the last few weeks.. I’m not much of a cook, so making a miniature apron hasn’t been high on my DIY to-do list..

I’m part of an handmade gift exchange and my new blog friend/ recipient Adrianne requested an apron for her 3 year old daughter. A week later my friend Sue asked if I had any toddler apron tutorials up my sleeve.. Well I thought to myself, isn’t this perfect timing?

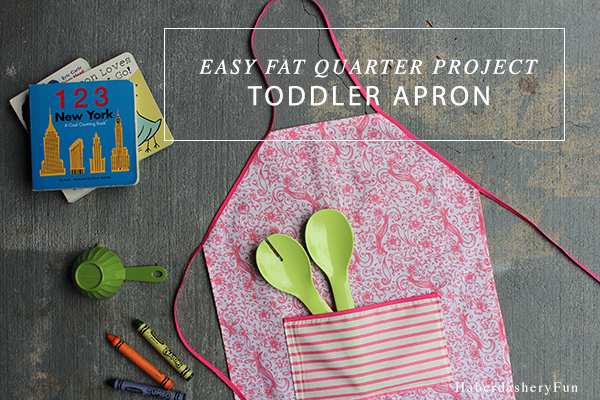
I chose to create a VERY simple toddler apron for the tutorial. New to sewing? This is for you. Why not get your kids involved and let them pick the materials.. All you need is a fat quarter and bias tape!!

Materials:

  1. 1 fat quarter
  2. 1/4″ bias binding
  3. Sewing machine and supplies
  4. Quilting ruler, rotary cutter and cutting mat
  5. Disappearing fabric ink pen
  6. Measuring tape
  7. Iron and ironing board

Here comes the fun part. Let’s start sewing.

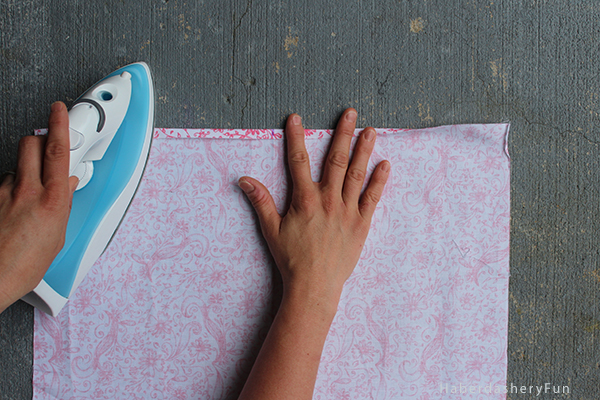
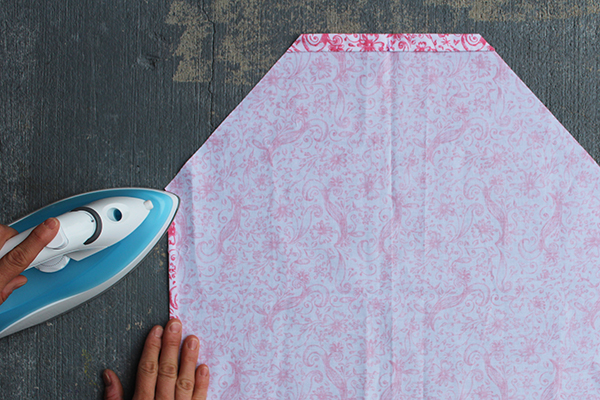
Step 1: Lay the fat quarter on your working surface, right side facing down. Hand press any wrinkles out. Turn down the top edge 1/4″ and press with an iron. Turn down another 3/4″ and press again. Place into your sewing machine and topstitch.

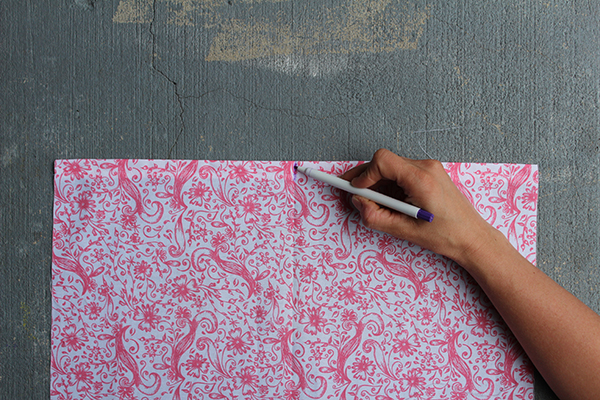
Step 2: Fold the fat quarter in half. Mark a line at the top and bottom using the disappearing fabric ink pen. This marks your center front and helps in pocket placement.

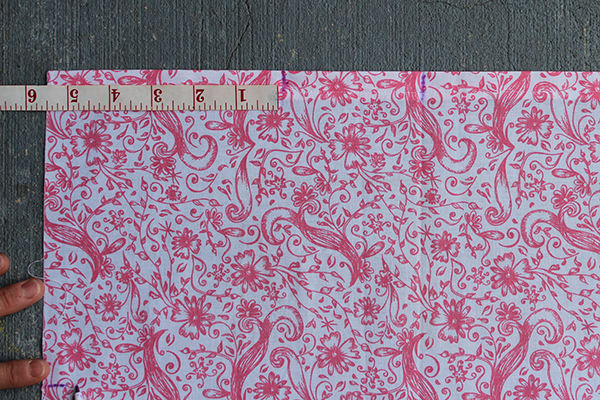
Step 3: Measure inwards from the top side edge 5 1/2″ and mark a line with the disappearing fabric ink pen. Measure downwards from the top side edge 6″ and mark a line. Repeat for the other side.

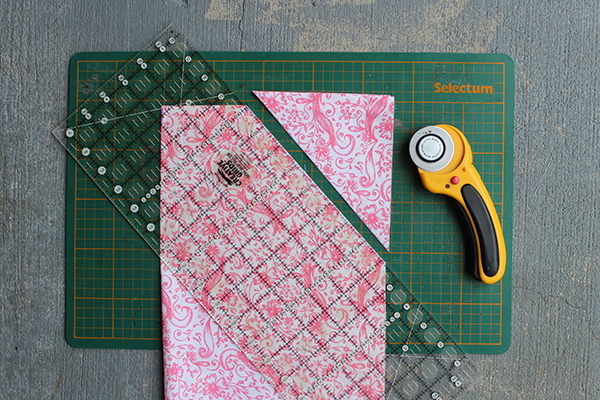
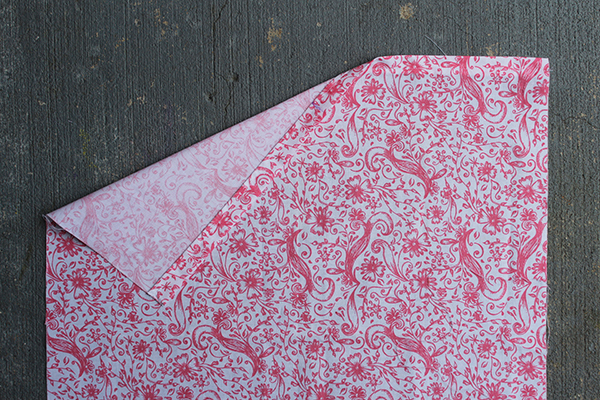
Step 4: Fold the fat quarter in half again. Make sure that the pen lines match up. Place the quilting ruler angled on top. Line up with each pen mark. Cut the corners off using your rotary cutter.

Step 5: Turn and fold the side seam 1/4″ and press with an iron. Turn and fold another 1/4″ and press. Place into your sewing machine and stitch down. Repeat for the other side. Repeat again for the bottom hem.

Step 6: Measure 20″ in length of bias tape and mark a line with the disappearing fabric in pen. Do not cut the tape.

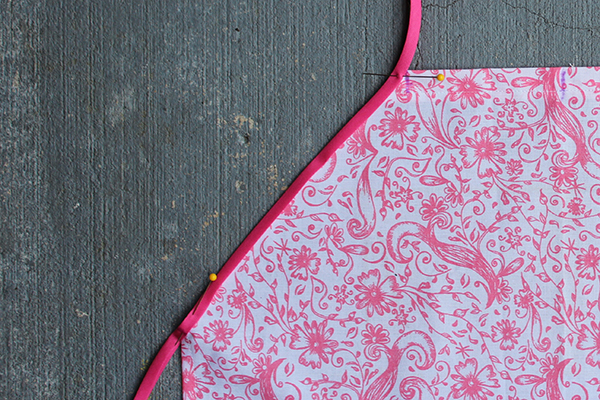
Step 7: At the 20″ line, pin the bias tape in place at the side of the apron. Continue to pin along the diagonal edge and pin at the top/neckline.

Step 8: Measure another 20″ in length. Mark a line on the tape and pin this at the other side of the neckline. This is good time to check the strap and neck length on your toddler. Adjust if necessary. Repeat and pin along the other side of the apron. Place into your sewing machine and stitch the bias tape down. Press.

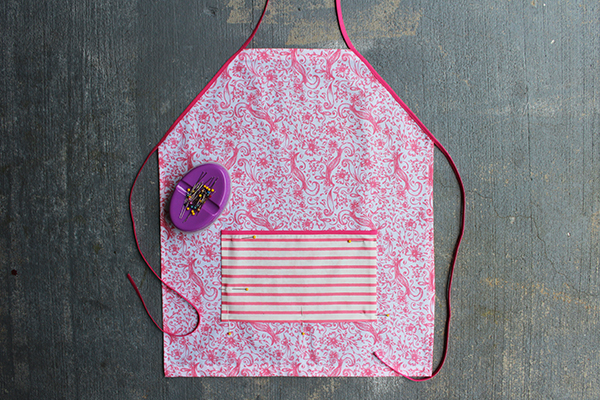
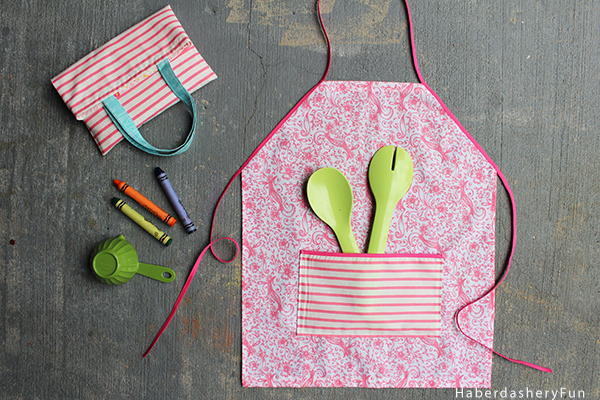
Step 9: Now add a pocket to jazz up the apron.. Cut a rectangle measuring 10″L x 6″W [ or smaller, your choice]. Place bias tape along the top edge and stitch down. Turn and fold the bottom edge and side seams each 1/4″. Press. Turn and fold 1/4″ and press again. Place the pocket on your apron and stitch down.

Ta- dah!! That’s it..

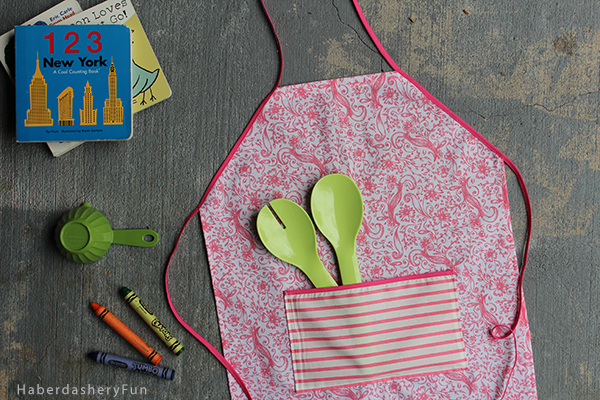
Of course I made a little bag to hold to apron. Every little girl needs a teeny-weeny bag, right?

Happy Sewing.

21 Comments

« DIY.. Cross Body Bag With Pom Poms
Featuring Haberdashery Fun.. Hancock Fabrics Tear Sheets »

Comments

  1. Larry says

    06/12/2014 at 11:34 am

    Cute. Looks super easy to do.. I’m going to give this a try. Maybe even make a matching apron for Dad!

    Reply
  2. Esmari Taylor says

    06/12/2014 at 1:59 pm

    My sister asked me to make my nephew an apron about a year ago! Now I have no more excuses! Thanks for the handy tutorial!

    Reply
  3. Jana (Ashes and Lace) says

    06/16/2014 at 3:33 pm

    This is such a cute project! Thanks for sharing! Saw it on I Should Be Mopping The Floor Linky Party!

    Reply
  4. Amy | Canary Street Crafts says

    06/17/2014 at 8:50 am

    So cute! I’m not too handy with a sewing machine, but with your instructions and pictures I think even I could make this!

    Reply
  5. Zakkiya Hamza says

    06/17/2014 at 11:05 am

    I love seeing sewing tutorials. Although i’m terrible at it, I just love seeing how people create such gorgeousness 🙂

    Reply
    • Haberdashery Fun says

      06/17/2014 at 11:33 am

      Wow.. Thank you for the kind words!! Appreciate your leaving a comment.

      Reply
  6. Katie Adams says

    06/20/2014 at 11:08 am

    Thanks for linking to Create Link Inspire at The Crafty Blog Stalker. You will be featured when the post goes live later tonight, and you have been pinned! Thank you for sharing.
    –Katie, TheCraftyBlogStalker.com

    Reply
  7. Lila says

    06/22/2014 at 12:40 pm

    I love this! I’m planning to make my daughter an apron, so I’m definitely pinning this! I saw this on the Link It or Lump It party. 🙂

    Reply
  8. Tori says

    06/23/2014 at 3:53 pm

    This is adorable Marni! Thanks for the easy to follow tutorial. I am featuring this on my blog Tuesdday:) Have a great week!

    Reply
    • Haberdashery Fun says

      06/23/2014 at 3:57 pm

      Thanks Tori. Hope you have a great week.

      Reply
  9. Lea says

    06/25/2014 at 6:32 pm

    Super cute – I pinned it to make my future niece.
    Found you from Frugal Crafty Home blog hop.
    Lea @ http://www.adropofthis.com

    Reply
  10. Lila says

    06/27/2014 at 11:26 am

    You’re my featured pick for tonight’s Link It or Lump It Party! Thanks again for sharing!

    Reply
  11. Amy W says

    06/30/2014 at 12:15 am

    Congrats. This cutie apron was chosen as a feature by our guest host at Link it or Lump it! Stop by and grab a feature button!

    http://www.delineateyourdwelling.com/2014/06/link-it-or-lump-it-party-number-44.html

    Reply

Trackbacks

  1. Do Tell Tuesday Link Party says:
    06/24/2014 at 12:00 am

    […] Toddler Apron // Haberdashery Fun – Adorable and easy toddler apron tutorial! […]

    Reply
  2. June Round Up | Haberdashery Fun says:
    07/01/2014 at 9:31 am

    […] Easy Toddler Apron – I’m not much of a cook, so I never expected to sew a toddler’s apron. Or anything for the kitchen, really.. This turned out to be a delightful project. I loved picked the fabric and coming up with the tutorial. The best part was staging the photos.. I think they turned out great. […]

    Reply
  3. A Blog Gift Exchange | Haberdashery Fun says:
    07/22/2014 at 11:50 am

    […] She requested an apron for her daughter. I had a lot of fun coming up her with her gift and decided to send a matching bag with the apron. Doesn’t every little girl need a pint sized bag? Adrianne’s apron had adjustable straps which is key when you don’t know the exact size of the child. The gift exchange inspired me and I wrote a simple toddler apron tutorial. Check it out here. […]

    Reply
  4. Made with love by you – Home made gift ideas for toddlers – Easy toddler apron | Made With Love By You says:
    11/05/2015 at 3:40 am

    […] This is so cute for a little toddler. They can wear it to help you cook or craft. You can make it as part of a larger gift, accompanied with child’s baking tools or crafting equipment. This project is ideal if you are just beginning to sew as it’s pretty straight forward. Follow the link to view the tutorial. https://haberdasheryfun.com/diy-projects/diy-easy-toddler-apron […]

    Reply
  5. 47 Genius Gifts for Creative 1 Year Olds | Dodo Burd says:
    09/05/2016 at 2:49 pm

    […] Toddler Apron […]

    Reply
  6. 10+ SEWING TUTORIALS FOR BEGINNERS - Barended says:
    06/28/2019 at 8:39 am

    […] DIY Easy Toddler Apron from Haberdashery Fun. […]

    Reply
  7. 47 Best Gifts for Creative 1 Year Olds – Mom-Approved Toys says:
    02/21/2020 at 2:36 am

    […] Toddler Apron […]

    Reply
  8. Easy Little Kid Sewing Project | Haberdashery Fun says:
    04/07/2023 at 9:06 am

    […] A Toddler Apron – Click here for […]

    Reply

Leave a Reply to 47 Best Gifts for Creative 1 Year Olds – Mom-Approved Toys Cancel reply

Your email address will not be published. Required fields are marked *

This site uses Akismet to reduce spam. Learn how your comment data is processed.

About me


Hi there - I'm Marni Weaver. A sewer, a sometimes quilter and a lover of fabric design. I started this blog to share my ideas. Come Join the Fun
shop now

Popular Categories

project for baby fabric projects seasonal projects fat quarter projects sewing tips and tricks inspiration

Categories

  • Applique
  • Baby
  • Bags and Pouches
  • Block Printing
  • Color
  • DIY Projects
  • Fabric
  • Fabric Design
  • Fat Quarter Projects
  • Home Decor
  • Inspiration
  • Just for Fun
  • Kids
  • No Sew
  • Patterns
  • Print On Fabric
  • Quilting
  • Scrap Fabric Projects
  • Seasonal
  • Sewing Tips & Tricks

Lovely sponsors

Recent Comments

  • How To Make Hand warmers | Haberdashery Fun on DIY.. Sew Heart Shaped Baby Burp Cloths
  • How To Make Hand warmers | Haberdashery Fun on How To Make Mini Heart Shaped Hand Warmers
  • Make Spooky Monster Inspired Face Cloths | Haberdashery Fun on DIY.. Make Monster Inspired Face Cloths
  • How To Sew A Fabric Bin | Haberdashery Fun on Sew An Easy Fabric Storage Bin
  • Make The Alma Tote In Fun Colors | Haberdashery Fun on New – The Alma Tote Pattern

Projects Elsewhere

find me on Pellon Projects sew mama sew contributor

momtastic contributor

Pinterest

Visit Marni@Haberdashery Fun's profile on Pinterest.

I'm Reading

  • Cluck Cluck Sew
  • Cooking Dangerously
  • In Color Order
  • Jen Hewitt
  • Jolly Jabber
  • Karly Spalding Photography
  • Leigh Laurel Studios
  • Lindsay Sews
  • Lotta Jansdotter
  • Love Patchwork and Quilting Magazine
  • Made
  • Making It Lovely
  • Noodle-Head
  • Polka Dot Chair
  • Sharon Holland Designs
  • Silhouette America Blog
  • Silhouette Design Store
  • The Purl Bee
  • The Purple Fig

Press:

Stitch Winter 2014

haberdashery_fun

Marni Weaver
Testing out a new stamp and a new color.. hello 🥑 avacado

#haberdasheryfun #versafineink #versafineclair @3dottedpenguinscommunity #blockprinting
Still experimenting with keeping the block printin Still experimenting with keeping the block printing, handmade feel in digital form. This one is a little rougher/less perfect, but still has the spirit ✨ Which one’s your pick—1 or 2.

#haberdasheryfun #versafineink #versafineclair #surfacepatterndesign
Who knew that one little stamp could do so much? # Who knew that one little stamp could do so much?
#haberdasheryfun #versafineink #versafineclair
Just added a new stamp pad to my collection—meet Just added a new stamp pad to my collection—meet Lilac Bloom! 💜Are you a fan of this soft shade, or is it a bit too light for your taste?

#versafineclair #blockprints #surfacepatternprint #haberdasheryfunpatterns #surfacepatterndesign #pfeil
Atlanta feels like a steam room right now 🫠 so Atlanta feels like a steam room right now 🫠 so I’m manifesting cooler temps by reworking my Alberta Wild Rose block print into Evergreen.

#blockprinting #banffnationalpark #alberta #surfacepatterndesign #haberdasheryfun
#versafineclair
Follow on Instagram

Copyright © 2025 · Klar theme by Crimson Pear :: web & surface design

Copyright © 2025 · Klar on Genesis Framework · WordPress · Log in