Haberdashery Fun

  • Home
  • About
    • Look Book
  • Contact
    • Collaborate?
  • Tutorials
  • Shop
  • Freebie
    • Email
    • Facebook
    • Instagram
    • Pinterest

Keep up to date with the latest posts!

Sew A Set of Pouches

in Bags and Pouches, DIY Projects on 05/02/18

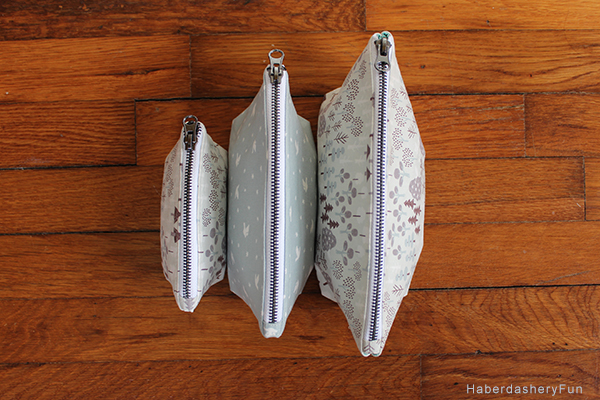
I am happy to be back sharing a twist on one of my favorite patterns today – the curvy zipper pouch. Today I will be showing how to turn one pouch into a trio set.

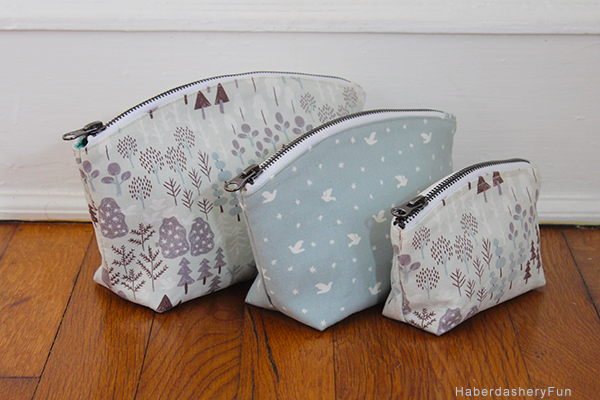
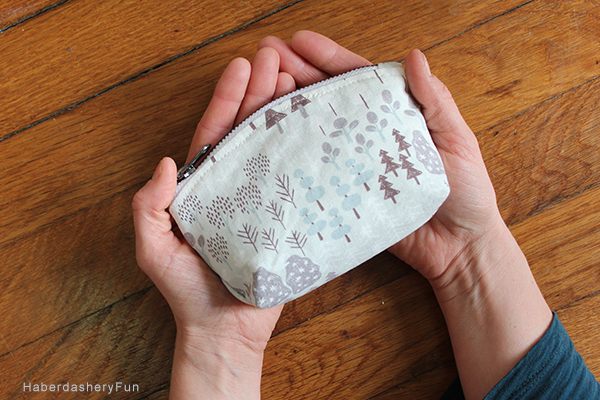
I love this pouch, especially in the smaller size. Isn’t the mini adorable? Add the nature themed fabric from DailyLike Canada and the pouches are perfection.

Materials needed to make the pouch set:

  1. Cotton canvas for exterior
  2. Cotton canvas or cotton fabric for lining
  3. Interfacing
  4. 3 zippers under the size 12″
  5. Disappearing fabric pen
  6. Sewing machine and supplies
  7. Iron and ironing board
  8. Curvy Zipper Pattern*

*The curvy zipper pouch is available in my online store

A couple things to consider before we get started:

  • Metal zippers can be difficult to work with. I suggest lengthening the stitch length and then slowly sewing over the zipper. You can always use a regular zipper.
  • This pouch has a tab at one end.  I love this feature, as it makes for a really wide pouch opening.
  • On my blog, HaberdasheryFun, I share a unique approach to sewing the top curve.  It is also ok to attach the zipper the regular “old fashioned” way.
  • For an extra study pouch, use interfacing on both the exterior and interior fabrics.
  • If re-sizing the pouch as per this post, use a 1/4″ – 3/8″ seam allowance.

To make a trio of pouches:

  1. Print the original Curvy Zipper Pattern.
  2. Place the pattern into the photocopier and use the ratio options to resize the pattern. Always start from the original pattern.  Resize to 75% and print, resize to 65% and print and lastly, resize to 50% and print. It’s that simple..!
  3. These smaller pattern pieces fit on a letter size piece of paper. To get a full pattern you can 1) Fold along the CF line, staple together and then cut the pattern out. 2) Print 2 copies and tape along the CF line.

Head to the original tutorial, but here is a quick run down on the steps:

  1. Cut your pattern pieces – 2 outside, 2 lining and 1 zipper tab.
  2. Measure and trim zipper down to size. Quick tip – add 1/8″ – 1/4″ to each top side seam allowance. Trim the zipper down to this new measurement. This extra wiggle room helps turn a great zipper corner.
  3. Trim zipper to size [at one end]. Turn and fold zipper tab. Insert tab over raw zipper end and sew.
  4. Sew the zipper along the top edge of front pouch. Repeat for back side. Note that you can use either method for attaching zipper. My original blog post gives a fun approach, but the regular old fashioned way works just as great.
  5. Sew the zipper to the lining front. Repeat for the back side.
  6. Open zipper. Place outside pieces, right sides facing.  Pin. Place lining pieces, right sides facing. Pin. Sew together with a smaller seam allowance.  Remember to leave a small opening at the lining bottom edge.
  7. Sew all 4 boxed corners.
  8. Turn right side out. Pin lining bottom edge together and sew.

That’s it! Hope you like this fun idea for making a trio set. You can buy the pattern in my online store. I will be sharing more patterns soon.

Related Posts Plugin for WordPress, Blogger...

Add a Comment

« The Easiest Tote Bag Around
Paperless Post And Adding Your Own Designs »

Leave a Reply Cancel reply

Your email address will not be published. Required fields are marked *

This site uses Akismet to reduce spam. Learn how your comment data is processed.

About me


Hi there - I'm Marni Weaver. A sewer, a sometimes quilter and a lover of fabric design. I started this blog to share my ideas. Come Join the Fun
shop now

Popular Categories

project for baby fabric projects seasonal projects fat quarter projects sewing tips and tricks inspiration

Categories

  • Applique
  • Baby
  • Bags and Pouches
  • Block Printing
  • Color
  • DIY Projects
  • Fabric
  • Fabric Design
  • Fat Quarter Projects
  • Home Decor
  • Inspiration
  • Just for Fun
  • Kids
  • No Sew
  • Patterns
  • Print On Fabric
  • Quilting
  • Scrap Fabric Projects
  • Seasonal
  • Sewing Tips & Tricks

Lovely sponsors

Recent Comments

  • Make A Simple Block Print Tote Bag | Haberdashery Fun on DIY.. Colorful Dish Towel Tote Bags
  • Make A Simple Block Print Tote Bag | Haberdashery Fun on Sew Asymmetrical Color Block Totes Tutorial
  • Make A Block Printed ToteBag | Haberdashery Fun on Sew A Reversible Tote
  • Make A Block Printed ToteBag | Haberdashery Fun on Quick Tip.. Sewing Boxed Corners
  • 20 Creative DIY Storage Bin Ideas - DIY & Crafts on Sew An Easy Fabric Storage Bin

Projects Elsewhere

find me on Pellon Projects sew mama sew contributor

momtastic contributor

Pinterest

Visit Marni@Haberdashery Fun's profile on Pinterest.
Follow on Bloglovin

I'm Reading

  • Cluck Cluck Sew
  • Cooking Dangerously
  • In Color Order
  • Jen Hewitt
  • Jolly Jabber
  • Karly Spalding Photography
  • Leigh Laurel Studios
  • Lindsay Sews
  • Lotta Jansdotter
  • Love Patchwork and Quilting Magazine
  • Made
  • Making It Lovely
  • Noodle-Head
  • Polka Dot Chair
  • Sharon Holland Designs
  • Silhouette America Blog
  • Silhouette Design Store
  • The Purl Bee
  • The Purple Fig

Press:

Stitch Winter 2014

haberdashery_fun

Marni Weaver
I have a drawer where I keep all of my block print I have a drawer where I keep all of my block printed papers and have often wondered.. “What the heck do I do with all of these”.

How about you?

I recently found a bunch of  tutorials over at @modpodgerocks and thought it would be fun to make wood coasters with my block prints. They turned out better than expected and so I thought to share with you.

Want more info? I created a blog post. See the link in my profile for the blog post and details. 

Day27/100 #100dayproject #dothehundreddayproject #100daysofsimpleshapes #haberdasheryfun #blockprintingmadesimple #onlineclasses #zoomworkshops #haberdasheryfunpatterns #haberdasheryfunclasses #handmadestamp #modpodge #modpodgecrafts #decoupageart #decoupagelovers #blockprintedbyhand
I’m sharing about how to frame your block printe I’m sharing about how to frame your block printed fabric on my blog today. Day 26/100 #100dayproject 

If you have ever thought you would like to learn how to block print… I have a course for you. It is called Block Printing Made Easy. It is all about the basics - working with simple shapes, design prompts and getting creative on paper and fabric.

This is an online course and starts on Monday, May 30. There are 3 modules with videos and also included in the course are 3 live zoom workshops. The videos are self paced, so the good news is you can cruise through them or take all the time you need.

The course is $97 USD.

See the link in my profile for additional details on the course( breakdown on each module) and to also access to my blog post.

#dothe100dayproject #haberdasheryfun 
#blockprintingmadeeasy #100daysofsimpleshapes #zoomclasses #haberdasheryfunpatterns #speedballfabricink #handmadefabrics #dothe100dayproject2022 #100dayproject2022 #handmadestamps #blockprintedfabric #ikeahacks #ikeaframes
Goodbye triangles, hello circles. I’m working Goodbye triangles, hello circles. 

I’m working on a project, so I printed a bunch of small fabric squares with my new circle stamp. Such a simple yet effective stamp.

I am launching an online course called “Block Printing Made Easy? Want to learn to block print? The course starts in two weeks (5/30). Want more info? See the link in my profile to join the waitlist and also to view the course details. 

Day 25/100 #100dayproject 

#dothe100dayproject #dothe100dayproject2022 #haberdasheryfun #haberdasheryfunpatterns #pdfpattern #blockprinting #blockprintingonfabric #blockprintingmadeeasy #blockprintingworkshop #speedballfabricink #konacottonsolids #speedballart
I’ve got one more triangle print to share and I I’ve got one more triangle print to share and I think that’s a wrap. Simple and easy. The pin cushion on that right that was gifted to me from my grandmother Mor Mor really takes the stage in my opinion 

The circle shape is next. I’m excited to work with no corners and see what will unfold.

Day 24/100
#haberdashery #100dayproject 
#100daysofsimpleshapes #blockprintingmadeeasy #dothe100dayproject #dothe100dayproject2022 
#haberdasheryfun #ikeahacks #konacotton #konacottonsolids 
#speedballfabricink #blockprinting #easyblockprint #haberdasheryfunpatterns #haberdasheryfunclasses
A mash up of triangle stamps I created so far duri A mash up of triangle stamps I created so far during the #100dayproject.
 
Who knew the triangle shape could be so much fun? I have had a blast the last playing around with it - both dissecting the shape and putting it back together. 

Which one is your favorite?

I can’t believe I am saying this, but Im ready to move on to a new shape. One that is more soft and organic. Next up, the circle!
Day 23/100

#100daysofsimpleshapes 
#haberdashery 
#blockprinting 
#blockprintingonfabric 
#blockprintingmadeeasy 
#haberdasheryfun
#speedballfabricink #speedballink #fatquarters 
#handmade #dothe100dayproject2022 
#100dayproject2022
Follow on Instagram

Copyright © 2022 · Klar theme by Crimson Pear :: web & surface design

Copyright © 2022 · Klar on Genesis Framework · WordPress · Log in