
I thought I was finished talking about the fabric flag garland that I made last week.. While I was packing it up to send to my friend, I realized how ugly the ends of the rope were.. They were covered in duck tape to hold the string from fraying. There was no way I would send it looking like that. So, I decided to create one more post and then I would officially put this one to bed! You can check out the garland tutorials here – Part 1 and Part 2
I thought this was the perfect opportunity to unveil a fun and new format to show my design process. I’m calling it “THIS PLUS THAT EQUALS…? In this case I started with the ugly rope ends covered in duck tape. My inspiration was a tea bag and I came up with.. Cute teabag inspired rope end covers..

Here is how I made them:
Materials:
- Scrap fabric – 2 colors
- Small piece of batting – Pellon makes great batting
- Steam A Seam – The Warm Company
- Pens and paper
- Sewing materials – thread, pins, scissors and sewing machine
- Iron and ironing board
6 Easy Sewing Steps:
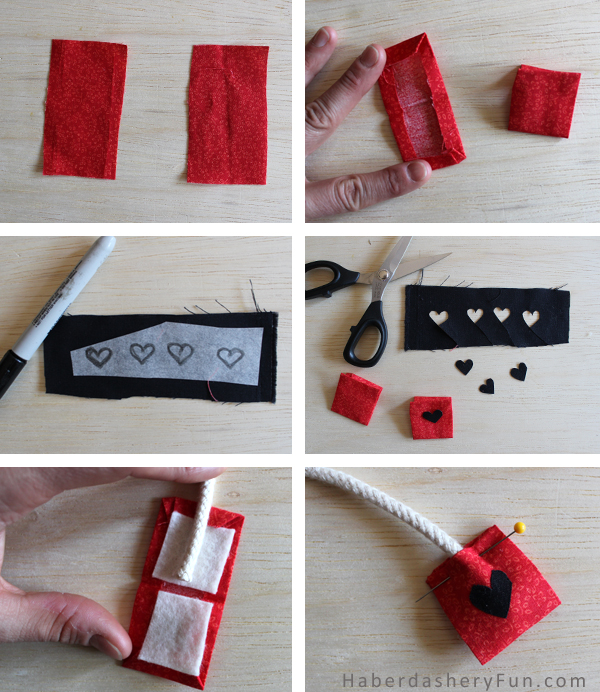
- Cut 2 small pieces of fabric – about the size of a business card
- Turn and fold in all sides 1/4″. Press with an iron. Fold in half and iron again
- Draw 4 small hearts on your Steam A Seam Paper. Iron down to your fabric. For more info on using Steam A Seam, check out my tutorial here
- Cut out your little hearts. Peel off the other backing and place onto the face of the fabric. Iron in place
- Cut 4 small pieces of batting about the size of a postage stamp. Place on either side of the the rope end
- Close and pin together. The rope end should be fully enclosed. Place into sewing machine and gently edgestitch around all 4 sides
Viola!!
Have a great week and happy sewing.


[…] – check out my tutorial here on covering the rope ends.. Very […]