Haberdashery Fun

  • Home
  • About
    • Look Book
  • Contact
    • Collaborate?
  • Tutorials
  • Shop
    • Email
    • Facebook
    • Instagram
    • Pinterest

Keep up to date with the latest posts!

Sew A Summer Totebag In 8 Easy steps

in DIY Projects, Fabric on 22/07/13

Last week I shared my airport code summer totebag. It was featured on Craftgawker and I am super happy with the results.  In just 2 days over 1,500 people checked it out..

A reader asked if I could post the sewing tutorial for the bag. You can see the full tutorial here, but I thought it would be fun to condense the tutorial down into 8 easy sewing steps.

You will have to do a little pattern drafting for this one.  But, even a beginner can make this!! It’s super easy and you can do the drafting right on your fabric. The bag is easy to sew, it is the handle area that takes a little time.
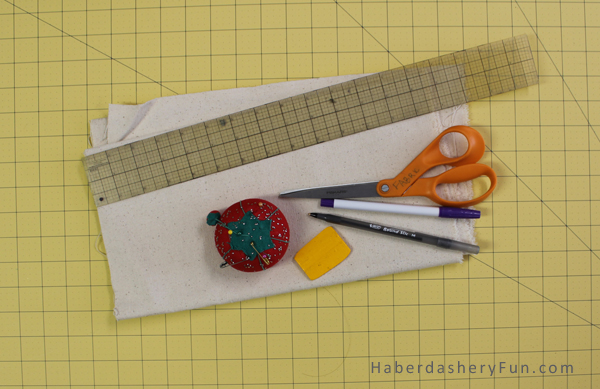
Materials Needed:

  • Cotton duck or a decorator weight fabric – the heavier the weight the better. You will need a substantial fabric for the handle area
  • Interfacing – I like the Pellon brand for fusible interfacings
  • Pins, needles, scissors, thread
  • Sewing machine
  • Iron and ironing board
  • Ruler, paper, pens
  • Disappearing ink pen

Create the 3 following pattern pieces. Measurements below include SA;

  1. Bag – draw a rectangle 26″L x 13.5″W
  2. Facing – draw a rectangle 4″L x 13.5″W [ this is for the top handle area]
  3. Interfacing –  draw a rectangle 3″L x 13.5″W [ fuse to each end of the main rectangle]

Time to start sewing the bag!

Click here to print the Handle template – Market-Totebag-Handle-Pattern-Piece.pdf

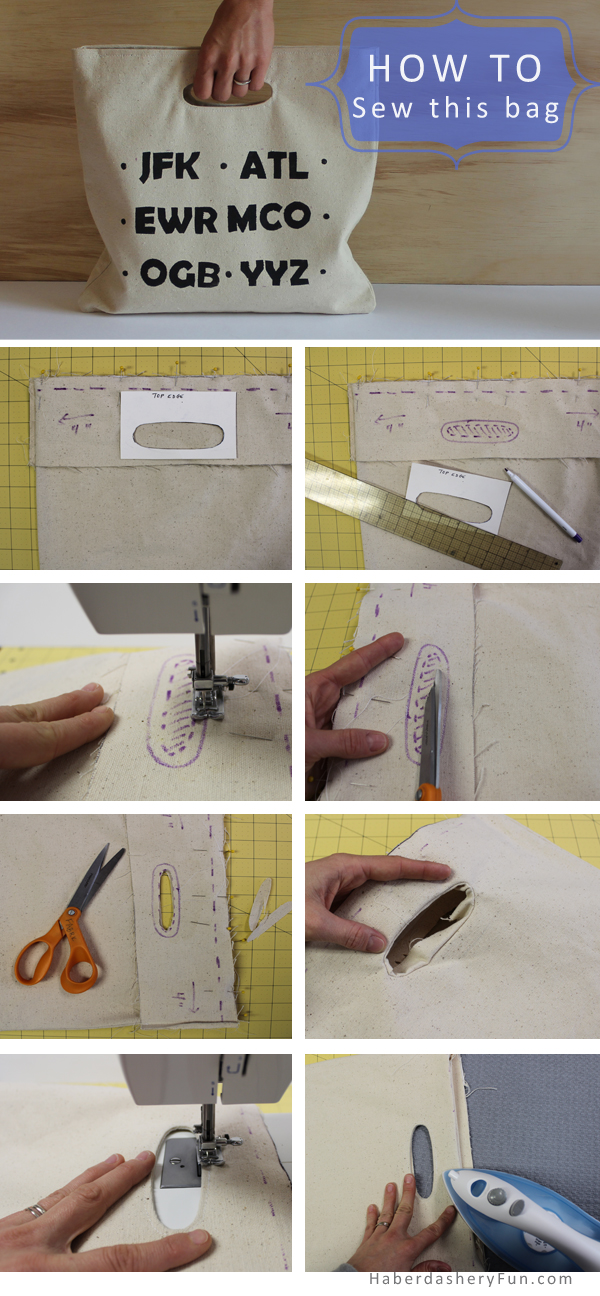
  1. With wrong sides together, fold the bag in half.  Place into your sewing machine and sew the side seams with a 1/2″ SA.  With the bag sewn, turn it right side out. Pin each facing piece to the top edge and pin at sides. The facing side seams are NOT sewn together. With the disappearing ink pen, mark a 1/2″ SA along the top edge. Center the handle template along this SA
  2. With the disappearing ink pen, trace around the oval – this outside oval is your sewing line.  Move 1/4″ inwards and and mark another oval. Mark this with a dashed line – you will CUT along this line
  3. Place into your sewing machine and sew around the OUTSIDE oval. Press the stitched seam
  4. With your scissors, pierce into the center of the oval. Cut out the entire center area. Make sure to stop cutting at the dashed line
  5. Do NOT cut into your SA! Cut and clip the oval edges. Clip the straight lines and notch the round areas..
  6. Pull the facing through the center of the oval. This means you will pull the facing inwards/into the inside of the bag. Wiggle the oval around until the oval lays flat. You may need to wiggle and reposition the oval ends. Re-clip if needed and wiggle more.  Press the oval with a hot iron
  7. With the oval now laying nice and flat, place back into your sewing maching and edgestitch around the oval. Repeat steps 1-2 for the other oval handle. Now sew the facing side seams with a 1/2″ SA. You are almost finished!
  8. Turn uder the top edge and facing edge with a 1/2″ SA.  Press.  With the folded SA now facing each other, place into your sewing machine and edgestitch along top edge. That’s it!

Note – The bag is not lined and the facing bottom edge was left raw. You could finish the facing bottom edge with a colorful binding.

Think of all the fun you could have with this bag.. There are so many variations you could make. You could applique your child’s name or an image on the front. I like the idea of sewing a bunch to use as party favor bags.  Agh.. So many things to do, “sew” little time.

That’s it for today. I love hearing from everyone.  If you have questions, please leave a comment, email or send a message on facebook.  I also love seeing pictures!

Have a great week and happy sewing!

3 Comments

« DIY.. Summer Totebag
DIY.. Make A Daycare Mesh Pouch »

Comments

  1. Trish says

    07/22/2013 at 2:39 pm

    For long distance relationships it would be good….LAX to LGA. Love these!

    Reply
    • Haberdashery Fun says

      07/22/2013 at 2:55 pm

      Ha! great idea.. That would be a lot of fun to make..

      Reply
  2. Erica says

    07/26/2013 at 10:07 am

    This is adorable! Perfect for summer and I love the airport codes. This would be a great gift for a traveler. 🙂

    Reply

Leave a Reply to Trish Cancel reply

Your email address will not be published. Required fields are marked *

This site uses Akismet to reduce spam. Learn how your comment data is processed.

About me


Hi there - I'm Marni Weaver. A sewer, a sometimes quilter and a lover of fabric design. I started this blog to share my ideas. Come Join the Fun
shop now

Popular Categories

project for baby fabric projects seasonal projects fat quarter projects sewing tips and tricks inspiration

Categories

  • Applique
  • Baby
  • Bags and Pouches
  • Block Printing
  • Color
  • DIY Projects
  • Fabric
  • Fabric Design
  • Fat Quarter Projects
  • Home Decor
  • Inspiration
  • Just for Fun
  • Kids
  • No Sew
  • Patterns
  • Print On Fabric
  • Quilting
  • Scrap Fabric Projects
  • Seasonal
  • Sewing Tips & Tricks

Lovely sponsors

Recent Comments

  • How To Make Hand warmers | Haberdashery Fun on DIY.. Sew Heart Shaped Baby Burp Cloths
  • How To Make Hand warmers | Haberdashery Fun on How To Make Mini Heart Shaped Hand Warmers
  • Make Spooky Monster Inspired Face Cloths | Haberdashery Fun on DIY.. Make Monster Inspired Face Cloths
  • How To Sew A Fabric Bin | Haberdashery Fun on Sew An Easy Fabric Storage Bin
  • Make The Alma Tote In Fun Colors | Haberdashery Fun on New – The Alma Tote Pattern

Projects Elsewhere

find me on Pellon Projects sew mama sew contributor

momtastic contributor

Pinterest

Visit Marni@Haberdashery Fun's profile on Pinterest.

I'm Reading

  • Cluck Cluck Sew
  • Cooking Dangerously
  • In Color Order
  • Jen Hewitt
  • Jolly Jabber
  • Karly Spalding Photography
  • Leigh Laurel Studios
  • Lindsay Sews
  • Lotta Jansdotter
  • Love Patchwork and Quilting Magazine
  • Made
  • Making It Lovely
  • Noodle-Head
  • Polka Dot Chair
  • Sharon Holland Designs
  • Silhouette America Blog
  • Silhouette Design Store
  • The Purl Bee
  • The Purple Fig

Press:

Stitch Winter 2014

haberdashery_fun

Marni Weaver
Still experimenting with keeping the block printin Still experimenting with keeping the block printing, handmade feel in digital form. This one is a little rougher/less perfect, but still has the spirit ✨ Which one’s your pick—1 or 2.

#haberdasheryfun #versafineink #versafineclair #surfacepatterndesign
Who knew that one little stamp could do so much? # Who knew that one little stamp could do so much?
#haberdasheryfun #versafineink #versafineclair
Just added a new stamp pad to my collection—meet Just added a new stamp pad to my collection—meet Lilac Bloom! 💜 And before you ask… nope, this design is not a corn stalk. Are you a fan of this soft shade, or is it a bit too light for your taste?

#versafineclair #blockprints #surfacepatternprint #haberdasheryfunpatterns #surfacepatterndesign #pfeil
Atlanta feels like a steam room right now 🫠 so Atlanta feels like a steam room right now 🫠 so I’m manifesting cooler temps by reworking my Alberta Wild Rose block print into Evergreen.

#blockprinting #banffnationalpark #alberta #surfacepatterndesign #haberdasheryfun
#versafineclair
Ode to summer travels. Alberta wild rose stamp alo Ode to summer travels. Alberta wild rose stamp along with a few sketches. 

#blockprinting #banffnationalpark #alberta #surfacepatterndesign #haberdasheryfun 
@3dottedpenguinscommunity #versafineclair
Follow on Instagram

Copyright © 2025 · Klar theme by Crimson Pear :: web & surface design

Copyright © 2025 · Klar on Genesis Framework · WordPress · Log in