Haberdashery Fun

  • Home
  • About
    • Look Book
  • Contact
    • Collaborate?
  • Tutorials
  • Shop
  • Workshops
    • Email
    • Facebook
    • Instagram
    • Pinterest

Keep up to date with the latest posts!

Destination DIY – Create a Market Tote

in DIY Projects, Fabric on 15/03/13

I have been wanting to do a post that involves my work travels.  Fun nerdy fact, I have sewn in a hotel room. Or two..

I spend alot of time in airports and in the past 7 weeks I have travelled to 6 cities.  I travel a lot for my job. I meet interesting people and talk about my product, trends, marketing all day.. For the most part, I really like the travel.  However, this last season was a blur – having a 13 month old in our house and the extensive travel was an interesting combination.

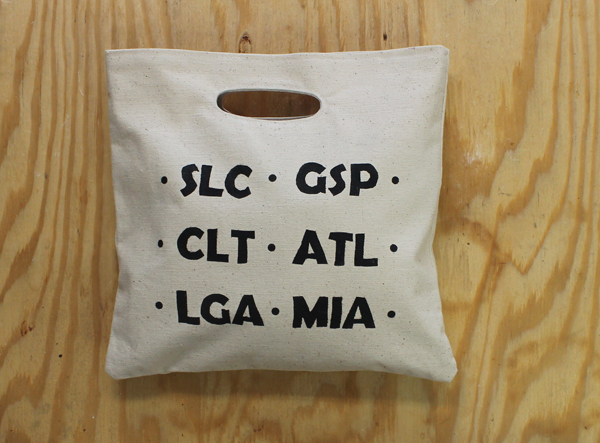
I was trying to remember the airport codes for all the cities that I recently visited and came up with a fun idea — screen print the airport codes onto market tote.  Here are the cities I last made it to-  SLC, CLT, LGA, GSP, ATL, MIA.  Can you figure them out?

“Market tote” translation – Bag with a hole in the top, use as the handles.

I used my trusty freezer paper for the screen printing portion. Check this link for the how to on freezer paper.   I developed the bag pattern from scratch.  This would be something fun to sew for an upcoming girls trip, family reunion, or even the beach!

Note – You will do a little pattern drafting for this one.  Beginners, don’t be scared!! It’s super easy and you can do the drafting right on your fabric.

Materials:

  • Cotton Duck Fabric – The heavier the weight the better. Test the fabric with your sewing machine. Not all sewing machines like thick fabric
  • Interfacing – fusible
  • Pins, needles, thread, scissors
  • Sewing machine
  • Iron and ironing board

Drafting materials:

  • Ruler
  • Disappearing ink pen
  • Confidence
  • Handle template

Screen Printing Materials:

  • Freezer paper, tulip ink, sponges
  • Iron and ironing board
  • Image – I created the letters in word.  Font size 120 pt

This portion not shown in images below.

  • Create the bag.  The smaller the better.  Draw a large rectangle 26″L x 13.5W. This includes SA
  • Create the facing. 4″L x 13.5W. Cut 2
  • Cut interfacing for the self. 3″L x 13.5″W. Cut 2
  • Iron interfacing to the top portion of the bag
  • Sew the bag –  fold in half  and sew the sides using 1/2″ SA

Step 1:

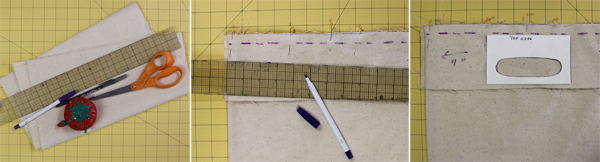
  • With the bag sewn, turn it right side out. Pin each facing piece to the top edge and pin at sides. The sides are not sewn together

Do the following steps for both sides of the bag:

  • Mark 1/2″ SA along top edge with disappearing pen. You will use this as a guide
  • Center handle template in the middle and at the top edge of the SEAM ALLOWANCE

Step 2:

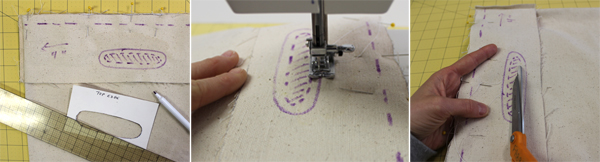
  • Trace  a solid line around the oval from the template
  • Mark a 1/4″ SA. Mark with a dashed line.  Mark the cutting area.  As above, I marked with multiple lines as a cutting reference.
  • Sew around the the solid outside line.
  • Pierce into the center area with scissors

Step 3:

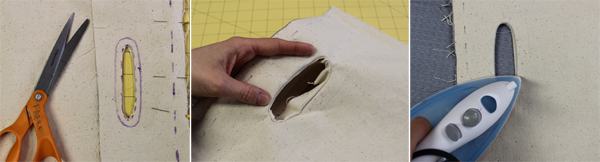
  • Cut out the entire center area. Do NOT cut into the SA!
  • Cut and clip the oval edges. Clip the straight lines and notch the corners..
  • Pull the facing through/ into the center of the oval
  • You will need to wiggle the corners a little until the lay flat. Re-clip if needed and wiggle more
  • Press the oval seam with a hot iron

Step 4:

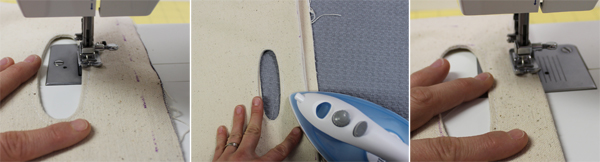
  • Edgestitch along outer edge of oval
  • Now sew the top edge – turn under the top edge 1/2″ and press. Turn entire top edge seam
  • Edgestitch along top edge
  • Press Top edge

You are done!

Happy Sewing

14 Comments

« Sew An Infinity Scarf
Emerald Green – Pantone Color of the Year 2013 »

Comments

  1. Maurice says

    03/15/2013 at 4:56 pm

    cool bag and idea! can you make a cool manly duffle bag?

    Reply
  2. www.thisblogisnotforyou.com says

    03/15/2013 at 9:44 pm

    Nice Idea! Really like your blog – thanks for stopping by at mine!

    Reply
  3. Kelly @ View Along the Way says

    03/18/2013 at 8:20 pm

    What a cool idea! Thanks so much for linking up to Monday Funday!

    Reply
  4. the cape on the corner says

    03/19/2013 at 2:14 pm

    so cute! and useful. i find it funny that one is MIA. is that miami? or missing in action?

    Reply
    • Haberdashery Fun says

      03/19/2013 at 3:11 pm

      Lol… Miami. But it could be missing in action!!

      Reply
  5. Becca says

    03/20/2013 at 5:31 pm

    Very cute! Wish your post had been around last fall. This was exactly what I wanted for my gift bags at my destination wedding. I ended up buying some cheapy bags that didn’t fit the theme of my wedding. :/ Love it! Found you on Sew Much Ado. Thanks for sharing

    Reply
  6. Jenn says

    03/24/2013 at 9:42 pm

    What a neat idea! I used to travel a ton and mostly internationaly when I was an internal auditor for my company. That would make for an interesting tote – SIN, BKK, CDG, AMS, GRU to name a few… I’d love it if you came and linked up at my Thrifty to Nifty Thursdays at A Jennuine Life: http://www.ajennuinelife.com/2013/03/thrifty-to-nifty-thursdays-12.html

    Reply

Trackbacks

  1. Tutorial: Market tote with cut in handles · Sewing | CraftGossip.com says:
    03/17/2013 at 2:41 pm

    […] Marni from Haberdashery Fun shows how to make this market tote are cut into the sides of the bag.  The square tote is easily embellished.  For hers, she used freezer paper to stencil the abbreviations of airports for cities she recently visited on business.  You could also use applique, embroidery, or just leave it plain.  Go to her blog for the how-to. […]

    Reply
  2. Tutorial: Market tote with cut in handles | Sewing Patterns says:
    03/17/2013 at 5:57 pm

    […] Marni from Haberdashery Fun shows how to make this market tote are cut into the sides of the bag.  The square tote is easily embellished.  For hers, she used freezer paper to stencil the abbreviations of airports for cities she recently visited on business.  You could also use applique, embroidery, or just leave it plain.  Go to her blog for the how-to. […]

    Reply
  3. DIY.. Summer Totebag | Haberdashery Fun says:
    07/19/2013 at 11:35 am

    […] few months ago I had a similar crazy work schedule and created an airport code themed totebag. I  thought it was cute and in a weird way, a funny keep sake.. One day my travel schedule […]

    Reply
  4. Summer Totebag.. Sew In 8 Easy steps | Haberdashery Fun says:
    07/22/2013 at 9:45 am

    […] reader asked if I could post the sewing tutorial for the bag. You can see the full tutorial here, but I thought it would be fun to condense the tutorial down into my 8 easy sewing […]

    Reply
  5. DIY.. Mini Book Tote and Journal Cover | Haberdashery Fun says:
    09/17/2013 at 3:38 pm

    […] add your “design”. For additional info on freezer printing, check out my tutorials here and here. Trace your design onto the freezer paper.  Cut out the design and iron onto the face of […]

    Reply
  6. Tips.. Working with Freezer Paper | Haberdashery Fun says:
    04/08/2014 at 11:45 am

    […] to share a little FYI on the subject! If you want to see one of my favorite freezer paper projects, click here to see my market […]

    Reply
  7. Printing Your Designs on Fabric | Haberdashery Fun says:
    02/10/2015 at 3:54 pm

    […] I love this bag.  I travel a lot for my job and travelled to these 6 cities in a very short period of time. I though it would be fun to add the codes to a bag. I share how to make the bag here. […]

    Reply

Leave a Reply Cancel reply

Your email address will not be published. Required fields are marked *

This site uses Akismet to reduce spam. Learn how your comment data is processed.

About me


Hi there - I'm Marni Weaver. A sewer, a sometimes quilter and a lover of fabric design. I started this blog to share my ideas. Come Join the Fun
shop now

Popular Categories

project for baby fabric projects seasonal projects fat quarter projects sewing tips and tricks inspiration

Categories

  • Applique
  • Baby
  • Bags and Pouches
  • Block Printing
  • Color
  • DIY Projects
  • Fabric
  • Fabric Design
  • Fat Quarter Projects
  • Home Decor
  • Inspiration
  • Just for Fun
  • Kids
  • No Sew
  • Patterns
  • Print On Fabric
  • Quilting
  • Scrap Fabric Projects
  • Seasonal
  • Sewing Tips & Tricks

Lovely sponsors

Recent Comments

  • How To Sew A Fabric Bin | Haberdashery Fun on Sew An Easy Fabric Storage Bin
  • Make The Alma Tote In Fun Colors | Haberdashery Fun on New – The Alma Tote Pattern
  • New Tote Bag Sewing Pattern Coming Soon! | Haberdashery Fun on New – The Alma Tote Pattern
  • New – The Alma Tote Pattern | Haberdashery Fun on Sew A Reversible Tote
  • Easy Little Kid Sewing Project | Haberdashery Fun on DIY.. Make Monster Inspired Face Cloths

Projects Elsewhere

find me on Pellon Projects sew mama sew contributor

momtastic contributor

Pinterest

Visit Marni@Haberdashery Fun's profile on Pinterest.

I'm Reading

  • Cluck Cluck Sew
  • Cooking Dangerously
  • In Color Order
  • Jen Hewitt
  • Jolly Jabber
  • Karly Spalding Photography
  • Leigh Laurel Studios
  • Lindsay Sews
  • Lotta Jansdotter
  • Love Patchwork and Quilting Magazine
  • Made
  • Making It Lovely
  • Noodle-Head
  • Polka Dot Chair
  • Sharon Holland Designs
  • Silhouette America Blog
  • Silhouette Design Store
  • The Purl Bee
  • The Purple Fig

Press:

Stitch Winter 2014

haberdashery_fun

Marni Weaver
Thank you to all who attended my first “Design F Thank you to all who attended my first “Design Fabric & Sew A Pouch” workshop on Sunday. You never know what may happen with a live zoom workshop. Magic always happens and I love to seeing what gets created!

FYI.. I have another workshop like this at the end of the month on Saturday Oct28 2pm-4pm( via zoom)

+Want to make something fun? 
+Want to learn to block print?
+Want to design your own fabric and sew something?

Come and join the fun! Beginners welcome. You just need sewing experience for later when you see the pouch. The link to register is in my profile.

#haberdasheryfun #haberdasheryfunprints #surfacepattern #dashpattern #blockprinting #blockprintedtextiles #blockprintedfabric #haberdasheryfunprints #fatquarterproject #pdfsewingpatterns
I gave myself a few minutes this morning to carve I gave myself a few minutes this morning to carve another 1” stamp. There is something magical about a quiet morning with a cup of coffee and an open door open that lets in the cool fall weather. 🍁 

#haberdasheryfun #haberdasheryfunpatterns #haberdasheryfunprints #blockprinting #blockprintmadeeasy #versafineclair #versafineclairinks #surfacepatterndesign
I had so much fun yesterday that I gave myself 20m I had so much fun yesterday that I gave myself 20mins today to get creative with another 1” stamp. Added yesterdays stamp in the mix. 

What do you do for self care and wellness? Do you put times into your calendar or just wing it each day? I am practicing adding time each day for a walk (or even two) and some form of relaxation.

#haberdasheryfun #haberdasheryfunpatterns #blockprintingmadeeasy #fatquarterproject #haberdasheryfunprints #blockprints #blockprintedfabric #blockprintedfabrics #surfacepatterndesign #spoonflower #spoonflowerfabric #versafineclair #versafineink
What do you do to get out of your head? I go for a What do you do to get out of your head? I go for a lot of walks, take a lot of showers (weird I know) and block print.

Today was one of those days, so I grabbed a small 1” stamp and made a quick print. It’s super simple, but I like how it turned out. 

#haberdasheryfun #blockprintingonfabric #blockprintingmadeeasy #blockprinting #fatquarterprojects #haberdasheryfunpatterns #haberdasheryfunprints #fabricdesign #surfacepatterndesign #spoonflower #badcaseofthemondays #blockprinted #versafineclair #versafineink
I often have people ask me.. what do I sew with th I often have people ask me.. what do I sew with the fabric I just block printed? 

Introducing.. the Dash Pouch. This pouch is included with my upcoming workshop called “Design fabric and sew a pouch”. 

There are 2 dates. Oct 1 and Oct 28, come join me and let’s have some fun. Link in profile has all the details.

#fatquarters #fatquarterproject #haberdasheryfun #haberdasheryfunpatterns #blockprintingonfabric #blockprintedteatowel #blockprintingmadeeasy
Follow on Instagram

Copyright © 2023 · Klar theme by Crimson Pear :: web & surface design

Copyright © 2023 · Klar on Genesis Framework · WordPress · Log in