Haberdashery Fun

  • Home
  • About
    • Look Book
  • Contact
    • Collaborate?
  • Tutorials
  • Shop
  • Freebie
    • Email
    • Facebook
    • Instagram
    • Pinterest

Keep up to date with the latest posts!

DIY.. Baby Wipes Case

in No Sew on 17/04/13

This post is for all you non-sewers.  And anyone who has a baby in their life..

Find fabric scraps and in a short afternoon you can create this fun wipes case.  Make one to match your diaper bag or make one for a new “Mom” friend.
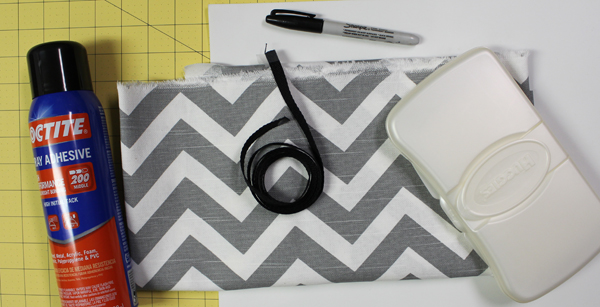
Materials Needed:

  • Fabric – this is a great project for scrap fabric. Requires 2 pieces approx 10″ x 8″
  • Trim – 3/8″
  • Small piece of ribbon, bias tape – approx 2″ long
  • Craft foam – “Creatology Fun Foam” works great
  • Empty wipes case
  • Sharpie / pen for tracing
  • Tracing paper
  • Glue gun
  • Spray adhesive
  • Cardboard

Note — Spray the adhesive in a WELL ventilated area.  Do not spray the glue on your beloved cutting mat!!

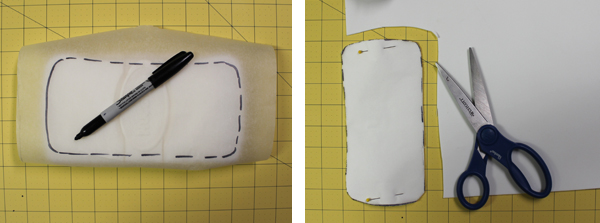
Step 1 – Prep your foam.  Place tracing paper on top of your wipes case.  Move inwards 1/8″ and trace/follow the outside edge. This is the pattern for your foam. Place on the foam, pin and cut 2 pieces.

Step 2 – Adhere the foam to wipes case.  Be careful where you use the adhesive spray – spray in a well ventilated area and on a cardboard/disposable surface.  Spray the wipes case and stick the foam down. Gently press until it is firmly held down.  Repeat for the other side.

Step 3 –  Spray the foam on the wipes case and your fabric.  Lay the fabric on the wipes case top and press.  Gently press/pull the air bubbles out.  Work fast.  If you have a light fabric, make sure your hands are CLEAN.

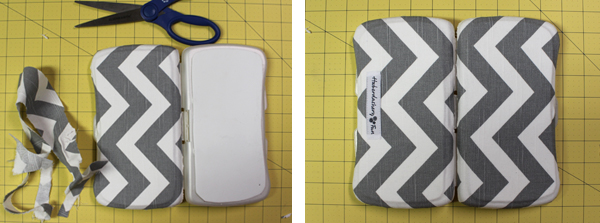
Step 4 – Trim down your fabric.  The fabric should be glued down around the wipes case sides.  Carefully trim to the wipes case  edge. Use OLD scissors. The glue may ruin a good pair of scissors.   Stay away from your sewing scissors!

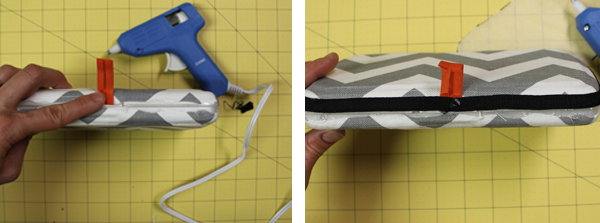
Step 5 – Cut a small piece of  bias tape, ribbon, etc and glue it down. You will fold this around the trim and cover the raw edges [beggining and ending edges of the 3/8″ trim].  Glue the trim around the edge of the wipes case.  This should cover the raw edges of the fabric.

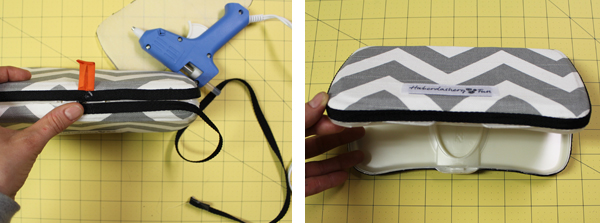
Step 6 – Repeat and glue the trim around the bottom edge.  Finish by wrapping the double fold binding around the raw edges and glue.

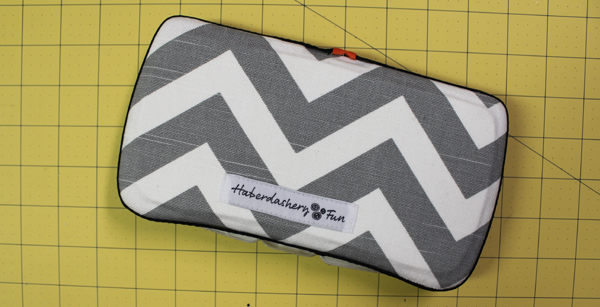
Voila!!  Now you have a great wipes case to show off.

Have a great day.

Related Posts Plugin for WordPress, Blogger...

4 Comments

« Color Therapy
Hello… Spoonflower Fabric »

Comments

  1. Trish says

    06/03/2013 at 9:58 am

    I absolutely love this! I would love one. Where can I buy it?!

    Reply
    • Haberdashery Fun says

      06/05/2013 at 11:09 am

      Thanks! I am working on getting these available in my Etsy shop. Stay tuned, I am also doing a Father’s Day contest with this and another item..

      Reply
  2. Holly says

    06/06/2013 at 8:58 pm

    Cute!!!

    Reply

Trackbacks

  1. DIY.. Father's Day Superhero Wipes Case | Haberdashery Fun says:
    06/12/2013 at 7:05 am

    […] wipes case is a repeat blog post. You can see the original here.  But I had to do a repeat. I saw this T Shirt and thought it would be fun to create a superhero […]

    Reply

Leave a Reply Cancel reply

Your email address will not be published. Required fields are marked *

This site uses Akismet to reduce spam. Learn how your comment data is processed.

About me


Hi there - I'm Marni Weaver. A sewer, a sometimes quilter and a lover of fabric design. I started this blog to share my ideas. Come Join the Fun
shop now

Popular Categories

project for baby fabric projects seasonal projects fat quarter projects sewing tips and tricks inspiration

Categories

  • Applique
  • Baby
  • Bags and Pouches
  • Block Printing
  • Color
  • DIY Projects
  • Fabric
  • Fabric Design
  • Fat Quarter Projects
  • Home Decor
  • Inspiration
  • Just for Fun
  • Kids
  • No Sew
  • Patterns
  • Print On Fabric
  • Quilting
  • Scrap Fabric Projects
  • Seasonal
  • Sewing Tips & Tricks

Lovely sponsors

Recent Comments

  • 3 Simple Summer Sewing Tutorials | Haberdashery Fun on Sew A Canvas Zipper Pouch
  • 3 Simple Summer Sewing Tutorials | Haberdashery Fun on Sew Asymmetrical Color Block Totes Tutorial
  • 3 Simple Summer Sewing Tutorials | Haberdashery Fun on Sew A Baby Towel With A Hood
  • Make A Simple Block Print Tote Bag | Haberdashery Fun on DIY.. Colorful Dish Towel Tote Bags
  • Make A Simple Block Print Tote Bag | Haberdashery Fun on Sew Asymmetrical Color Block Totes Tutorial

Projects Elsewhere

find me on Pellon Projects sew mama sew contributor

momtastic contributor

Pinterest

Visit Marni@Haberdashery Fun's profile on Pinterest.
Follow on Bloglovin

I'm Reading

  • Cluck Cluck Sew
  • Cooking Dangerously
  • In Color Order
  • Jen Hewitt
  • Jolly Jabber
  • Karly Spalding Photography
  • Leigh Laurel Studios
  • Lindsay Sews
  • Lotta Jansdotter
  • Love Patchwork and Quilting Magazine
  • Made
  • Making It Lovely
  • Noodle-Head
  • Polka Dot Chair
  • Sharon Holland Designs
  • Silhouette America Blog
  • Silhouette Design Store
  • The Purl Bee
  • The Purple Fig

Press:

Stitch Winter 2014

haberdashery_fun

Block Printing
A homemade block printed pouch is perfect for camp A homemade block printed pouch is perfect for camping trips. Holds essentials for the campsite, swimming and the beach. 

Are you a sewer?? My blog has tons of pouch tutorials. See the link in profile and click Blog- sewing.

#haberdashery #blockprinting #blockprintingmadeeasy #100dayofsimpleshapes #speedballfabricink #haberdasheryfunpatterns #haberdasheryfun #blockprintmadeeasy #isew
A big hello to everyone new around here. Thank you A big hello to everyone new around here.
Thank you for stopping by ❤️🎉

Did you know that along with all my block printing that I also sew? I have had a sewing blog for 10 years. If you are new to sewing or looking for tips and tricks, I’ve got the spot for you.

Head to the link in my profile and click sewing tutorials - blog. I even have a tutorial for this cross body tote over on my blog. 

#haberdasheryfun #haberdasheryfunpatterns #isewbags #surfacepatterndesigner #blockprintingmadeeasy #100daysofsimpleshapes #100dayproject #dothe100dayproject #haberdasheryfunonlineclasses #konacotton #canvasbags #speedballfabricink #simpleshapesarefun #blockprintmadeeasy
I’m back in my favorite Toronto kitchen so had t I’m back in my favorite Toronto kitchen so had to take a few block print photos. Continuing on with my simple prints theme and playing around with the heart block.

#haberdasheryfunpatterns #blockprinted #100daysofsimpleshapes #speedballfabricink #100daysproject #dothe100dayproject #blockprintedfabric #100daysofblockprinting #blockprintmadeeasy #blockprintingmadeeasy #100daysofsimpleprints #blockprintedfabric #haberdasheryfun Day 32/100
Happy Monday! We are back from vacation and I am s Happy Monday! We are back from vacation and I am still cruising thru my “simple circle” blockprint theme. This one is my favorite of the last group. Swipe to see it’s companions.

What are you working on?

#haberdasheryfun #haberdasheryfunpatterns #speedballink #100dayproject2022 #dothe100dayproject2022 #surfacedesigncommunity #surfacepatterndesign #handmadestamp #blockprintfabrics #blockprintedfabric #100daysofsimpleshapes #blockprintingmadeeasy #blockprintingmadesimple #fatquarterprojects #fatquarterproject #konacottonsolids #konacottons 

Day 31/100
Instagram post 18239908753108863 Instagram post 18239908753108863
Follow on Instagram

Copyright © 2022 · Klar theme by Crimson Pear :: web & surface design

Copyright © 2022 · Klar on Genesis Framework · WordPress · Log in