Haberdashery Fun

  • Home
  • About
    • Look Book
  • Contact
    • Collaborate?
  • Tutorials
  • Shop
    • Email
    • Facebook
    • Instagram
    • Pinterest

Keep up to date with the latest posts!

DIY.. Halloween Candy Bowl

in DIY Projects, Seasonal on 24/10/13

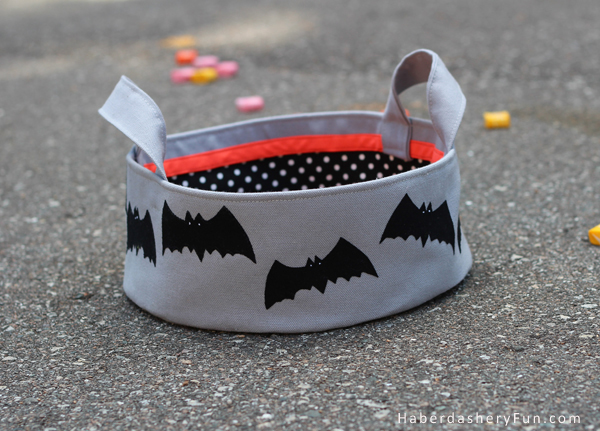
Halloween is just around the corner. Have you finished your costumes? Looking for another project to take on?

This is an easy project. You can make this spooky Halloween candy bowl in just a few short hours. So set aside your morning this Saturday and you create a memory keeper to pull out and re-use for years to come. Plus, it’s a great project for Moms and kids to do together..

Materials needed:

  1. Cotton canvas for exterior
  2. Printed cotton canvas for lining
  3. Black cotton fabric for the bats – 1 fat quarter
  4. Fusible Web – Try Pellon EZ Steam
  5. Interfacing – Pellon Shape Flex SF101 was used for this project. Find interfacing that will give more substance to the fabric
  6. 1/2″ bias binding – homemade or store bought
  7. Sewing machine and sewing supplies
  8. Iron and ironing board

Great news!! Head on over to Pellon Projects. You can download a PDF tutorial for this project. The PDF includes step by step instructions and also 2 templates – a circle template for the bottom and also one for the bats.

Before we get started, cut the following pattern pieces

  1. Exterior Fabric: Cut 1 bottom and 2 rectangles. The bowl side rectangle measures 15 1/8” x 5” and the strap rectangle measures 3”W x 22”L.
  2. Lining Fabric: You need to make the lining a little smaller so it isn’t too bulky inside the bowl. Reduce both the circle template and large rectangle by 1/8″. Not sure how to do this? Start on the circle.  Using a ruler measure inwards 1/8″ and make a small dash mark. Repeat for the entire circumference of the circle. Trace the dash lines and you have the lining pattern piece. Do the same for the large rectangle and reduce 1/8″ on all sides.

Alright, let’s get sewing:

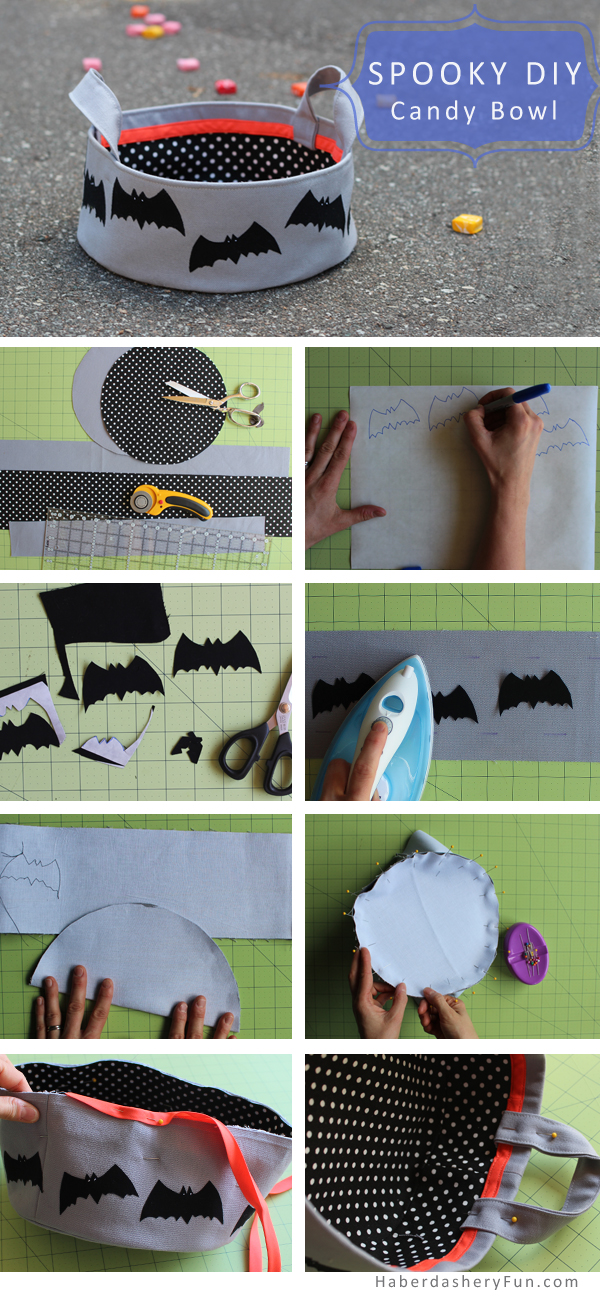
  1. Prepare your fabric.  You have already cut the fabric, so you need to use interfacing and give it more structure. Cut the interfacing to size and iron to the backside of both the exterior and lining fabric
  2. Draw 9 bats on the smooth side of the EZ Steam paper. With the bats traced, now place the textured side of EZ Steam paper down onto black fabric.  Press with an iron
  3. Cut out all your bats
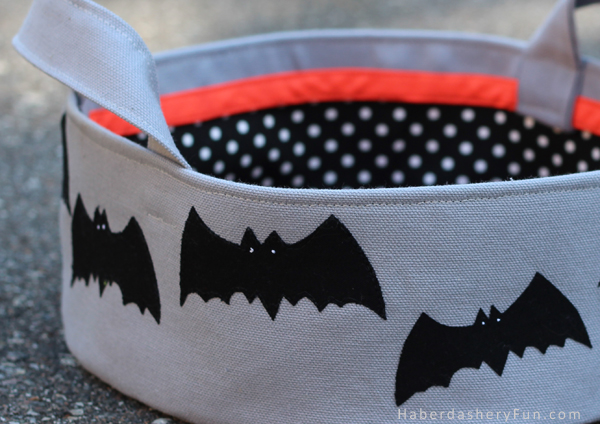
  4. Lay the bats onto the side bowl rectangle. Watch your placement and leave at least 1” along the top edge and ½” along the bottom edge. You want the bats to be centered. Now peel the backing off of each bat stick in place. Press each in place to adhere. Applique around the edges of each bat. Using white thread, hand stitch the bat eyes
  5. Fold the circles and rectangle in half. Hand press to leave a fold mark for placement [ like a cut notch]. While the rectangles are folded in half, place into your sewing machine and stitch together with a 1/4″ seam allowance. Press seam allowances
  6. Using fold marks as placement, pin the bottom to the side. Place into sewing machine and stitch together with a 1/4″ seam allowance. Press. You now have your bowls completed. Turn the exterior bowl right side out and leave the lining right side in. Place lining inside and jiggle around to get the seams to match up. Press in place
  7. Pin bias tape to top edge and stitch down.  Fold and turn down top edge 1”. Press down with an iron
  8. Sew your strap together. I have a great strap tutorial and you can check it out here. Place straps under top edge and pin in place. Stitch the straps down. Optional – Edgstitch around top edge

Happy Sewing!

Related Posts Plugin for WordPress, Blogger...

41 Comments

« DIY.. Simple Superman Onesie
Halloween Inspiration 2013 »

Comments

  1. Stephanie Ann says

    October 24, 2013 at 1:03 pm

    So cute! Have you ever thought of doing a YouTube tutorial?

    Reply
    • Haberdashery Fun says

      October 24, 2013 at 1:10 pm

      Aghh.. Thanks! My husband said the same thing the other day.. So we are going to look into this for 2014. I’m not sure where to begin, but I’m going to give it a shot.. I will keep you posted 🙂

      Reply
  2. Melanie says

    October 25, 2013 at 4:36 pm

    This is so cute! Love those bats, and the lining is fun too!

    Reply
    • Haberdashery Fun says

      October 27, 2013 at 7:24 am

      Hi – thanks for stopping by. I agree, aren’t the bats cute? Spooky, but cute..

      Reply
  3. krystie says

    October 26, 2013 at 11:30 am

    adorable! looks better than store ones!

    Reply
  4. Britt says

    October 27, 2013 at 1:19 am

    I know this is random, but I wanted to say thanks for the baby batman costume idea from last year. I made it for my son this year and he loves it! His baby sister is Robin:) thanks for the great posts! I’m not sure how to share a pic with you, if you know tell me and I’ll do it. Sunshine!

    Reply
  5. Jenna says

    October 27, 2013 at 8:10 pm

    This is adorable! How talented you are!

    Reply
    • Haberdashery Fun says

      October 27, 2013 at 9:18 pm

      Thank you so much. I went to your blog and your recipes look amazing!!

      Reply
  6. Kaitlin Jenkins says

    October 27, 2013 at 9:13 pm

    This is SO cute!

    Reply
    • Haberdashery Fun says

      October 27, 2013 at 9:18 pm

      Hi- thank you for stopping by. I appreciate the comment 🙂

      Reply
  7. Mandy @ Sugar Bee Crafts says

    October 30, 2013 at 2:53 pm

    Thanks for linking to Take-A-Look Tuesday over at Sugar Bee Crafts – I featured you today!
    –Mandy, SugarBeeCrafts.com

    Reply
    • Haberdashery Fun says

      October 30, 2013 at 4:07 pm

      Hi – thank you for the feature! I stopped by your blog. Lots of great projects last week.

      Reply
  8. claire says

    November 2, 2013 at 6:07 am

    Thank you for linking up @ Craft Create & Inspire last weekend 🙂 Your awesome project is featured this weekend !!

    Hope you can stop by and join us this week ..

    http://lemonpaperdesigns.blogspot.co.uk/2013/11/craft-create-inspire-linky-party-4.html

    Claire x

    Reply
  9. Marsha says

    September 12, 2014 at 5:59 pm

    When I went to cut out the rectangles I realized the rectangles are meant to be cut on the fold, but I don’t see that in the instructions. Am I not seeing it?
    I assume it is 1/4 inch seam allowance too, is that correct?
    Very cute design.

    Reply
    • Haberdashery Fun says

      September 14, 2014 at 1:56 pm

      Hi Marsha. Thank you very much for your comment. I’m checking my pattern and notes and will get back to you very soon.

      Reply
    • Haberdashery Fun says

      September 30, 2014 at 3:20 pm

      Hi Marsha, Thank you again for leaving your previous comment. I apologize for the delay in getting back to you. You are correct – the sides of the bowl/rectangles should be cut “on the fold”. They should also be sewn with a 1/4″ seam allowance. Let me know how it goes and please send along images of your finished project. Thanks again.

      Reply
    • beverly Pulse says

      September 9, 2018 at 2:50 pm

      Thank you for asking this question. I am trying to put that huge circle bottom on a 15″ L rectangle and it is not working. Now I know why.

      Reply
  10. T'onna @ USS Crafty says

    October 5, 2014 at 3:13 pm

    I love this Halloween bowl! I’m pinning it!

    Navy Wifey Peters @ Submarine Sunday Link Party!

    Reply
    • Haberdashery Fun says

      October 6, 2014 at 9:50 am

      Thank you so much for stopping by. I will come by on Sunday for sure. Have a great week.

      Reply
  11. Julie says

    October 6, 2014 at 3:14 am

    Such a cute design, the fabrics you chose, and the little orange trim are just perfect.

    Reply
  12. Carissa Rasmussen says

    October 7, 2014 at 5:55 pm

    this is so fun! I think I need to use these for organizing. so versatile! please share at our link party http://www.carissamiss.com/2014/10/outside-box-no-5.html

    Reply
    • Haberdashery Fun says

      October 7, 2014 at 5:57 pm

      Thanks for the invite! I just popped over and added my link. I will add you to my link party list.

      Reply
  13. Alexis @ Persia Lou says

    October 8, 2014 at 2:52 am

    Soooo cute! I love the bias tape on the inside!

    Reply
  14. Emily says

    October 11, 2014 at 8:39 am

    cute! I love the bats on this bowl!! Thanks for linking up to Create Link Inspire party… this is featured today over at Nap-Time Creations in DIY Halloween ideas! I’ve posted it to facebook and would really appreciate a share on this photo to help get the word out! https://www.facebook.com/naptimecreationsbyEmily/photos/a.432861810079463.99807.355067511192227/864372216928418/?type=1

    Reply
  15. Lydia Larae says

    October 11, 2014 at 11:36 am

    This is so cute, and it looks totally doable. I love your blog too, by the way! Thanks for sharing this fun project.

    Reply
    • Haberdashery Fun says

      October 12, 2014 at 10:16 am

      Thanks so mu h for stopping by. I will let you know when the pattern goes up.

      Reply
  16. Lisa at Mabey She Made It says

    October 15, 2014 at 5:55 pm

    I love this! You may want to stop over at Mabey She Made It tomorrow. 😉

    Reply
    • Haberdashery Fun says

      October 16, 2014 at 6:45 am

      Thank you. I will come on over 🙂

      Reply
  17. BuyHalloween Costumes2014.Com says

    October 16, 2014 at 2:11 pm

    Thanks for sharing such a pleasant idea, piece of writing is
    nice, thats why i have read it fully

    Reply

Trackbacks

  1. Halloween Candy Bowl says:
    October 26, 2013 at 5:42 am

    […] Source […]

    Reply
  2. Tutorial: Fabric basket for handing out Halloween candy | Sewing | CraftGossip.com says:
    October 27, 2013 at 2:10 pm

    […] Marni from Haberdashery Fun shares a tutorial showing how to make a fabric candy basket for your Halloween treats.  Short handles at either side will make it easy for you to hold out in front of you while the kids pick out their trick or treat goodies.  She appliqued the sides of the gray basket with spooky Halloween bats.  It’s made from a canvas fabric, lined with a quilting weight cotton and heavily interfaced so it holds its shape.   It’s super cute for Halloween, but you could make this from any palette of colors for a year-round accent for your home.  Go to Haberdashery Fun for the how-to. […]

    Reply
  3. Tutorial: Fabric basket for handing out Halloween candy | Sewing Patterns says:
    October 28, 2013 at 3:45 am

    […] Marni from Haberdashery Fun shares a tutorial showing how to make a fabric candy basket for your Halloween treats.  Short handles at either side will make it easy for you to hold out in front of you while the kids pick out their trick or treat goodies.  She appliqued the sides of the gray basket with spooky Halloween bats.  It’s made from a canvas fabric, lined with a quilting weight cotton and heavily interfaced so it holds its shape.   It’s super cute for Halloween, but you could make this from any palette of colors for a year-round accent for your home.  Go to Haberdashery Fun for the how-to. […]

    Reply
  4. Fabric Candy Bowl DIY Tutorial - Things To Do Yourself - DIY says:
    October 29, 2013 at 4:23 pm

    […] DIY.. HALLOWEEN CANDY BOWL […]

    Reply
  5. Scared Yet by VeryCherry | SwoonFlower says:
    November 1, 2013 at 1:14 pm

    […] get a jump on next year and print this up on the Kona Cotton and make up some of these great halloween candy bowls to creep out the kids who come to the door looking for treats. […]

    Reply
  6. DIY.. Make A Mini Jewelry Roll | Haberdashery Fun says:
    December 17, 2013 at 11:09 am

    […] Click here to see my easy tutorial on cutting binding strips. For this project you need to cut binding 2-1/2″ x 40″ […]

    Reply
  7. Block Party: Halloween Crafts, Recipes, Home Decor and More Features - Rae Gun Ramblings says:
    October 12, 2014 at 9:01 pm

    […] Treat Boxes | Halloween Soaps | Ghost Cupcakes | Halloween Pinata Cups | Halloween Garland | Halloween Candy Bowl | Pumpkin Place Setting | Scrap Wood Ghosts | Halloween Candy Bark | Glow in the Dark Bat Wing Shoe […]

    Reply
  8. Creative Ideas for Halloween - Making the World Cuter says:
    October 12, 2014 at 9:02 pm

    […] Treat Boxes | Halloween Soaps | Ghost Cupcakes | Halloween Pinata Cups | Halloween Garland | Halloween Candy Bowl | Pumpkin Place Setting | Scrap Wood Ghosts | Halloween Candy Bark | Glow in the Dark Bat Wing Shoe […]

    Reply
  9. Do Tell Tuesday time! - Crafty CupboardCrafty Cupboard says:
    October 14, 2014 at 1:31 am

    […] man. I love the adorable trick-or-treat basket from Haberdashery Fun! That bias pop of color inside is my […]

    Reply
  10. Mabey She Made It 10 Fall and Halloween Ideas to Crush On - Mabey She Made It says:
    October 16, 2014 at 8:02 am

    […] Halloween Candy Dish || Haberdashery Fun || I love this for next to the front door. I may have to make one! […]

    Reply
  11. 10 Halloween Candy Bowls DIY - Food Recipee says:
    July 1, 2016 at 9:26 am

    […] The Halloween Candy Bowl DIY From […]

    Reply
  12. Showing Off - my picks! - Sugar Bee Crafts says:
    June 19, 2018 at 4:17 pm

    […] And another to-do for next year – custom basket for candy – love it! From Haberdashery Fun: […]

    Reply

Leave a Reply Cancel reply

Your email address will not be published. Required fields are marked *

This site uses Akismet to reduce spam. Learn how your comment data is processed.

About me


Hi there - I'm Marni Weaver. A sewer, a sometimes quilter and a lover of fabric design. I started this blog to share my ideas. Come Join the Fun
shop now

Popular Categories

project for baby fabric projects seasonal projects fat quarter projects sewing tips and tricks inspiration

Categories

  • Applique
  • Baby
  • Bags and Pouches
  • Color
  • DIY Projects
  • Fabric
  • Fabric Design
  • Fat Quarter Projects
  • Home Decor
  • Inspiration
  • Just for Fun
  • Kids
  • No Sew
  • Patterns
  • Print On Fabric
  • Quilting
  • Scrap Fabric Projects
  • Seasonal
  • Sewing Tips & Tricks

Lovely sponsors

Recent Comments

  • Quilted Ripstop Reversible Tote | Haberdashery Fun on Quick Tip.. Sewing Boxed Corners
  • Make Nine in 2021 – Sew, Bake, Snap on DIY.. Reversible Fabric Storage Bin
  • 26 Diy placemats ideas - Perfect Table Setting on DIY.. Heart Shaped Placemats Tutorial For Sew Mama Sew
  • More Free Tote Patterns | on Reversible 1 Hour Tote Pattern
  • Collapsible Kraft-Tex Bowl on DIY.. Collapsible Fabric Bowls

Projects Elsewhere

find me on Pellon Projects sew mama sew contributor

momtastic contributor

Pinterest

Visit Marni@Haberdashery Fun's profile on Pinterest.
Follow on Bloglovin

I'm Reading

  • Cluck Cluck Sew
  • Cooking Dangerously
  • In Color Order
  • Jen Hewitt
  • Jolly Jabber
  • Karly Spalding Photography
  • Leigh Laurel Studios
  • Lindsay Sews
  • Lotta Jansdotter
  • Love Patchwork and Quilting Magazine
  • Made
  • Making It Lovely
  • Noodle-Head
  • Polka Dot Chair
  • Sharon Holland Designs
  • Silhouette America Blog
  • Silhouette Design Store
  • The Purl Bee
  • The Purple Fig

Press:

Stitch Winter 2014

haberdashery_fun

My 5 yr old modeling the latest print from Sunday’s block printing zoom workshop. It’s fun to try to draw, carve and print all the while teaching and sharing over zoom. The prints made during these workshops aren’t perfect, but they sure are fun and memorable to create. Thank you to the small group of participants in attendance this Sunday, teaching these workshops has been good for my soul. 
.
Details soon to come for next month’s / May workshop. For more information email - marni@haberdasheryfun.com
.
#haberdashery #haberdasheryfunpatterns #haberdasheryfun #zoomworkshop #haberdasheryfunclasses #pdfpatterns #isew #printandpattern #printmaking #surfacepatterndesign #zoomclasses #isewbags #printmakersofinstagram
My next workshop is here! Have you wanted to lea My next workshop is here! 

Have you wanted to learn to block print and don’t know where to start? This is the perfect intro class and you will be up and running in 1 hour. 

Sunday, April 11th 
11am- 12pm EST
Space is limited.

Email me at marni@haberdasheryfun.com for details.

#zoomclasses #pdfpattern #isew #haberdashery #haberdasheryfun #haberdasheryfunpatterns #haberdasheryfunclasses #pdf #sewing
Day 22 of #marchmeetthemaker2021 is “Hands”. . Day 22 of #marchmeetthemaker2021 is “Hands”.
.
My 5yr old loves to snoop and to go through my stuff. He especially loves my block printing supples, recently found my stash of stamps and lined them up.  When I saw my handiwork from over the years, I thought it would make a fun picture. 
.
.
#marchmeetthemaker #mmtm #speedballart #mmtm2021 #haberdashery #haberdasheryfun #blockprinting #haberdasheryfunpatterns #pdfpattern #isewlation #speedycarve 
#isewbags #isew #zoomclasses #haberdasheryfunclasses #printandpattern #printmakersofinstagram
Day 18 for #marchmeetthemaker2021 was “color”. Day 18 for #marchmeetthemaker2021 was “color”. I often look at people’s Instagram accounts where the colors are soft, muted and soothing. I say to myself ..Oooh. I want my Instagram feed to look like that. But the reality is, I love ❤️ ❤️ ❤️ color. 
.
.
#marchmeetthemaker #mmtm2021 #mmtm #pdfpattern #haberdashery #haberdasheryfun  #isewbags #haberdasheryfunpatterns #isew #konasolids #dollarspotfinds #dollarspot
Day 16 prompt for #marchmeetthemaker2021 is “Fro Day 16 prompt for #marchmeetthemaker2021 is “From The Archives”.. I first posted this picture 2 years ago. ❤️ the red and the simplicity of the print. If you have attended one of my zoom block printing workshops, you may recognize the shapes? Super simple, yet mixed together they make such a fun modern print.
.
.
#marchmeetthemaker #mmtm #isew #haberdashery #isewbags #pdfpattern #surfacedesigners #haberdasheryfun #haberdasheryfunclasses #zoomclasses #learntoblockprint #lovetosew #haberdasheryfunpatterns #speedballart
Follow on Instagram

Copyright © 2021 · Klar theme by Crimson Pear :: web & surface design