Haberdashery Fun

  • Home
  • About
    • Look Book
  • Contact
    • Collaborate?
  • Tutorials
  • Shop
    • Email
    • Facebook
    • Instagram
    • Pinterest

Keep up to date with the latest posts!

DIY.. Toy Bath Bag

in Baby, DIY Projects on 27/08/13

Do you have toys at the bottom of your tub? Shoved in the corners? I do, every night.  Each morning I bend over to pick up all the little bits before I take my shower or bath… For months I have wanted something to hold all the little toys. Then I realized that I should sew a bath tote!

This was really easy to make. I made a smaller version a few months ago. You can see the post here.  This bath bag is a lot larger so I can fit all the toys.

I used cotton canvas for the outside and waterproof PUL fabric for the interior. This was my first time sewing with PUL fabric.  I wasn’t sure how my machine would react to the PUL, but it was easier than expected. I made the stitch length a little longer and the fabric sewed like a dream!

Materials Needed:

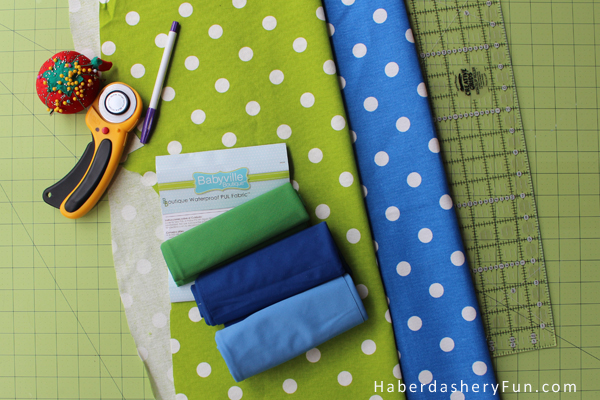
  1. Cotton duck / Cotton canvas fabric – Cotton duck is sturdy and helps give the bag structure. Great for the outside/self
  2. PUL fabric – Waterproof fabric.  This fabric is great for baby products and perfct for the lining! I bought a 3 color pack from a brand called Babyville Boutique at JoAnn Fabric
  3. Rotary cutter
  4. Cutting mat
  5. Quilting / Cutting ruler
  6. Sewing materials – pins, thread, sewing machine
  7. Disappearing ink pen
  8. Iron and ironing board

Before we get started, here are a few things to consider:

  1. Pattern size – You will need to cut 2 rectangles 23″ x 13″.  Your strap will be 1 3/4″ x 10″
  2. Lining Pattern – I didn’t make the lining piece smaller, but I really should have. I’m too lazy to do it.. The lining was a bit large for the self.  If you cut the same size rectangles, make sure to sew the lining sides seams with a 1/8″ larger SA
  3. Pins and PUL – Pin in the seam allowance or along the stitch line. The pins will make holes in the back/waterproof side of the fabric
  4. Iron and PUL – I didn’t realize until after I was finished, but you can iron PUL fabric. However do NOT touch the waterproof side with your iron. Use steam to press the wrinkles out

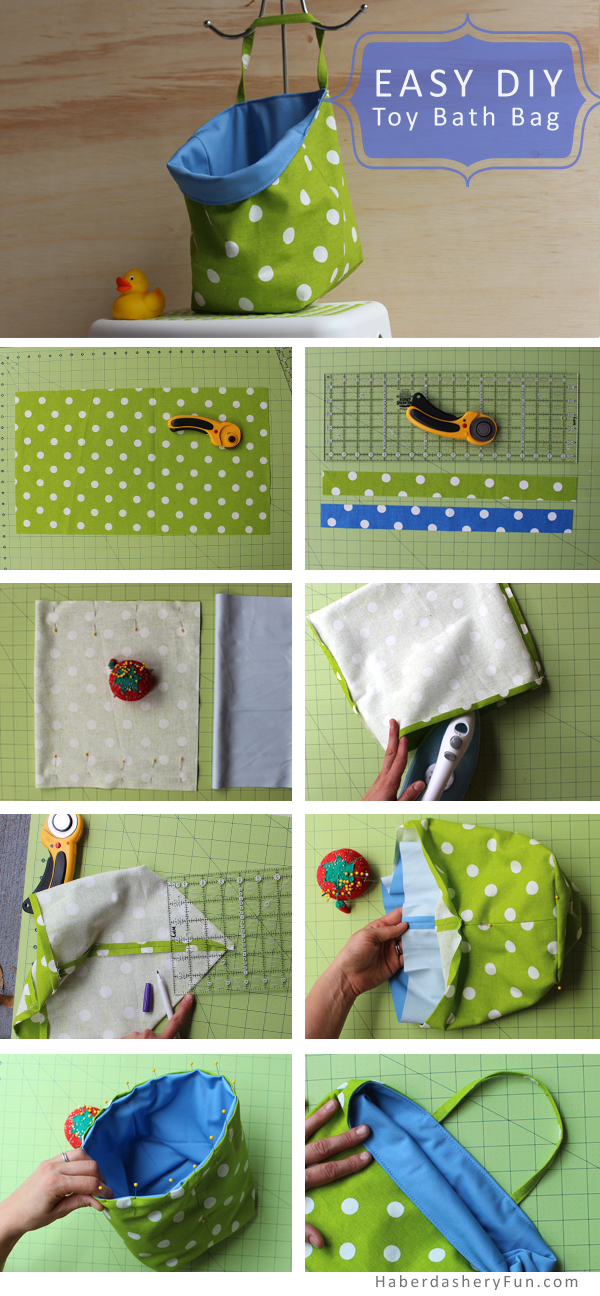
Alright let’s get sewing:

  1. Cut your self and lining pieces using your rotary cutter
  2. While you are cutting your main pattern pieces, also cut your strap
  3. Fold both rectangles in half. Pin along side seam. When you fold the PUL fabric in half, do not pin!  The pins will make holes. If you need to pin, pin in the SA.  Place into sewing machine and sew with a 1/4″ SA. Press the seams
  4. Turn the self right side out. Turn down the top edge 1/4″ and press
  5. Twist the bottom of the bag.  Jiggle it around so that your side seams are laying flat and facing upwards. You should have a point.  Using your creative grids ruler – measure 3″ down from the point and draw a line.  You also want a 45 degree angle along the side. Be as precise/finicky as you can. Place into your sewing machine and stitch along the line. While you sew this line, also sew your strap. I have an awesome strap tutorial and you can see it here
  6. Turn the cotton duck right side out and leave the lining right side in. Place the lining into the cotton duck. Match the corners and side seams. Pin in place. This will help hold the bags togther
  7. Roll the lining top edge down and pin the top edge. Insert strap ends into place and pin. My finished strap was 8″ long. Note that you only have a strap on 1 side
  8. Place into sewing machine. Topstitch along the top edge

Not sure how you would hang this in your bathroom or shower area? I found these awesome clear suction cups at The Container Store. I used 2 and you can adjust them up/down or anyway needed!

That’s it.. Happy Sewing!

Related Posts Plugin for WordPress, Blogger...

22 Comments

« DIY.. Pillowcases and Zig Zag Trim
DIY.. Straps, Straps and Straps! »

Comments

  1. Laraine says

    August 28, 2013 at 4:55 pm

    Awesome bag that will substantially hold stuff. I really love the colors you have chosen, attract attention from small eyes, and easy to throw into like a basketball net

    Reply
  2. Melissa says

    September 8, 2013 at 9:17 am

    Cute! Pinned this.

    Reply
  3. Janell says

    September 21, 2013 at 3:59 pm

    I am always looking for something to store the kid’s bath toys. This would be perfect! I found your site on Tater Tots and Jello. Thanks for the tutorial!

    Reply
  4. Megan @ HOmemade Ginger says

    September 23, 2013 at 10:27 pm

    I love this! What a genius idea. Thanks for linking up at the Ginger Jamboree!

    Reply

Trackbacks

  1. DIY.. Straps, Straps and Straps | Haberdashery Fun says:
    August 30, 2013 at 9:56 am

    […] rubber duckies!  It was super easy to sew, if you want to check it out, you can see the tutorial here.  So far we have used it almost every night. It has been fun making a game out of cleaning up the […]

    Reply
  2. Sew a bath toy bag with this featured tutorial! | Go To Sew says:
    September 6, 2013 at 6:00 am

    […] this age old problem with this fantastic Bath Toy Bag tutorial from Haberdashery Fun! The toys will be tucked away tidily and you’ll be able to shower without injuring your […]

    Reply
  3. Tutorial: Bath toy bag | Sewing Patterns says:
    September 8, 2013 at 3:33 am

    […] a a waterproof PUL lining.  A handle hangs it from a towel rack or the handles of your bathtub.  Go to her tute to see how to make […]

    Reply
  4. {Reader Tutorial} Make A Toy Bath Bag - And Sew We Craft says:
    September 15, 2013 at 2:01 pm

    […] Click here for the full tutorial! […]

    Reply
  5. Tell Me Tuesday! says:
    September 17, 2013 at 12:01 am

    […] Loaf – The First Year Blog Pillow Dolls – Him & Her//Toy Bath Bag – Haberdashery Fun// Diamond Baby Quilt – Persia Lou Why Don’t You Just Quit? – Starting […]

    Reply
  6. DIY Toy Storage Ideas | The Budget Decorator says:
    February 18, 2014 at 11:17 pm

    […] Haberdashery Fun has a complete step by step tutorial for how to sew these cute DIY toy bath bags! […]

    Reply
  7. Top 10 DIY Baby Gear says:
    February 28, 2014 at 5:20 pm

    […] DIY project and photo credit to haberdasheryfun.com  […]

    Reply
  8. Top 5 Baby Tutorials | Haberdashery Fun says:
    August 12, 2014 at 11:18 am

    […] Toy Bath Bag: […]

    Reply
  9. How to store and organize your kids bath toys | Parent Guide says:
    January 19, 2015 at 6:55 am

    […] DIY Bath Toy Bag – Create your own bath toy bag with this easy to follow guide. Gorgeous pictures and simple instructions. […]

    Reply
  10. DIY Toy Storage Bags says:
    May 2, 2015 at 11:03 pm

    […] DIY…..Toy Bath Bag […]

    Reply
  11. Top 10 DIY Baby Gear | Viseem says:
    August 6, 2015 at 8:01 pm

    […] via haberdasheryfun.com  […]

    Reply
  12. Stacy’s Top Picks DIY Baby Gear | Stacy's Club says:
    August 6, 2015 at 8:10 pm

    […] via haberdasheryfun.com  […]

    Reply
  13. DIY Baby Bib Trio | Haberdashery Fun says:
    December 23, 2015 at 3:09 pm

    […] to sew more baby items? Check out my tutorial for an on the go changing pad, bath toy bag and a great tutorial on appliquéing this baby bib [ plus a burp […]

    Reply
  14. Make Your Own Bath Toy Holder | D.I.Y Woodworking Plans says:
    May 11, 2016 at 12:41 pm

    […] DIY.. Toy Bath Bag […]

    Reply
  15. 15 Delightful DIY Toy Storage Ideas - Little Red Window says:
    May 12, 2016 at 11:03 am

    […] Bath Toy Bag from Haberdashery Fun […]

    Reply
  16. Sew Heart Shaped Baby Burp Cloths | Haberdashery Fun says:
    July 21, 2016 at 6:02 pm

    […] Bath Toy Bag […]

    Reply
  17. How to Store and Organize Your Kids Bath Toys | Parent Guide says:
    June 18, 2018 at 5:02 am

    […] DIY Bath Toy Bag […]

    Reply
  18. DIY.. Toy Bath Bag - Every Thing Home says:
    February 7, 2020 at 9:48 pm

    […] Source […]

    Reply

Leave a Reply Cancel reply

Your email address will not be published. Required fields are marked *

This site uses Akismet to reduce spam. Learn how your comment data is processed.

About me


Hi there - I'm Marni Weaver. A sewer, a sometimes quilter and a lover of fabric design. I started this blog to share my ideas. Come Join the Fun
shop now

Popular Categories

project for baby fabric projects seasonal projects fat quarter projects sewing tips and tricks inspiration

Categories

  • Applique
  • Baby
  • Bags and Pouches
  • Color
  • DIY Projects
  • Fabric
  • Fabric Design
  • Fat Quarter Projects
  • Home Decor
  • Inspiration
  • Just for Fun
  • Kids
  • No Sew
  • Patterns
  • Print On Fabric
  • Quilting
  • Scrap Fabric Projects
  • Seasonal
  • Sewing Tips & Tricks

Lovely sponsors

Recent Comments

  • Make Nine in 2021 – Sew, Bake, Snap on DIY.. Reversible Fabric Storage Bin
  • 26 Diy placemats ideas - Perfect Table Setting on DIY.. Heart Shaped Placemats Tutorial For Sew Mama Sew
  • More Free Tote Patterns | on Reversible 1 Hour Tote Pattern
  • Collapsible Kraft-Tex Bowl on DIY.. Collapsible Fabric Bowls
  • Haberdashery Fun on DIY.. Reversible Fabric Storage Bin

Projects Elsewhere

find me on Pellon Projects sew mama sew contributor

momtastic contributor

Pinterest

Visit Marni@Haberdashery Fun's profile on Pinterest.
Follow on Bloglovin

I'm Reading

  • Cluck Cluck Sew
  • Cooking Dangerously
  • In Color Order
  • Jen Hewitt
  • Jolly Jabber
  • Karly Spalding Photography
  • Leigh Laurel Studios
  • Lindsay Sews
  • Lotta Jansdotter
  • Love Patchwork and Quilting Magazine
  • Made
  • Making It Lovely
  • Noodle-Head
  • Polka Dot Chair
  • Sharon Holland Designs
  • Silhouette America Blog
  • Silhouette Design Store
  • The Purl Bee
  • The Purple Fig

Press:

Stitch Winter 2014

haberdashery_fun

I made the most glorious little Kraft-tex journal I made the most glorious little Kraft-tex journal cover over the holidays.  Not only do I love the color of the month for December (blue turquoise), but the texture of my journal is like aged leather and looks durable and rugged. Did you know Kraft-tex is actually paper??? My cover was simple to make and is just one rectangular piece of Kraft-tex, folded over at the ends and topstitched. Thats it.❤️

You can check @ctpublishing for other projects and more info.
.
.
.
#haberdasheryfun #haberdasheryfunpatterns #krafttex #krafttexuniversity #krafttexstyle #ctpublishing #isew #isewlation
Highlights from 2020. Glad it’s complete. Upward Highlights from 2020. Glad it’s complete. Upward and onward. What are you creating for the year ahead? Here’s to making 2021 a creative, fun, adventurous and graceful year.
What a fun class! Thank you to the participants in What a fun class! Thank you to the participants in my first zoom block printing class. It was an amazing group of people coming together with a common goal - sharing their love of print and pattern design.

My hubby snapped a few pictures during the workshop. I’m normally a “hider outer”, but thought this was a perfect opportunity to say Hi.  Even if it is looking down and away from the camera. 🤪

I will be hosting another block printing zoom workshop mid January. Come one come all. DM or email me for details.
.
.
.
#coffeewithhaberdasheryfun #blockprintingworkshop #zoomclass #pdfpattern #haberdasheryfun #haberdashery 
#blockprint #blockprinting #isew #fabricdesign #surfacepatterndesign #zoomsewingclass #zoomdesignclass
You’ve printed some fabric.. now what?? Build or You’ve printed some fabric.. now what?? Build or buy a frame and make yourself some easy wall art = ✔️

Want to learn how to block print? Grab a cup of coffee, a few supplies and join me for a free zoom class this Sunday, Dec 13th at 11am ( Eastern Time Zone ).

Check my recent blog post for the supply list. If you want to come and just hang out and watch, that’s ok too. DM or email me for details.
.
.
#haberdashery #blockprint #coffeewithhaberdasheryfun #PDF 
#isew #haberdasheryfun #curvyzipperpouch #fabricdesign 
#surfacedesign #haberdasheryfunpatterns #creativehappylife
Want to learn how to block print? I’m hosting a Want to learn how to block print? I’m hosting a free zoom class and the supply list is now up on my blog. You can DM me or send an email to marni@haberdasheryfun.com to join this free class. Click on the link in my bio to go to my blog.

Sunday, December 13 at 11am Est time zone.

.
#haberdashery #haberdasheryfun #blockprinting #pdfpattern #haberdasheryfunpatterns #coffeewithhaberdasheryfun #fabricdesign #blockprint
Follow on Instagram

Copyright © 2021 · Klar theme by Crimson Pear :: web & surface design