Haberdashery Fun

  • Home
  • About
    • Look Book
  • Contact
    • Collaborate?
  • Tutorials
  • Shop
    • Email
    • Facebook
    • Instagram
    • Pinterest

Keep up to date with the latest posts!

DIY.. Make A Daycare Mesh Pouch

in DIY Projects, Fabric on 24/07/13

A few weeks ago, my husband requested that I design mesh daycare pouches. He was tired of sending our son’s second batch of clothing to daycare in zip lock bags.  While we really like zip lock bags in our house, my husband thought it was time to send the clothing in a nice little bag. And he said, isn’t this the perfect opportunity for a “project”!?

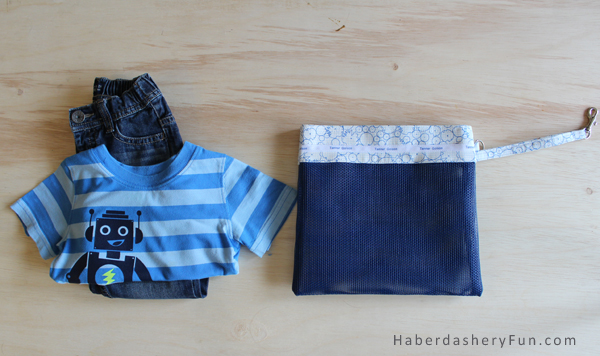
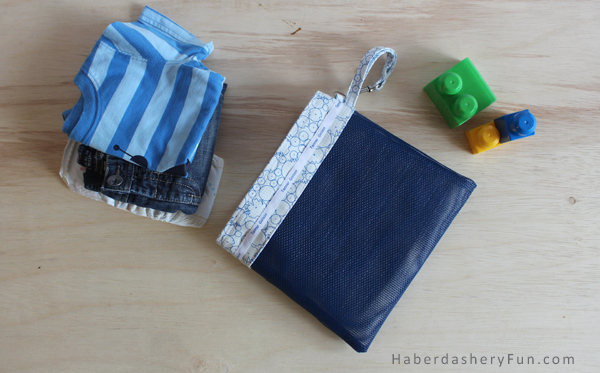
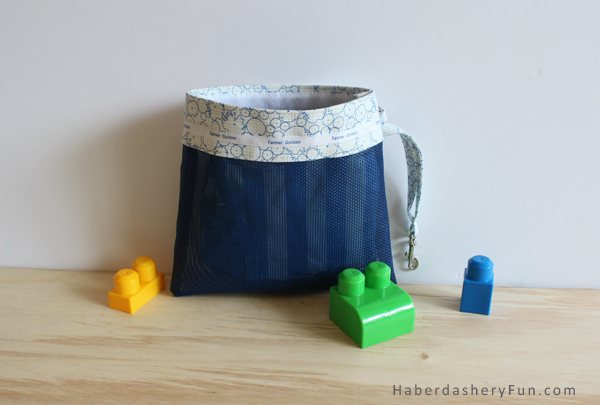
The finished pouch holds a pair of toddler pants, t-shirt and a diaper. My husband was very excited when he saw the finished product. He said that the the diaper bag was now OUT and that the pouch was IN – this was his new carry all.  He then requested that I make another one – a mini fanny pack version for our baby to wear and carry his own stuff.  Ha, we”ll see about that one.

Pouches4 600px

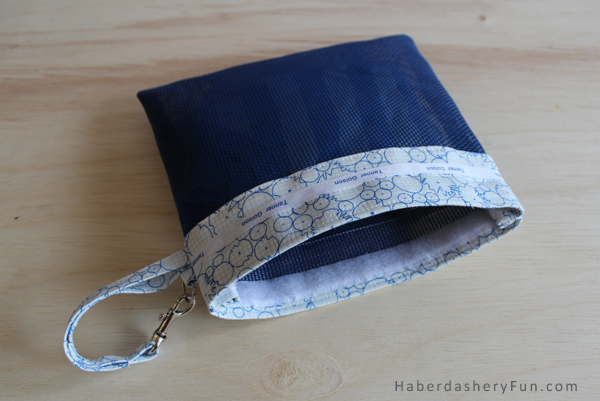
My favorite part of the pouch is the name tape that I added across the front. I bought this at Namemaker – this is just a strand of uncut iron on labels.  I have wanted to incorporate Tanner’s name tape into a project for awhile now.  Make sure to check out the Namemaker website – labels, labels galore. I already have a new idea in mind.

Before we get started, here is some basic info:

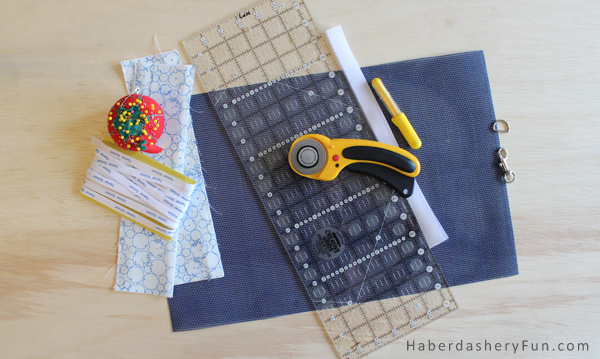
You will need to make the pattern for your pouch. Don’t worry, they are super easy to make. I found it was easist to draft the pattern right on the mesh and fabric using my Chaco lining pen and then cut it down to size with my rotary cutter.  You will need to make the following pattern pieces, the measurements include SA:

  1. Mesh – main pattern piece. Draw a rectangle 18″ x 11 3/4″
  2. Fabric trim – 3″ x 11 3/4″ [ also cut 2 pieces of cotton duck or interfacing]
  3. Straps – 1 3/4″ x 20″

Materials Needed:

  1. Fabric
  2. Interfacing or cotton duck
  3. Mesh
  4. Velcro
  5. Iron on labels / uncut
  6. Clip and D ring
  7. Clover Chalco pen
  8. Olfa rotatary cutter and mat
  9. Thread, pins, scissors
  10. Pens, paper and ruler
  11. Sewing machine
  12. Iron and ironing board

Ready to sew? Here are the 8 easy steps:

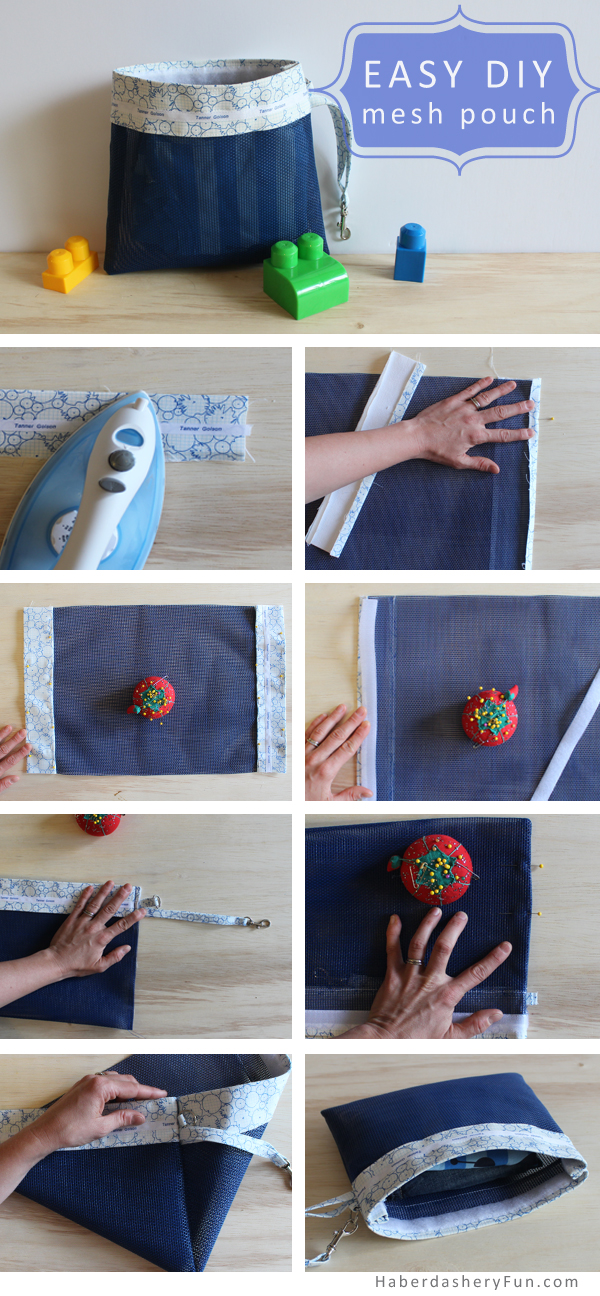
  1. Cut your fabric.  Fabric trim – fold under the SA at each end. 1/2″ for the top edge and 1/4″ for the bottom edge. Press with an iron.  If you bought the name tape, iron this into place. You may need to stitch the tape into place
  2. Place the trim around the mesh ends. The 1/2″ SA will cover the top raw edge.
  3. Pin in place. Fold under the 1/4″ SA and pin.  Place into your sewing machine and edgestitch down
  4. Turn over to back side. Place velcro down – you will need to cover the raw edge of the fabric with each velcro strip. Pin each in place and then stitch down. Note to self – you want to make sure that you cover enough of the fabric raw edge [at least 1/4″] and also to really secure the velcro down. I made a previous clear pouch  for a friend and her child loved playing with the pouch. Over time, he gave the pouch a “wear and resistance” test and pulled the top area apart!
  5. Sew your straps. I have an awesome strap making tutorial here.  Once you have completed the straps, insert your D Ring end and the clip end into the side seam near the fabric trim. You will sew the side seams with a french seam. Start with wrong sides togther, sew with a 1/4″ SA. Make sure to backstitch and really secure your ends
  6. Turn right sides together and finger press the side seam. You want to catch all the SA in your second seam, so stitch this seam with a large enough SA. I used a 3/8″ SA. Batchstitch at each end
  7. You have finished 1 side seam
  8. Sew a french seam for the other side – turn the pouch back to wrong sides togther and repeat. You are finished!

I’d love to hear if you make this pouch or something similar. As always, please contact me with any questions or comments.

Happy Sewing!

Related Posts Plugin for WordPress, Blogger...

5 Comments

« Sew A Summer Totebag In 8 Easy steps
Fat Quarter Love »

Comments

  1. Jonie says

    July 27, 2013 at 10:20 am

    I like the name label tape part of this. Very clever.

    Reply
  2. Patricia says

    August 1, 2013 at 11:01 pm

    This is really neat. I saw your other post on the vinyl pouches. I like the idea of mesh. Where did you buy it? Is it hard to sew with?

    Reply
    • Haberdashery Fun says

      August 2, 2013 at 11:09 pm

      Hi. Thanks for stopping by. The mesh was really easy to work with. I found the mesh at a small independent sewing shop. Seattle Fabrics [.com] sells mesh. Try checking them out. Let me know how it goes, I think you will really like sewing with it 🙂

      Reply

Trackbacks

  1. Tutorial: Mesh daycare pouch to hold a change of clothes | Sewing | CraftGossip.com says:
    July 26, 2013 at 10:34 am

    […] Marni from Haberdashery Fun made this mesh zippered pouch to carry an extra change of clothes to her son’s daycare, and she shares a tutorial showing how she made it.  It’s a vast improvement over the large plastic baggie that they had been using!  The bag is big enough to hold a pair of toddler pants, a shirt, and a diaper.  It’s labeled with her son’s name – she used a length of uncut label tape stitched across the top.   Go to her blog to get the how-to. […]

    Reply
  2. Tutorial: Mesh daycare pouch to hold a change of clothes | Sewing Patterns says:
    July 27, 2013 at 6:20 am

    […] Marni from Haberdashery Fun made this mesh zippered pouch to carry an extra change of clothes to her son’s daycare, and she shares a tutorial showing how she made it.  It’s a vast improvement over the large plastic baggie that they had been using!  The bag is big enough to hold a pair of toddler pants, a shirt, and a diaper.  It’s labeled with her son’s name – she used a length of uncut label tape stitched across the top.   Go to her blog to get the how-to. […]

    Reply

Leave a Reply Cancel reply

Your email address will not be published. Required fields are marked *

This site uses Akismet to reduce spam. Learn how your comment data is processed.

About me


Hi there - I'm Marni Weaver. A sewer, a sometimes quilter and a lover of fabric design. I started this blog to share my ideas. Come Join the Fun
shop now

Popular Categories

project for baby fabric projects seasonal projects fat quarter projects sewing tips and tricks inspiration

Categories

  • Applique
  • Baby
  • Bags and Pouches
  • Color
  • DIY Projects
  • Fabric
  • Fabric Design
  • Fat Quarter Projects
  • Home Decor
  • Inspiration
  • Just for Fun
  • Kids
  • No Sew
  • Patterns
  • Print On Fabric
  • Quilting
  • Scrap Fabric Projects
  • Seasonal
  • Sewing Tips & Tricks

Lovely sponsors

Recent Comments

  • Make Nine in 2021 – Sew, Bake, Snap on DIY.. Reversible Fabric Storage Bin
  • 26 Diy placemats ideas - Perfect Table Setting on DIY.. Heart Shaped Placemats Tutorial For Sew Mama Sew
  • More Free Tote Patterns | on Reversible 1 Hour Tote Pattern
  • Collapsible Kraft-Tex Bowl on DIY.. Collapsible Fabric Bowls
  • Haberdashery Fun on DIY.. Reversible Fabric Storage Bin

Projects Elsewhere

find me on Pellon Projects sew mama sew contributor

momtastic contributor

Pinterest

Visit Marni@Haberdashery Fun's profile on Pinterest.
Follow on Bloglovin

I'm Reading

  • Cluck Cluck Sew
  • Cooking Dangerously
  • In Color Order
  • Jen Hewitt
  • Jolly Jabber
  • Karly Spalding Photography
  • Leigh Laurel Studios
  • Lindsay Sews
  • Lotta Jansdotter
  • Love Patchwork and Quilting Magazine
  • Made
  • Making It Lovely
  • Noodle-Head
  • Polka Dot Chair
  • Sharon Holland Designs
  • Silhouette America Blog
  • Silhouette Design Store
  • The Purl Bee
  • The Purple Fig

Press:

Stitch Winter 2014

haberdashery_fun

I made the most glorious little Kraft-tex journal I made the most glorious little Kraft-tex journal cover over the holidays.  Not only do I love the color of the month for December (blue turquoise), but the texture of my journal is like aged leather and looks durable and rugged. Did you know Kraft-tex is actually paper??? My cover was simple to make and is just one rectangular piece of Kraft-tex, folded over at the ends and topstitched. Thats it.❤️

You can check @ctpublishing for other projects and more info.
.
.
.
#haberdasheryfun #haberdasheryfunpatterns #krafttex #krafttexuniversity #krafttexstyle #ctpublishing #isew #isewlation
Highlights from 2020. Glad it’s complete. Upward Highlights from 2020. Glad it’s complete. Upward and onward. What are you creating for the year ahead? Here’s to making 2021 a creative, fun, adventurous and graceful year.
What a fun class! Thank you to the participants in What a fun class! Thank you to the participants in my first zoom block printing class. It was an amazing group of people coming together with a common goal - sharing their love of print and pattern design.

My hubby snapped a few pictures during the workshop. I’m normally a “hider outer”, but thought this was a perfect opportunity to say Hi.  Even if it is looking down and away from the camera. 🤪

I will be hosting another block printing zoom workshop mid January. Come one come all. DM or email me for details.
.
.
.
#coffeewithhaberdasheryfun #blockprintingworkshop #zoomclass #pdfpattern #haberdasheryfun #haberdashery 
#blockprint #blockprinting #isew #fabricdesign #surfacepatterndesign #zoomsewingclass #zoomdesignclass
You’ve printed some fabric.. now what?? Build or You’ve printed some fabric.. now what?? Build or buy a frame and make yourself some easy wall art = ✔️

Want to learn how to block print? Grab a cup of coffee, a few supplies and join me for a free zoom class this Sunday, Dec 13th at 11am ( Eastern Time Zone ).

Check my recent blog post for the supply list. If you want to come and just hang out and watch, that’s ok too. DM or email me for details.
.
.
#haberdashery #blockprint #coffeewithhaberdasheryfun #PDF 
#isew #haberdasheryfun #curvyzipperpouch #fabricdesign 
#surfacedesign #haberdasheryfunpatterns #creativehappylife
Want to learn how to block print? I’m hosting a Want to learn how to block print? I’m hosting a free zoom class and the supply list is now up on my blog. You can DM me or send an email to marni@haberdasheryfun.com to join this free class. Click on the link in my bio to go to my blog.

Sunday, December 13 at 11am Est time zone.

.
#haberdashery #haberdasheryfun #blockprinting #pdfpattern #haberdasheryfunpatterns #coffeewithhaberdasheryfun #fabricdesign #blockprint
Follow on Instagram

Copyright © 2021 · Klar theme by Crimson Pear :: web & surface design