Haberdashery Fun

  • Home
  • About
    • Look Book
  • Contact
    • Collaborate?
  • Tutorials
  • Shop
  • Freebie
  • Block Printing Course
    • Email
    • Facebook
    • Instagram
    • Pinterest

Keep up to date with the latest posts!

DIY.. Colorful vinyl pouches

in DIY Projects, Fabric on 13/05/13

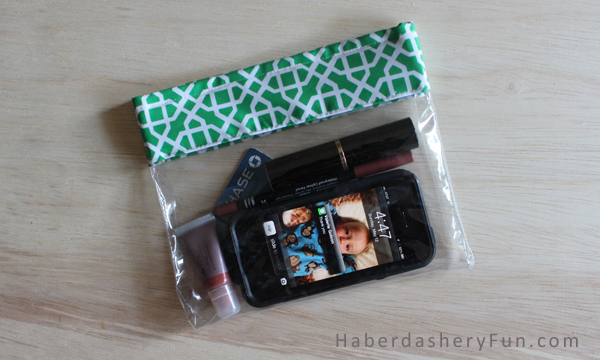
My friend Sue uses a zip lock bag as a clutch when she goes out.  It holds all her stuff – phone, cards, lipgloss..  Everyone gets a real kick out of it.  When a few friends were recently out with her, they took pictures of her holding the ziplock and texted me saying..  Look someone else uses a zip lock like YOU DO!!  Sadly, this is true.

While shopping in Knoxville, TN last month, I stumbled upon super cute clear vinyl pouches.  They came in a few sizes and I could visualize all the uses…  It made me think of my friend Sue. I knew right away that I wanted to attempt to make one for her.

You will have to make the pattern. Don’t worry, it is just a few straight lines..

I wanted the pouch to be small enough to fit in a jacket pocket, yet still carry the “essentials”. To get the right size little pouch, I traced off a 2 lines – the top of the bag and a perpendicular line to keep everything square. I then placed everything on top of the drafting paper – cell phone, credit cards and make up.

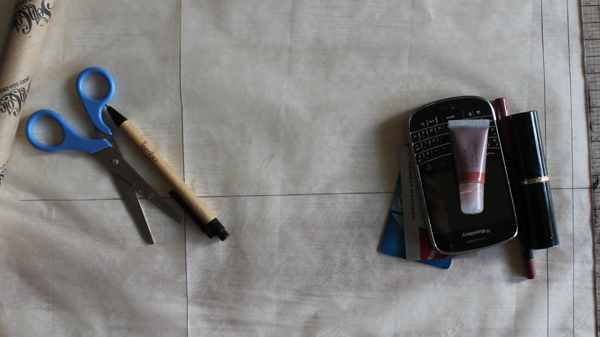
I pulled the paper over everything and made a few marks. I wanted to get the length and width of the pouch.

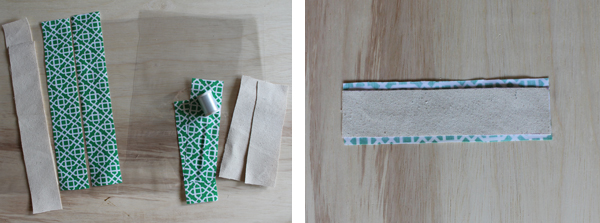
I came up with the following pattern pieces and measurements:

  1. Main pouch- to be cut in clear vinyl – 13.5″ x 9″
  2. Facing – to be cut in colorful laminated fabric – 2.5″ x 9″
  3. Facing backing – to be cut in cotton canvas – 2″ x 8.5″ [ This gives the laminated fabric some strength]

Note – these measurements include seam allowances

Materials needed:

  • Clear vinyl – either a 12 or 16 gauge
  • Clear or regular thread
  • Laminated fabric
  • Cotton duck
  • Velcro – at least 9″
  • Scissors, paper scissors, pens, ruler
  • Paper for pattern
  • Sewing machine

Here are the easy steps to creating your pouch:

Cut your material:

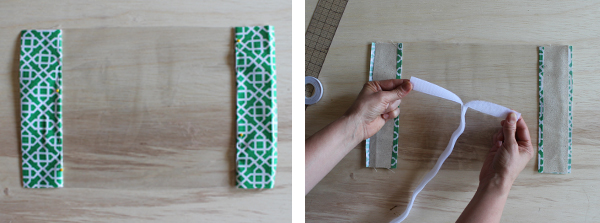
  1. Main pouch – cut 1 piece from the clear vinyl
  2. Facing – cut 2 pieces of the laminated fabric
  3. Backing – cut 2 pieces from the cotton canvas. Note that the backing pieces are 1/2″ smaller  than the facing pieces

The facing piece should be right side down.  Place the backing in the middle.

Turn 1 side of the laminated fabric edge 1/4″ towards the backing. Finger press.  Right side up,  now place the facing on top of the vinyl.  Pin down along where your stitch would be.  Edge stitch along the bottom of the facing.

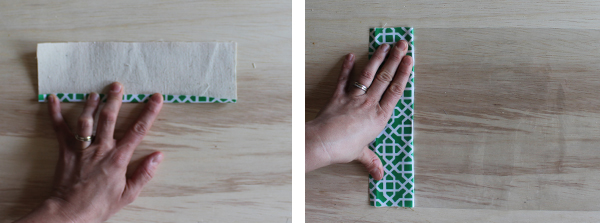
Repeat for the other side. This completes the bottom of the facing.

Prepare your velcro.  Cut to 9″.  Turn your project so that it is facing rightside down.

Open velcro and place 1 on each side of your project.

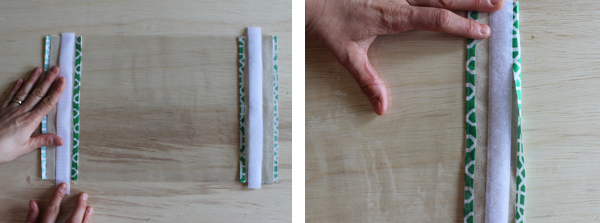
Velcro placement – make sure you can turn the top edge of the laminated fabric 1/4″ and place it UNDER the velcro. Pin velcro down.  Sew the velcro along the top and bottom edges. Repeat for the other side. This completes the facing top edge.

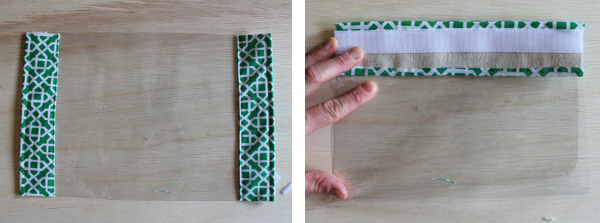
Place right sides together, matching at the top edge. Sew with a 1/4″ seam allowance down both sides. Remember to backstitch, especially at the top.

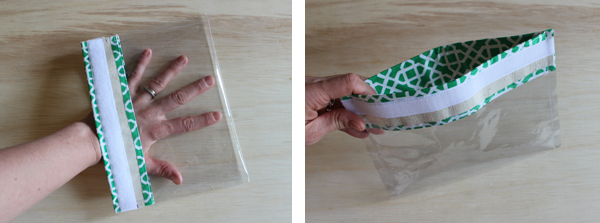
Gently pull and turn the inside out.  You want the rightside of the laminated fabric to now face the outside. This might take some wiggling. Carefully work the corners out and then finger press the side seams to lay flat. Voila –  You now finished your little pouch! Applause.

Now that you have conquered making this cute pouch – try making other sizes by adjusting the pattern. You can also make the same pouch out of any material – mesh, rip stop, cotton.

If you have any questions or comments, please feel free to contact me. I would love to hear your fedeback on working with vinyl!  I also love seeing images of your projects..

Happy Sewing!

20 Comments

« DIY.. Heart Shaped Sachets
A Few Tips On Sewing With Vinyl »

Comments

  1. Alyssa says

    05/13/2013 at 9:48 pm

    I like these. A larger size would be great for on the go baby products!

    Reply
  2. Sara says

    05/13/2013 at 10:24 pm

    These are so adorable!

    Reply
  3. Kaely says

    05/16/2013 at 3:00 pm

    I’m finishing up my new diaper bag now and was trying to dream up how to make ‘bags’ or ‘pouches’ to hold all the necessary things I will need with two toddlers and an infant 🙂 These are perfect and i have vinyl already! I will say I’m going to try them without the clear thread, I’ll sew them with the seams on the outside then use a home-made biased tape on the edges so i can make them out of what I already have! I’ll try to remember to post back on how it goes!

    Reply
    • Haberdashery Fun says

      05/22/2013 at 8:44 pm

      Hi Kaely- Thanks for dropping by! I look forward to seeing your finished pouches. I like the idea of bias tape on the edges and using colored thread instead of the clear thread. I would love to see images if you can send when you are finished 🙂

      Reply
  4. Nala says

    05/19/2013 at 12:11 pm

    These are great! I have wanted to make pouches and wasn’t sure what material to use. Vinyl it is!

    Reply
  5. Sandy K says

    06/29/2013 at 1:33 pm

    I can see these bags will take off fast. Every one needs to corral all of the little things your carry around. The little bags would be easy to take from one purse and add to another and still keep track of what your have.

    Reply
    • Haberdashery Fun says

      06/29/2013 at 7:54 pm

      Hi – Thanks so much for stopping by! The bags are super fun and easy to make. Let me know if you make any and I would love to see images.

      Reply
  6. doreen says

    04/20/2014 at 12:17 pm

    What a cute and practical idea. This can be made in so many different sizes to hold items when you are out on the go. I’m pinning. I’m making 🙂 Now following you, too. I used to sew everything years ago, and want to get back into it. Thanks for inspiring me.

    Doreen

    Reply
    • Haberdashery Fun says

      04/20/2014 at 1:49 pm

      Hi Doreen. Thank you. They are great. I’m in the works for making a double-sided version and hope to post this week. These pouches are great gifts – I made a bunch for my friends and now their friends want some as well 🙂

      Reply
  7. Perles de Lune says

    07/24/2014 at 9:16 am

    Great idea and excellent tutorial! These are so fun and so quick to sew, I’ve become addicted…
    Here’s my version: http://perleslune.blogspot.fr/2014/07/premier-vinyl.html

    Reply
    • Haberdashery Fun says

      07/24/2014 at 9:48 am

      Wow – Thank you so much for sharing your pictures! Love the fabric you selected and your pouches look great!!

      Reply

Trackbacks

  1. Sewing with vinyl.. A few tips | Haberdashery Fun says:
    05/16/2013 at 11:27 am

    […] made these adorable clear, plastic pouches and shared them on my blog on Monday.  I had a blast and can’t wait to make more pouches to carry and organize all my […]

    Reply
  2. Quick tips on sewing with laminated fabric | Haberdashery Fun says:
    05/24/2013 at 12:19 pm

    […] was in Napa last weekend for a girls trip and brought a few of my clear vinyl pouches  to give out to a some of the Moms.  I thought they would like them for their diaper bags […]

    Reply
  3. Gym Bag Tutorial – Finished & Key Fob | Bailey Marie and Me says:
    06/22/2013 at 9:46 am

    […] And there’s others too that I just cant think of. But don’t be discouraged! I absolutely love this bag. Right now I pack my changes of clothes and gym outfits in ziploc bags, and want to have a more nature-friendly/cuter option so I am planning to make these from Haberdashery Fun: […]

    Reply
  4. Vinyl Pouch Tutorial | Bailey Marie and Me says:
    06/23/2013 at 10:47 am

    […] based my bags off of this tutorial, but modified it SLIGHTLY based on the materials I had and what I wanted to […]

    Reply
  5. DIY.. Make A Daycare Mesh Pouch | Haberdashery Fun says:
    07/24/2013 at 10:26 am

    […] the fabric raw edge [at least 1/4"] and also to really secure the velcro down. I made a previous clear pouch  for a friend and her child loved playing with the pouch. Over time, he gave the pouch a […]

    Reply
  6. Product Review.. "Perfect Shape" Template Paper | Haberdashery Fun says:
    12/31/2013 at 9:17 am

    […] it. At first, I really didn’t know what I would use it for. Then I remembered my post on vinyl pouches and how difficult it was to trace and then cut my pattern pieces on the clear vinyl.   Aghhh.. […]

    Reply
  7. DIY... Make A Vinyl and Fabric Cosmetic Pouch | Haberdashery Fun says:
    01/08/2014 at 11:39 am

    […] If you want to see other projects I made with vinyl, click here for my mini jewelry roll and here for my velcro zipper […]

    Reply
  8. DIY.. Double Sided Vinyl Pouch | Haberdashery Fun says:
    04/24/2014 at 6:49 am

    […] made a version of this pouch before and use it all the time.  Clear vinyl rocks – I love how easy it is to see all my stuff […]

    Reply
  9. DIY.. Top 5 Vinyl Sewing Projects | Haberdashery Fun says:
    10/14/2014 at 9:31 am

    […] Colorful Vinyl Pouches […]

    Reply

Leave a Reply Cancel reply

Your email address will not be published. Required fields are marked *

This site uses Akismet to reduce spam. Learn how your comment data is processed.

About me


Hi there - I'm Marni Weaver. A sewer, a sometimes quilter and a lover of fabric design. I started this blog to share my ideas. Come Join the Fun
shop now

Popular Categories

project for baby fabric projects seasonal projects fat quarter projects sewing tips and tricks inspiration

Categories

  • Applique
  • Baby
  • Bags and Pouches
  • Block Printing
  • Color
  • DIY Projects
  • Fabric
  • Fabric Design
  • Fat Quarter Projects
  • Home Decor
  • Inspiration
  • Just for Fun
  • Kids
  • No Sew
  • Patterns
  • Print On Fabric
  • Quilting
  • Scrap Fabric Projects
  • Seasonal
  • Sewing Tips & Tricks

Lovely sponsors

Recent Comments

  • Easy Little Kid Sewing Project | Haberdashery Fun on DIY.. Make Monster Inspired Face Cloths
  • Easy Little Kid Sewing Project | Haberdashery Fun on DIY.. Easy Toddler Apron
  • HaberdasheryFun and an easy Kraft-tex sewing project | Haberdashery Fun on Collapsible Kraft-Tex Bowl
  • HaberdasheryFun and an easy Kraft-tex sewing project | Haberdashery Fun on Sewing With Kraft-Tex
  • 3 Simple Summer Sewing Tutorials | Haberdashery Fun on Sew A Canvas Zipper Pouch

Projects Elsewhere

find me on Pellon Projects sew mama sew contributor

momtastic contributor

Pinterest

Visit Marni@Haberdashery Fun's profile on Pinterest.
Follow on Bloglovin

I'm Reading

  • Cluck Cluck Sew
  • Cooking Dangerously
  • In Color Order
  • Jen Hewitt
  • Jolly Jabber
  • Karly Spalding Photography
  • Leigh Laurel Studios
  • Lindsay Sews
  • Lotta Jansdotter
  • Love Patchwork and Quilting Magazine
  • Made
  • Making It Lovely
  • Noodle-Head
  • Polka Dot Chair
  • Sharon Holland Designs
  • Silhouette America Blog
  • Silhouette Design Store
  • The Purl Bee
  • The Purple Fig

Press:

Stitch Winter 2014

haberdashery_fun

Marni Weaver
Block and paper print from Saturday’s workshop. Block and paper print from Saturday’s workshop. This was a fun workshop to lead. Such an awesome group with great questions and engagement. Many new friends to follow here on IG❤️

Thank you to everyone who signed up or attended a workshop this Spring. 

I love teaching about simple shapes. It really is eye opening when you start deconstructing a repeat pattern into super simple shapes!

My block printing made easy online class starts today with module 1 out now. It will be offered again this August. More workshops and details to come. 

#haberdasheryfun #blockprintingmadeeasy #simpleshapes #surfacepattern #surfacepatterndesign #memademay2023 #100dayproject #100dayproject2023 #easycarve #haberdasheryfunclasses
One more, one more.. I had so much fun, I’m offe One more, one more.. I had so much fun, I’m offering one more workshop for the spring season.

This Saturday, May 20th @ 10am est. Come join the fun!

I love teaching the basics to block printing using simple shapes. Feel like you can’t draw? thats ok, I have a guided worksheet that we use. 

If you cant make the workshop and want a deep dive into block printing, my online course starts this Monday, May 22. It’s a 3 week adventure with self paced video modules, worksheets and Saturday Live Q&As

Link in profile has details for the free workshop and my course.

#haberdasheryfun #blockprintingmadeeasy #simpleshapes #memademay2023 #blockprintingsimpleshapes #surfacepatterndesign #100dayproject #100dayproject2023 #memademay #konacotton #konacottonsolids
Sharing a few simple blocks from the last few week Sharing a few simple blocks from the last few weeks of workshops. I had a blast teaching these workshops. So I am now considering adding one more workshop this week. Should it be daytime or in the evening? I would love to hear your thoughts.

TBD on date and time, will share more details here and a sign up page in the next few days.

#blockprinting #blockprintingmadeeasy #haberdasheryfun #haberdasheryfunpatterns #surfacepatterndesign #memdemay2023 #100dayproject2023 #100dayptoject #haberdasheryfunclasses #printwithspeedball
What a fun workshop yesterday. Thanks to all who j What a fun workshop yesterday. Thanks to all who joined and gave their  time and energy. We had participants from South Africa to Austria to Canada and here in the US. I love it b/c I am from Alberta Canada and live in Atlanta.

My workshops are only an hour and we have alot to accomplish.. but I love hearing where are from and what they are up to! 

We even had a brief appearance from the cutest 11mos old ❤️🎉 

I played with the same shape the last 3 workshops and had fun seeing what could be made with the half moon shape. Now what yo do next?? Sew something or have fun with them in illustrator 

#haberdasheryfun #haberdasheryfunpatterns #onlineclasses #blockprintingmadeeasy #memademay2023 #100dayproject #100dayproject2023 #surfacepatterndesign #blockprintedfabric #konacotton #konacottonsolids
I’m hosting one last workshop this week. Come jo I’m hosting one last workshop this week. Come join in for some fun creating block prints with simple shapes. 

Can’t draw? Don’t feel inspired or imaginative?? That’s ok. I promise block printing can be fun and easy.

Sign up details in the link in my profile. See you Wednesday ❤️

#haberdasheryfun #blockprintingmadeeasy #haberdasheryfunpatterns #zoomclasses #surfacepatterndesign #memademay2023 #100dayproject #blockprinting #fabricdesign #fabricdesigner #blockprinted
Follow on Instagram

Copyright © 2023 · Klar theme by Crimson Pear :: web & surface design

Copyright © 2023 · Klar on Genesis Framework · WordPress · Log in