Haberdashery Fun

  • Home
  • About
    • Look Book
  • Contact
    • Collaborate?
  • Tutorials
  • Shop
  • Freebie
  • Block Printing Course
    • Email
    • Facebook
    • Instagram
    • Pinterest

Keep up to date with the latest posts!

DIY.. Quilted Color Pop Zipper Pouch

in Bags and Pouches, DIY Projects on 09/09/14

Color Pop Quilted Pouch Main

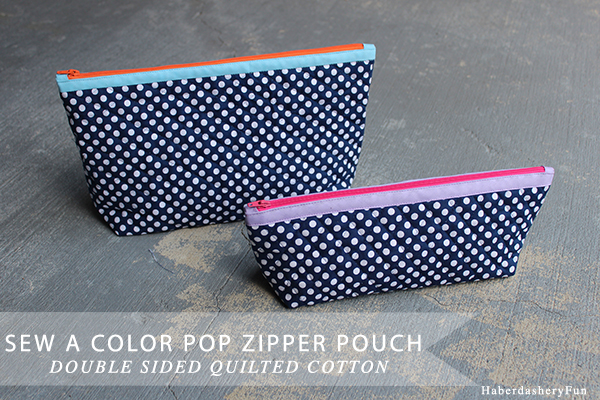
Last week I finally had a few spare moments to sit down and think. I gathered all my bias tape and zippers and came up with this tutorial.  I love finding unique fabric, colorful trim, a fun notion or doo-dad and combining them all in different ways.

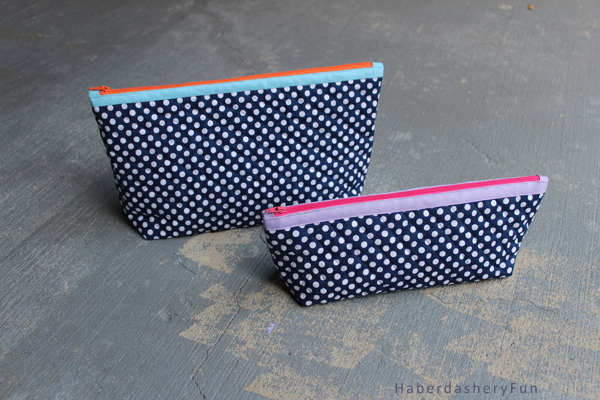
There are a few great things about this pouch. #1. LOTS of color #2. It is super easy to sew AND #3.. You don’t need to add lining. Not adding lining is my favorite part. The fabric is already quilted. It is a double sided quilted cotton from Riley Blake Designs.  I was part of their blog hop last July and asked for way too much fabric. I’ve had extra in my stash begging to be used. I love that you just bind the seams and are good to go.
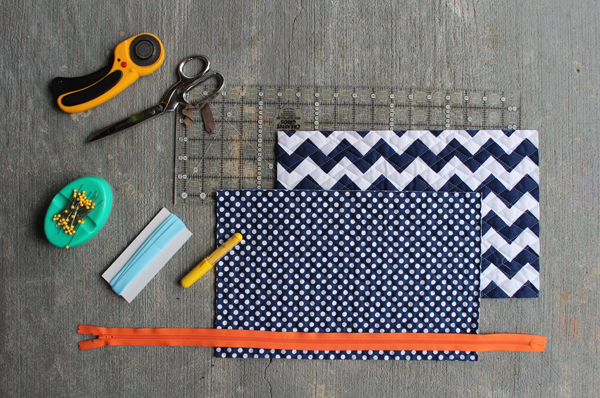
Materials:

  1. Double sided quilted cotton fabric – check out Riley Blake Designs
  2. Zipper
  3. Bias tape – I used Wrights 1/2″ double fold bias tape
  4. Sewing supplies
  5. Rotary cutter, mat and quilting ruler – check out Creative Grids 
  6. Disappearing fabric pen or chalk pen – I love using the Clover Chaco Liner
  7. Sewing machine
  8. Iron and ironing board

Before we get started, you need to cut your fabric. Below are the dimensions for 2 sizes:

  1. Small pouch – cut 2 rectangles measuring 13″L x 6.5″W
  2. Large pouch – cut 2 rectangles measuring 14″L x 9″W
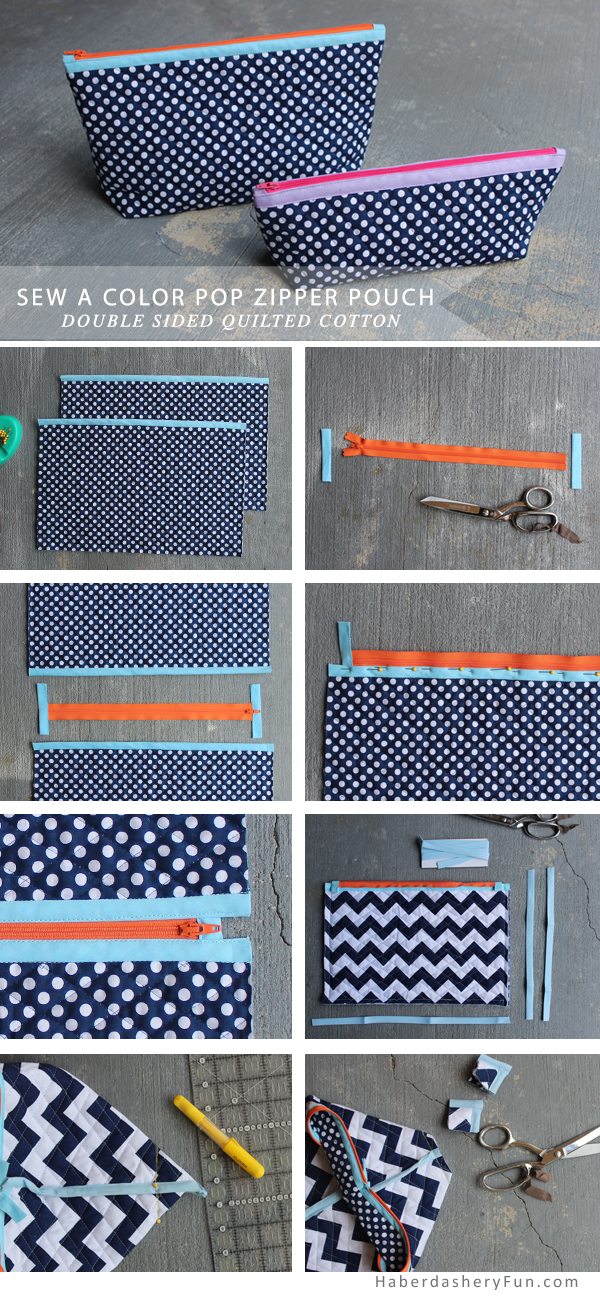
Color Pop Quilted Pouch

Let’s get sewing:

  1. Cut 2 pieces of bias tape the length of your fabric. Leave a 1/2″ at each end. Cover the raw edge with the bias tape and sew. Make sure the bias tape is sewn to the long end of each rectangle.
  2. Cut your zipper to size. Cut the zipper 1 1/2″ shorter than the length of the rectangle [13″]. Cut 2 pieces of bias tab for the tab at each end. Cover the ends with the tape. I wrote a tutorial that will help this on Momtastic. Click here to see the tab step in more detail.
  3. Lay the zipper under the bias tape. Center the zipper. There should be 3/4″ at each end. Stitch in place.
  4. Lay the other rectangle on top of the zipper. Repeat as step above.
  5. Fold in half along the zipper. Right sides facing each other. Pin at side seams. Place into sewing machine and stitch the sides together with a 1/2″ seam allowance. Open the zipper and then sew the bottom edge together with the 1/2″ seam allowance.
  6. Cut the bias tape to the length of the side seam. Leave a little extra for wiggle room. Cover the raw edges. Repeat for the bottom edge.
  7. Pinch and wiggle the side and bottom seams to lay on top of each other.  Make sure there is a 45 degree angle at the side, place the ruler 1 1/2″ from the tip and draw a line with a disappearing fabric pen. Pin. Place into sewing machine and stitch following the line.
  8. Cut off the ends. Bind the edges with bias tape. Turn right side out. Wiggle all corners into place and you are complete.

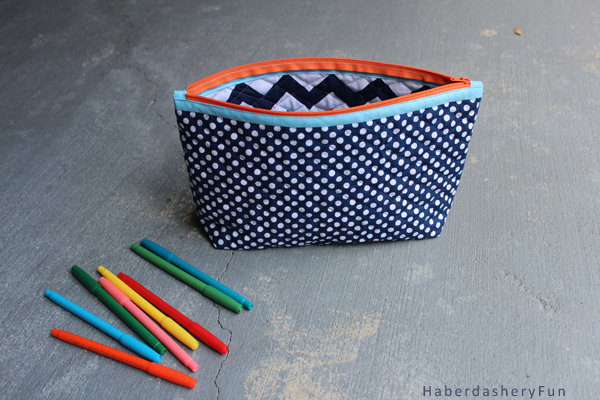
That’s it. Finished sizes are: small pouch is 11 3/4″L x 3″W x  4 1/2″H and the large pouch is 13″ L x 3 5/8″ x  6 3/4″

There are so many options for this guy. I’m surprised at the large size and how useful it is. I hold my sewing stuff in it, but it would also be great for make-up, baby gear or school stuff… And remember that gift giving season is coming up. I promise, any friend, sister or Mom would love to receive this pouch.

That’s it for today. Let me know how it goes. I love hearing from you. If you make a pouch, please come to my Facebook page and share your photos. Also, please come back on Thursday.. I’m working with Jo-Ann fabrics and sharing my Fabric A-Frame Organizer as part of the #SewYourStyle Jo-Ann and Pellon blog hop. I’m pretty excited about this opportunity.

** Please note that this post contains affiliate links. If you purchase a product through the link, I will receive a small commission. I’m sure you will love the product – a zipper, bias tape, chaco liner, etc.. I use these all the time.***

46 Comments

« Inspired By.. Pops of Color
DIY.. A – Frame Organizer »

Comments

  1. Ann says

    09/09/2014 at 8:41 pm

    Sooo cute!!

    Reply
  2. Kate says

    09/10/2014 at 8:02 am

    Love it – I’m nuts about polka dots and colour! Thanks for the how-to.

    Reply
    • Haberdashery Fun says

      09/10/2014 at 10:08 am

      Thanks Kate! I love polka dots as well!

      Reply
  3. Amy W says

    09/10/2014 at 10:51 pm

    Looove how these turned out!

    Reply
  4. Ren says

    09/14/2014 at 8:39 am

    These are fabulous! I’m always a sucker for a good pop of color. And polka dots. It’s a great combo.

    I would love for you to join us and link up at Inspire Us Thursday: Sew Needle Stitch Hook on The Inspired Wren.

    Reply
  5. Corrine says

    09/14/2014 at 9:31 am

    This is awesome! I am pinning it for later!

    Reply
    • Haberdashery Fun says

      09/14/2014 at 1:39 pm

      Thank you for stopping by 🙂

      Reply
  6. Julie says

    09/15/2014 at 10:33 pm

    Wow! What a great tutorial! Please don’t judge the quality of my zippered pouch to harshly. It was made quickly with a two year old destroying the room as I sewed : )!

    Reply
    • Thea says

      02/17/2015 at 11:10 am

      Do you have to use bias tape?

      Reply
  7. Ashley@Biggerthanthethreeofus says

    09/16/2014 at 9:09 am

    Adorable. Pinning! Would love to have you link up with us this morning at the DIY’ers.
    http://biggerthanthethreeofus.com/the-diyers-16/

    Reply
    • Haberdashery Fun says

      09/16/2014 at 9:13 am

      Thanks for stopping by. I would love to link up and will head over now 🙂

      Reply
  8. France says

    09/18/2014 at 4:28 pm

    Using bias to finish the edge along the zipper is an excellent idea! It makes a nice flat border. Thank you for inserting so many pictures into the tutorial. 🙂

    Reply
    • Haberdashery Fun says

      09/18/2014 at 4:38 pm

      Thanks so much for leaving a comment. The pouches are super easy to do and adds such a pop of color. I’m glad you like the images!

      Reply
  9. Emily says

    09/20/2014 at 8:34 am

    so cute! You can never have too many of these pouches ;o) You are featured this weekend at the Create Link Inspire features over at Nap-Time Creations- Emily

    Reply
  10. Cindy G. says

    09/21/2014 at 9:19 am

    These are just adorable! And, I love that you don’t have to sew a separate lining. Just one question… In step one, when you sew the bias tape on the long edge, you’re covering the raw edge, and not just top-stitching it in place, right? That’s what my sewing brain is telling me, but my eyes are debating the fact and I just wanted to be sure.

    I have some gorgeous hand-dyed fabrics, and I’m thinking that I might need to make a little quilt sandwich with them so I can turn them into pouches! It’s an extra step to quilt the fabric myself but I think it would be worth it in the end. Thanks for the inspiration!

    Reply
    • Haberdashery Fun says

      09/21/2014 at 7:29 pm

      Thanks for stopping by Cindy. Yes, you cover the raw edges with the bias tape. Good suggestion – I will revise the step, as covering the raw edges makes more sense. Thank you! 🙂

      Reply
  11. Tori says

    09/22/2014 at 9:01 pm

    So cute Marni!! I love the color pop with the polka dots! I also really love the quilted chevron inside! I’m pinning to my sewing project board:)

    Reply
    • Haberdashery Fun says

      09/23/2014 at 7:41 am

      Thanks Tori. They are super easy to make and I love the no lining option

      Reply
  12. sue says

    10/17/2014 at 12:50 am

    These are very cute! I have some quilted fabric I’d like to use! I see in the pictures that there is bias tape at each end of the zipper but don’t see any mention of this step in the directions. I am just missing it somehow?

    Reply
    • Haberdashery Fun says

      10/17/2014 at 9:35 am

      Hi, Thanks for stopping by. I just looked over my directions and you are right, the bias tape part is kind of vague. Should be in step 1 – lay your rectangles on your work surface. Cover one LONG end of each rectangle with bias tape [meaning cover the raw edge]. Sew bias tape down as desired.

      Hope this helps and let me know how it goes – Marni

      Reply
      • Kathleen says

        10/25/2014 at 5:18 pm

        I think Sue means the short pieces of bias tape that cover the ends of the zipper. I was also wondering about that. What step would it be? Do you sew those down as you sew the rectangles to the zipper?Thanks!

        Reply
        • Haberdashery Fun says

          10/26/2014 at 9:12 am

          Hi Kathleen, Ohhh. gotcha. No, first cut 2 pieces of bias tape about 3-4″ [ these will be tabs that covered each end]. Trim your zipper and then sew one strip to each end. This clean finishes the zipper end. I wrote a tutorial on this over at Momtastic – ti shows the tabs in more detail. Here is the link:

          http://www.momtastic.com/diy/415383-zipper-pouch-bags/

          Let me know if this helps? Plus I’ve started a Flickr group. Please consider joining and adding your project to the group. I’d LOVE to see it 🙂

          Reply
  13. Sara says

    01/04/2015 at 7:10 pm

    What does it look like inside – how do you cover the seams with tape? Do you go all around in one piece or do you do each bit separately?

    Reply
    • Haberdashery Fun says

      01/04/2015 at 11:49 pm

      Hi Sara, The easiest method would be to just wrap the seams with the bias tape, pin and then stitch down. To be really neat – turn and fold the bias tape under at each end to clean finish it. For the inside there are 5 places for the bias tape… #1-2) Each side seam #3) Bottom seam #4-5) Box each corners and then sew the bias tape to each side. That’s it. Let me know how it goes.

      Reply
  14. Thea says

    02/17/2015 at 11:11 am

    Do you have to use bias tape

    Reply
    • Haberdashery Fun says

      02/18/2015 at 9:18 am

      Hi There. No – you can use anything really, it just needs to fold over the raw edge. Try using fabric. I’d love to see finished pictures of your pouch.

      Marni

      Reply
  15. Snazzy Cats says

    05/27/2015 at 9:50 pm

    Hi, love this case is quilting fabric expensive and where could i purchase it as cheaply as possible?

    Reply
    • Haberdashery Fun says

      05/27/2015 at 10:01 pm

      Hi There, Thanks for leaving a comment. You could always quilt you own fabric.. I have a tutorial here – https://haberdasheryfun.com/diy-projects/diy-quilt-your-own-fabric
      I also looked and you can get the Riley Blake double sided quilted fabric online for $15 a yard right now. Check out – https://www.fabric.com

      Let me know how it goes. I would love to see finished images of your pouch 🙂
      Marni

      Reply
  16. Kajin'Kisaï says

    12/05/2015 at 12:52 pm

    J’adore! C’est trop mignon. Bravo!

    Reply
  17. Patterson says

    12/09/2015 at 11:54 pm

    Trying to put mine together now and my zipper doesn’t line up like yours in the picture. I used template and bought a 7″ zipper, however when I put the closer 1/2 from edge on the left, the zipper doesn’t go all the way across. It is about 1/2 ” short. Could you have used a 9″ zipper?

    Reply
    • Haberdashery Fun says

      12/10/2015 at 12:15 am

      Hi there.. Yes, I think your zipper is too short.. Mine was a very long zipper that I trimmed down to size.. If you’ve already sewn the tabs at each end of the 7″ zipper, just adjust the fabric rectangle and make it smaller.. Your pouch will be smaller, but that’s ok.

      For adjusting the size of the rectangle, you want the side of the rectangle where you are placing the zipper to be 1 1/2″ LONGER than the zipper. However, BEFORE you cut your real fabric, test this measurement out on a scrap piece of fabric and see if the length works.. I even use paper towels for this trial and error part. Pin the zipper in place and see if it works.. If it does, you have the right size. Adjust accordingly.

      Let me know if this works and how it goes 🙂
      Marni

      Reply
  18. Mandaryne says

    01/22/2016 at 6:42 pm

    Thank you so muuuch ! <3

    Reply
  19. Nancy says

    03/15/2016 at 5:01 pm

    Thanks so much for this. Made one for my husband with marine themed fabric. Small one fit his headphones with room for ipod. Instructions worked beautifully. Really appreciated your linked zipper tutorial!

    Reply
    • Haberdashery Fun says

      03/15/2016 at 9:17 pm

      HI Nancy,

      Thank you for your comment – it made my day! I appreciate your letting me know and would love to see images of the finished product! Have a great night – Marni

      Reply
  20. Addison says

    03/28/2016 at 5:25 am

    so cute! You can never have too many of these pouches. Do you have to use bias tape?

    Reply
    • Haberdashery Fun says

      04/01/2016 at 10:50 am

      Hi Addison,

      Sorry for the delay in getting back t you. I just had a baby so I am a tad behind in things. For the pouch, you can use anything really, it just needs to be able to fold over and enclose the raw fabric edges..
      Marni

      Reply

Trackbacks

  1. CraftCrave | DigiFree | CraftCrave says:
    09/10/2014 at 1:39 pm

    […] DIY.. Color Pop Zipper Pouch – 1 freebie(s)? […]

    Reply
  2. Tutorial: Color Pop Zipper Pouch – Sewing says:
    09/17/2014 at 10:47 am

    […] Color Pop Zipper Pouch, by Haberdashery Fun […]

    Reply
  3. Do Tell Tuesday, come link up! - Crafty CupboardCrafty Cupboard says:
    09/23/2014 at 12:01 am

    […] love what a fun pop of color the bias tape adds to these Color Pop Zipper Pouches by Haberdashery Fun! The double-sided pre-quilted cotton fabric makes it nice and sturdy too. Love […]

    Reply
  4. 15 Regalos de Navidad Handmade - Skarlett says:
    11/06/2014 at 6:21 pm

    […] Estuche cremallera superior ¿Y este como se hace? […]

    Reply
  5. 100+ Free Zipper Pouch Patterns says:
    11/14/2014 at 6:20 am

    […] 50. Quilted Color Pop Zippered Pouch […]

    Reply
  6. 20 Easy Zipper Pouches To Sew - Sew Delicious says:
    03/16/2016 at 2:28 pm

    […] Quilted Color Pop Zipper Pouch by Haberdashery […]

    Reply
  7. 5 zippered pouch ideas! | Holly McBride Workshop says:
    09/05/2016 at 3:32 pm

    […]  Quilted Color Pop Zippered Pouch by Haberdashery […]

    Reply
  8. 21 DIY Hostess Gifts Perfect For Party Season says:
    11/15/2019 at 2:56 pm

    […] your hostess say goodbye to fumbling through her purse for random things with this super useful zipper pouch to hold her little items. You can even personalize it with a unique print you know she’ll love and […]

    Reply
  9. 21 DIY Hostess Gifts Perfect For Party Season | Shabby Chic Furniture says:
    11/18/2019 at 9:02 pm

    […] your hostess say goodbye to fumbling through her purse for random things with this super useful zipper pouch to hold her little items. You can even personalize it with a unique print you know she’ll love and […]

    Reply
  10. Make Half Square Triangle Pouches says:
    04/13/2020 at 10:57 pm

    […] same for sewing a zipper pouch. I have quite a few tutorials here on my blog and you can see one here and […]

    Reply

Leave a Reply to Haberdashery Fun Cancel reply

Your email address will not be published. Required fields are marked *

This site uses Akismet to reduce spam. Learn how your comment data is processed.

About me


Hi there - I'm Marni Weaver. A sewer, a sometimes quilter and a lover of fabric design. I started this blog to share my ideas. Come Join the Fun
shop now

Popular Categories

project for baby fabric projects seasonal projects fat quarter projects sewing tips and tricks inspiration

Categories

  • Applique
  • Baby
  • Bags and Pouches
  • Block Printing
  • Color
  • DIY Projects
  • Fabric
  • Fabric Design
  • Fat Quarter Projects
  • Home Decor
  • Inspiration
  • Just for Fun
  • Kids
  • No Sew
  • Patterns
  • Print On Fabric
  • Quilting
  • Scrap Fabric Projects
  • Seasonal
  • Sewing Tips & Tricks

Lovely sponsors

Recent Comments

  • Easy Little Kid Sewing Project | Haberdashery Fun on DIY.. Make Monster Inspired Face Cloths
  • Easy Little Kid Sewing Project | Haberdashery Fun on DIY.. Easy Toddler Apron
  • HaberdasheryFun and an easy Kraft-tex sewing project | Haberdashery Fun on Collapsible Kraft-Tex Bowl
  • HaberdasheryFun and an easy Kraft-tex sewing project | Haberdashery Fun on Sewing With Kraft-Tex
  • 3 Simple Summer Sewing Tutorials | Haberdashery Fun on Sew A Canvas Zipper Pouch

Projects Elsewhere

find me on Pellon Projects sew mama sew contributor

momtastic contributor

Pinterest

Visit Marni@Haberdashery Fun's profile on Pinterest.
Follow on Bloglovin

I'm Reading

  • Cluck Cluck Sew
  • Cooking Dangerously
  • In Color Order
  • Jen Hewitt
  • Jolly Jabber
  • Karly Spalding Photography
  • Leigh Laurel Studios
  • Lindsay Sews
  • Lotta Jansdotter
  • Love Patchwork and Quilting Magazine
  • Made
  • Making It Lovely
  • Noodle-Head
  • Polka Dot Chair
  • Sharon Holland Designs
  • Silhouette America Blog
  • Silhouette Design Store
  • The Purl Bee
  • The Purple Fig

Press:

Stitch Winter 2014

haberdashery_fun

Marni Weaver
Block and paper print from Saturday’s workshop. Block and paper print from Saturday’s workshop. This was a fun workshop to lead. Such an awesome group with great questions and engagement. Many new friends to follow here on IG❤️

Thank you to everyone who signed up or attended a workshop this Spring. 

I love teaching about simple shapes. It really is eye opening when you start deconstructing a repeat pattern into super simple shapes!

My block printing made easy online class starts today with module 1 out now. It will be offered again this August. More workshops and details to come. 

#haberdasheryfun #blockprintingmadeeasy #simpleshapes #surfacepattern #surfacepatterndesign #memademay2023 #100dayproject #100dayproject2023 #easycarve #haberdasheryfunclasses
One more, one more.. I had so much fun, I’m offe One more, one more.. I had so much fun, I’m offering one more workshop for the spring season.

This Saturday, May 20th @ 10am est. Come join the fun!

I love teaching the basics to block printing using simple shapes. Feel like you can’t draw? thats ok, I have a guided worksheet that we use. 

If you cant make the workshop and want a deep dive into block printing, my online course starts this Monday, May 22. It’s a 3 week adventure with self paced video modules, worksheets and Saturday Live Q&As

Link in profile has details for the free workshop and my course.

#haberdasheryfun #blockprintingmadeeasy #simpleshapes #memademay2023 #blockprintingsimpleshapes #surfacepatterndesign #100dayproject #100dayproject2023 #memademay #konacotton #konacottonsolids
Sharing a few simple blocks from the last few week Sharing a few simple blocks from the last few weeks of workshops. I had a blast teaching these workshops. So I am now considering adding one more workshop this week. Should it be daytime or in the evening? I would love to hear your thoughts.

TBD on date and time, will share more details here and a sign up page in the next few days.

#blockprinting #blockprintingmadeeasy #haberdasheryfun #haberdasheryfunpatterns #surfacepatterndesign #memdemay2023 #100dayproject2023 #100dayptoject #haberdasheryfunclasses #printwithspeedball
What a fun workshop yesterday. Thanks to all who j What a fun workshop yesterday. Thanks to all who joined and gave their  time and energy. We had participants from South Africa to Austria to Canada and here in the US. I love it b/c I am from Alberta Canada and live in Atlanta.

My workshops are only an hour and we have alot to accomplish.. but I love hearing where are from and what they are up to! 

We even had a brief appearance from the cutest 11mos old ❤️🎉 

I played with the same shape the last 3 workshops and had fun seeing what could be made with the half moon shape. Now what yo do next?? Sew something or have fun with them in illustrator 

#haberdasheryfun #haberdasheryfunpatterns #onlineclasses #blockprintingmadeeasy #memademay2023 #100dayproject #100dayproject2023 #surfacepatterndesign #blockprintedfabric #konacotton #konacottonsolids
I’m hosting one last workshop this week. Come jo I’m hosting one last workshop this week. Come join in for some fun creating block prints with simple shapes. 

Can’t draw? Don’t feel inspired or imaginative?? That’s ok. I promise block printing can be fun and easy.

Sign up details in the link in my profile. See you Wednesday ❤️

#haberdasheryfun #blockprintingmadeeasy #haberdasheryfunpatterns #zoomclasses #surfacepatterndesign #memademay2023 #100dayproject #blockprinting #fabricdesign #fabricdesigner #blockprinted
Follow on Instagram

Copyright © 2023 · Klar theme by Crimson Pear :: web & surface design

Copyright © 2023 · Klar on Genesis Framework · WordPress · Log in