Haberdashery Fun

  • Home
  • About
    • Look Book
  • Contact
    • Collaborate?
  • Tutorials
  • Shop
  • Freebie
    • Email
    • Facebook
    • Instagram
    • Pinterest

Keep up to date with the latest posts!

DIY Freezer Paper Project – 1 Design Into 3 Layouts

in DIY Projects, Print On Fabric on 11/04/13

Have you ever seen a graphic print on a shirt or bag and thought to yourself  “Wow that’s cool – I could make that!”.  I say that to myself all the time.  And I usually also find myself saying .. I could create that for HALF the price!!

I found an Art Nouveau book last weekend and it supplied the creative juice to get the ball rolling on creating a graphic print.  After I developed the print, I thought it would be fun to play with the layout and design size.

I love creating prints on the products I sew.  I would love the option of using a Silhouette machine.. but I don’t own one YET.  So, I usually create the images from freezer paper and fabric ink.

Materials and Inspiration:

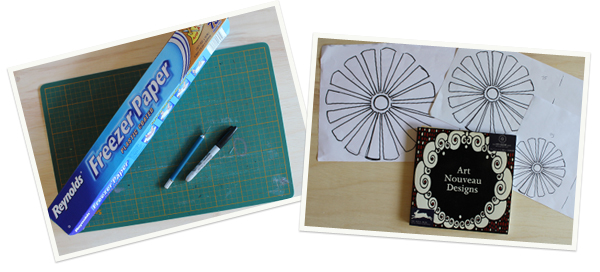
Materials needed – freezer paper, marker or pen, cutting mat, X-Acto knife, paper to draw and fabric.

You can use freezer paper to print onto almost anything.  I made the totebags and strongly suggest you attempt sewing the tote.  However, you can buy blank bags, aprons, t-shirts and pillow cases in craft stores.  If you are looking for a super detailed step by step tutorial on freezer paper printing – check out my DIY Dino post here.

Steps:

I was inspired by the floral images in my Art Nouveau book and hand drew the motif.  I then photocopied and resized the image.

1 large Image – Main Focus Area

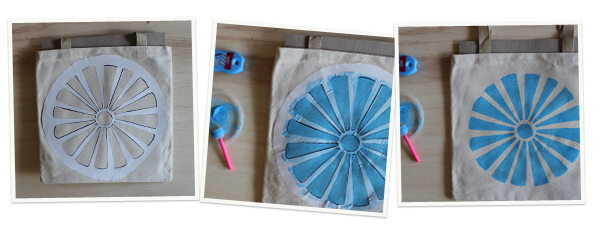
  • Iron the print down onto the fabric. Make sure to lift and press and not pull the iron over your paper. The more delicate the image the more careful you want to be with the iron
  • Dab the sponge into the fabric ink and onto your fabric. Work fairly fast and be consistent with your paint thickness
  • While the ink is still wet, lift and pull the freezer paper off your fabric


2 Smaller Images – Asymmetrical Design

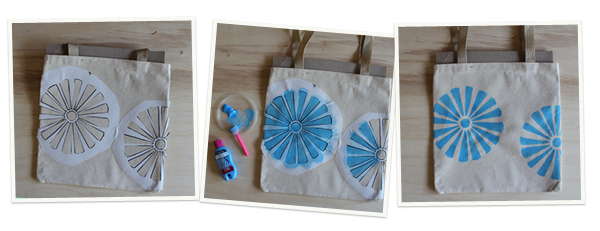
  • It looks great to have an asymmetrical design and place one of the images hanging off the side. Cut off the overhanging paper.  Cut the image borders down in size so you can double check the layout
  • With your newly trimmed edges, make sure you are careful when you paint the fabric. Don’t get over eager like I did and paint OFF the freezer paper and onto your fabric
  • Pull the freezer paper off while still wet


4 Small Images – Quadrant Design

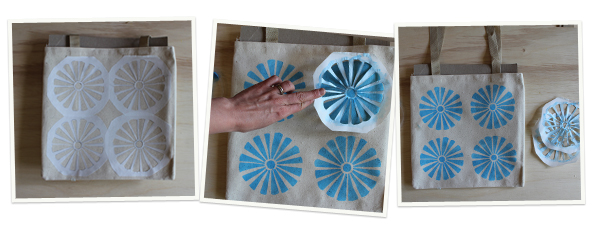
  • Trim down all your image edges. Lay down images
  • Iron down.  With your smaller intricate designs – iron very carefully. Make sure the iron is hot and hold it in one place for a few seconds. You want to certain the freezer paper is adhered
  • Pull off the freezer paper and admire your work!

Have a great day.

Related Posts Plugin for WordPress, Blogger...

12 Comments

« Inspired by Art Nouveau Florals
Color Therapy »

Comments

  1. Savanah says

    04/11/2013 at 8:42 am

    I love this!! Thanks for sharing the tutorial!! Great idea and easy too

    Reply
  2. Laraine Weavr says

    04/11/2013 at 4:18 pm

    I love the design, reminds me of shasta daisies in summer. So festive and a terrific design for pillows, and fabric designs, to make pictures for wall hangings. Thanks

    Reply
  3. Marie says

    04/11/2013 at 9:58 pm

    To answer your question, YES, this happens to me all the time. I walk by something and think, I can do that! Who is selling this for $50 or whatever and then I never end up doing it. BUT I feel a little more confident after reading this. Although, I have one question, well I’m more in need of clarification.

    So I just iron the freezer paper directly onto the bag? That seems weird but then again, I’m not a DIY person so I just want to be sure. I really want to try this on the weekend!

    Thanks,
    Marie

    Reply
    • Haberdashery Fun says

      04/12/2013 at 9:48 pm

      HI – yes, just draw your design onto the freezer paper [matte side]. Cut out the design using an X-acto knife and then iron the paper down [matte side up/shiny side down] onto the fabric. It will stick! I promise. After the paper is applied – using a sponge apply the fabric ink to the open areas and then peel the paper off. It works!

      Reply
  4. Carla Malin says

    04/12/2013 at 12:20 am

    These bags are amazing. I can’t decide which one I like best. I’m sure if I followed your instructions perfectly, mine would still end up looking about half as good yours. But it’s worth a shot!

    Reply
  5. Paula Thompson says

    04/12/2013 at 7:59 pm

    Super fun idea, Ive never heard of using freezer paper before. I use stencils all the time but like the idea of ironing on the paper, you’d probably get less leakage this way. Great project I’ll put it in my book of to do’s.

    Reply
    • Haberdashery Fun says

      04/13/2013 at 12:20 pm

      Hi – yes. it is super easy and you can print your own fabric this way.. pillows, curtains.. anything!

      Reply
  6. Jody Sowa says

    04/13/2013 at 11:46 am

    Super cute idea, I think they would be great as recyclable grocery bags, you could decorate with a lemon or other “grocery” type themes … love it!

    Reply
    • Haberdashery Fun says

      04/13/2013 at 12:19 pm

      Awesome idea for a grocery bag.. Thank you for the comment!

      Reply
  7. Sarah Jane says

    04/13/2013 at 9:44 pm

    Love this! This is the perfect market bag.. The colors are great – I’m making this tomorrow!

    Reply
  8. Katie Goldsworthy says

    06/06/2013 at 8:08 am

    That turned out really cute! I need to take a try with freezer paper! Thanks for linking it up at Monday Funday!

    Reply

Trackbacks

  1. DIY.. Mini Book Tote and Journal Cover | Haberdashery Fun says:
    09/17/2013 at 4:05 pm

    […] your “design”. For additional info on freezer printing, check out my tutorials here and here. Trace your design onto the freezer paper.  Cut out the design and iron onto the face of the […]

    Reply

Leave a Reply to Haberdashery Fun Cancel reply

Your email address will not be published. Required fields are marked *

This site uses Akismet to reduce spam. Learn how your comment data is processed.

About me


Hi there - I'm Marni Weaver. A sewer, a sometimes quilter and a lover of fabric design. I started this blog to share my ideas. Come Join the Fun
shop now

Popular Categories

project for baby fabric projects seasonal projects fat quarter projects sewing tips and tricks inspiration

Categories

  • Applique
  • Baby
  • Bags and Pouches
  • Block Printing
  • Color
  • DIY Projects
  • Fabric
  • Fabric Design
  • Fat Quarter Projects
  • Home Decor
  • Inspiration
  • Just for Fun
  • Kids
  • No Sew
  • Patterns
  • Print On Fabric
  • Quilting
  • Scrap Fabric Projects
  • Seasonal
  • Sewing Tips & Tricks

Lovely sponsors

Recent Comments

  • 3 Simple Summer Sewing Tutorials | Haberdashery Fun on Sew A Canvas Zipper Pouch
  • 3 Simple Summer Sewing Tutorials | Haberdashery Fun on Sew Asymmetrical Color Block Totes Tutorial
  • 3 Simple Summer Sewing Tutorials | Haberdashery Fun on Sew A Baby Towel With A Hood
  • Make A Simple Block Print Tote Bag | Haberdashery Fun on DIY.. Colorful Dish Towel Tote Bags
  • Make A Simple Block Print Tote Bag | Haberdashery Fun on Sew Asymmetrical Color Block Totes Tutorial

Projects Elsewhere

find me on Pellon Projects sew mama sew contributor

momtastic contributor

Pinterest

Visit Marni@Haberdashery Fun's profile on Pinterest.
Follow on Bloglovin

I'm Reading

  • Cluck Cluck Sew
  • Cooking Dangerously
  • In Color Order
  • Jen Hewitt
  • Jolly Jabber
  • Karly Spalding Photography
  • Leigh Laurel Studios
  • Lindsay Sews
  • Lotta Jansdotter
  • Love Patchwork and Quilting Magazine
  • Made
  • Making It Lovely
  • Noodle-Head
  • Polka Dot Chair
  • Sharon Holland Designs
  • Silhouette America Blog
  • Silhouette Design Store
  • The Purl Bee
  • The Purple Fig

Press:

Stitch Winter 2014

haberdashery_fun

Block Printing
A homemade block printed pouch is perfect for camp A homemade block printed pouch is perfect for camping trips. Holds essentials for the campsite, swimming and the beach. 

Are you a sewer?? My blog has tons of pouch tutorials. See the link in profile and click Blog- sewing.

#haberdashery #blockprinting #blockprintingmadeeasy #100dayofsimpleshapes #speedballfabricink #haberdasheryfunpatterns #haberdasheryfun #blockprintmadeeasy #isew #sewingtutorials Day 33/100
A big hello to everyone new around here. Thank you A big hello to everyone new around here.
Thank you for stopping by ❤️🎉

Did you know that along with all my block printing that I also sew? I have had a sewing blog for 10 years. If you are new to sewing or looking for tips and tricks, I’ve got the spot for you.

Head to the link in my profile and click sewing tutorials - blog. I even have a tutorial for this cross body tote over on my blog. 

#haberdasheryfun #haberdasheryfunpatterns #isewbags #surfacepatterndesigner #blockprintingmadeeasy #100daysofsimpleshapes #100dayproject #dothe100dayproject #haberdasheryfunonlineclasses #konacotton #canvasbags #speedballfabricink #simpleshapesarefun #blockprintmadeeasy
I’m back in my favorite Toronto kitchen so had t I’m back in my favorite Toronto kitchen so had to take a few block print photos. Continuing on with my simple prints theme and playing around with the heart block.

#haberdasheryfunpatterns #blockprinted #100daysofsimpleshapes #speedballfabricink #100daysproject #dothe100dayproject #blockprintedfabric #100daysofblockprinting #blockprintmadeeasy #blockprintingmadeeasy #100daysofsimpleprints #blockprintedfabric #haberdasheryfun Day 32/100
Happy Monday! We are back from vacation and I am s Happy Monday! We are back from vacation and I am still cruising thru my “simple circle” blockprint theme. This one is my favorite of the last group. Swipe to see it’s companions.

What are you working on?

#haberdasheryfun #haberdasheryfunpatterns #speedballink #100dayproject2022 #dothe100dayproject2022 #surfacedesigncommunity #surfacepatterndesign #handmadestamp #blockprintfabrics #blockprintedfabric #100daysofsimpleshapes #blockprintingmadeeasy #blockprintingmadesimple #fatquarterprojects #fatquarterproject #konacottonsolids #konacottons 

Day 31/100
Instagram post 18239908753108863 Instagram post 18239908753108863
Follow on Instagram

Copyright © 2022 · Klar theme by Crimson Pear :: web & surface design

Copyright © 2022 · Klar on Genesis Framework · WordPress · Log in