Haberdashery Fun

  • Home
  • About
    • Look Book
  • Contact
    • Collaborate?
  • Tutorials
  • Shop
  • Freebie
    • Email
    • Facebook
    • Instagram
    • Pinterest

Keep up to date with the latest posts!

DIY.. Tradeshow Badge Holder

in DIY Projects, Scrap Fabric Projects on 03/09/13

I attend alot of tradeshows.  At the end of the week, I am attending Surf Expo in Orlando, Florida. There will be apparel, accessories and footwear exhibitors in outdoor categories like resort, surf, swim and skate.  My company will be exhibiting for the first time and I am really looking forward to it.

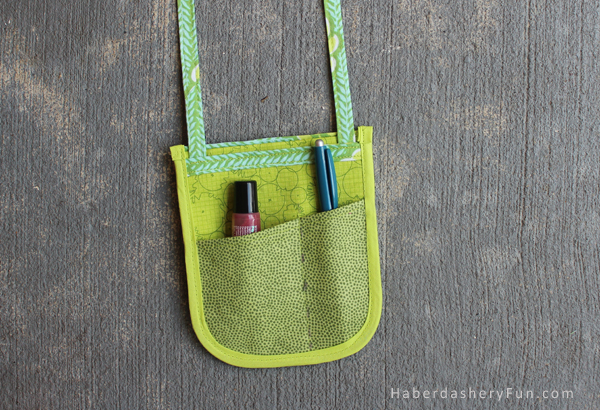
Tradeshows always give their attendees ugly, plastic, generic badge holders…So I thought it would be fun to make one to wear. Here is my easy DIY and how to make a whimiscal and colorful badge holder.

I was inspired by the outdoors and nature, so I incorporated different greens and floral themes into the holder.

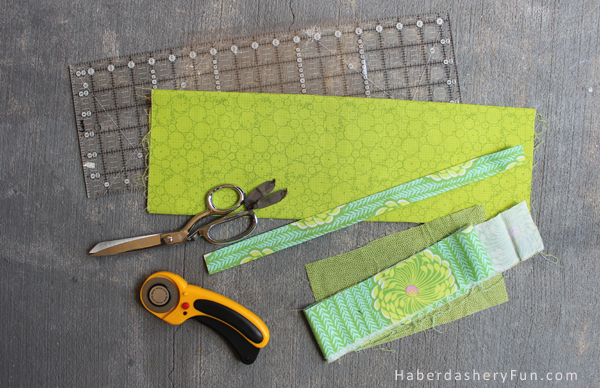
The materials you will need:

  1. Fabric scraps – at least 3 colors
  2. A small piece of vinyl
  3. Fusible Interfacing – Pellon SF101 Shape-Flex always works great. This gives light weight cotton just enough structure
  4. Binding – store bought or home-made
  5. Sewing supplies – thread, pins, measureing tape, scissors, sewing machine
  6. Rotary cutter and cutting mat
  7. Drafting supplies – pens, tracing paper, ruler
  8. Iron and ironing board
  9. Wonder Tape – optional

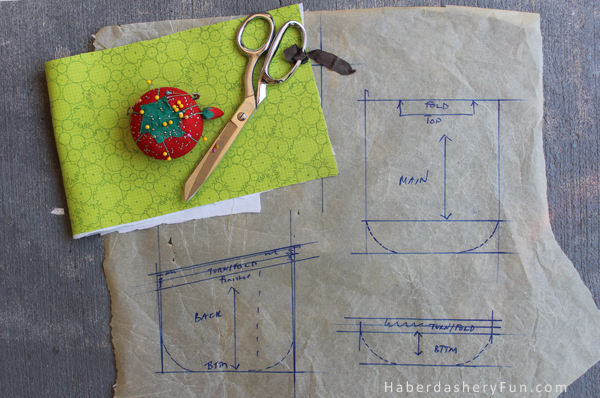
I had an old and super ugly badge holder from a previous tradeshow and used it for inspiration. I knew what I was looking to make, so I sat down and drafted the pattern pieces.  If you chose to make one for yourself, envision a very large business card holder with a clear vinyl front to hold your name badge.  On the back, you can make slots to hold tradeshow essentials – business cards, pen, lipgloss and money/credit cards.

Before we get started, here are a few things to consider..

  1. Sewing with vinyl can be tricky. For the last steps and sewing the binding down, hold onto the thread tails and and gently guide/push the holder trhough. Having enough thread to hold onto has really worked well for me
  2. Sewing the binding onto the vinyl wasn’t easy!! I googled how to sew binding and found tutorials on how to sew binding without “cursing”!!  I second guessed myself here.. until I placed small pieces of wonder tape under the binding to hold it to the vinyl. Hello. Easy.

Alright, let’s get started..

  1. You will be working with fabric scraps, so make sure to have large enough pieces for the main and back piece. The front piece is placed on the fold. Fuse both the main and back piece and then cut everything out. Make sure to cut a long piece of fabric for your straps [ approx 40″ L]
  2. Lay everything out to give an idea of how you will stack them togther.
  3. Turn down edges and and iron. This will clean finish the edges. While you are ironing, develop your strap. Check out here for my easy strap making tutorial
  4. Assemble the front.  Place pieces onto vinyl and sew down. Remember to have long thread tails to hold onto.. vinyl will be much easier to work with
  5. Assemble the back.  If you made slots, mark for pen pocket. Pin in place. Place into your sewing machine and topstitch down. At this, it is also a good idea to edgesitch around the back. This will hold the pocket down and help later when sewing on the binding..
  6. Strap placement. Cut a piece of the strap, so you can insert the straps under and have them the ends covered
  7. Pin each strap down. Place into your sewing machine and edgestitch top and bottom
  8. Cut binding to size.  Pin down in place. Roll the top edge to clean finish. Place into your sewing machine and stitch around the outside edge. As noted above, the perfect trick – cut and adhere small pieces of wonder tape.  Note: At the time of taking my pictures, I couldn’t decide on the binding color..Hence the 2 sets of binding. I sat with it for a few hours and decided on the lighter lime green.

I used 3 different fabrics for my holder. The straps are made from Amy Butler  and the main piece was made from Carolyn Friedlander.  I love love LOVE these fabric designers!!

Well, that’s it for today. Happy sewing.

Related Posts Plugin for WordPress, Blogger...

6 Comments

« DIY.. Straps, Straps and Straps!
Inspired by Zakka »

Comments

  1. gina says

    09/03/2013 at 9:28 pm

    Hey! I love this. I wish I could sew. I’ve tried learning several times-I just don’t have the patience for it. Or, I’m not that good. ha! Thanks for stopping by and leaving a comment 🙂

    Reply
  2. rob jackson says

    09/04/2013 at 5:01 pm

    AWESOME and cute at the same time. i do alot of trade shows and have lots of helpers and ideas like this catch peoples [ clients / buyers] eyes. you tend to remember the seller / booth holders name and it increases sales while giving a notch above in presence.

    well done….i will take 50 !!!!

    Reply
  3. Maurice says

    09/04/2013 at 5:02 pm

    great project! I like the drawings too.

    Reply
  4. Orla says

    09/05/2013 at 7:01 pm

    This is great. My brother attends the Comic Con shows and is an exhibitor.. This would be great to make for him, but it a comic/yet manly colored way! Great tutorial. Pretty easy to follow

    Reply

Trackbacks

  1. DIY.. Make a Tradeshow Badge Holder | Addicted 2 Fun: Interesting Pictures, Inspiration , Quotes & Content that Matters! says:
    04/10/2014 at 11:57 pm

    […] Attending a tradeshow or conference? Make a one of a kind badge holderTo Learn “DIY.. Make a Tradeshow Badge Holder” DIY Crafts click here […]

    Reply
  2. DIY.. Top 5 Vinyl Sewing Projects | Haberdashery Fun says:
    10/14/2014 at 9:30 am

    […] Trade Show Badge Holder […]

    Reply

Leave a Reply Cancel reply

Your email address will not be published. Required fields are marked *

This site uses Akismet to reduce spam. Learn how your comment data is processed.

About me


Hi there - I'm Marni Weaver. A sewer, a sometimes quilter and a lover of fabric design. I started this blog to share my ideas. Come Join the Fun
shop now

Popular Categories

project for baby fabric projects seasonal projects fat quarter projects sewing tips and tricks inspiration

Categories

  • Applique
  • Baby
  • Bags and Pouches
  • Block Printing
  • Color
  • DIY Projects
  • Fabric
  • Fabric Design
  • Fat Quarter Projects
  • Home Decor
  • Inspiration
  • Just for Fun
  • Kids
  • No Sew
  • Patterns
  • Print On Fabric
  • Quilting
  • Scrap Fabric Projects
  • Seasonal
  • Sewing Tips & Tricks

Lovely sponsors

Recent Comments

  • 3 Simple Summer Sewing Tutorials | Haberdashery Fun on Sew A Canvas Zipper Pouch
  • 3 Simple Summer Sewing Tutorials | Haberdashery Fun on Sew Asymmetrical Color Block Totes Tutorial
  • 3 Simple Summer Sewing Tutorials | Haberdashery Fun on Sew A Baby Towel With A Hood
  • Make A Simple Block Print Tote Bag | Haberdashery Fun on DIY.. Colorful Dish Towel Tote Bags
  • Make A Simple Block Print Tote Bag | Haberdashery Fun on Sew Asymmetrical Color Block Totes Tutorial

Projects Elsewhere

find me on Pellon Projects sew mama sew contributor

momtastic contributor

Pinterest

Visit Marni@Haberdashery Fun's profile on Pinterest.
Follow on Bloglovin

I'm Reading

  • Cluck Cluck Sew
  • Cooking Dangerously
  • In Color Order
  • Jen Hewitt
  • Jolly Jabber
  • Karly Spalding Photography
  • Leigh Laurel Studios
  • Lindsay Sews
  • Lotta Jansdotter
  • Love Patchwork and Quilting Magazine
  • Made
  • Making It Lovely
  • Noodle-Head
  • Polka Dot Chair
  • Sharon Holland Designs
  • Silhouette America Blog
  • Silhouette Design Store
  • The Purl Bee
  • The Purple Fig

Press:

Stitch Winter 2014

haberdashery_fun

Marni Weaver
My entry for this week’s design challenge @spoon My entry for this week’s design challenge @spoonflower. Browns are definitely not my favorite color these days, but the challenge was “earth tones” and using just 4 colors. 

Ps. This started as a super simple block print and then I scanned it into the computer and drew the pattern in illustrator. 

If you have a moment you can head over to spoonflower to vote. ❤️✔️

#haberdasheryfun #spoonflowerchallenge #spoonflowerdesignchallenge #spoonflowerfabric #blocprintingonfabric #blockprinting #blockprintsmadeeasy ##blockprintmadeeasy #surfacepatterndesign #spoonflowermakers #blockprintestextiles #haberdasheryfunprints
I am so glad it’s the weekend. How about you? I’m off prompt for the month and here is #carvedecember, Day 7 and the prompt for “Long”. I really like structured, linear and streamlined prints. With this challenge, I am playing around and trying new things.

#carvedecember2022 #haberdasheryfun #blockprint #blockprinting #blockprintingmadeeasy #notecardsfordays #speedballart #tsukineko #blockprintedfabric #inkpad #inkpadstorage #surfacepattern #surfacepatterndesign #floralprints #handcarvedstamp #handcarvedstamps.
So many people have asked me about my process. One So many people have asked me about my process. One tip is that I love using a grid to create the overall design and keep the block print streamlined. Here’s how you go about it. #carvedecember #carvedecember2022 #blockprinting #haberdasheryfun #blockprinted #speedballink
Simple block print for the prompt “Ponder”. I Simple block print for the prompt “Ponder”. I get a lot of questions on my process, so you can check out my reel for a little behind the scenes.

#carvedecember #carvedecember2022 #haberdashery #blockprinting #bloxkprintingmadeeasy #blockprintingonfabric #blockprintingworkshop #blockprint #haberdasheryfun #haberdasheryfunpatterns
Day 5 for #carvedecember is “Plain”. I’m not Day 5 for #carvedecember is “Plain”. I’m not a huge fan of florals, and for some reason this shape came to mind. By itself it is kinda boring/ plain. In a repeat design it definitely comes alive. 

What is your printing process? Do you like all an over scattered or a grid pattern? My favorite way to work is using a pencil grid and then making a very linear and streamlined print.

#carvedecember2022 #haberdasheryfun #haberdashery #blockprintsmadeeasy #blockprints #speedballart #blockprintedfabric #haberdasheryfunpatterns
Follow on Instagram

Copyright © 2023 · Klar theme by Crimson Pear :: web & surface design

Copyright © 2023 · Klar on Genesis Framework · WordPress · Log in