Haberdashery Fun

  • Home
  • About
    • Look Book
  • Contact
    • Collaborate?
  • Tutorials
  • Shop
  • Freebie
  • Block Printing Course
    • Email
    • Facebook
    • Instagram
    • Pinterest

Keep up to date with the latest posts!

Make A Simple Block Print Tote Bag

in Bags and Pouches, DIY Projects on 24/04/22

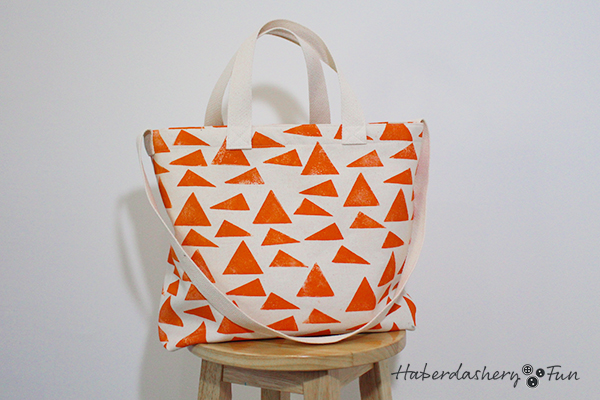
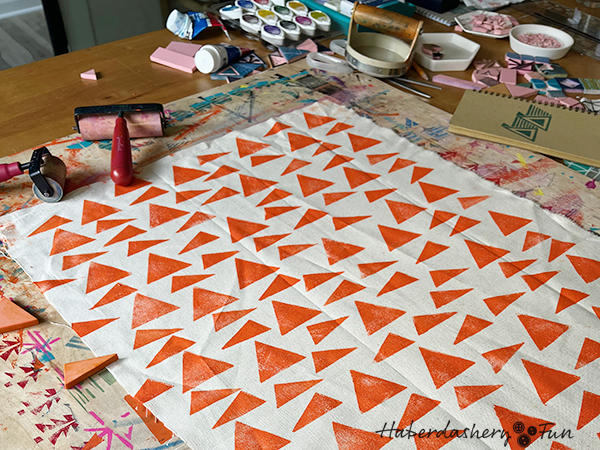
Have you wanted to block print and then sew it into something fun and awesome? Well, this post is for you. I recently shared a block printed tote bag on Instagram. I had quite a few readers DM me, ask questions and also request the tutorial, so here it is.

Block print fabric with haberdasheryFun

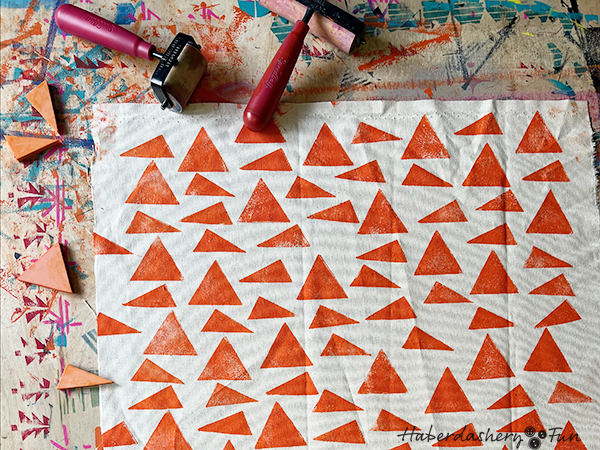
This is a multi step process. You will need to first print your fabric and then sew the tote. For fabric design, I love using Speedball fabric ink. However, you can also use regular Speedball block printing ink on fabric. Each ink has a different makeup and timeline for curing / drying on the fabric. The safest route is to let the ink dry to the touch and wait about a week. If you aren’t sure, wait until it is dry to the touch and then place a piece of scrap fabric over the surface and iron to heat set. One trick is whether you can still smell the ink. If you can still smell the ink, it is safe to safe it isn’t 100% dry yet.

Supplies Needed:

  • Cotton canvas fabric – in a solid light color
  • Block print supplies – fabric ink, brayer, flat surface and speedy carve block
  • Sewing supplies – pins, thread, disappearing fabric ink pen
  • Sewing machine, iron and ironing board
  • Quilting supplies – rotary cutter, cutting mat and quilting ruler
  • 1″ cotton webbing – approx 2 yards for straps
Sew a block printed tote with haberdasheryFun.

Let’s get started:

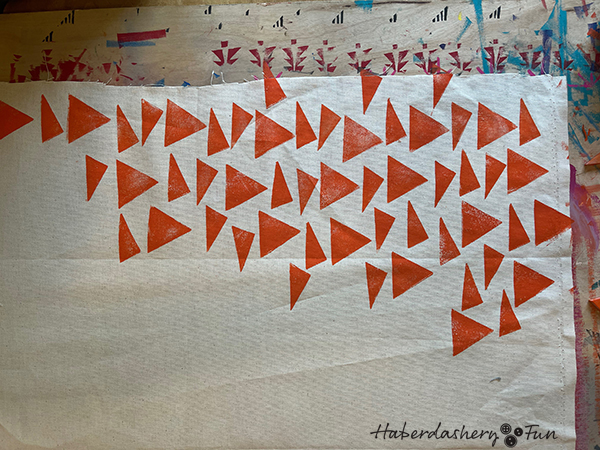
First, you will need to block print your fabric. For this tote, the fabric you print needs to be at least 20″ W x 50″ L. This will make the two exterior pieces, however, if you want to add interior pockets, you need more printed fabric.

A couple of comments on this post and tote:

  • This is a super simple tote to make. It does not have any “bells and whistles”.
  • You may want to double check the strap measurements in this post against a tote bag you love to carry. Do this before you cut the webbing to make sure the handles and cross body strap sizes work for you.
  • This bag is not lined. You will need to finish the interior seams yourself – either use a zig zag stitch, use pinking shears or the most professional option is to finish with a serger.
  • Add pockets before you turn and roll the top edge. However, this post does not share how to add pockets.
Sew A Block Print Totebag with HaberdasheryFun

The next steps will be for cutting and sewing the tote.

  1. Bring your quilting supplies onto your work surface. To cut the fabric, you will need your quilting ruler, cutting mat and rotary cutter. You can also cut the fabric with scissors, but a rotary cutter cuts your fabric super straight and even
  2. Cut two large rectangles measuring 17″ W x 16″ L. These are the exterior pieces of the tote.
  3. Put the quilting supplies to the side and get your sewing supplies ready.
  4. Place the two prices of fabric right sides together. Pin along the two shorter sides and the bottom.
  5. Sew the pinned pieces together with a 1/2″ seam allowance. Make sure to leave ONE 17″ length seam not sewn together. Do not sew over the pins.
  6. Press the seams with a hot iron. Open the seams and press again.
  7. Place the sewn pieces onto your work surface. Finger press any wrinkles out. Have the one side that was not sewn together at the top of your work surface.
  8. Take your ruler and make a 1-1/2″ square in one bottom corner. Repeat and make another 1-1/2″ square in the opposite corner. These will make the boxed corners.
  9. Take your scissors and cut out the 1″ squares.
  10. Now it is time to make the boxed corners. Pinch and match the bottom and side seams together. You want them to meet each other right at the seam allowance. Place a pin into the seam making sure that the side seam allowance and bottom seam allowance match.
  11. Place into your sewing machine and sew together with a 1/2″ seam allowance. Repeat for the other side.
  12. Put the fabric onto your work surface and turn right-side out. Wiggle the corners into place.
  13. Now it is time to cut your webbing for the straps – Cut pieces of webbing measuring 20″ in length. These are for the handles. Cut one strap measuring 40″ in length. This longer piece is for the cross body strap.
  14. We are on the home stretch. Place the tote onto your work surface. The top of the tote is at the top. Turn and fold the top edge under 1″. Press with a hot iron.
  15. Turn and fold the top end under again. Press with a hot iron. Pin in place.
  16. Place into your sewing machine. Adjust the seam allowance to be longer and then edge stitch around the entire top edge of the tote. Repeat again about 1″ down from the top edge. Make sure that you are sewing the layers together.
  17. Measure inwards along the top edge 3-1/2″ from each side seam. Mark with a pin.
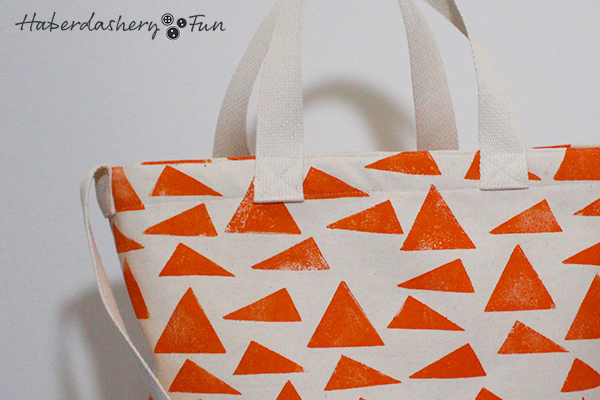
  18. Turn the ends of the webbing under 1/4″. Place one webbing end at the pin that is 3-1/2″ from the side seam. Repeat for the other end. Pin the straps in place.
  19. Put the tote into your sewing machine and sew an “X” at each end of the webbing. The “X” makes the straps nice and secure. Repeat for four sides.
  20. Sew the cross body strap in place using the same method as above – following steps 15-19.
Learn to sew and block print with HaberdasheryFun

That’s it! What do you think? Easy or hard? Want more tutorials? The following tote tutorials are super fun and easy as well:

Asymmetrical tote – Check out the tutorial here.

Simple tea towel tote – Check out the tutorial here.

Great news! I am launching an online course called “Block Printing Made Simple”. The course will be 3 weeks long with a live zoom Q & A session each Saturday. I made this course for all those people who struggle with the basics, don’t know where to start or for the designers who may need extra tips tricks and design prompts to get them on their way.

The course starts Monday, May 30th. I will be sharing more over the next few weeks. Want to join the waitlist for the course? – Click here to be added to my wait list and receive more info.

Until then, happy sewing and block printing!

Add a Comment

« The #100DayProject Starts Monday
Creative Uses For Your Block Prints »

Leave a Reply Cancel reply

Your email address will not be published. Required fields are marked *

This site uses Akismet to reduce spam. Learn how your comment data is processed.

About me


Hi there - I'm Marni Weaver. A sewer, a sometimes quilter and a lover of fabric design. I started this blog to share my ideas. Come Join the Fun
shop now

Popular Categories

project for baby fabric projects seasonal projects fat quarter projects sewing tips and tricks inspiration

Categories

  • Applique
  • Baby
  • Bags and Pouches
  • Block Printing
  • Color
  • DIY Projects
  • Fabric
  • Fabric Design
  • Fat Quarter Projects
  • Home Decor
  • Inspiration
  • Just for Fun
  • Kids
  • No Sew
  • Patterns
  • Print On Fabric
  • Quilting
  • Scrap Fabric Projects
  • Seasonal
  • Sewing Tips & Tricks

Lovely sponsors

Recent Comments

  • Easy Little Kid Sewing Project | Haberdashery Fun on DIY.. Make Monster Inspired Face Cloths
  • Easy Little Kid Sewing Project | Haberdashery Fun on DIY.. Easy Toddler Apron
  • HaberdasheryFun and an easy Kraft-tex sewing project | Haberdashery Fun on Collapsible Kraft-Tex Bowl
  • HaberdasheryFun and an easy Kraft-tex sewing project | Haberdashery Fun on Sewing With Kraft-Tex
  • 3 Simple Summer Sewing Tutorials | Haberdashery Fun on Sew A Canvas Zipper Pouch

Projects Elsewhere

find me on Pellon Projects sew mama sew contributor

momtastic contributor

Pinterest

Visit Marni@Haberdashery Fun's profile on Pinterest.
Follow on Bloglovin

I'm Reading

  • Cluck Cluck Sew
  • Cooking Dangerously
  • In Color Order
  • Jen Hewitt
  • Jolly Jabber
  • Karly Spalding Photography
  • Leigh Laurel Studios
  • Lindsay Sews
  • Lotta Jansdotter
  • Love Patchwork and Quilting Magazine
  • Made
  • Making It Lovely
  • Noodle-Head
  • Polka Dot Chair
  • Sharon Holland Designs
  • Silhouette America Blog
  • Silhouette Design Store
  • The Purl Bee
  • The Purple Fig

Press:

Stitch Winter 2014

haberdashery_fun

Marni Weaver
Block and paper print from Saturday’s workshop. Block and paper print from Saturday’s workshop. This was a fun workshop to lead. Such an awesome group with great questions and engagement. Many new friends to follow here on IG❤️

Thank you to everyone who signed up or attended a workshop this Spring. 

I love teaching about simple shapes. It really is eye opening when you start deconstructing a repeat pattern into super simple shapes!

My block printing made easy online class starts today with module 1 out now. It will be offered again this August. More workshops and details to come. 

#haberdasheryfun #blockprintingmadeeasy #simpleshapes #surfacepattern #surfacepatterndesign #memademay2023 #100dayproject #100dayproject2023 #easycarve #haberdasheryfunclasses
One more, one more.. I had so much fun, I’m offe One more, one more.. I had so much fun, I’m offering one more workshop for the spring season.

This Saturday, May 20th @ 10am est. Come join the fun!

I love teaching the basics to block printing using simple shapes. Feel like you can’t draw? thats ok, I have a guided worksheet that we use. 

If you cant make the workshop and want a deep dive into block printing, my online course starts this Monday, May 22. It’s a 3 week adventure with self paced video modules, worksheets and Saturday Live Q&As

Link in profile has details for the free workshop and my course.

#haberdasheryfun #blockprintingmadeeasy #simpleshapes #memademay2023 #blockprintingsimpleshapes #surfacepatterndesign #100dayproject #100dayproject2023 #memademay #konacotton #konacottonsolids
Sharing a few simple blocks from the last few week Sharing a few simple blocks from the last few weeks of workshops. I had a blast teaching these workshops. So I am now considering adding one more workshop this week. Should it be daytime or in the evening? I would love to hear your thoughts.

TBD on date and time, will share more details here and a sign up page in the next few days.

#blockprinting #blockprintingmadeeasy #haberdasheryfun #haberdasheryfunpatterns #surfacepatterndesign #memdemay2023 #100dayproject2023 #100dayptoject #haberdasheryfunclasses #printwithspeedball
What a fun workshop yesterday. Thanks to all who j What a fun workshop yesterday. Thanks to all who joined and gave their  time and energy. We had participants from South Africa to Austria to Canada and here in the US. I love it b/c I am from Alberta Canada and live in Atlanta.

My workshops are only an hour and we have alot to accomplish.. but I love hearing where are from and what they are up to! 

We even had a brief appearance from the cutest 11mos old ❤️🎉 

I played with the same shape the last 3 workshops and had fun seeing what could be made with the half moon shape. Now what yo do next?? Sew something or have fun with them in illustrator 

#haberdasheryfun #haberdasheryfunpatterns #onlineclasses #blockprintingmadeeasy #memademay2023 #100dayproject #100dayproject2023 #surfacepatterndesign #blockprintedfabric #konacotton #konacottonsolids
I’m hosting one last workshop this week. Come jo I’m hosting one last workshop this week. Come join in for some fun creating block prints with simple shapes. 

Can’t draw? Don’t feel inspired or imaginative?? That’s ok. I promise block printing can be fun and easy.

Sign up details in the link in my profile. See you Wednesday ❤️

#haberdasheryfun #blockprintingmadeeasy #haberdasheryfunpatterns #zoomclasses #surfacepatterndesign #memademay2023 #100dayproject #blockprinting #fabricdesign #fabricdesigner #blockprinted
Follow on Instagram

Copyright © 2023 · Klar theme by Crimson Pear :: web & surface design

Copyright © 2023 · Klar on Genesis Framework · WordPress · Log in