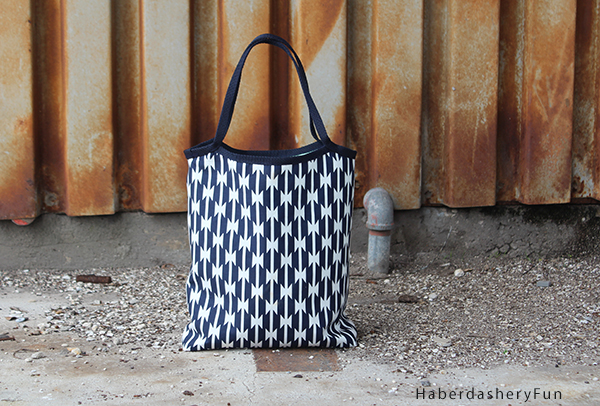
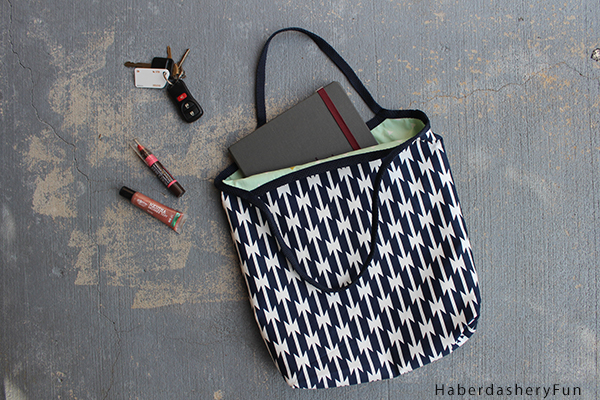
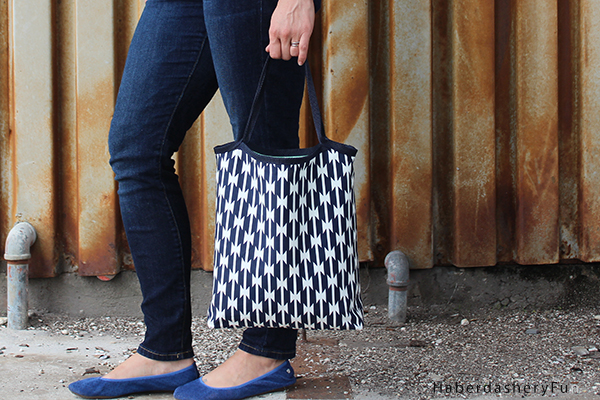
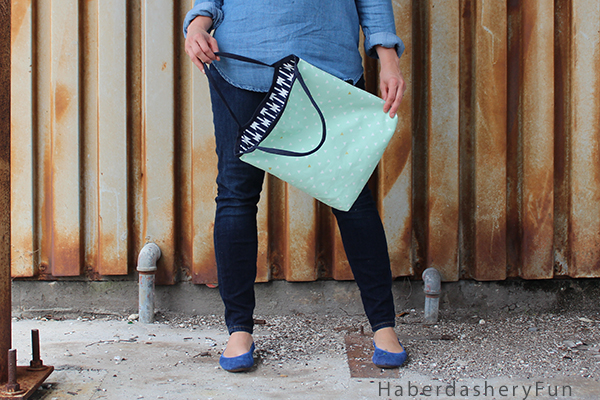
This tote is the perfect size as a grab and go bag. It is big enough to hold all your essentials, yet small enough for a quick trip to the market. Not only is it super easy to make and you can sew it in under an hour, but it is reversible!
I love sewing this bag and have made it so many times that I can now do it in my sleep. I’ve given it to many family members and friends. My husband uses it as a baby bag, my Mom carries her iPad in it and my Mother-In-Law holds her knitting projects in it.. I travel with it – fold it up and put it in the front pocket of my suitcase. There are so many uses, right?
The pattern is available in my online store.

I’ve been hoarding and waiting for the perfect time to tear open my April Rhode’s “Arizona” fat quarter bundle from The Fat Quarter Shop. I knew the modern, geometric designs would bring the simplicity of the bag to life. Her pattern literally vibrates and pops off the fabric. I had to check a few times to make sure my pictures weren’t out of focus!!
This is a very basic tote bag project and utilizes 1″ webbing wrapped around the raw edges of the bag. You sew a piece to the center front and center back and then sew one continuous piece that becomes the 2 straps.

Materials:
- Fabric – 2 colors, 1/2 yard each or 2 fat quarters for the outside/same color/pattern and 2 fat quarters for the lining/same color/pattern
- Interfacing – I like using Pellon SF101
- 1″ Poly webbing – 3 yards. Check out Seattle Fabrics for colors and widths
- Disappearing fabric pen
- Sewing supplies – thread, pins, scissors
- Iron and ironing board
- Pattern – the PDF pattern is available in my online store.
Let’s get sewing:
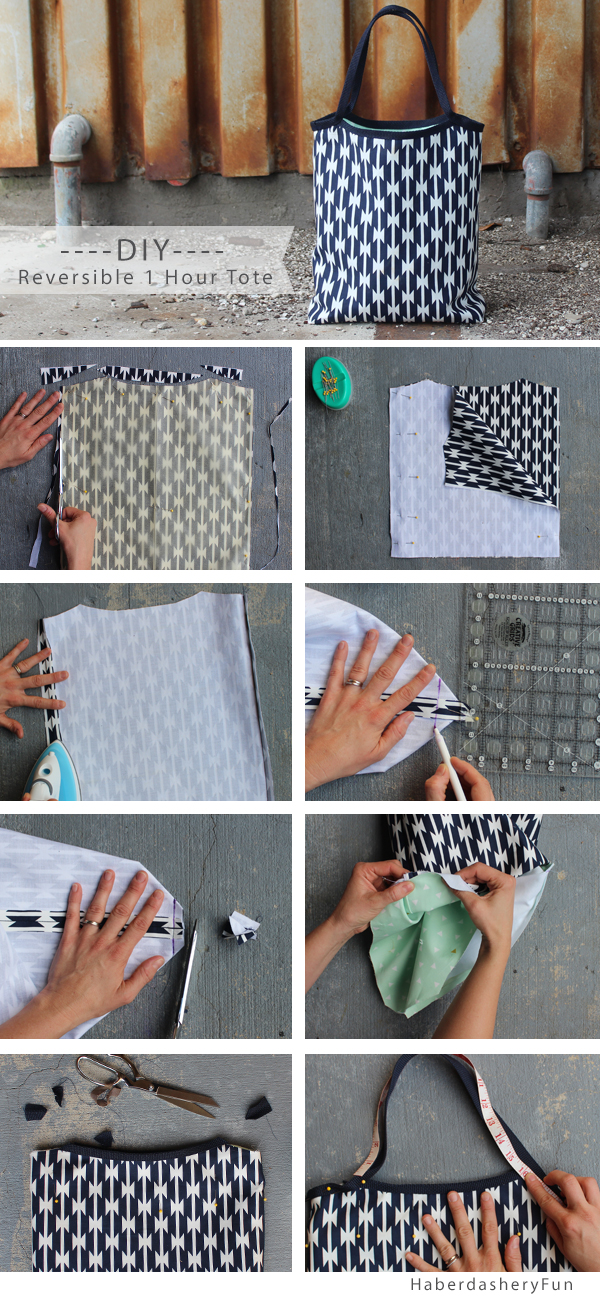
- Iron the interfacing to the wrong side of your fabric. Both main and lining. Place and pin pattern on the fabric. Cut out 2 main and 2 lining pieces.
- Place main pieces on top of each other, right sides facing. Pin. Place into sewing machine and stitch side seams and bottom together with a 1/2″ seam allowance. Repeat for lining pieces.Press seams. Open seams and press again.
- Create boxed corners at all 4 corners. Wiggle bottom to meet side seam. Sit seams directly on top of one another. Place quilting ruler on top and line up at the 45 degree mark and 1″ up from point. Mark a line with the disappearing fabric ink pen. Repeat for each corner. Place into sewing machine and stitch following the line.
- Cut off the tip. Leave a 1/2″ seam allowance. Want to learn more? Check out my quick tip tutorial on sewing boxed corners.
- Turn main bag right side facing out. Leave lining right side facing in. Place the lining into the main bag and wiggle corners into place. Pin along top edge.
- Lay bag flat on working surface. Hand press wrinkles out. Measure along front along front curve and add 1″ to each side. Cut webbing to the length of the front curve. Cut 2 pieces [ one for back and one for front]
- Cover center front raw edge with the webbing. Pin and place into sewing machine. Edgestitch webbing along the center front. Backstitch. Repeat for center back. Trim the ends off.
- Create the continuous strap – start at one side seam and cover the raw edge with webbing. Pin in place. Continue up the side seam towards the front top edge curve. Pin to hold in place. Leave 16″ of webbing free and then pin the webbing in place at the other side, top front edge. Pin. Continue around side seam [ covering raw edges] and repeat for the back. Place into your sewing machine and edgestitch along the webbing. Stitch in one continuos loop, including along the 16″ strap. Backstitch at the end. Note: Use a lighter over the webbing ends if it is fraying.
A couple of comments:
- Take caution to not twist the webbing when sewing the straps. You don’t want to sew the webbing in place, only to find that it is twisted around. While you are wrapping the raw edges, make sure it lays nice and flat.
- Are the ends of your webbing frayed and gross? Use a lighter and gently melt the ends of the webbing. Just a tad. This technique is perfect for anywhere the webbing is not enclosed or under another seam. Works like a charm.
- You can determine your own strap length. Each strap in this tutorial is 16″ long. Change the strap length to suit your armhole. However, remember to cut enough at the beginning and before you attach to your bag.
I love this bag so much that I named it the “Jolly” bag a few years ago. It brings back fond memories. I’ve used my pattern a gazillion times and love sewing this bag as a simple gift.
The pattern is available in my online store.
This post was brought to you in collaboration with The Fat Quarter Shop. They provided me with the fabric to create this handbag. I appreciate the support that allows me to create new and unique content for my blog. The print you see above is called “Tomahawk Stripe” and is from Art Gallery Fabrics and their Arizona collection.
Want to see other tote bag tutorials? Click here for my Asymmetrical Color Block Tote.
Happy sewing.


Love this but something went wrong with your directions. It’s almost as if part of them have been translated from another language and some are just cut off. Please fix this if you can and then delete this email. Great bag!! Thanks.
Would like to see a sewing patternm
Hi there,
You can access the pattern in my online shop – https://haberdasheryfun.myshopify.com
Marni
I love this. I might have to break down and actually make a bag…
This is adorable and I can’t wait for the pattern 🙂
hello. this looks great and i want to make these for christmas. Is there a pattern to follow? you say to use half a yard of fabric, but dont include the dimensions of each side of the bag. also you cut it into a shape, so a pattern would be really helpful! Thanks
Hi there. Thanks for stopping by. I should have the pattern up in the next few weeks.
yay! thank you! i want to make some for holiday gifts. this is so perfect and a nice departure from your usual box tote! cant wait!
Awesome bag!! I’ve got a Craft Gossip post scheduled for tomorrow evening that links to your tutorial: http://sewing.craftgossip.com/tutorial-reversible-1-hour-tote/2014/10/10/
–Anne
Thanks Anne. Have a great weekend.
Wow, what a lovely bag! Lovely on the inside and on the outside!
Thanks for stopping by. Check out the Arizona from Art Gallery Fabrics collection.. It is really beautiful! Have a great day.
You make it seem really easy! I am going to give this a try! Thanks for sharing!
akamatras.blogspot.com
Lovely bag! Goodness all the possibilities of fabric!! I can’t wait for you to add the pattern to use but really, a simple rectangle would work fine. Appreciate your sharing!
Thank you for the comment. I’ll let you know when the pattern goes up. Should be very soon.
Looks like a cute bag – hope Craft Gossip posts again when there’s an actual pattern. For instruction #2 – I assume you meant machine, not mating. For instruction #6, it seems you left off the rest of the last sentence – cut webbing to . . .
Thanks for bag.
Thank you for letting me know of the typos! I’ve made the changes.I can email you when the pattern goes up 🙂
I just saw this as I was browsing your blog, i came over from Pinterst and looking for vinyl crafts.. Thanks for the sewing inspiration.
Love it!!! Is there already a pattern I may have missed?.. Thanks!!
Hi – Thanks for stopping by. You didn’t miss it. The pattern is coming :). I will email you when it is up.
Hi There. No, the pattern is soon to come. I will email when it is up. Thanks for stopping by.
I love this tote bag ! Thanks for sharing !
Hi – Thanks for stopping by. You will love this tote. I will email when the pattern is up. Have a great day.
I’d like the pattern when it becomes available.
Sure no problem. I will email you when it goes up. Thank you for reaching out 🙂
Just learning to sew. I think your bag is super! Can’t wait for the pattern. Please let me know when it’s ready. Thank you for a tote that is pretty and can be practical.
Hi Danette, Thanks for coming by. You will be super happy with this tote. I will email you when the pattern is up. 🙂
I’ve been searching for just the right tote bag. I think this might be it. Would like the traceable pattern too please. Thank you.
HI Vicki – great. I will add you to the list and email once it’s up. Have a great weekend. 🙂
Hi! Thanks for this great PATTERN! Just one question, how to ‘match’ the ends of the webbing once you have sewn the whole round? I dont manage to get it near. Thanks!
Hi Sophie,
It should match, but really it should overlap by about 1/2″.. When it overlaps, you just sew on top and back stitch.
My only thought if it doesn’t match and it too short, is that you made the straps too long, thus not giving enough at the end?
Marni
Can’t wait until you have time to put the pattern up. Looking forward to it and thanks in advance/
Thank you so much for letting me know. I will add you to the list and email once it is up 🙂
LOVE this bag
Thank you. I’m sharing the pattern and doing a giveaway at the same time for fabric. I will email you when this is up.
hello! i was wondering if I were going to make this just a rectangle as the comments suggest above if you could tell me the dimensions you made the bag…. Im DYING to make some of these for christmas gifts and would love to test it out making it just a rectangle until the pattern is up. Thanks!
Hi – sure. The dimensions are 14-3/4″L x 14″W. The 14-3/4″ length is from the highest point. I should have the pattern in about 3 weeks. PLUS I’m having a fabric giveaway at the same time. I will email you when it is up. Thanks for stopping by.
Just awesome ! Going to try for my sister’s christmas gift ! Can you please add me to the email list ?
Thanks a lot !!!
Thanks or stopping by. Yes, will add you to the list for sure. I hope to have the pattern up in the next 10 days or so.. Plus a fabric giveaway to go along with it 🙂 Have a great week.
Hi there!
Great idea for a tote,, and to make for presents,,with five daughters, ten grandchildren, I can make these up over a weekend!! Please add me to your list for the tote bag pattern,, I am thinking Library book bag to use with their day trip with Nana,,(thats me)..
great idea. Would be an awesome Library tote. My toddler has a little V-Tech computer and he uses a smaller version to carry around the computer.. You can make the straps as long or short as you like 🙂
I just found the One Hour reversible bag—is the pattern out –if so , where do I find it? Thanks
Hi – Thanks for stopping by. No, the pattern isn’t out yet. Should be in the next 2 weeks. I can email you when it is up
Thank you for the tutorial on this great looking tote…..I have downloaded the pdf and with be making quite a few of these for myself and family……..
Thanks for letting me know Lori :). I’d love to see pictures of your finished totes.. Have a happy holiday season.
Great bag! Can you be more specific on which webbing you used from Seattle Fabrics- there are quite a few! Thanks!
Hi Susan,
I used the 1″ Polypropylene Webbing. They have a variety of colors. I recently found a bunch of colors at Jo-Ann fabrics as well. Let me know how it goes.
Marni
Thank you for sharing. What great gifts this one will make. Like your fabric choices.
Thanks Ellie.. Isn’t the Arizona collection amazing? If I do another fabric giveaway [ I did one for the PDF pattern release], I will make sure to add you to the email list. Have a great week.
Thank you for a great tutorial. This bag does look easy, I will have to give them a go.
Thank you Angela, I appreciate your leaving me a comment. You will LOVE this bag!!
I’ve printed out the pdf – but it seems shorter than the picture. What are the finished dimentions?
The bag looks great – and hope to make it this weekend for a conference I’m attending.
Hi Mary. Did you print 2 pieces? There should be a top and a bottom piece and you tape them together where it says ” tape along this line”.. Then you place that on the fold.
Let me know how it goes. – Marni
Lol! of course- feeling silly, thanks for responding. I made a bag last night, so easy and very clever. I’m sure it’s the first of many!
Not sure how to upload a pic or I would
Thanks Mary.. no worries! I’m glad it worked for you. You could email a pic if you like.. marni@haberdasheryfun . com
Thanks again for stopping by and happy sewing!! 🙂
– Marni
Hi!
just wanted to say thank you for a great pattern!! Have made two of these already and love them 🙂
HI Lene, Thanks so much for getting me know.. It means a lot to me. I’d love to see photos, if you want to post on FB or on Instagram? Have a great day – Marni
Geetings from Paris !
Thank you Marny for sharing the tuto. I have just made one tote.
Hi Tango – thanks for letting me know. I would love to see images of your tote! If you are on instagram, pls share and use #HaberdasheryFun or @haberdasheryFun… Thanks – Marni
I just love this. I will def have to try it. I’d love for you to visit and link up at Support your fellow crafter! http://superstinkyboys.blogspot.com/2017/03/support-your-fellow-crafter-linky-party_20.html
Thank you. I will come right over and link up to your link party. Thanks for the heads up 🙂