Haberdashery Fun

  • Home
  • About
    • Look Book
  • Contact
    • Collaborate?
  • Tutorials
  • Shop
  • Freebie
    • Email
    • Facebook
    • Instagram
    • Pinterest

Keep up to date with the latest posts!

Make A Half Moon Printed Pouch

in Bags and Pouches, DIY Projects on 09/05/16

Accessorize your summer with.. popsicles!

Popsicle print half moon pouch

Red half Moon Pouch Pain

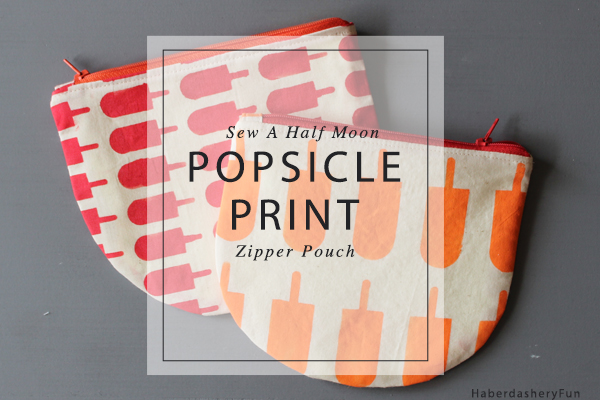
I have an addiction to sewing pouches and thought a “half moon” shape was perfect for a summer-time pouch.  I also love to print my own fabric and decided that a bright popsicle theme was in order.

Main image popsicle scraps

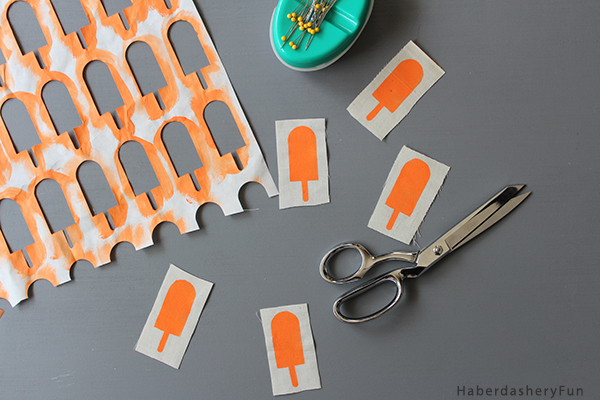
Isn’t the popsicle the cutest design?  I bought the popsicle design in the Silhouette Design Store and then created a repeat pattern in Silhouette Studio. After finalizing my design, I sent the image to be cut and was well on my way. Interested in printing your own fabric or making cool stuff, but don’t have a Silhouette machine? Great news – My Silhouette Challenge Facebook group is giving away a Silhouette Portrait to one lucky winner. See below for further details.

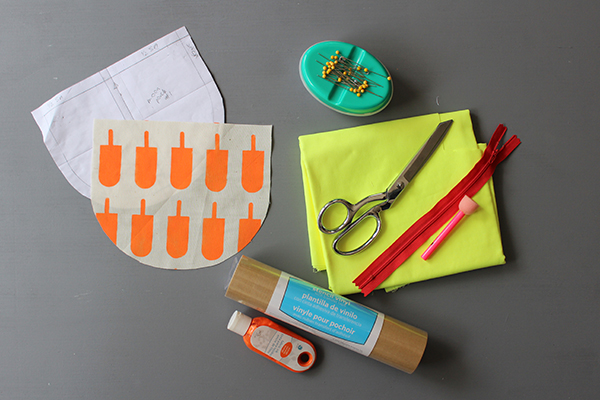
Want to make something similar.. Here’s what you need:

  1. Silhouette Cameo or Portrait
  2. Stencil vinyl
  3. Fabric ink
  4. Silhouette mat and tools
  5. Cotton fabric in 2 colors
  6. Interfacing – optional
  7. 9″ Zipper
  8. Sewing machine and supplies
  9. Iron and ironing board

Materials

Let’s get started..

Step 1 – Print your fabric. Not sure what to do? I’ve got a ton of tutorials on printing your town fabric. Check here and here to get started.

Step 1 print fabric

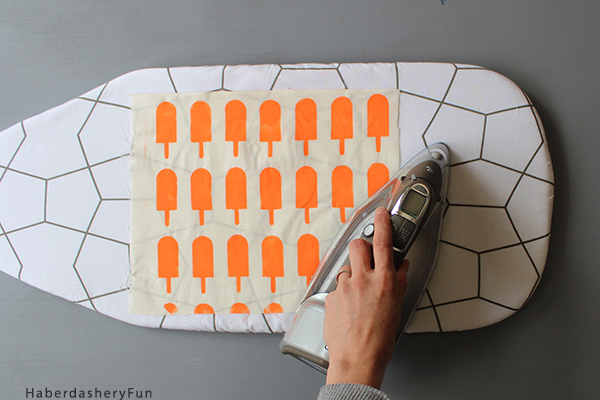
Step 2 – Set your fabric aside to dry. Once the fabric is dry, iron the fabric to get the wrinkles out. If you use a lightweight fabric, the fabric may become slightly distorted from pulling the stencil off.  Give the fabric a gentle tug in the opposite direction and then set back in place with an iron.

Step 2 iron fabric

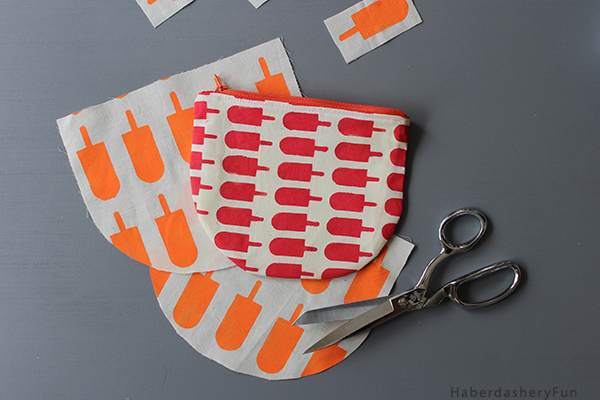
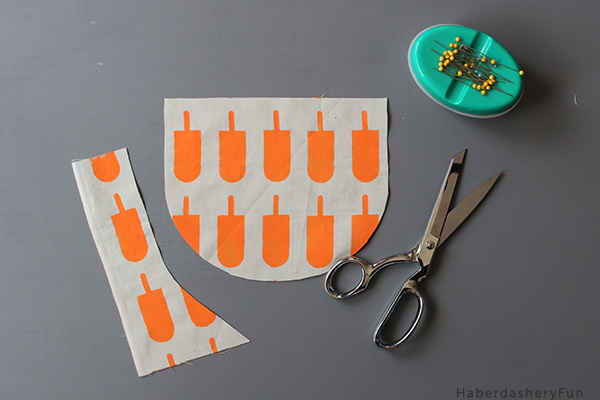
Step 3 – Cut 2 half moon pieces out of the printed fabric. Cut another 2 half moon pieces out of the lining fabric. I made the pattern and hope to share it soon. Note – if you want the pouch to be a little sturdier, iron fusible interfacing on the backside of the exterior fabric.

Step 3 Cut Fabric

Step 4 – Cut the zipper to fit the pouch [ I like to measure inwards 5/8″ from each top side seam and mark a line with a disappearing fabric pen]. Cut the zipper to fit this measurement. From scrap fabric, cut a rectangle measuring 3″ x 2″ and make a zipper tab. Fold the rectangle in half and then fold each side inwards again to meet in the middle. Place the cut zipper end into the tab. With your sewing machine, topstitch on either side of the tab. Need more information on sewing a zipper? Try my tutorial here..

Step 4 Zipper Tabs

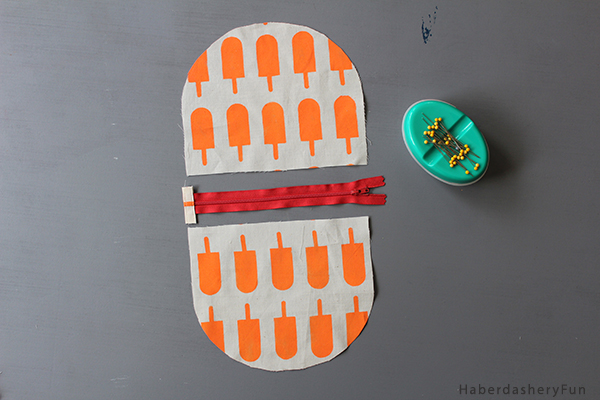
Step 5 – Place the zipper face down between the 5/8″ lines.  Turn and tuck the non-zipper tab end into the seam allowance at one of the 5/8″ lines. Pin. Change to your zipper foot and sew the zipper in place. Place the lining on top, sandwiching the zipper and stitch the lining in place. Repeat for the other side.

Step 5 Sew zipper

Step 5B Sew zipper

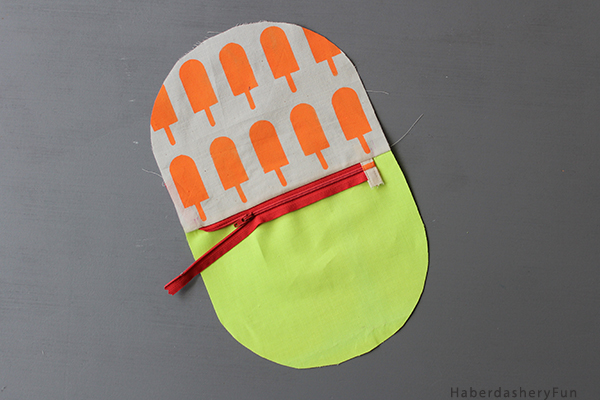
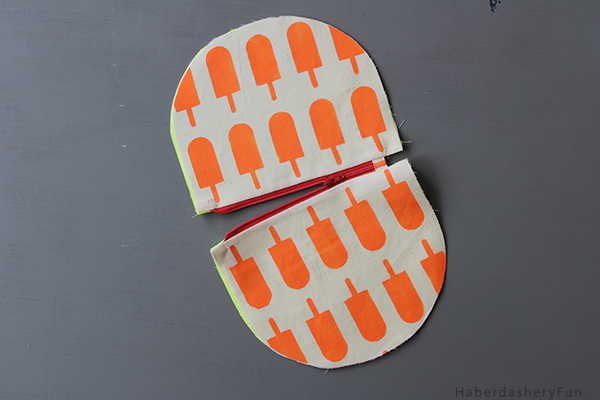
Step 6 – You are on the home stretch! Place the outside pieces right sides facing and place the lining pieces right sides facing. Pin in place. Sew with a 1/2″ seam allowance. To make a really nice SMOOTH curve, use a disappearing fabric ink pen and mark a 1/2″ seam allowance around the half moon curve. Place into your sewing machine and stitch together following the dashed line. Remember to leave a small 2″ opening in the lining. Press with an iron.

Sewing Alert – Notice how the outside seam is uneven on my red popsicle pouch? I rushed sewing the 1/2″ seam and wasn’t paying attention. I think it looks terrible and is such poor workmanship. Use the method above and you will be sure to sew an nice even curve.

Wonky Red Pouch

Step 7 – Notch the curves. Cut small notches into the seam allowance about 1/2″ apart. This helps to create the smooth shape. Pull the pouch through the small opening in the lining. Press again. Pin the lining opening closed and stitch closed.

That’s it!! Fun right? So what summer shape inspired you? Sunglasses?? The beach? fruit?

Need inspiration and want to see more Silhouette Projects? I’ve got two great Silhouette treats for you today. First off, my Silhouette Challenge buddies and I are all sharing projects on our blogs today, so peruse the projects below for a wealth of Silhouette inspiration!

Sunshine. Sea Salt. And Ice Cream Shirt Personalized Lawn Chair DIY Summer Strawberry Tote DIY - With the Silhouette Mint! How to Use Multiple Colors of Silhouette Sketch Pens Patriotic Hand-Scripted USA Shirt Herb Garden with Personalized Tin Outdoor Pillow for Summer How to Make Huge Paper Flowers Make A Half Moon Printed Pouch DIY Nautical Pallet Sign Vertical Herb Garden Ladder Kyltit yrttipenkkiin / Labels for herbs Pineapple Cup Decal DIY Flamingo Nail Art Sunshine Straw Toppers Summer Planner Stickers

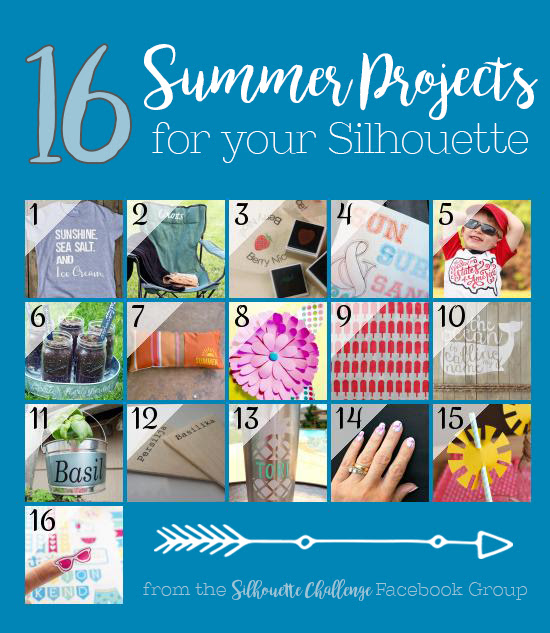
1. Sisters, What // 2. Small Stuff Counts // 3. Adventures in All Things Food // 4. Creative Ramblings // 5. Where The Smiles Have Been // 6. Curly Crafty Mom // 7. Architecture of a Mom // 8. Create & Babble // 9. HaberdasheryFun // 10. Coral + Mint Design Co. // 11. Designed Decor // 12. Tehtaiskˆ nyt? // 13. Tori Grant Designs // 14. Morena’s Corner // 15. It Happens in a Blink // 16. unOriginal Mom Silhouette Portrait Giveaway And I’ve saved the best for last! Silhouette America has graciously sponsored our giveaway of a Silhouette Portrait! One lucky grand prize winner will receive their very own Silhouette Portrait, and two runners up will each receive a Heat Transfer Vinyl Starter Kit. (If you already own a Silhouette, just think how great a gift this would make for a friend!)†To enter: just complete the entries in the Rafflecopter widget below. You have 18 potential entries, which means a lot of winning power. So, hurry up and enter! (This giveaway runs from 8:00 am on May 9 until 11:59pm on May 16, 2016, and is open to readers with a US mailing address.) a Rafflecopter giveaway

Related Posts Plugin for WordPress, Blogger...

23 Comments

« Make Kids Stamps With Your Silhouette Mint
Happy Birthday Farm Girl Vintage! »

Comments

  1. DeDe @ Designed Decor says

    05/09/2016 at 8:28 am

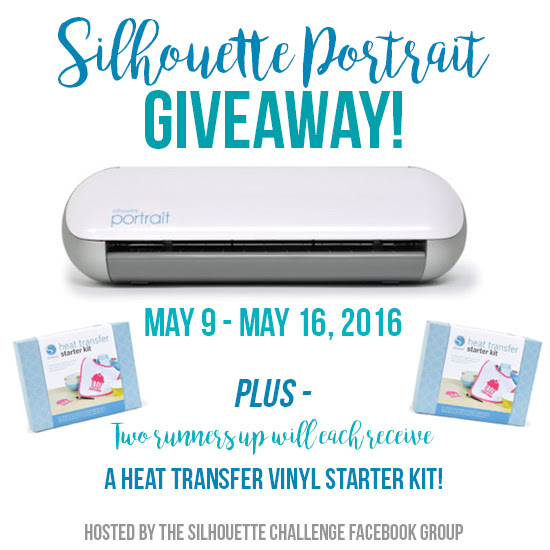
    Cute idea for holding items for the pool bag!

    Reply
    • Haberdashery Fun says

      05/09/2016 at 9:41 am

      Thanks Dede.. Cute and simple right? Have great day – Marni

      Reply
  2. Meredith @ Coral + Mint Design Co. says

    05/09/2016 at 11:00 am

    This is so cute! I’ve been scared of working with zippers, but this pouch is so cute that I just might have to try it.

    P.S: I have the same ironing board as you! Ha

    Reply
    • Haberdashery Fun says

      05/09/2016 at 12:38 pm

      Thanks Meredith.. IKEA ironing board, right? It’s perfect to use on the kitchen table.. Have a great day 🙂
      Marni

      Reply
  3. Melanie says

    05/09/2016 at 1:17 pm

    That popsicle pattern is so fun!

    Reply
  4. Sarah says

    05/10/2016 at 1:11 pm

    These are really cute, I love the bright colors and popsicles are so perfect for summer.

    Reply
  5. Carrie @ Curly Crafty Mom says

    05/10/2016 at 11:13 pm

    This turned out so darn cute! I love the shape and the little popsicle pattern! Perfect for the summer AND pool!

    Carrie
    curlycraftymom.com

    Reply
  6. Morena says

    05/11/2016 at 7:26 pm

    That print is ADORABLE!!

    Reply
    • Haberdashery Fun says

      05/11/2016 at 11:11 pm

      Thanks Morena. It was fun to come up with 🙂 – Marni

      Reply
  7. Meredith @ unOriginalMom says

    05/13/2016 at 8:41 am

    These are so cute!! And I love the idea of “printing” fabric with a Silhouette stencils. So many possibilities! Thanks for sharing!

    Reply
  8. Jennifer Dawn says

    05/13/2016 at 11:00 am

    These are SO cute! What a fresh take on zippered pouches! I’d love for you to share this at our weekly link party! http://www.thelifeofjenniferdawn.com/2016/05/fun-birthday-party-ideas-little-bird.html Hope to see you there!

    Reply
    • Haberdashery Fun says

      05/13/2016 at 3:20 pm

      Thanks for letting me know about the link party. I’ll come on over and share – Marni

      Reply

Trackbacks

  1. DIY Flamingo Nail Art - Morena's Corner says:
    05/09/2016 at 6:02 am

    […] Smiles Have Been // 6. Curly Crafty Mom // 7. Architecture of a Mom // 8. Create & Babble // 9. HaberdasheryFun // 10. Coral + Mint Design Co. // 11. Designed Decor // 12. Tehtaiskö nyt? // 13. Tori Grant […]

    Reply
  2. Vertical Herb Garden Ladder! ~- Designed Decor says:
    05/09/2016 at 7:01 am

    […] Smiles Have Been // 6. Curly Crafty Mom // 7. Architecture of a Mom // 8. Create & Babble // 9. HaberdasheryFun // 10. Coral + Mint Design Co. // 11. Designed Decor // 12. Tehtaiskö nyt? // 13. Tori Grant […]

    Reply
  3. How to Use Multiple Colors of Silhouette Sketch Pens - Creative Ramblings says:
    05/09/2016 at 8:00 am

    […] Smiles Have Been // 6. Curly Crafty Mom // 7. Architecture of a Mom // 8. Create & Babble // 9. HaberdasheryFun // 10. Coral + Mint Design Co. // 11. Designed Decor // 12. Tehtaiskö nyt? // 13. Tori Grant […]

    Reply
  4. Pineapple Cup Decal | Tori Grant Designs says:
    05/09/2016 at 8:05 am

    […] Smiles Have Been // 6. Curly Crafty Mom // 7. Architecture of a Mom // 8. Create & Babble // 9. HaberdasheryFun // 10. Coral + Mint Design Co. // 11. Designed Decor // 12. Tehtaiskö nyt? // 13. Tori Grant […]

    Reply
  5. CraftCrave | DigiFree | CraftCrave says:
    05/10/2016 at 8:03 am

    […] Make A Half Moon Printed Pouch – 1 freebie(s)? […]

    Reply
  6. Wednesday Weekly #36 | Helen's Closet says:
    05/11/2016 at 2:00 pm

    […] cute half-moon pouch tutorial from Haberdashery […]

    Reply
  7. Summer Planner Stickers for your Silhouette - unOriginal Mom says:
    05/17/2016 at 8:25 am

    […] Smiles Have Been // 6. Curly Crafty Mom // 7. Architecture of a Mom // 8. Create & Babble // 9. HaberdasheryFun // 10. Coral + Mint Design Co. // 11. Designed Decor // 12. Tehtaiskˆ nyt? // 13. Tori Grant […]

    Reply
  8. Make Fun Canvas Pencil Cases | Haberdashery Fun says:
    09/14/2016 at 1:02 am

    […] and have a bunch of tutorials to get you started. Try this tutorial, this one. I love this one for half moon zipper […]

    Reply
  9. Patriotic Hand-Scripted USA Shirt + Silhouette GIVEAWAY! says:
    05/21/2018 at 11:16 am

    […] Smiles Have Been // 6. Curly Crafty Mom // 7. Architecture of a Mom // 8. Create & Babble // 9. HaberdasheryFun // 10. Coral + Mint Design Co. // 11. Designed Decor // 12. Tehtaiskö nyt? // 13. Tori Grant […]

    Reply
  10. How to Make Huge Paper Flowers says:
    08/17/2018 at 1:34 pm

    […] Smiles Have Been // 6. Curly Crafty Mom // 7. Architecture of a Mom // 8. Create & Babble // 9. HaberdasheryFun // 10. Coral + Mint Design Co. // 11. Designed Decor // 12. Tehtaiskö nyt? // 13. Tori Grant […]

    Reply
  11. Simple Steps For Block Printing | Haberdashery Fun The simple steps to start block printing says:
    12/04/2021 at 9:44 pm

    […] Freeze Paper Printing – Make A Half Moon Printed Pouch […]

    Reply

Leave a Reply Cancel reply

Your email address will not be published. Required fields are marked *

This site uses Akismet to reduce spam. Learn how your comment data is processed.

About me


Hi there - I'm Marni Weaver. A sewer, a sometimes quilter and a lover of fabric design. I started this blog to share my ideas. Come Join the Fun
shop now

Popular Categories

project for baby fabric projects seasonal projects fat quarter projects sewing tips and tricks inspiration

Categories

  • Applique
  • Baby
  • Bags and Pouches
  • Block Printing
  • Color
  • DIY Projects
  • Fabric
  • Fabric Design
  • Fat Quarter Projects
  • Home Decor
  • Inspiration
  • Just for Fun
  • Kids
  • No Sew
  • Patterns
  • Print On Fabric
  • Quilting
  • Scrap Fabric Projects
  • Seasonal
  • Sewing Tips & Tricks

Lovely sponsors

Recent Comments

  • Make A Simple Block Print Tote Bag | Haberdashery Fun on DIY.. Colorful Dish Towel Tote Bags
  • Make A Simple Block Print Tote Bag | Haberdashery Fun on Sew Asymmetrical Color Block Totes Tutorial
  • Make A Block Printed ToteBag | Haberdashery Fun on Sew A Reversible Tote
  • Make A Block Printed ToteBag | Haberdashery Fun on Quick Tip.. Sewing Boxed Corners
  • 20 Creative DIY Storage Bin Ideas - DIY & Crafts on Sew An Easy Fabric Storage Bin

Projects Elsewhere

find me on Pellon Projects sew mama sew contributor

momtastic contributor

Pinterest

Visit Marni@Haberdashery Fun's profile on Pinterest.
Follow on Bloglovin

I'm Reading

  • Cluck Cluck Sew
  • Cooking Dangerously
  • In Color Order
  • Jen Hewitt
  • Jolly Jabber
  • Karly Spalding Photography
  • Leigh Laurel Studios
  • Lindsay Sews
  • Lotta Jansdotter
  • Love Patchwork and Quilting Magazine
  • Made
  • Making It Lovely
  • Noodle-Head
  • Polka Dot Chair
  • Sharon Holland Designs
  • Silhouette America Blog
  • Silhouette Design Store
  • The Purl Bee
  • The Purple Fig

Press:

Stitch Winter 2014

haberdashery_fun

Marni Weaver
I have a drawer where I keep all of my block print I have a drawer where I keep all of my block printed papers and have often wondered.. “What the heck do I do with all of these”.

How about you?

I recently found a bunch of  tutorials over at @modpodgerocks and thought it would be fun to make wood coasters with my block prints. They turned out better than expected and so I thought to share with you.

Want more info? I created a blog post. See the link in my profile for the blog post and details. 

Day27/100 #100dayproject #dothehundreddayproject #100daysofsimpleshapes #haberdasheryfun #blockprintingmadesimple #onlineclasses #zoomworkshops #haberdasheryfunpatterns #haberdasheryfunclasses #handmadestamp #modpodge #modpodgecrafts #decoupageart #decoupagelovers #blockprintedbyhand
I’m sharing about how to frame your block printe I’m sharing about how to frame your block printed fabric on my blog today. Day 26/100 #100dayproject 

If you have ever thought you would like to learn how to block print… I have a course for you. It is called Block Printing Made Easy. It is all about the basics - working with simple shapes, design prompts and getting creative on paper and fabric.

This is an online course and starts on Monday, May 30. There are 3 modules with videos and also included in the course are 3 live zoom workshops. The videos are self paced, so the good news is you can cruise through them or take all the time you need.

The course is $97 USD.

See the link in my profile for additional details on the course( breakdown on each module) and to also access to my blog post.

#dothe100dayproject #haberdasheryfun 
#blockprintingmadeeasy #100daysofsimpleshapes #zoomclasses #haberdasheryfunpatterns #speedballfabricink #handmadefabrics #dothe100dayproject2022 #100dayproject2022 #handmadestamps #blockprintedfabric #ikeahacks #ikeaframes
Goodbye triangles, hello circles. I’m working Goodbye triangles, hello circles. 

I’m working on a project, so I printed a bunch of small fabric squares with my new circle stamp. Such a simple yet effective stamp.

I am launching an online course called “Block Printing Made Easy? Want to learn to block print? The course starts in two weeks (5/30). Want more info? See the link in my profile to join the waitlist and also to view the course details. 

Day 25/100 #100dayproject 

#dothe100dayproject #dothe100dayproject2022 #haberdasheryfun #haberdasheryfunpatterns #pdfpattern #blockprinting #blockprintingonfabric #blockprintingmadeeasy #blockprintingworkshop #speedballfabricink #konacottonsolids #speedballart
I’ve got one more triangle print to share and I I’ve got one more triangle print to share and I think that’s a wrap. Simple and easy. The pin cushion on that right that was gifted to me from my grandmother Mor Mor really takes the stage in my opinion 

The circle shape is next. I’m excited to work with no corners and see what will unfold.

Day 24/100
#haberdashery #100dayproject 
#100daysofsimpleshapes #blockprintingmadeeasy #dothe100dayproject #dothe100dayproject2022 
#haberdasheryfun #ikeahacks #konacotton #konacottonsolids 
#speedballfabricink #blockprinting #easyblockprint #haberdasheryfunpatterns #haberdasheryfunclasses
A mash up of triangle stamps I created so far duri A mash up of triangle stamps I created so far during the #100dayproject.
 
Who knew the triangle shape could be so much fun? I have had a blast the last playing around with it - both dissecting the shape and putting it back together. 

Which one is your favorite?

I can’t believe I am saying this, but Im ready to move on to a new shape. One that is more soft and organic. Next up, the circle!
Day 23/100

#100daysofsimpleshapes 
#haberdashery 
#blockprinting 
#blockprintingonfabric 
#blockprintingmadeeasy 
#haberdasheryfun
#speedballfabricink #speedballink #fatquarters 
#handmade #dothe100dayproject2022 
#100dayproject2022
Follow on Instagram

Copyright © 2022 · Klar theme by Crimson Pear :: web & surface design

Copyright © 2022 · Klar on Genesis Framework · WordPress · Log in