Haberdashery Fun

  • Home
  • About
    • Look Book
  • Contact
    • Collaborate?
  • Tutorials
  • Shop
  • Freebie
    • Email
    • Facebook
    • Instagram
    • Pinterest

Keep up to date with the latest posts!

Sew Clear Vinyl Wallets

in Bags and Pouches, DIY Projects on 23/09/15

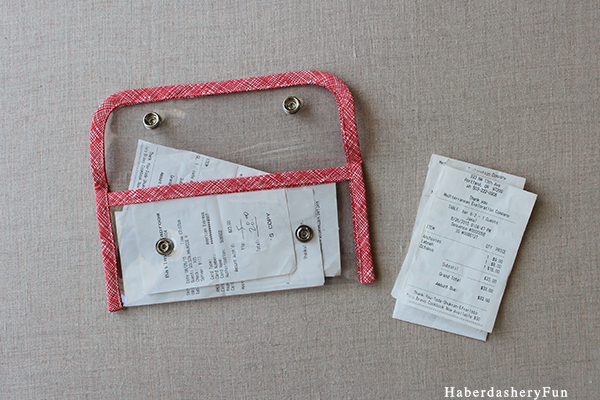
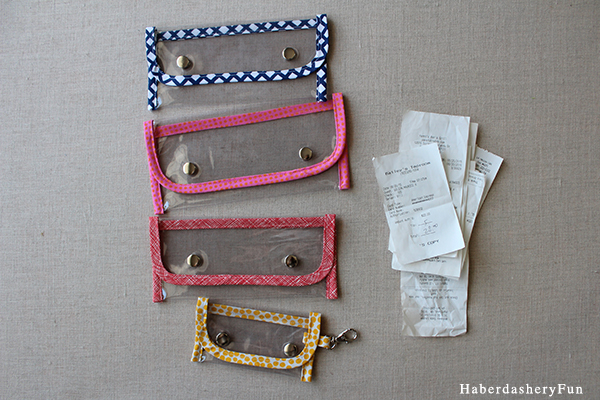
A few months ago my sister-in-law asked if I would make her clear pouches for her business receipts. She accidentally misplaces a few receipts each month and it drives her crazy tracking them down.

Sew Clear Vinyl Wallets Main

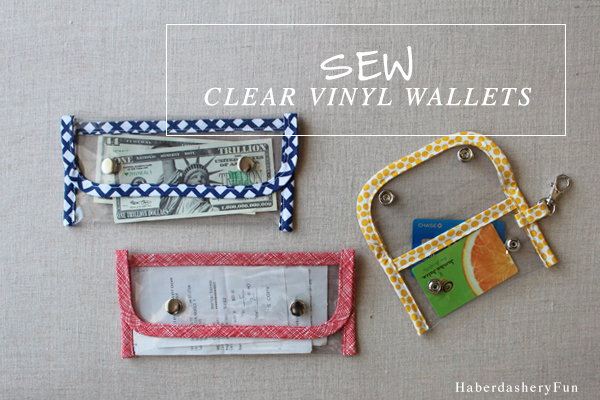
An envelope was my inspiration. I added colorful bias tape and 2 brass snaps to make the pouch professional looking… This wallet turned out to be very handy – it’s slim and sleek and doesn’t take up too much bulk in a handbag. I also think it’s super cute.

Clear Vinyl Wallets Single

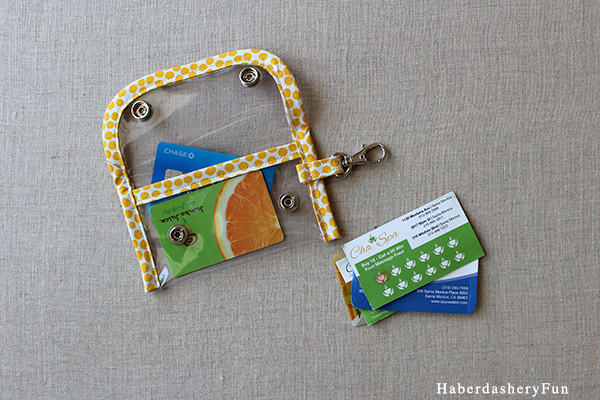
I love how the pouch turned out and ended up making quite a few, including a small one for credit cards. A vinyl wallet is a great beginner sewing project and fairly quick to conquer.  Set aside a few hours and you can make a few in one afternoon.

Mini Clear Vinly Wallet

I’ve made many clear pouches over the last few years and will probably be making many more. If you’ve read my blog, you know that I’m a sucker for clear vinyl. Click here for another easy fabric pouch and here for double sided vinyl pouch. To date, the double sided vinyl pouch is one of my most utilized and favorite sewing projects.
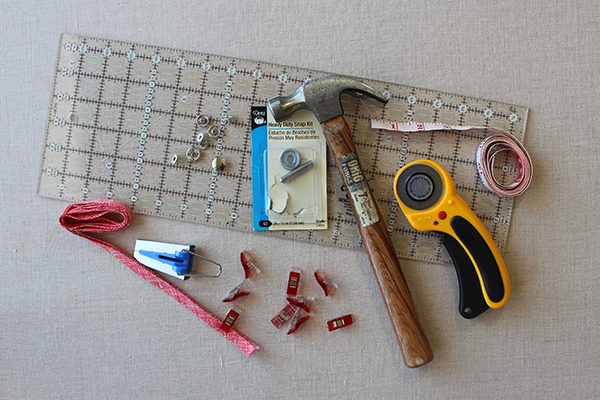
Clear Wallets Materials

Materials Needed:

  1. Clear vinyl
  2. Fabric to make bias tape or store bought bias tape
  3. Clover bias tape maker – optional
  4. Dritz – Heavy duty snap tool kit and heavy duty snaps
  5. Clover Wonder Clips
  6. Sewing machine and supplies
  7. Iron and ironing board
  8. Something circular as round corner template
  9. Pen and paper
  10. Elmer’s gluestick – optional

A couple of things before we get started:

  • Bias tape –  If you plan to make your own bias tape – click here for my bias tape tutorial. Never tried making bags tape..? Give it a go, it’s easy to do! Plus a bold, colorful bias tape makes your projects much prettier.
  • Vinyl – I used 16 gauge clear vinyl for this project. Cut the vinyl into a 8 1/2″ x 11″ rectangle [ letter size piece of paper ] and round off 2 corners at one of the short ends. Tip – trace the corners onto a piece of paper and keep as a curve template later on.

Ok. Let’s get sewing:

Sew Clear Vinyl Wallets

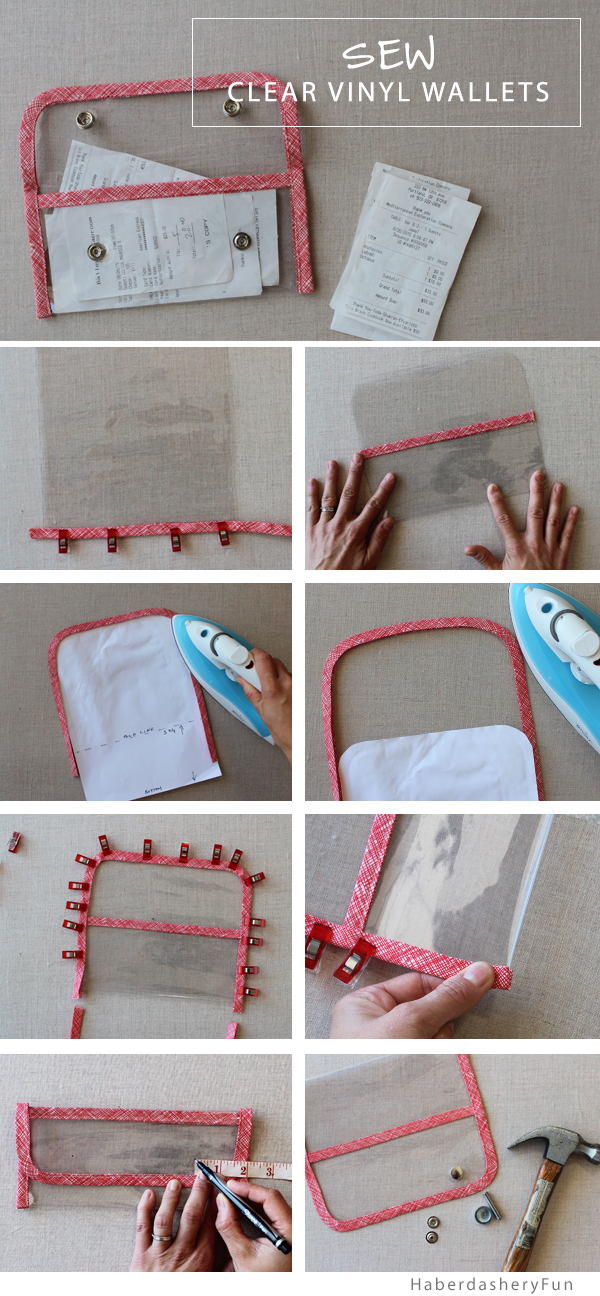
  1. Lay the vinyl rectangle on your work surface. Open the bias tape and lay the vinyl inside. The edge of the vinyl should butt up against the fold of the bias tape. Make sure that you are inserting the non-rounded corner end.. Fold to cover the raw edge of the vinyl. Use wonder clips to hold in place and/or use a small dab of glue stick along the vinyl edge.  Place into your sewing machine and stitch down. Trim the bias tape off at each end.
  2. Place the vinyl piece back onto your work surface, bias tape along the bottom.  Turn and fold upwards 3 3/4″. Finger press a fold into the vinyl. Tip – Place into your sewing machine and make little stitches at the top and bottom of the pocket, but within the seam allowance. This will helps hold the vinyl in place.
  3. Place the paper template onto your work surface. Lay the bias tape around the outside edge, leave a small tail at each end. Iron the bias tape and gently pull/press a curve into the 2 top corners.
  4. Gently pull the bias tape from the vinyl.
  5. Now place the bias tape around the outside edge of the vinyl.  Feel with your fingers and make sure that the vinyl edge butts up against the folded edge of the bias tape. if you are having a hard time holding the bias tape in place, use small dabs of glue along the vinyl edge. Hold the bias tape in place with wonder clips.
  6. Pinch and fold the bottom 1/2 tail under to hide the raw edge. Place into your sewing machine and stitch down. Backstitch at each end.
  7. On the outside front flap, measure inwards about 2″ and upwards about 1 1/4″. Use a pen and make a small mark for the “front” snap placement. Create a little hole. Repeat for the other side. Place the flap back down onto the pouch and finger press flat. Use a pen and trace the hole to mark the “back” snap placement. Repeat for the other side. You are now ready to add the snaps.
  8. Read the directions on the Tool kit and snaps. Use a small hammer and add the “front” snaps to the flap. Add the “back” snaps to the top of the pouch.

Quick tip – is the wallet a little bulky? To make your pouch lay flat, place it under a stack of heavy books for a few hours. The pressure of the books will help press a fold into the vinyl.

Clear Vinyl Wallets 3

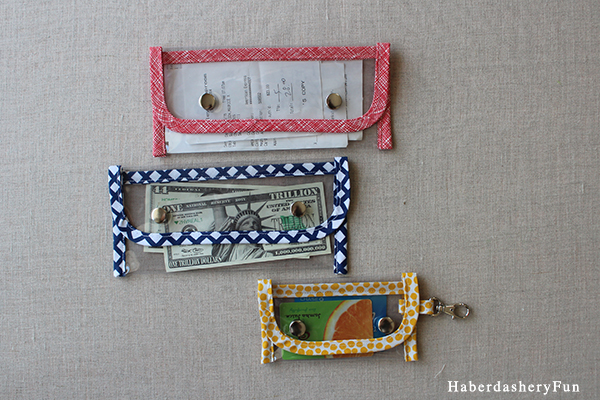
Just think of all the uses for these pouches – coupons, business cards, small documents… I made one pouch that was slightly larger and also a mini one. The template for the credit card pouch measures 9″ x 5 1/2″ and simply add a small a small swivel clip to one side. If you plan to sew a mini wallet and have any questions – let me know.

Clear Vinyl Wallets 4

Happy Sewing!

Related Posts Plugin for WordPress, Blogger...

18 Comments

« Art Gallery Fabrics – A Tote Made From Jeni Baker’s Curiosities Collection
A Little Feature in Love Patchwork & Quilting Magazine »

Comments

  1. Lynne Tilley says

    09/24/2015 at 12:47 am

    These are wonderful. I happened to get a roll of heavy clear vinyl on a sale rack and snatched it up cheap. I haven’t used any of it yet, but this is the perfect project to finally cut into it. I have quite a large roll, so it will go a long way. Thanks!

    Reply
    • Haberdashery Fun says

      09/25/2015 at 1:55 pm

      Hi Lynne – Thanks for stopping by. You’ll love sewing with the clear vinyl. Let me know if you have any questions.. Plus, I have quite a few clear vinyl tutorials up on my blog, search vinyl for more projects :). Have a great weekend.

      Reply
  2. Abbey says

    10/01/2015 at 1:22 pm

    Oh these are just cute! What size needle and presser foot do you use for the machine when making these vinyl stuff?

    Reply
    • Haberdashery Fun says

      10/01/2015 at 8:24 pm

      Hi Abbey,

      Thanks for stopping by. I used a new universal needle and a standard presser foot for this project. Because you aren’t sewing right on top of the vinyl layers and instead are sewing on top of the fabric/bias tape a regular presser foot works fine here. However, I find it very useful to start with a long thread tail and hold onto it when you start the first stitch.. It helps your machine get some traction.. It’s easy from there. Let me know how it goes and I would LOVE to see pictures of your project 🙂

      Marni

      Reply
  3. Haley says

    10/03/2015 at 11:38 am

    I love these! They look so cute all together!

    Reply
  4. Lou Lou Girls says

    10/04/2015 at 4:07 pm

    Looks so good! Pinned and tweeted. We truly appreciate you taking the time to be a part of our party. Please stop by and party with us again. The party starts Monday at 7 pm and ends on Friday at 7 pm. Happy Sunday! Lou Lou Girls

    Reply
  5. Margie says

    10/19/2015 at 9:46 am

    Love this idea. I want to commend you for all the details provided including the gauge of the vinyl. You are the first person I have seen that provide that detail.
    Thanks

    Reply
  6. GlassesShop says

    10/21/2015 at 11:16 pm

    Interesting idea, glad to read your blog 🙂

    Reply
  7. Maurice says

    12/06/2015 at 7:57 pm

    I can see a gazillion uses for these!! Awesome..

    Reply
  8. Melissa @ My Recent Favorite books says

    12/30/2015 at 6:33 pm

    Love this idea!

    Reply
    • Haberdashery Fun says

      12/31/2015 at 12:33 am

      Thanks Melissa! I hope you make a few. You’ll love and USE them… I’ve made a bunch and they work great!

      Reply
  9. Debbie Thompson says

    01/07/2020 at 11:25 am

    What gauge vinyl do you recommend for this sewing project?

    Reply
    • Haberdashery Fun says

      02/26/2020 at 1:25 pm

      Hi there. I typically use 8 gauge clear vinyl. If you go to Joann Fabrics, you can touch and feel the different thicknesses of vinyl. Start with the 8 gauge and see if you like that. I wouldn’t go too thin though.

      Happy Sewing!

      Marni

      Reply
  10. Haberdashery Fun says

    01/25/2018 at 9:20 am

    Looks great! Thanks for sharing 🙂

    Reply

Trackbacks

  1. Tutorial: Clear vinyl wallets – Sewing says:
    09/29/2015 at 4:37 pm

    […] Sew Clear Vinyl Wallets, by Haberdashery Fun […]

    Reply
  2. Hello 2016.. Best Projects 2015 | Haberdashery Fun says:
    12/31/2015 at 10:32 am

    […] Clear Vinyl Receipt Wallets […]

    Reply
  3. Sew An Emergency Travel Pouch | Haberdashery Fun says:
    02/10/2016 at 12:00 am

    […] my instructions here.. New to sewing with vinyl? Check out my other vinyl tutorials here – clear vinyl wallets, ribbon and vinyl pouches and vinyl and fabric cosmetic […]

    Reply
  4. Sewing Challenge 3/52: Make Sewing Easier | Creative Pink Butterfly says:
    01/22/2018 at 6:29 am

    […] now I had tried keeping them in the original packaging, but they kept slipping out. I followed this simple tutorial. The measurements I used was 21 x 23 cm (8″ x 9″). On one of the short sides I made […]

    Reply

Leave a Reply Cancel reply

Your email address will not be published. Required fields are marked *

This site uses Akismet to reduce spam. Learn how your comment data is processed.

About me


Hi there - I'm Marni Weaver. A sewer, a sometimes quilter and a lover of fabric design. I started this blog to share my ideas. Come Join the Fun
shop now

Popular Categories

project for baby fabric projects seasonal projects fat quarter projects sewing tips and tricks inspiration

Categories

  • Applique
  • Baby
  • Bags and Pouches
  • Block Printing
  • Color
  • DIY Projects
  • Fabric
  • Fabric Design
  • Fat Quarter Projects
  • Home Decor
  • Inspiration
  • Just for Fun
  • Kids
  • No Sew
  • Patterns
  • Print On Fabric
  • Quilting
  • Scrap Fabric Projects
  • Seasonal
  • Sewing Tips & Tricks

Lovely sponsors

Recent Comments

  • 3 Simple Summer Sewing Tutorials | Haberdashery Fun on Sew A Canvas Zipper Pouch
  • 3 Simple Summer Sewing Tutorials | Haberdashery Fun on Sew Asymmetrical Color Block Totes Tutorial
  • 3 Simple Summer Sewing Tutorials | Haberdashery Fun on Sew A Baby Towel With A Hood
  • Make A Simple Block Print Tote Bag | Haberdashery Fun on DIY.. Colorful Dish Towel Tote Bags
  • Make A Simple Block Print Tote Bag | Haberdashery Fun on Sew Asymmetrical Color Block Totes Tutorial

Projects Elsewhere

find me on Pellon Projects sew mama sew contributor

momtastic contributor

Pinterest

Visit Marni@Haberdashery Fun's profile on Pinterest.
Follow on Bloglovin

I'm Reading

  • Cluck Cluck Sew
  • Cooking Dangerously
  • In Color Order
  • Jen Hewitt
  • Jolly Jabber
  • Karly Spalding Photography
  • Leigh Laurel Studios
  • Lindsay Sews
  • Lotta Jansdotter
  • Love Patchwork and Quilting Magazine
  • Made
  • Making It Lovely
  • Noodle-Head
  • Polka Dot Chair
  • Sharon Holland Designs
  • Silhouette America Blog
  • Silhouette Design Store
  • The Purl Bee
  • The Purple Fig

Press:

Stitch Winter 2014

haberdashery_fun

Marni Weaver
My entry for this week’s design challenge @spoon My entry for this week’s design challenge @spoonflower. Browns are definitely not my favorite color these days, but the challenge was “earth tones” and using just 4 colors. 

Ps. This started as a super simple block print and then I scanned it into the computer and drew the pattern in illustrator. 

If you have a moment you can head over to spoonflower to vote. ❤️✔️

#haberdasheryfun #spoonflowerchallenge #spoonflowerdesignchallenge #spoonflowerfabric #blocprintingonfabric #blockprinting #blockprintsmadeeasy ##blockprintmadeeasy #surfacepatterndesign #spoonflowermakers #blockprintestextiles #haberdasheryfunprints
I am so glad it’s the weekend. How about you? I’m off prompt for the month and here is #carvedecember, Day 7 and the prompt for “Long”. I really like structured, linear and streamlined prints. With this challenge, I am playing around and trying new things.

#carvedecember2022 #haberdasheryfun #blockprint #blockprinting #blockprintingmadeeasy #notecardsfordays #speedballart #tsukineko #blockprintedfabric #inkpad #inkpadstorage #surfacepattern #surfacepatterndesign #floralprints #handcarvedstamp #handcarvedstamps.
So many people have asked me about my process. One So many people have asked me about my process. One tip is that I love using a grid to create the overall design and keep the block print streamlined. Here’s how you go about it. #carvedecember #carvedecember2022 #blockprinting #haberdasheryfun #blockprinted #speedballink
Simple block print for the prompt “Ponder”. I Simple block print for the prompt “Ponder”. I get a lot of questions on my process, so you can check out my reel for a little behind the scenes.

#carvedecember #carvedecember2022 #haberdashery #blockprinting #bloxkprintingmadeeasy #blockprintingonfabric #blockprintingworkshop #blockprint #haberdasheryfun #haberdasheryfunpatterns
Day 5 for #carvedecember is “Plain”. I’m not Day 5 for #carvedecember is “Plain”. I’m not a huge fan of florals, and for some reason this shape came to mind. By itself it is kinda boring/ plain. In a repeat design it definitely comes alive. 

What is your printing process? Do you like all an over scattered or a grid pattern? My favorite way to work is using a pencil grid and then making a very linear and streamlined print.

#carvedecember2022 #haberdasheryfun #haberdashery #blockprintsmadeeasy #blockprints #speedballart #blockprintedfabric #haberdasheryfunpatterns
Follow on Instagram

Copyright © 2023 · Klar theme by Crimson Pear :: web & surface design

Copyright © 2023 · Klar on Genesis Framework · WordPress · Log in